当执行一个 TensorFlow 函数的时候,并不会马上执行运算,而是把运算存储到一个称为“图”(graph)的数据结构里面。
图存储的各种运算,只有在会话(session)里执行图,才会真正地执行。
图的构建
对于
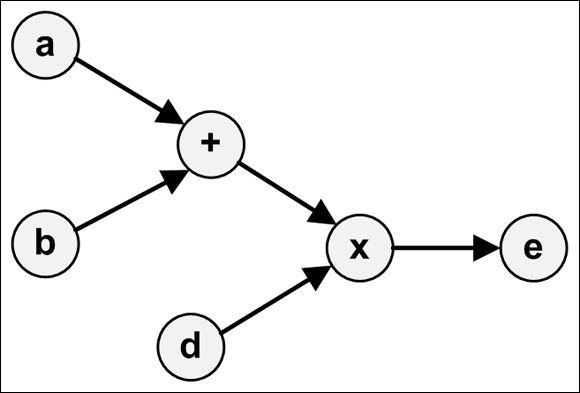
1 c = tf.add(a, b)
2 e = tf.multiply(c, d)
它们所形成的图就是:
TensorFlow 用 Graph 这个容器数据结构来表示图。图的方法可以分为两类:
- 访问图中的数据
- 创建 GraphDef
访问图中的数据
有这么一些访问图数据的方法:
- get_tensor_by_name(name):根据 name 返回张量。
- get_operation_by_name(name):根据 name 返回运算。
- get_operations():返回运算的列表。
- get_all_collection_keys():返回集合的列表。
- get_collection(name, scope=None):返回给定集合的值列表。
- add_to_collection(name, value):添加值。
- add_to_collections(name, value):添加值。
示例代码:
1 # 访问图中的数据
2 x1 = tf.constant(2, name='x1')
3 x2 = tf.constant(3, name='x2')
4 my_sum = x1 + x2
5 print(tf.get_default_graph().get_operations())
6 print(tf.get_default_graph().get_tensor_by_name('x1:0'))
[<tf.Operation 'x1' type=Const>, <tf.Operation 'x2' type=Const>, <tf.Operation 'add' type=Add>]
Tensor("x1:0", shape=(), dtype=int32)
其中 'x1:0' 表示的是 'name:index',0 表示的是这个张量的索引。
创建 GraphDef
GraphDef 是序列化之后的 Graph。
GraphDef 以一种特殊的格式(protocol buffer 或 protobuf)存储图中的数据。protobuf 可以是二进制格式或者文本格式(长得像 JSON)。
在 GraphDef 中,所有的张量和运算都用节点来表示。每个节点都有 name/op/attr 这些字段。它的样子就像:
node {
    name: { ... }
    op: { ... }
    attr { ... }
    attr { ... }
    ...
    versions { ... }
}
再通过一段代码来熟悉,as_graph_def 可以访问 TensorFlow 应用中的图:
1 a = tf.constant(666)
2 b = tf.constant(777)
3 sum1 = a + b
4 print(tf.get_default_graph().as_graph_def())
node {
  name: "Const"
  op: "Const"
  attr {
    key: "dtype"
    value {
      type: DT_INT32
    }
  }
  attr {
    key: "value"
    value {
      tensor {
        dtype: DT_INT32
        tensor_shape {
        }
        int_val: 666
      }
    }
  }
}
node {
  name: "Const_1"
  op: "Const"
  attr {
    key: "dtype"
    value {
      type: DT_INT32
    }
  }
  attr {
    key: "value"
    value {
      tensor {
        dtype: DT_INT32
        tensor_shape {
        }
        int_val: 777
      }
    }
  }
}
node {
  name: "add"
  op: "Add"
  input: "Const"
  input: "Const_1"
  attr {
    key: "T"
    value {
      type: DT_INT32
    }
  }
}
versions {
  producer: 38
}
tf.train 中的 write_graph 可以把图输出到文件。
函数签名如下:
write_graph(graph/graph_def, logdir, name, as_text=True)
代码示例:
print(tf.train.write_graph(tf.get_default_graph(), os.getcwd(), 'graph.dat', as_text=True))
此时会输出:
/your/path/graph.dat
即新生成了这个文件。
创建并运行会话
在 TensorFlow 里,都是先构建好 Graph,然后再在会话(session)中执行。
会话的创建
会话必须显式地创建,通过 tf.Session,它有 3 个参数:
- target:执行引擎(execution engine)的名称
- graph:启动的图实例
- config:配置
一般我们使用默认参数,那就是:
1 with tf.Session() as sess:
2     pass
会话的执行
session 最重要的方法就是 run(),它接收 4 个方法:
- fetches: 指定若干个需要执行的张量或运算
- feed_dict: 需要喂给张量的数据
- options: 配置参数
- run_metadata: 会话的输出数据
如果 fetches 是一个张量,run 会返回一个和张量等值的 ndarray。
1 t = tf.constant([6, 66, 666])
2 with tf.Session() as sess:
3     res = sess.run(t)
4     print(res)
[ 6 66 666]
如果 fetches 是一个运算,run 会返回一个运算之后的 ndarray 值。
1 t1 = tf.constant(6)
2 t2 = tf.constant(66)
3 my_multiply = t1 * t2
4
5 with tf.Session() as sess:
6     res = sess.run(my_multiply)
7     print(res)
396
如果 fetches 是元素的集合,run 也会返回一个相应的集合。
1 t1 = tf.constant(6)
2 t2 = tf.constant(66)
3
4 with tf.Session() as sess:
5     res1, res2 = sess.run([t1, t2])
6     print(res1)
7     print(res2)
6
66
输出到日志
TensorFlow 的日志是通过 tf.logging 实现的。示例代码:
1 import tensorflow.compat.v1 as tf
2
3 tf.logging.set_verbosity(tf.logging.INFO)
4 t = tf.constant(6)
5
6 with tf.Session() as sess:
7     res = sess.run(t)
8     tf.logging.info('Output: %f', res)
I0713 18:06:02.146098 140734845322688 <ipython-input-22-3ef84fc83efc>:8] Output: 6.000000