1.document.getElementById('ID')和 document/parent.querySelector('选择器')区别
document.getElementById('ID'):
- 通过指定ID获取元素;
- 返回第一个符合条件的元素;
- 如果找不到匹配项,则返回null;
- 只有document下存在getElementById;
document/parent.querySelector('选择器'):
- 通过指定选择器获取元素;
- 返回第一个符合条件的元素;
- 如果找不到匹配项,则返回null;
- IE8以下不可以使用;
2.遮罩层(弹窗)
专门写一个div(宽高为100%,控制器透明度、背景色、display)做遮罩层,通过绝对定位的层级实现遮罩
<!DOCTYPE html>
<html lang="en">
<head>
        <meta charset="UTF-8">
        <meta name="viewport" content="width=<device-width>, initial-scale=1.0">
        <meta http-equiv="X-UA-Compatible" content="ie=edge">
    <title>Document</title>
    <style>
    #cover{
        position:absolute;left:0px;top:0px;
        background:rgba(0, 0, 0, 0.4);
        width:100%;  /*宽度设置为100%,这样才能使隐藏背景层覆盖原页面*/
        height:100%;
        filter:alpha(opacity=60);  /*设置透明度为60%*/
        opacity:0.6;  /*非IE浏览器下设置透明度为60%*/
        display:none;
        z-Index:1;
    }
    #modal{
        position:absolute;
        width:500px;
        height:300px;
        top:50%;
        left:50%;
        background-color:#fff;
        display:none;
        cursor:pointer;
        z-Index:2;
    }
    </style>
</head>
<body>
        <div>显示页面的全部内容
                <div id="opens">打开弹框</div>
        </div>
            <!-- //页面的遮罩层 -->
        <div id="cover"></div>
            <!-- //页面的弹出框 -->
        <div id="modal">
                <div id="closes">关闭弹框</div>
        </div>
        <script>
             var opens = document.querySelector("#opens");
             var closes = document.querySelector("#closes");
             var cover = document.querySelector("#cover");
             var modal = document.querySelector("#modal");
             opens.onclick = function(){
                cover.style.display="block";   //显示遮罩层
                modal.style.display="block";   //显示弹出层
            };
             closes.onclick = function(){
                cover.style.display="none";   //隐藏遮罩层
                modal.style.display="none";   //隐藏弹出层
             };
        </script>
</body>
</html>
3.JS中的style操作的是行间样式,不能修改<style>和外面.css文件中的样式值;
4.<script><script/>标签最好放在</body>结束标签的上一行
如果放在<head></head>标签中间,由于html页面是自上而下的顺序进行解析,就有可能在处理script脚本时,存在还未定义的标签或选择器或样式;如果一定要用在<head></head>标签中间,必须使用window.onload(),设置在页面完全加载完成后,再执行JS脚本;所以<script><script/>标签最好放在</body>结束标签的上一行,以便在所有HTML页面元素全部加载完成后,再处理JS脚本,也不会降低用户体验(在处理JS时,出现问题可能会导致页面完全空白)
5.函数两种调用方法
函数名调用和事件调用( box.onclick = funcEvent;事件调用时不能写括号,否则页面加载或刷新时会直接调用)
<!DOCTYPE html>
<html lang="en">
<head>
    <meta charset="UTF-8">
    <meta name="viewport" content="width=device-width, initial-scale=1.0">
    <meta http-equiv="X-UA-Compatible" content="ie=edge">
    <title>函数调用</title>
</head>
<body>
    <button id="box">事件调用</button>
    <script>
        function func(){
            alert("函数名调用");
        }
        func();//函数名调用

        //事件调用
        function funcEvent(){
            alert("事件调用");
        }
        var box = document.getElementById("box");
        box.onclick = funcEvent;
    </script>
</body>
</html>
6.‘1’+1=11?
原因:+号的作用;字符串
+号的作用:
- 作为计算的加法运算符使用,此时加号的油油两侧必须都是数字;
- 作为连接符进行使用,把加号两边的内容连接起来,此时加号的任意一边必有一个为字符串;
如何判断+号的两边是数字还是字符串:通过typeof 值即可知道其类型;
<!DOCTYPE html>
<html lang="en">
<head>
    <meta charset="UTF-8">
    <meta name="viewport" content="width=device-width, initial-scale=1.0">
    <meta http-equiv="X-UA-Compatible" content="ie=edge">
    <title>Document</title>
</head>
<body>
    <input class="input1" type="text">
    +
    <input class="input2" type="text">
    <button class="plus">=</button>
    <span class="result"></span>
    <script>
        var input1 = document.querySelector('.input1');
        var input2 = document.querySelector('.input2');
        var plus = document.querySelector('.plus');
        var result = document.querySelector('.result');

        plus.onclick = function(){
            console.log(input1.value + input2.value);
            console.log(typeof input1.value);
            result.innerHTML = input1.value + input2.value ;
        };
    </script>
</body>
</html>
结果:

注意:获取ID,获取class,获取value,获取innerHTML这些获取到的全部都是String,不能作为数字进行计算。
7.不能再声明变量时直接获取值
因为当第一次刷新表单时,有可能使用的是声明时的默认值即为空
<!DOCTYPE html>
<html lang="en">
<head>
    <meta charset="UTF-8">
    <meta name="viewport" content="width=device-width, initial-scale=1.0">
    <meta http-equiv="X-UA-Compatible" content="ie=edge">
    <title>简易聊天</title>
    <style>
        * { margin:0; padding:0;}
        div { width: 438px; height: 312px; background: url('wechat_bg.gif') no-repeat; background-size: cover; margin: 150px auto; position: relative;}
        textarea {
            display: block;
            border:1px solid #554d96;
            width:222px;
            height: 80px;
            line-height: 20px;
            /* text-indent: 22px; */
            padding: 5%;
            position: absolute;
            top: 72px;
            left: 106px;
            border-radius: 4px;
            box-sizing: border-box;
            box-shadow: 1px 1px #9a94ce;
            outline:none;
            resize: none;

        }
        input {
            position: absolute;
            top: 162px;
            left: 268px;
            width: 60px;
            height: 20px;
            color: white;
            background: none;
            border:2px solid white;
            background: #0aa1d4;
            font-size: 10px;
            vertical-align: middle;
            border-radius: 4px;
        }
        ul {
            list-style: none;
            position: absolute;
            top: 196px;
            left: 105px;
        }

        li {
            width:226px;
            height: 26px;
            line-height: 26px;
            text-indent: 12px;
            background: #554d95;
            color: white;
            border-radius: 6px;
            margin-bottom: 10px;
        }

    </style>
</head>
<body>
    <div>
        <textarea name="inputarea" id="inputarea" class="inputarea" cols="30" rows="10"></textarea>
        <input class="sbt_btn" type="submit" value="提交">
        <ul class="chat_list">
        </ul>
    </div>
    <script>
        var sbtBtn = document.querySelector(".sbt_btn");
        var inputarea = document.querySelector(".inputarea");
        var chatList = document.querySelector(".chat_list");
        sbtBtn.onclick = function(){
            if(inputarea.value != ''){
                chatList.innerHTML = '<li>' + inputarea.value + '</li>' + chatList.innerHTML;
            }
        };
    </script>
</body>
</html>
此处一定不能写成,这样获取到的值永远是第一次刷新时的空值:
var sbtBtn = document.querySelector(".sbt_btn");
        var inputarea = document.querySelector(".inputarea").value;
        var chatList = document.querySelector(".chat_list");
        sbtBtn.onclick = function(){
            if(inputarea != ''){
                chatList.innerHTML = '<li>' + inputarea + '</li>' + chatList.innerHTML;
            }
        };
8. :nth-of-type(n)
:nth-of-type(n) 选择器匹配属于父元素的特定类型的第 N 个子元素的每个元素.n 可以是数字、关键词或公式。
p:nth-of-type(2)
{
background:#ff0000;
}
Odd 和 even 是可用于匹配下标是奇数或偶数的子元素的关键词(第一个子元素的下标是 1)。
在这里,我们为奇数和偶数 p 元素指定两种不同的背景色:
p:nth-of-type(odd)
{
background:#ff0000;
}
p:nth-of-type(even)
{
background:#0000ff;
}
使用公式 (an + b)。描述:表示周期的长度,n 是计数器(从 0 开始),b 是偏移值。
在这里,我们指定了下标是 3 的倍数的所有 p 元素的背景色:
p:nth-of-type(3n+0)
{
background:#ff0000;
}
li:nth-of-type(1) { background: url('selector_img/icon1.png') no-repeat #ffe3e2 20px 14px;}
li:nth-of-type(2) { background: url('selector_img/icon2.png') no-repeat #ffe3e2 20px 14px;}
li:nth-of-type(3) { background: url('selector_img/icon3.png') no-repeat #ffe3e2 20px 14px;}
li:nth-of-type(4) { background: url('selector_img/icon4.png') no-repeat #ffe3e2 20px 14px;}
li:nth-of-type(5) { background: url('selector_img/icon5.png') no-repeat #ffe3e2 20px 14px;}
<ul>
<li>微博</li>
<li>图片</li>
<li>博客</li>
<li>视频</li>
<li>更多>></li>
</ul>9.判断条件
if判断中,表达式最终会转成布尔值后才会继续进行判断,所以如果需要判断时,已经知道了布尔值结果,可以在if判断里直接写布尔值,尽量不使用表达式
开关:在判断条件不适合用在判断条件里时,可以通过设置标识符,切换状态
<!DOCTYPE html>
<html lang="en">
<head>
    <meta charset="UTF-8">
    <meta name="viewport" content="width=device-width, initial-scale=1.0">
    <meta http-equiv="X-UA-Compatible" content="ie=edge">
    <title>下拉菜单展合</title>
    <style>
        ul,li,div,body { margin: 0; padding: 0; }
        ul li { list-style: none; }
        .bg { width: 1000px; height: 1000px; background: url('selector_img/bg.jpg') no-repeat; margin:0 auto; position: relative;}
        .wrap { position: absolute; top:280px; left: 330px; border-radius: 6px; padding:4px;  }
        .selector { width: 342px; height: 70px; line-height: 70px; color:white; font-size: 32px; position: absolute; top:4px; left: 12px; text-align: center; background: url('selector_img/ar.png') no-repeat #f97775 278px 28px; border-radius: 12px;}
        .list { position: absolute; top:74px; left: 12px; display: none; }
        li { width: 212px; height: 70px; line-height: 70px; border-radius: 12px; margin-top: 2px; padding-left:130px; font-size: 32px;  }
        li:nth-of-type(1) { background: url('selector_img/icon1.png') no-repeat #ffe3e2 20px 14px;}
        li:nth-of-type(2) { background: url('selector_img/icon2.png') no-repeat #ffe3e2 20px 14px;}
        li:nth-of-type(3) { background: url('selector_img/icon3.png') no-repeat #ffe3e2 20px 14px;}
        li:nth-of-type(4) { background: url('selector_img/icon4.png') no-repeat #ffe3e2 20px 14px;}
        li:nth-of-type(5) { background: url('selector_img/icon5.png') no-repeat #ffe3e2 20px 14px;}
        .wrap_bg { width:350px; height: 430px; background: #f97775; border-radius: 6px; padding:4px; display: none; }
    </style>
</head>
<body>
    <div class="bg">
        <div class="wrap">
            <div class="selector">菜单</div>
            <div class="list">
                <ul>
                    <li>微博</li>
                    <li>图片</li>
                    <li>博客</li>
                    <li>视频</li>
                    <li>更多>></li>
                </ul>
            </div>
            <div class="wrap_bg"></div>
        </div>
    </div>
    <script>
        var selector = document.querySelector(".selector");
        var list = document.querySelector(".list");
        var wrap_bg = document.querySelector(".wrap_bg");
        var onOff = true;
        selector.onclick = function(){
            if(onOff){
                list.style.display = "block";
                wrap_bg.style.display = "block";
                //注意这里不能再事件外面再更改onOff
                onOff = false;
            }else{
                list.style.display = "none";
                wrap_bg.style.display = "none";
                onOff = true;
            }
        };
    </script>
</body>
</html>
10. img.style.src 中src不是样式属性所以不能这样用
如下:imgPic.src = "img/monster2.png";
不能用成imgPic.style.src = "img/monster2.png";
<body>
   <div class="bg">
        <div class="chat_list"></div>
        <div class="send">
            <img class="imgPic" src="img/monster1.png" alt="">
            <input class="text" type="text">
            <button class="btn">发送</button>
        </div>
   </div>
   <script>
       var imgPic = document.querySelector(".imgPic");
       var onOff = true;
       imgPic.onclick = function(){
            if(onOff){
                imgPic.src = "img/monster2.png";
                onOff = false;
            }else{
                imgPic.src = "img/monster1.png";
                onOff = true;
            }
       };

   </script>
</body>
11. value值需要在哪用就在哪获取,否则可能会获取到空值
如onclick事件中,如果在onclick之前就获取,会获取到空值
如下,如果在声明时直接var inputarea = document.querySelector(".inputarea").value;会得到空值,之后再onclick方法里也是空值
<body>
    <div>
        <textarea name="inputarea" id="inputarea" class="inputarea" cols="30" rows="10"></textarea>
        <input class="sbt_btn" type="submit" value="提交">
        <ul class="chat_list">
        </ul>
    </div>
    <script>
        var sbtBtn = document.querySelector(".sbt_btn");
        var inputarea = document.querySelector(".inputarea");
        var chatList = document.querySelector(".chat_list");
        sbtBtn.onclick = function(){
            if(inputarea.value != ''){
                chatList.innerHTML = '<li>' + inputarea.value + '</li>' + chatList.innerHTML;
            }else{
                alert("发送内容不能为空");
            }
        };
    </script>
</body>
12.如果轮播图所有图都很大,需要加载一段时间,怎么样实现能使用户体验好一些
设置预加载图,在页面加载完后,再去加载轮播图,使用懒加载即给图片加一个onload事件。
如果是大量图片的H5,建议做整个页面的load预加载图。
13.获取元素的多种方式
- document.getElementById("idName")在文档中通过id获取一个元素;
- document/parent.querySelector("选择器")在父级下通过css选择器获取一个元素(根据选择器匹配到第0个元素);
- parent.getElementsByTagName("标签名")在父级下通过标签名获取一组元素(类数组);
- parent.getElementsByClassName("类名")在父级下通过类名获取一组元素(类数组);
- parent.querySelectorAll("选择器")在父级下通过css选择器获取一组元素(类数组);
一般不建议直接从document文档中获取,一般从某个元素的父级到子级逐级获取
类数组:一组元素、集合、NodeList都是类数组
14.类数组和数组的相同点和区别
- 一组元素(类数组)不能直接操作(即不能直接设置其样式等),哪怕这组元素只有一个,想要操作都只能通过下标进行操作每一个;如:btns.style.background = "red";只能btns[0].style.background = "red";加上下标后才能进行操作;如果要批量操作一组元素,可以使用循环;
- 一组元素.length代表元素的个数;
- 类数组下标也是从0开始;
15.循环
循环:批量的操作元素,重复性的处理某些事情
同时执行的多个嵌套循环不能使用相同变量,不同时执行的可以相同
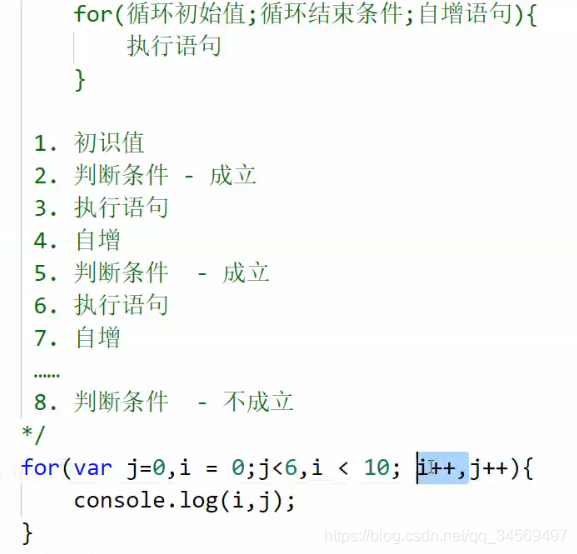
有两个(多个)循环变量的情况下,什么时候结束?当最后一个循环变量不成立时,循环就结束(此处当i<10不成立时就结束)。
京东幻灯片:数组存储图片和文字;
点击下一页按钮时,切换图片、改变文字、切换导航圆点(先直接全部清除圆点,再给当前的圆点的className设置成active);
鼠标移入小圆点,显示缩略图(给a标签加上移入移出事件);批量添加事件:nav[i].onmouseover = function(){}; nav[i].onmouseout = function(){};获取到当前图片;
注意:循环里的代码是在页面JS代码加载时就解析了,而navs[i].onmouseover是在鼠标移入时才执行,即页面加载完后for循环已经执行完了,所以此时navs[i].onmouseover里的navs[i]是循环执行结束后的结果即角标为navs[i].length时的结果,即navs数组的最后一个(即navs[i].length);
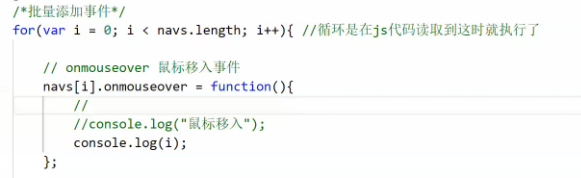
注意事件函数中不要去调用外边循环的变量,因为此时循环已经执行完了。
正确调用方法:使用上下文环境对象,this进行获取。
16.this 上下文环境执行对象
this在事件处理函数中,代表的是当前调用事件的元素(在事件函数中,代表触发当前函数的元素),如果在事件函数中,我们需要拿到操作是这组中的某一个,就可以使用this。只有function中才有this,所以上下文环境变量指的就是function的执行范围内。
原则:除了嵌套函数以外,谁调用,this指向谁
- 函数被谁调用,this就指向谁,如果被事件调用,指向当前触发事件的元素;
- 如果直接调用就指向window(全局对象);
17.伪类和伪元素的区别
一个冒号是伪类,目的是为了通过选择器,格式化DOM树以外的信息(比如: <a> 标签的:link、:visited 等)以及不能被常规CSS选择器获取到的信息(要获取第一个子元素,我们无法用常规的CSS选择器获取,但可以通过 :first-child 来获取到)。弥补了CSS选择器的不足,用来更方便地获取信息。
伪类:
- :first-child 匹配第一个子元素。
<ul>
    <li>111</li>
    <li>222</li>
</ul>
li:first-child {
color: red; // 第一个 li 会变红
}
- :last-child匹配最后一个子元素。
li:last-child {
  color:red; // 最后一个 li 会变红
}- :first-of-type匹配属于其父元素的第一个特定类型的子元素。
<div>
    <h1>h1文本</h1>
    <p>p文本</p>
</div>
p:first-of-type {
color: red; // <p>标签的内容变为红色
}- :last-of-type匹配属于其父元素的最后一个特定类型的子元素。
<div>
    <h1>h1文本</h1>
    <h1>h1文本2</h1>
    <p>p文本</p>
</div>
h1:last-of-type {
color: red; // 倒数第一个<h1>标签的内容变为红色(h1文本2)
}:first-child与:first-of-type的区别:
如果你的CSS写成以下,页面是不会有变化的,因为<p>元素并不是父元素<div>的第一个子元素。
p:first-child {
  color:red;
}两个冒号是伪元素,伪元素本质上是创建了一个虚拟容器(元素),我们可以在其中添加内容或样式。伪元素可以创建一些文档语言无法创建的虚拟元素。比如:文档语言没有一种机制可以描述元素内容的第一个字母或第一行,但伪元素可以做到(::first-letter、::first-line)。同时,伪元素还可以创建源文档不存在的内容,比如使用 ::before 或 ::after。
伪元素:
- ::before在被选元素之前插入内容。需要指定content属性来插入内容。
<p>CSS</p>p::before {
content: "Hi,";
}- ::after在被选元素之后插入内容。需要指定content属性来插入内容。
<p>Hi, </p>p::after {
content: "CSS";
}结果为:Hi,CSS
- ::first-letter匹配元素中文本的首字母。
<p>我在学伪元素</p>p::first-letter {
font-size: 32px;
}- ::first-line匹配元素中第一行的文本(只能在块元素中使用)。
<p>我在学伪元素,我在学伪元素,我在学伪元素,我在学伪元素,我在学伪元素,我在学伪元素,我在学伪元素,我在学伪元素,我在学伪元素,我在学伪元素,我在学伪元素</p>p::first-line {
color: red;
}- ::selection匹配被用户选中的部分
<p>我在学伪元素,我在学伪元素,我在学伪元素,我在学伪元素,我在学伪元素,我在学伪元素,我在学伪元素,我在学伪元素,我在学伪元素,我在学伪元素,我在学伪元素</p>p::selection {
color: red;
}18. CSS中旋转图片
transform: rotate(180deg);
各个浏览器需要进行兼容
.prev,.next { width:25px; height:46px; display: block; background: url('img/ar.png') no-repeat;}
        .next {
            transform:rotate(180deg);
            -ms-transform:rotate(180deg); 	/* IE 9 */
            -moz-transform:rotate(180deg); 	/* Firefox */
            -webkit-transform:rotate(180deg); /* Safari 和 Chrome */
            -o-transform:rotate(180deg); 	/* Opera */
}
<span class="prev"></span>
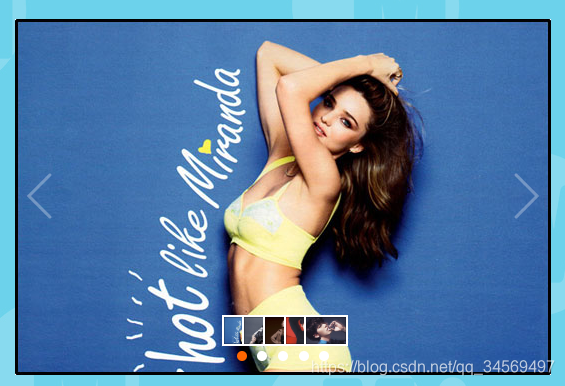
<span class="next"></span>19.CSS制作导航栏圆点,切换图片同时切换圆点位置,缩略图显示,点击a标签或缩略图切换banner图片/文字/导航按钮
<nav>
<a href="#" class="active"><img src="img/img1.jpg" alt=""></a>
<a href="#"><img src="img/img2.jpg" alt=""></a>
<a href="#"><img src="img/img3.jpg" alt=""></a>
<a href="#"><img src="img/img4.jpg" alt=""></a>
<a href="#"><img src="img/img5.jpg" alt=""></a>
</nav> /* 通过宽高,margin,border,overflow:hidden隐藏border以外的内容及圆角处理导航栏圆点(和三角形图标一样) */
nav { position: absolute; left: 0; bottom: 10px; text-align: center; width: 100%;}
nav a { display: inline-block; width: 10px; height: 10px; margin: 0 3px; background: #fff; border-radius: 50%; position: relative; }
nav img { position: absolute; top: -36px; left: -18px; margin: 0 3px; width: 40px; display: none; border: 2px solid #fff;}
nav .active { background: #ff6600; }代码解析:
a标签中,使用display: inline-block;使a标签一行内显示,width: 10px; height: 10px; margin: 0 3px; background: #fff; border-radius: 50%;设置a标签的长宽,各个a标签间的距离,背景色,设置圆角,使a标签显示成圆点;设置相对路径,以便设置点击a标签时hover显示图片缩略图;
img标签中,设置图片于a标签的绝对位置,设置图片大小,并默认不显示,a悬浮时,最后通过JS控制只显示一张缩略图
结果:

切换banner更改圆点的位置:
注意:需要通过document.querySelectorAll("nav a")获取到所有的a标签:
//将banner图放进数组
var bannersArr = ["img/img4.jpg","img/img3.jpg","img/img1.jpg","img/img5.jpg","img/img2.jpg"];
//将文字说明放进数组
var remarkArr = ["时尚潮流先锋——做最好的自己","未来属于我们——只要有你","JavaScript高级工程师——你值得拥有","生命在于静止","畅想未来——有你有我有大家"];
var prev = document.querySelector(".prev");
var next = document.querySelector(".next");
var imgPath = document.querySelector(".active img");
var remark = document.querySelector(".remark");
//需要获取到全部的a标签
var navs = document.querySelectorAll("nav a");
var num = 0 ;
next.onclick = function(){
//在切换到下一张前先清除当前banner的active样式
// navs[num].className = "";
num++;
num = num>bannersArr.length-1?0:num;
imgPath.src = bannersArr[num];
remark.innerHTML = remarkArr[num] + " 第"+ (num+1) +"页";
//for循环的方式暴力清除全部banner的active样式
for (var i = 0; i < navs.length; i++) {
navs[i].className = "";
}
//nav导航栏圆点切换(将当前的banner圆点样式改为active)
navs[num].className = "active";
console.info(navs[num]);
};
prev.onclick = function(){
//在切换到下一张前先清除当前banner的active样式
// navs[num].className = "";
num--;
num = num<0?bannersArr.length-1:num;
imgPath.src = bannersArr[num];
remark.innerHTML = remarkArr[num] + " 第"+ (num+1) +"页";
//for循环的方式暴力清除全部banner的active样式
for (var i = 0; i < navs.length; i++) {
navs[i].className = "";
}
//nav导航栏圆点切换(将当前的banner圆点样式改为active)
navs[num].className = "active";
};两种方式清除非当前banner的active样式:
方式一:
//在切换到下一张前先清除当前banner的active样式
navs[num].className = "";
num++;方式二:
//for循环的方式暴力清除全部banner的active样式
for (var i = 0; i < navs.length; i++) {
navs[i].className = "";
}结果:

显示缩略图:
注意:
- for循环中的代码是在页面一加载就进行解析的,而onmouseover等事件函数是在有事件行为时才执行,所以在for循环里获取一组元素的结果是只拿到了最后一个下标的元素;
- 可以通过this指向当前触发点击事件的元素,进行处理;
//实现鼠标移入移出显示banner缩略图
//navs是类数组(querySelectorAll获取到的是一组元素),不能直接操作一组元素,因此使用for循环进行操作
for(var i=0;i<navs.length;i++){
navs[i].index = i; // 为第i个a元素添加一个index属性,赋值为i
navs[i].onmouseover = function(){
//for循环中的代码是在页面一加载就进行解析的,而onmouseover等事件函数是在有事件行为时才执行,所以不能在for循环的事件函数中获取一组元素的值
//需要通过this上下文环境(在事件函数中,谁调用就指向触发当前函数的元素),所以通过this就可以在循环里获取每个a标签
var navImg = this.querySelector("img");
navImg.src = bannersArr[this.index];
navImg.style.display = "block";
};
navs[i].onmouseout = function(){
//for循环中的代码是在页面一加载就进行解析的,而onmouseover等事件函数是在有事件行为时才执行,所以不能在for循环的事件函数中获取一组元素的值
//需要通过this上下文环境(在事件函数中,谁调用就指向触发当前函数的元素),所以通过this就可以在循环里获取每个a标签
var navImg = this.querySelector("img");
navImg.style.display = "none";
};
}点击a标签或缩略图切换banner/页码remark/导航按钮:
注意:此处的navs[i].index = i;用于在解析循环时就记录下a标签的index,以便在点击时获取对应的index,跳转到对应的banner图片和按钮以及页码备注。
navs[i].index = i; // 为第i个a元素添加一个index属性,赋值为i
navs[i].onclick = function(){
//将所有a标签的样式进行暴力清除
for(var j=0;j<navs.length;j++){
navs[j].className = "";
}
//将当前的a标签的样式设置为active
this.className = "active";
//将文字更改为对应页文字
console.info(this.index);
imgPath.src = bannersArr[this.index];
remark.innerHTML = remarkArr[this.index] + " 第"+ (this.index+1) +"页";
num = this.index;//必须将此处的index再赋值为num,才能再点击按钮后再次按上下一页时不出错
};问题一:有什么办法可以在鼠标移入按钮时,可以紧接着再移到缩略图上进行点击?因为a标签移出时隐藏了(display:none)缩略图,如果将图片紧挨着按钮可以(但是感觉不美观)?
解决方法一:图片的显示隐藏使用opacity属性。但是切换时会有抖动
解决方法二:使用定时器延时隐藏缩略图
window.setTimeout(function(){
navImg.style.display = "none";
},1000);问题二:点击a标签圆点按钮切换后再点击上一页下一页,发现按钮当前页切换有问题
解决:num = this.index;必须将此处的index再赋值为num,将当前点击的页码赋值给上下页,才能在点击按钮后再次按上下一页时得到正确的页码索引。
19.禁止a标签刷新
a标签是超链接,会导致页面的刷新,或者跳转页面,所以可以通过href="javascript:;"来禁止其发生
20.简易banner轮播图
html:
<!DOCTYPE html>
<html lang="en">
<head>
<meta charset="UTF-8">
<meta name="viewport" content="width=device-width, initial-scale=1.0">
<meta http-equiv="X-UA-Compatible" content="ie=edge">
<title>京东简易幻灯片</title>
<style>
body,ul,li,a,div { margin:0; padding:0; }
ul,li { list-style: none ;}
a { cursor: pointer; text-decoration: none; }
img { vertical-align: top; }
.banner_bg { width:1000px; height:800px; background: url('img/bg.jpg') no-repeat; margin: 0 auto; position: relative;}
.banner { width: 536px; height: 356px; position: absolute; top: 168px; left: 296px; }
ul li { display: none; }
ul .active { display: block; }
.prev,.next { width:25px; height:46px; display: block; background: url('img/ar.png') no-repeat;}
.prev { position: absolute; top: 154px; left: 12px; }
.next {
position: absolute; top: 154px; right: 12px;
transform:rotate(180deg);
-ms-transform:rotate(180deg); /* IE 9 */
-moz-transform:rotate(180deg); /* Firefox */
-webkit-transform:rotate(180deg); /* Safari 和 Chrome */
-o-transform:rotate(180deg); /* Opera */
}
.mark { width: 532px; height: 70px; line-height: 70px; position: absolute; top: 544px; left: 296px; text-align: center; color: #666666; font-size: 20px; }
/* 通过宽高,margin,border,overflow:hidden隐藏border以外的内容及圆角处理导航栏圆点(和三角形图标一样) */
nav { position: absolute; left: 0; bottom: 10px; text-align: center; width: 100%;}
nav a { display: inline-block; width: 10px; height: 10px; margin: 0 3px; background: #fff; border-radius: 50%; position: relative; }
nav img { position: absolute; top: -36px; left: -18px; margin: 0 3px; width: 40px; display: none; border: 2px solid #fff;}
nav .active { background: #ff6600; }
</style>
</head>
<body>
<div class="banner_bg">
<div class="banner">
<ul>
<li class="active"><img src="img/img1.jpg" alt=""></li>
<li><img src="img/img2.jpg" alt=""></li>
<li><img src="img/img3.jpg" alt=""></li>
<li><img src="img/img4.jpg" alt=""></li>
<li><img src="img/img5.jpg" alt=""></li>
</ul>
<span class="prev"></span>
<span class="next"></span>
<nav>
     <a href="#" class="active"><img src="img/img1.jpg" alt=""></a>
     <a href="#"><img src="img/img2.jpg" alt=""></a>
     <a href="#"><img src="img/img3.jpg" alt=""></a>
     <a href="#"><img src="img/img4.jpg" alt=""></a>
     <a href="#"><img src="img/img5.jpg" alt=""></a>
</nav>
</div>
<div class="mark">时尚潮流先锋——做最好的自己</div>
</div>
</body>方法一:num++方式(需要图片有规律)
<script>
        var prev = document.querySelector(".prev");
        var next = document.querySelector(".next");
        var imgPath = document.querySelector(".active img");
        var num = 1;
        next.onclick = function(){
            console.info(imgPath);
            num++;
            if(num>5){
                num = 1;
            }
            imgPath.src =  "img/img" + num + ".jpg";
        };
        prev.onclick = function(){
            console.info(imgPath);
            num--;
            if(num<1){
                num = 5;
            }
            imgPath.src =  "img/img" + num + ".jpg";
        };
    </script>
方法二:数组方式(图片任意)
<script>
        //将banner图放进数组
        var bannersArr = ["img/img4.jpg","img/img3.jpg","img/img1.jpg","img/img5.jpg","img/img2.jpg"];
        //将文字说明放进数组
        var markArr = ["时尚潮流先锋——做最好的自己","未来属于我们——只要有你","JavaScript高级工程师——你值得拥有","生命在于静止","畅想未来——有你有我有大家"];

        var prev = document.querySelector(".prev");
        var next = document.querySelector(".next");
        var imgPath = document.querySelector(".active img");
        var num = 0 ;
        next.onclick = function(){
            num++;
            // if(num>4){
            //     num = 0;
            // }
            num = num>bannersArr.length-1?0:num;
            imgPath.src = bannersArr[num];
            console.info(imgPath.src);
        };
        prev.onclick = function(){
            num--;
            // if(num<0){
            //     num = bannersArr.length-1;
            // }
            num = num<0?bannersArr.length-1:num;
            imgPath.src = bannersArr[num];
            console.info(imgPath.src);
        };
    </script>
21.直接使用元素.innerHTML += ".....";会产生性能问题
可以将元素.innerHTML放进声明的变量中,再进行赋值
var cont = "";
cont += "<div></div>";
box.innerHTML(src);
22.保持 文本格式输出 使用 <pre></pre>并使用white-space::pre-wrap
文本框输入内容,后端传入后没有换行符标识,但需要保持原本的段落格式,需要使用 <pre></pre>并使用white-space::pre-wrap进行处理。


23.classList 类数组
类数组只是和数组相似,并没有数组中的各种方法。
classList不兼容IE8(需要自己使用webpark搭建构建工具,配置进行编译使其兼容各种版本)
classList获取设置元素的class列表(类数组),能获取元素的所有class名字:
- 通过下标获取到元素的每一个class;
- length:元素的class个数
- value :存储完整的class
- add('class名字'):给元素添加一个class;
- remove('class名字'):从元素的classList删除一项class;
- contains(class名字):判断元素的classList是否包含这个class,是返回true,否返回false;
- toggle(‘class名字’):切换class,如果元素有这个class就删掉,没有就加上这个class
<!DOCTYPE html>
<html lang="en">
<head>
<meta charset="UTF-8">
<meta name="viewport" content="width=device-width, initial-scale=1.0">
<meta http-equiv="X-UA-Compatible" content="ie=edge">
<title>自定义复选框-classList(方法测试)</title>
<style>
body,h2 { margin: 0; padding: 0; }
.bg { width: 554px; height: 800px; background: url('img/checkboxbg.png') no-repeat; margin: 0 auto; }
.options { width: 306px; height: 166px; position: relative; left: 124px; top: 323px;}
h2 { color: #e3637c; position: absolute; left: 152px; top: 34px;}
.checkeara { position: absolute; left: 0; top: 98px; text-align: center; width: 306px; height: 32px;}
a { text-decoration: none; display: inline-block; width: 70px; height: 30px; line-height: 30px; border: 1px solid #e3637c; color: black; }
.checked { background: url('img/checked.png') no-repeat 55px 15px; }
</style>
</head>
<body>
<div class="bg">
<div class="options">
<h2>模拟复选</h1>
<div class="checkeara">
<a href="javascript:;" class="item1 checked">美食</a>
<a href="javascript:;" class="item1">逛街</a>
<a href="javascript:;" class="item1">旅游</a>
</div>
</div>
</div>
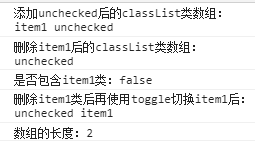
<script>
var options = document.querySelectorAll("a");
for(var i=0;i<options.length;i++){
options[i].onclick = function(){
this.classList.add("unchecked");
console.info("添加unchecked后的classList类数组:"+this.classList.value);//value获取所有的class类(类数组)
this.classList.remove("item1");//移除元素的某个class类
console.info("删除item1后的classList类数组:"+this.classList.value);
console.info("是否包含item1类:"+this.classList.contains("item1"));//元素是否包含某个class类,是返回ture,否返回false
this.classList.toggle("item1");//切换class,如果有就删除这个类,如果没有就添加这个类
console.info("删除item1类后再使用toggle切换item1后:"+this.classList.value);
console.info("数组的长度:"+this.classList.length);//元素的class类个数
};
}
</script>
</body>
</html>结果:
24.自定义复选框
方法一:使用className判断是否为checked,是则取消,否则加上checked(使用于class只有一个的情况下)
<!DOCTYPE html>
<html lang="en">
<head>
    <meta charset="UTF-8">
    <meta name="viewport" content="width=device-width, initial-scale=1.0">
    <meta http-equiv="X-UA-Compatible" content="ie=edge">
    <title>自定义复选框</title>
    <style>
        body,h2 { margin: 0; padding: 0; }
        .bg { width: 554px; height: 800px; background: url('img/checkboxbg.png') no-repeat; margin: 0 auto; }
        .options { width: 306px; height: 166px; position: relative; left: 124px; top: 323px;}
        h2 { color: #e3637c; position: absolute; left: 152px; top: 34px;}
        .checkeara { position: absolute; left: 0; top: 98px; text-align: center; width: 306px; height: 32px;}
        a { text-decoration: none; display: inline-block; width: 70px; height: 30px; line-height: 30px; border: 1px solid #e3637c; color: black;  }
        .checked { background: url('img/checked.png') no-repeat 55px 15px; }
    </style>
</head>
<body>
    <div class="bg">
        <div class="options">
            <h2>模拟复选</h1>
            <div class="checkeara">
                <a href="javascript:;" class="checked">美食</a>
                <a href="javascript:;">逛街</a>
                <a href="javascript:;">旅游</a>
            </div>
        </div>
    </div>
    <script>
        var options = document.querySelectorAll("a");
        for(var i=0;i<options.length;i++){
            options[i].onclick = function(){
                // if(this.className == ""){
                //     this.className = "checked";
                // }else{
                //     this.className = "";
                // }

                //注意此处需要使用空号包着整个赋值部分
                this.className = (this.className=="checked"?"":"checked");
            };
        }
    </script>
</body>
</html>
方法二:多个class存在时,不能再根据className进行判断,可以使用classList
<!DOCTYPE html>
<html lang="en">
<head>
    <meta charset="UTF-8">
    <meta name="viewport" content="width=device-width, initial-scale=1.0">
    <meta http-equiv="X-UA-Compatible" content="ie=edge">
    <title>自定义复选框-classList(方法测试)</title>
    <style>
        body,h2 { margin: 0; padding: 0; }
        .bg { width: 554px; height: 800px; background: url('img/checkboxbg.png') no-repeat; margin: 0 auto; }
        .options { width: 306px; height: 166px; position: relative; left: 124px; top: 323px;}
        h2 { color: #e3637c; position: absolute; left: 152px; top: 34px;}
        .checkeara { position: absolute; left: 0; top: 98px; text-align: center; width: 306px; height: 32px;}
        a { text-decoration: none; display: inline-block; width: 70px; height: 30px; line-height: 30px; border: 1px solid #e3637c; color: black;  }
        .checked { background: url('img/checked.png') no-repeat 55px 15px; }
    </style>
</head>
<body>
    <div class="bg">
        <div class="options">
            <h2>模拟复选</h1>
            <div class="checkeara">
                <a href="javascript:;" class="item1 checked">美食</a>
                <a href="javascript:;" class="item1">逛街</a>
                <a href="javascript:;" class="item1">旅游</a>
            </div>
        </div>
    </div>
    <script>
        var options = document.querySelectorAll("a");
        for(var i=0;i<options.length;i++){
            options[i].onclick = function(){
                this.classList.toggle("checked");
                /*
                if(this.classList.contains("checked")){
                    this.classList.remove("checked");
                }else{
                    this.classList.add("checked");
                }*/
                //this.classList.contains("checked")?this.classList.remove("checked"):this.classList.add("checked");
            };
        }
    </script>
</body>
</html>
结果:

25.自定义单选框
方式一:给当前option(this.classList.add('checked'))加上checked,并且移除非当前项的checked
思路:通过循环将所有的单选项全部清除options[i].classList.remove('checked'),再给当前加上checked
<!DOCTYPE html>
<html lang="en">
<head>
    <meta charset="UTF-8">
    <meta name="viewport" content="width=device-width, initial-scale=1.0">
    <meta http-equiv="X-UA-Compatible" content="ie=edge">
    <title>自定义单选框</title>
    <style>
        body,h2 { margin: 0; padding: 0; }
        .bg { width: 554px; height: 800px; background: url('img/bg.png') no-repeat; margin: 30px auto; }
        .options { width: 306px; height: 166px; position: relative; left: 124px; top: 168px; text-align: center;}
        a { text-decoration: none; display: inline-block; width: 70px; height: 30px; line-height: 30px; border: 1px solid #e3637c; color: black;  }
        .checked { background: url('img/checked.png') no-repeat 55px 15px; }
    </style>
</head>
<body>
    <div class="bg">
        <div class="options">
                <a href="javascript:;" class="item checked">男</a>
                <a href="javascript:;" class="item">女</a>
                <a href="javascript:;" class="item">保密</a>
        </div>
    </div>
    <script>
        var options = document.querySelectorAll("a");
        for(var i=0;i<options.length;i++){
            options[i].onclick = function(){
            //思路:首先循环清除所有为checked的选项,再将当前项设置为checked(**注意此处需要循环清除,外层的for循环已经在解析时执行过了)
            for(var i=0;i<options.length;i++){
                options[i].classList.remove("checked");
            }
            this.classList.add("checked");
            };
        }
    </script>
</body>
</html>
方式二:通过this==option[i]判断是否是当前操作的单选项
思路:判断this==option[i]判断是当前操作的option,如果options[i] == this,说明找到了当前操作的一项,如果是当前项就加上checked,其余非当前项全部清除checked
<script>
        var options = document.querySelectorAll("a");
        for(var i=0;i<options.length;i++){
            options[i].onclick = function(){
                //要得到所有的options[i]并进行处理,需要重新循环得到,onclick外的循环已经在JS第一次执行时就执行过了
                //如果是当前项就加上checked,其余非当前项全部清除checked
                for(var j=0;j<options.length;j++){
                    if(this==options[j]){
                        this.classList.add("checked");
                    }else{
                        options[j].classList.remove("checked");
                    }
                }
            };
        }
    </script>
方法三:定点删除,直接找到class类名为checked的选项,直接删除,再将当前项设置为checked
此方法是直接操作DOM,所以性能不是特别好
<script>
        var options = document.querySelectorAll("a");
        for(var i=0;i<options.length;i++){
            options[i].onclick = function(){
                //定点清除:找到为checked的class的选项,直接清除,再将当前项加上checked
                var checkedOption = document.querySelector(".options .checked");
                checkedOption.classList.remove("checked");
                this.classList.add("checked");
            };
        }
26.阻止链接响应(点击链接后不做任何事情)
- <a href="#" >test</a> //点击链接,在页面过长时,会返回到顶部。但可以加上 onclick="return false",防止上滚到页的顶部
- <a href="####" >test</a> //使用2个到4个#,见的大多是"####",也有使用"#all"等其他的。默认不上滚到页的顶部
- <a href="javascript:void(0);" >test</a> //其中,javascript:void(0) 仅仅表示一个死链接,执行空事件 。javascript:void(0)是javascript的操作符,会计算一个表达式,但不会返回值,当用户点击链接时,void(0) 计算为 0,但在 JavaScript 上没有任何效果。当然也不会改变当前页面的任何内容新浪微博写法
- <a href="javascript:;" >test</a> //QQ空间写法
javascript:void(0);和javascript:;基本没什么区别,但在ie6.0下可能存在bug:
- 用这种方法挂载的事件处理函数中改变img的src属性,浏览器不会显示图片,必须在右键菜单中点显示图片才能显示。//没遇到。
- 不能使用右键菜单中的open in new window //打开新链接,自然是不能的,都没链接如何打开。
- 不能把链接地址加入收藏夹 //ie6会提示“您可能添加不安全的收藏页”并把javascript:; 或者 javascript:void(0);做为收藏页名称
- 页面mediaplayer播放停止 //不祥
- javascript:void(0)之后再用onclick提交新页面或刷新页面是不成功的。//不会改变当前页面的任何内容
27.选项卡切换
方法一:设置id值作为索引(在选项卡个数太多的时候不使用,需手动添加多个id)
<!DOCTYPE html>
<html lang="en">
<head>
    <meta charset="UTF-8">
    <meta name="viewport" content="width=device-width, initial-scale=1.0">
    <meta http-equiv="X-UA-Compatible" content="ie=edge">
    <title>选项卡切换</title>
    <style>
        .options .active {
            background: red;
        }
        .cont div {
            display: none;
        }
        .cont .show {
            margin: 10px;
            font-size: 40px;
            display: block;
        }
    </style>
</head>
<body>
<div>
    <div class="options">
        <button id="1" class="active">选卡一</button>
        <button id="2">选卡二</button>
        <button id="3">选卡三</button>
    </div>
    <div class="cont">
        <div class="show">选卡一对应内容</div>
        <div>选卡二对应内容</div>
        <div>选卡三对应内容</div>
    </div>
</div>
<script>
    var btns = document.querySelectorAll(".options button");
    var conts = document.querySelectorAll(".cont div");
    for(var i=0;i<btns.length;i++){

        btns[i].id = i;
        btns[i].onmouseover = function(){
            //conts个数和btns个数一样,所以可以借助同一个循环(**)
            for(var i=0;i<btns.length;i++){
                //点击某个选卡时,清除其他所有选卡选中状态active,给当前选卡加上active
                btns[i].classList.remove("active");
                //给当前选项卡对应的div内容区添加show
                conts[i].classList.remove("show");
            }
            this.classList.add("active");
            //第0个按钮对应第0个div,第1个按钮对应的第1个div,第2个按钮对应的第2个div
            //所以拿到当前的按钮的id(this.id)就能得到当前应该是第几个div
            conts[this.id].classList.add("show");

        };
    }
</script>
</body>
</html>
方法二:自定义索引(推荐方法):自定义属性,即定义一个标准里没有的属性
当在事件中需要知道操作的元素是第几个时,可以使用索引
<!DOCTYPE html>
<html lang="en">
<head>
    <meta charset="UTF-8">
    <meta name="viewport" content="width=device-width, initial-scale=1.0">
    <meta http-equiv="X-UA-Compatible" content="ie=edge">
    <title>选项卡切换——自定义索引</title>
    <style>
        .options .active {
            background: red;
        }
        .cont div {
            display: none;
        }
        .cont .show {
            margin: 10px;
            font-size: 40px;
            display: block;
        }
    </style>
</head>
<body>
<div>
    <div class="options">
        <button class="active">选卡一</button>
        <button>选卡二</button>
        <button>选卡三</button>
    </div>
    <div class="cont">
        <div class="show">选卡一对应内容</div>
        <div>选卡二对应内容</div>
        <div>选卡三对应内容</div>
    </div>
</div>
<script>
    var btns = document.querySelectorAll(".options button");
    var conts = document.querySelectorAll(".cont div");
    for(var i=0;i<btns.length;i++){
        //自定义属性index:给元素添加一个标准里没有的属性
        btns[i].index = i;
        console.info(btns[i].index);
        btns[i].onmouseover = function(){
            //conts个数和btns个数一样,所以可以借助同一个循环(**)
            for(var i=0;i<btns.length;i++){
                //点击某个选卡时,清除其他所有选卡选中状态active,给当前选卡加上active
                btns[i].classList.remove("active");
                //给当前选项卡对应的div内容区添加show
                conts[i].classList.remove("show");
            }
            this.classList.add("active");
            //第0个按钮对应第0个div,第1个按钮对应的第1个div,第2个按钮对应的第2个div
            //所以拿到当前自定义的属性index就能得到当前应该是第几个div
            conts[this.index].classList.add("show");

        };
    }
</script>
</body>
</html>
方法三:定点清除(DOM中直接找到当前选中的btn,div) ,直接操作DOM性能不好,不推荐
<!DOCTYPE html>
<html lang="en">
<head>
    <meta charset="UTF-8">
    <meta name="viewport" content="width=device-width, initial-scale=1.0">
    <meta http-equiv="X-UA-Compatible" content="ie=edge">
    <title>选项卡切换——定点清除</title>
    <style>
        .options .active {
            background: red;
        }
        .cont div {
            display: none;
        }
        .cont .show {
            margin: 10px;
            font-size: 40px;
            display: block;
        }
    </style>
</head>
<body>
<div>
    <div class="options">
        <button class="active">选卡一</button>
        <button>选卡二</button>
        <button>选卡三</button>
    </div>
    <div class="cont">
        <div class="show">选卡一对应内容</div>
        <div>选卡二对应内容</div>
        <div>选卡三对应内容</div>
    </div>
</div>
<script>
    //思路:直接找到样式为active的进行清除,再将当前点击的设置为active即可
    var btns = document.querySelectorAll(".options button");
    var conts = document.querySelectorAll(".cont div");

    for(var i=0;i<btns.length;i++){
        //自定义属性index
        btns[i].index = i;
        btns[i].onmouseover = function(){
            //直接找到样式为active,show的btn和div进行清除(需要操作DOM性能不太好)
            var activeBtn = document.querySelector(".options .active");
            var showDiv = document.querySelector(".cont .show");

            activeBtn.classList.remove("active");
            showDiv.classList.remove("show");

            //再将当前点击的btn和对应的div设置为active,show即可
            this.classList.add("active");
            conts[this.index].classList.add("show");

        };
    }
</script>
</body>
</html>
方法四:通过num记录当前选中的在第几个btn(并对应cont);点击其他btn后直接对选中的btn清除选中,再给当前选中的设置选中;同步记录到当前选中的btn,cont
注意:最后最后一定要更改同步记录的num为当前选中的btn ,num=this.index;
<!DOCTYPE html>
<html lang="en">
<head>
<meta charset="UTF-8">
<meta name="viewport" content="width=device-width, initial-scale=1.0">
<meta http-equiv="X-UA-Compatible" content="ie=edge">
<title>选项卡切换——定点清除——num记录</title>
<style>
.options .active {
background: red;
}
.cont div {
display: none;
}
.cont .show {
margin: 10px;
font-size: 40px;
display: block;
}
</style>
</head>
<body>
<div>
<div class="options">
<button class="active">选卡一</button>
<button>选卡二</button>
<button>选卡三</button>
</div>
<div class="cont">
<div class="show">选卡一对应内容</div>
<div>选卡二对应内容</div>
<div>选卡三对应内容</div>
</div>
</div>
<script>
//思路:通过num记录当前选中的在第几个btn(并对应cont);点击其他btn后直接对选中的btn清除选中,再给当前选中的设置选中;同步记录到当前选中的btn,cont
var btns = document.querySelectorAll(".options button");
var conts = document.querySelectorAll(".cont div");
var num = 0;//通过num记录当前选中的在第几个btn
for(var i=0;i<btns.length;i++){
btns[i].index = i;
btns[i].onmouseover = function(){
//点击其他btn后直接对选中的btn清除选中
btns[num].classList.remove("active");
conts[num].classList.remove("show");
//再给当前选中的btn,div设置选中active,show
this.classList.add("active");
conts[this.index].classList.add("show");
//**同步记录到当前选中的btn,cont
num = this.index;
};
}
</script>
</body>
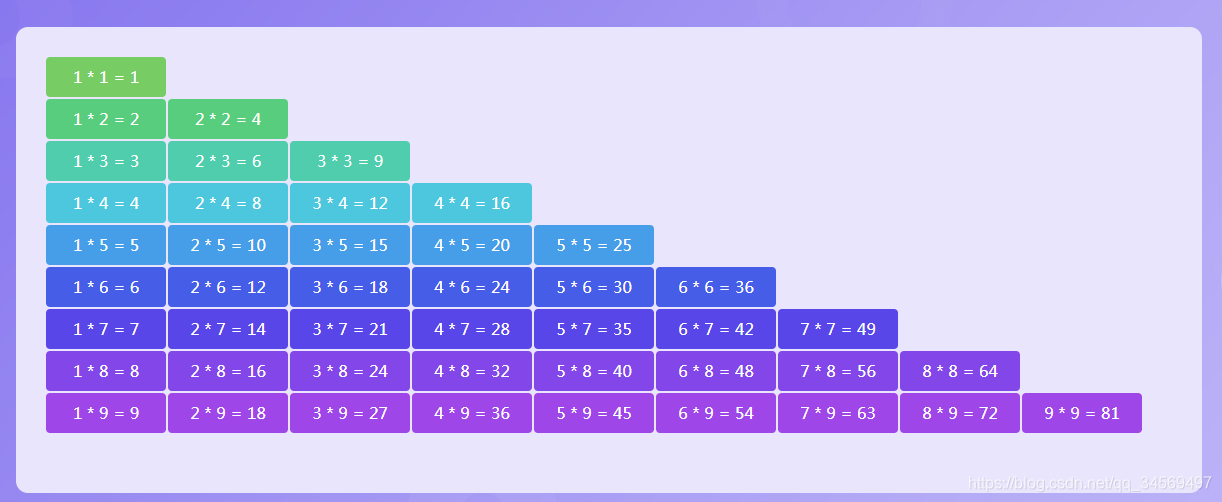
</html>28.九九乘法表:<br>换行形式/position定位形式
使用两种方式进行实现:
方式一:<br>换行形式
<!DOCTYPE html>
<html lang="en">
<head>
    <meta charset="UTF-8">
    <meta name="viewport" content="width=device-width, initial-scale=1.0">
    <meta http-equiv="X-UA-Compatible" content="ie=edge">
    <title>九九乘法表-br换行方式</title>
    <style>
        body,ul,li,div { margin: 0; padding: 0; }
        img { vertical-align: top; border: none; }
        ul,li { list-style: none; }

        .bg { width: 1600px; height: 1067px; background: url('img/99tab_bg.jpg') no-repeat; margin: 0 auto; }
        .tab99 { width:1156px; height: 436px; background: #e8e5fc; position: relative; top: 436px; left: 250px; padding: 30px 0 0 30px; border-radius: 12px; }
        .tab99 div { width: 120px; height: 40px; line-height: 40px; background: #78cc64; color: white; text-align: center; border-radius: 4px; margin: 0 2px 2px 0; display: inline-block; }
    </style>
</head>
<body>
      <div class="bg">
        <div class="tab99">
          <!-- <div>1 * 1 = 1</div><br><div>1 * 2 = 2</div><div>1 * 2 = 2</div><div>1 * 2 = 2</div> -->
        </div>
      </div>
      <script>
        //br换行方式需要设置div样式:display: inline-block;
        var tab99 = document.querySelector(".tab99");
        var divStr = '';
        for(var i=1;i<10;i++){
          for(var j=1;j<=i;j++){
            var txt = j + " * " + i + " = " + i*j;
            divStr += '<div>'+ txt +'</div>';
          }
          divStr += '<br>';
        }
        tab99.innerHTML = divStr;
      </script>
</body>
</html>
方式二:position定位形式
<!DOCTYPE html>
<html lang="en">
<head>
    <meta charset="UTF-8">
    <meta name="viewport" content="width=device-width, initial-scale=1.0">
    <meta http-equiv="X-UA-Compatible" content="ie=edge">
    <title>九九乘法表-position定位方式</title>
    <style>
        body,ul,li,div { margin: 0; padding: 0; }
        img { vertical-align: top; border: none; }
        ul,li { list-style: none; }

        .bg { width: 1600px; height: 1067px; background: url('img/99tab_bg.jpg') no-repeat; margin: 0 auto; }
        .tab99 { width:1156px; height: 436px; background: #e8e5fc; top: 436px; left: 250px; padding: 30px 0 0 30px; border-radius: 12px; position: relative; }
        .tab99 div { width: 120px; height: 40px; line-height: 40px; background: #78cc64; color: white; text-align: center; border-radius: 4px; margin: 0 2px 2px 0; position: absolute; }
    </style>
</head>
<body>
      <div class="bg">
        <div class="tab99"></div>
      </div>
      <script>
        var colors = ['#78cc64','#58cd7e','#4fcdad','#4cc7dd','#469ee8','#465de8','#5846e8','#8346e8','#9e46e8'];
        //position方式需要设置div样式:position定位top,left
        var tab99 = document.querySelector(".tab99");
        var divStr = '';
        for(var i=1;i<10;i++){
          for(var j=1;j<=i;j++){
            var txt = j + " * " + i + " = " + i*j;
            //因为i,j初始化为1,但是定位是从0,0开始,所以需要使用i-1和j-1。本身需要上下margin 30所以需要再+30
            var topStr = (i-1)*42 + 30;
            var leftStr = (j-1)*122 + 30;
            divStr += '<div style="top:'+ topStr +'px;left:'+ leftStr +'px;background:'+ colors[i-1] +'">'+ txt +'</div>';
          }
        }
        tab99.innerHTML = divStr;
      </script>
</body>
</html>
结果:
29.拼图实现(position实现/取模实现)
方法一:position实现
<!DOCTYPE html>
<html lang="en">
<head>
    <meta charset="UTF-8">
    <meta name="viewport" content="width=device-width, initial-scale=1.0">
    <meta http-equiv="X-UA-Compatible" content="ie=edge">
    <title>拼图——position实现</title>
    <style>
        body { margin:0; padding:0; background-color: #d3f1d5; }
        .bg { width: 545px; height:545px; margin: 100px auto; position: relative; }
        .bg div { width: 50px; height: 50px; background: url('img.jpg') no-repeat; position: absolute; }
    </style>
</head>
<body>
<div class="bg"></div>
<script>
    var bg = document.querySelector(".bg");
    var divStr = '';
    var w = 50;
    var h = 50;
    //i代表行,j代表列
    for(var i=0;i<10;i++){
        for(var j=0;j<10;j++){
            var x = w * j;
            var y = h * i;
            var bp = -x + 'px -' + y + 'px';
            //加了5px的间隙(只给div定位加不给背景图定位加)
            divStr += '<div style="top:'+ (y+5*i) +'px;left:'+ (x+5*j) +'px;background-position:'+ bp +'"></div>';
        }
    }
    bg.innerHTML = divStr;
</script>
</body>
</html>
方法二:取模实现
<!DOCTYPE html>
<html lang="en">
<head>
    <meta charset="UTF-8">
    <meta name="viewport" content="width=device-width, initial-scale=1.0">
    <meta http-equiv="X-UA-Compatible" content="ie=edge">
    <title>拼图——取模实现</title>
    <style>
        body { margin:0; padding:0; background-color: #d3f1d5; }
        .bg { width: 545px; height:545px; margin: 100px auto; position: relative; }
        .bg div { width: 50px; height: 50px; background: url('img.jpg') no-repeat; position: absolute; }
    </style>
</head>
<body>
<div class="bg"></div>
<script>
    var bg = document.querySelector(".bg");
    var divStr = '';
    var w = 50;
    var h = 50;
    //总共100个div,10行显示,每行10个
    /*
     --x:   0   1    2   3    4    5    6    7    8    9    —— 0-9
            10  11   12  13   14   15   16   17   18   19   —— 10-19
            20  21   22  23   24   25   16   27   28   29   —— 20-29
            30  31   32  33   34   35   36   37   38   39   —— 30-39

        发现X轴,任意数%10的值都为0-9
        发现Y轴,都是从0-9,10-19,20-29,每个数/10的整数位即其所在的第几行

    */
    for(var i=0;i<100;i++){
        var x = i%10;//每行第0-9个
        var y = parseInt(i/10);//第几行行
        var bp = -(x*w) + 'px -' + (y*h) + 'px';
        divStr += '<div style="top:'+ ((5+h)*y) +'px;left:'+ ((5+w)*x) +'px;background-position:'+ bp +'"></div>';
    }
    bg.innerHTML = divStr;
</script>
</body>
</html>
结果:
