1 数字图像处理:基于霍夫变换的车道线检测
https://zhuanlan.zhihu.com/p/60190848
2 环境
2-1 安装 Anaconda3 环境

2-2 在Anaconda3 环境种安装开发IDE spyder
刚开始找不到spyder,但是我安装完vs code之后就出现了选择安装spyder的图标

2-3 安装opencv和contrib扩展库
2-4安装matplotlib库
https://blog.csdn.net/weixin_42116878/article/details/80525811
、
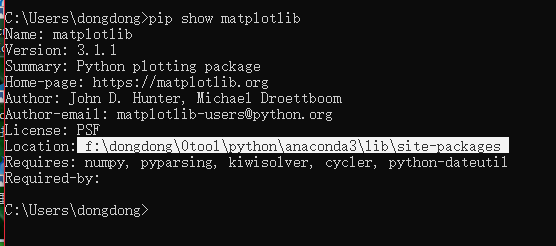
找不到 matplotlib问题
解决:
先查看matplotlib的安装路径
pip show matplotlib
然后将路径添加
import sys
sys.path.append(" F:/dongdong/0tool/python/anaconda3/lib/site-packages")
其中括号内的为上一步实际查出的安装路径。
3 工程代码
搞一个纯英文路径


使用spyder打开
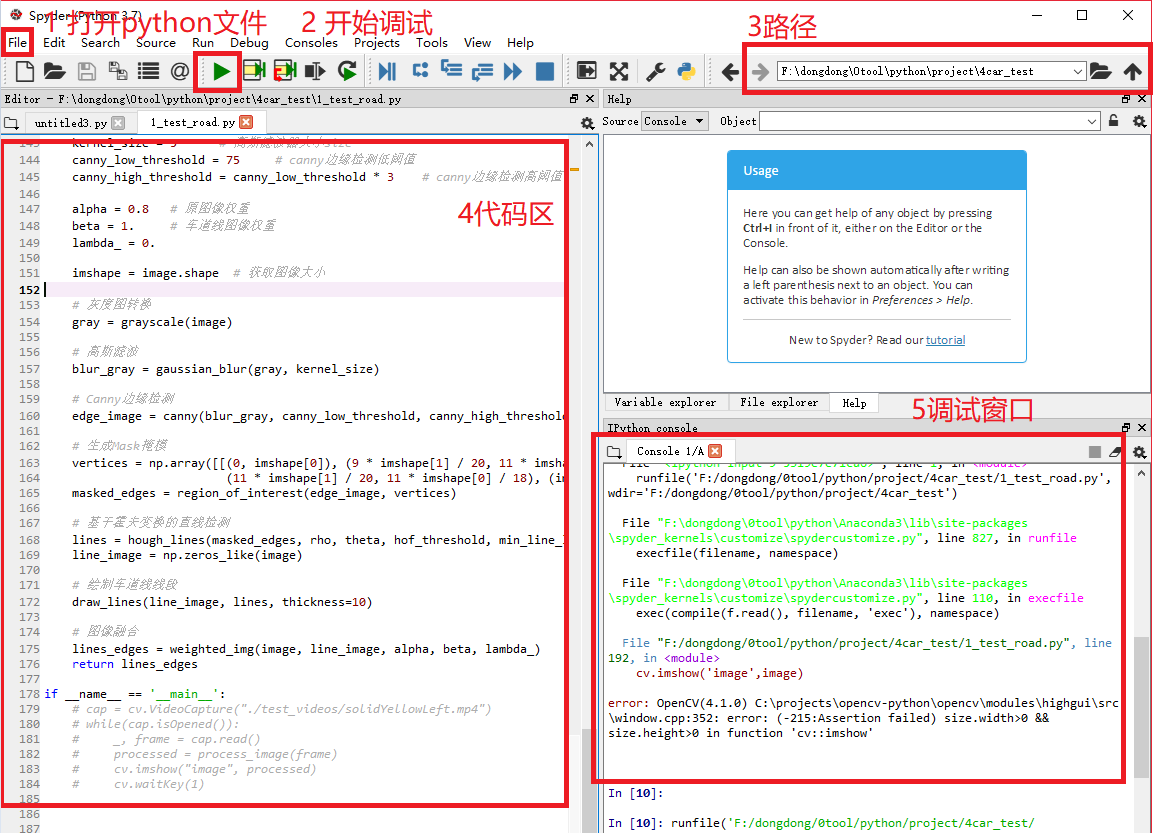
获取图片的时候路径地址,目前相对路径和绝对路径有问题,容易报错读不到图
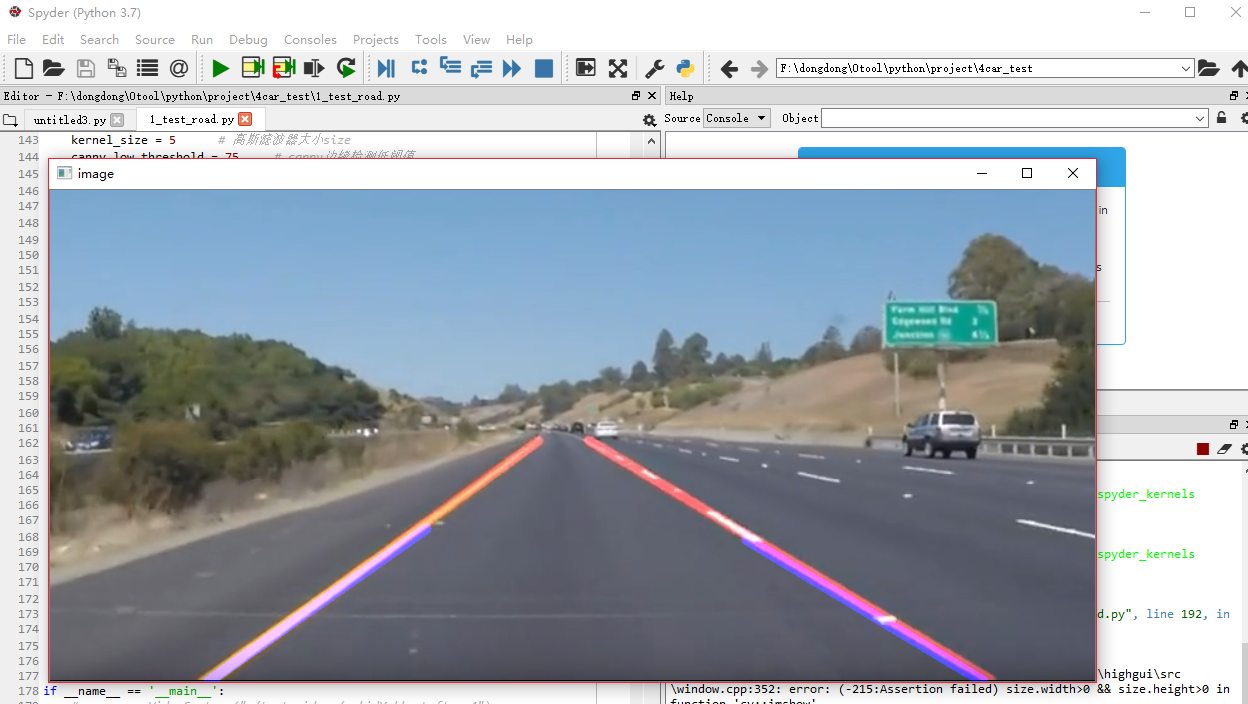
结果图
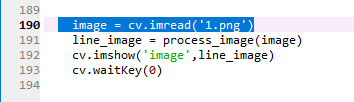
单张图
视频流
放开代码注释
#!/usr/bin/env python2
# -*- coding: utf-8 -*-
#import sys
#sys.path.append("F:/dongdong/0tool/python/Anaconda3/Lib/site-packages")

import numpy as np
import cv2 as cv
import matplotlib.pyplot as plt


# 灰度图转换
def grayscale(image):
    return cv.cvtColor(image, cv.COLOR_RGB2GRAY)

# Canny边缘检测
def canny(image, low_threshold, high_threshold):
    return cv.Canny(image, low_threshold, high_threshold)

# 高斯滤波
def gaussian_blur(image, kernel_size):
    return cv.GaussianBlur(image, (kernel_size, kernel_size), 0)

# 生成感兴趣区域即Mask掩模
def region_of_interest(image, vertices):

    mask = np.zeros_like(image)  # 生成图像大小一致的zeros矩

    # 填充顶点vertices中间区域
    if len(image.shape) > 2:
        channel_count = image.shape[2]
        ignore_mask_color = (255,) * channel_count
    else:
        ignore_mask_color = 255

    # 填充函数
    cv.fillPoly(mask, vertices, ignore_mask_color)
    masked_image = cv.bitwise_and(image, mask)
    return masked_image

# 原图像与车道线图像按照a:b比例融合
def weighted_img(img, initial_img, a=0.8, b=1., c=0.):
    return cv.addWeighted(initial_img, a, img, b, c)

# def reset_global_vars():
#
#     global SET_LFLAG
#     global SET_RFLAG
#     global LAST_LSLOPE
#     global LAST_RSLOPE
#     global LAST_LEFT
#     global LAST_RIGHT
#
#     SET_RFLAG = 0
#     SET_LFLAG = 0
#     LAST_LSLOPE = 0
#     LAST_RSLOPE = 0
#     LAST_RIGHT = [0, 0, 0]
#     LAST_LEFT = [0, 0, 0]

def draw_lines(image, lines, color=[255,0,0], thickness=2):

    right_y_set = []
    right_x_set = []
    right_slope_set = []

    left_y_set = []
    left_x_set = []
    left_slope_set = []

    slope_min = .35  # 斜率低阈值
    slope_max = .85  # 斜率高阈值
    middle_x = image.shape[1] / 2  # 图像中线x坐标
    max_y = image.shape[0]  # 最大y坐标

    for line in lines:
        for x1, y1, x2, y2 in line:
            fit = np.polyfit((x1, x2), (y1, y2), 1)    # 拟合成直线
            slope = fit[0]  # 斜率

            if slope_min < np.absolute(slope) <= slope_max:

                # 将斜率大于0且线段X坐标在图像中线右边的点存为右边车道线
                if slope > 0 and x1 > middle_x and x2 > middle_x:
                    right_y_set.append(y1)
                    right_y_set.append(y2)
                    right_x_set.append(x1)
                    right_x_set.append(x2)
                    right_slope_set.append(slope)

                # 将斜率小于0且线段X坐标在图像中线左边的点存为左边车道线
                elif slope < 0 and x1 < middle_x and x2 < middle_x:
                    left_y_set.append(y1)
                    left_y_set.append(y2)
                    left_x_set.append(x1)
                    left_x_set.append(x2)
                    left_slope_set.append(slope)

    # 绘制左车道线
    if left_y_set:
        lindex = left_y_set.index(min(left_y_set))  # 最高点
        left_x_top = left_x_set[lindex]
        left_y_top = left_y_set[lindex]
        lslope = np.median(left_slope_set)   # 计算平均值

    # 根据斜率计算车道线与图片下方交点作为起点
    left_x_bottom = int(left_x_top + (max_y - left_y_top) / lslope)

    # 绘制线段
    cv.line(image, (left_x_bottom, max_y), (left_x_top, left_y_top), color, thickness)

    # 绘制右车道线
    if right_y_set:
        rindex = right_y_set.index(min(right_y_set))  # 最高点
        right_x_top = right_x_set[rindex]
        right_y_top = right_y_set[rindex]
        rslope = np.median(right_slope_set)

    # 根据斜率计算车道线与图片下方交点作为起点
    right_x_bottom = int(right_x_top + (max_y - right_y_top) / rslope)

    # 绘制线段
    cv.line(image, (right_x_top, right_y_top), (right_x_bottom, max_y), color, thickness)

def hough_lines(img, rho, theta, threshold, min_line_len, max_line_gap):

    # rho:线段以像素为单位的距离精度
    # theta : 像素以弧度为单位的角度精度(np.pi/180较为合适)
    # threshold : 霍夫平面累加的阈值
    # minLineLength : 线段最小长度(像素级)
    # maxLineGap : 最大允许断裂长度
    lines = cv.HoughLinesP(img, rho, theta, threshold, np.array([]), minLineLength=min_line_len, maxLineGap=max_line_gap)
    return lines

def process_image(image):

    rho = 1       # 霍夫像素单位
    theta = np.pi / 180    # 霍夫角度移动步长
    hof_threshold = 20   # 霍夫平面累加阈值threshold
    min_line_len = 30    # 线段最小长度
    max_line_gap = 60    # 最大允许断裂长度

    kernel_size = 5      # 高斯滤波器大小size
    canny_low_threshold = 75     # canny边缘检测低阈值
    canny_high_threshold = canny_low_threshold * 3    # canny边缘检测高阈值

    alpha = 0.8   # 原图像权重
    beta = 1.     # 车道线图像权重
    lambda_ = 0.

    imshape = image.shape  # 获取图像大小

    # 灰度图转换
    gray = grayscale(image)

    # 高斯滤波
    blur_gray = gaussian_blur(gray, kernel_size)

    # Canny边缘检测
    edge_image = canny(blur_gray, canny_low_threshold, canny_high_threshold)

    # 生成Mask掩模
    vertices = np.array([[(0, imshape[0]), (9 * imshape[1] / 20, 11 * imshape[0] / 18),
                          (11 * imshape[1] / 20, 11 * imshape[0] / 18), (imshape[1], imshape[0])]], dtype=np.int32)
    masked_edges = region_of_interest(edge_image, vertices)

    # 基于霍夫变换的直线检测
    lines = hough_lines(masked_edges, rho, theta, hof_threshold, min_line_len, max_line_gap)
    line_image = np.zeros_like(image)

    # 绘制车道线线段
    draw_lines(line_image, lines, thickness=10)

    # 图像融合
    lines_edges = weighted_img(image, line_image, alpha, beta, lambda_)
    return lines_edges

if __name__ == '__main__':
    # cap = cv.VideoCapture("./test_videos/solidYellowLeft.mp4")
    # while(cap.isOpened()):
    #     _, frame = cap.read()
    #     processed = process_image(frame)
    #     cv.imshow("image", processed)
    #     cv.waitKey(1)


    image = cv.imread('1.png')
    line_image = process_image(image)
    cv.imshow('image',line_image)
    cv.waitKey(0)