文件操作完整步骤:
1.用open内置函数打开文件hello,返回值是一个文件对象
f=open("/home/centos01/hello")
2.读取文件内容(或写入f.write("内容"),但必须open是以可写方式打开的文件才行)
f.read()
3.关闭文件
f.close()
文件操作的其他模式(open函数的模式):
r 以读的方式打开,定位到文件开头 , 默认的模式,例如f=open("/home/centos01/hello")就相当于f=open("/home/centos01/hello",'r')
r+ 以读写的方式打开,定位文件开头 , 可以写入内容到文件
w 以写的方式打开,打开文件的时候会清空文件的内容,并且不能读
w+ 以读写的方式打开,定位到文件头,并且打开文件的时候也会清空文件的内容
a 以写的方式打开,定位到文件的末尾,是一个追加的操作 , 但并不允许读
a+ 以读写的方式打开,定位到文件的末尾,追加的方式。
在使用以上 mode 打开文件的时候,如果增加了b 模式,表示以二进制方式打开,如果读取的文件是一个非文本文件,可以在原有模式上加b,eg:'rb','rb+','wb+','ab','ab+'等
指针:
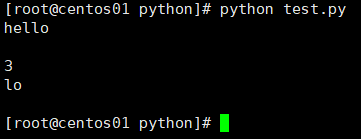
创建一个hello文件,内容为hello
# coding:utf-8
f = open("/mnt/hello")
print f.read()
#seek需要传两个值;
#第一个参数:偏移量;偏移量>0,代表向右移动的字符;反之,向左移动的字符;
#第二个参数:  0:代表文件开头    1:当前位置     2:文件末尾;
f.seek(3,0)        #从文件开头偏移3个字符,预测read结果应该是"lo\n"
print f.tell()     #打印当前的偏移量
print f.read()
运行结果:
读文件(read,readline,readlines)
readline和readlines方法:
readline方法
依次读取文件,仅返回一行文件信息
In [1]: f=open("/mnt/passwd")

In [2]: f.readline()
Out[2]: 'root:x:0:0:root:/root:/bin/bash\n'

In [3]: f.readline()
Out[3]: 'bin:x:1:1:bin:/bin:/sbin/nologin\n'
readlines方法
以列表的方式返回文件信息,保留换行符
In [1]: f=open("/mnt/passwd")

In [2]: f.readlines()
Out[2]:
['root:x:0:0:root:/root:/bin/bash\n',
 'bin:x:1:1:bin:/bin:/sbin/nologin\n',
 'daemon:x:2:2:daemon:/sbin:/sbin/nologin\n',
 'adm:x:3:4:adm:/var/adm:/sbin/nologin\n',
 'lp:x:4:7:lp:/var/spool/lpd:/sbin/nologin\n',
 'sync:x:5:0:sync:/sbin:/bin/sync\n',
 'shutdown:x:6:0:shutdown:/sbin:/sbin/shutdown\n',
 'halt:x:7:0:halt:/sbin:/sbin/halt\n',
 'mail:x:8:12:mail:/var/spool/mail:/sbin/nologin\n',
 'operator:x:11:0:operator:/root:/sbin/nologin\n',
 'games:x:12:100:games:/usr/games:/sbin/nologin\n',
 'ftp:x:14:50:FTP User:/var/ftp:/sbin/nologin\n',
 'nobody:x:99:99:Nobody:/:/sbin/nologin\n',
 'systemd-network:x:192:192:systemd Network Management:/:/sbin/nologin\n',
 'dbus:x:81:81:System message bus:/:/sbin/nologin\n',
 'polkitd:x:999:998:User for polkitd:/:/sbin/nologin\n',
 'sshd:x:74:74:Privilege-separated SSH:/var/empty/sshd:/sbin/nologin\n',
 'postfix:x:89:89::/var/spool/postfix:/sbin/nologin\n',
 'centos01:x:1000:1000:centos01:/home/centos01:/bin/bash\n',
 'tss:x:59:59:Account used by the trousers package to sandbox the tcsd daemon:/dev/null:/sbin/nologin\n']
readlines实际应用:
[root@centos01 python]# cat test.py
# coding:utf-8
f=open("/etc/passwd")
print [i.strip() for i in f.readlines()][:5] #这是一个列表生成式,strip()去除空格,[:5]取列表中前5行
f.close()
[root@centos01 python]# python test.py
['root:x:0:0:root:/root:/bin/bash', 'bin:x:1:1:bin:/bin:/sbin/nologin', 'daemon:x:2:2:daemon:/sbin:/sbin/nologin', 'adm:x:3:4:adm:/var/adm:/sbin/nologin', 'lp:x:4:7:lp:/var/spool/lpd:/sbin/nologin']
写文件(write,writelines)
write
writelines
可以写入多行文本内容
[root@python mnt]# cat hello       #查看hello文件内容
hello
In [1]: f = open("/mnt/hello",'a+')   #用追加的方式打开文件

In [2]: f.write("123\n")                    #追加123并换行

In [3]: f.writelines(["python\n","java\n"])   #追加多行内容,由于writelines括号里面只能跟一个参数,可以将多行内容以列表方式导入

In [4]: f.close()
[root@python mnt]# cat hello        #再次查看文件,内容已改变
hello
123
python
java
文件对象f是可迭代的吗?
In [14]: f = open("/mnt/hello",'a+')

In [15]: for i in f:
   ....:     print i
   ....:
hello

python

java
可见是可迭代的,因此我们在写脚本的时候可以利用这个特性,open文件之后直接可以用循环遍历文件所有行
文件内置属性
print f.closed #返回bool值,判断文件对象是否已经关闭
print f.mode #查看文件的打开方式是r,w,w+...
print f.name #查看文件名(绝对路径)
with语句:使用with语句可以防止open完文件之后忘记close()的情况
In [24]: with open("/mnt/hello") as f1:
   ....:     print f1.read()
   ....:
hello
python
java


In [25]: print f1.closed          #我们并没有使用f1.closed(),现在使用文件内置属性测试一下是否已关闭,结果为True,已经关闭了
True
练习1:
显示文件所有行,但忽略以#开头的行
[root@centos1 mnt]# cat /mnt/hello
#hello
hello
python
java
[root@centos01 python]# cat test.py
# coding:utf-8
with open("/mnt/hello") as f:
    for line in f:  #利用文件对象可迭代特性,直接for循环遍历
        if line.strip()[0] != "#":  #表示如果第一个字符不是"#",.strip()表示去除字符串的空格;[0]表示取字符串的第一个元素
            print line,  #打印line,逗号表示不换行输出
[root@centos01 python]# python test.py
hello
python
java
练习2:
把/etc/passwd文件中的“root”字符串替换为“redhat”,将更换后的另存为/tmp/passwd文件
[root@centos01 python]# cat test.py
# coding:utf-8
with open("/etc/passwd") as f:
    for line in f:
        bline=line.replace("root","redhat")
        with open("/tmp/passwd","a+") as m:
            m.write(bline)
[root@centos01 python]# python test.py
[root@centos01 python]# cat /tmp/passwd
redhat:x:0:0:redhat:/redhat:/bin/bash
                   ...
练习3:
逐页显示文本文件程序,用户输入一个文件名,每次默认显示行数为10行,给用户一个选项,“是否继续(y/n)”
[root@centos01 python]# cat test.py
# coding:utf-8
file_name=raw_input("文件名(绝对路径):")
with open(file_name) as f:
    li=[i.strip() for i in f.readlines()]
file_length=len(li)
j=0
for i in range(file_length):
    print li[i]
    j+=1
    if j==10:
        choice=raw_input("是否继续(y/n):")
        if choice == "n": #使用这样的判断可以在用户选择n的时候跳出循环,选y或者直接回车继续显示下10行
            break
        else:
            j=0
            continue
[root@centos01 python]# python test.py
文件名(绝对路径):/etc/passwd
root:x:0:0:root:/root:/bin/bash
bin:x:1:1:bin:/bin:/sbin/nologin
daemon:x:2:2:daemon:/sbin:/sbin/nologin
adm:x:3:4:adm:/var/adm:/sbin/nologin
lp:x:4:7:lp:/var/spool/lpd:/sbin/nologin
sync:x:5:0:sync:/sbin:/bin/sync
shutdown:x:6:0:shutdown:/sbin:/sbin/shutdown
halt:x:7:0:halt:/sbin:/sbin/halt
mail:x:8:12:mail:/var/spool/mail:/sbin/nologin
operator:x:11:0:operator:/root:/sbin/nologin
是否继续(y/n):n
[root@centos01 python]#
练习4:
将文件夹下所有图片名称加上'_fc',并计算你处理的图片个数和花费的时间
[root@centos01 python]# ls /mnt/Pictures/
a.png  b.png
[root@centos01 python]# cat test.py
#coding:utf-8
import os    #调用os函数
import time  #调用time函数

start_time=time.time()
path = '/mnt/Pictures'  #将图片所在目录定义成一个变量,方便后面调用
li=[i for i in os.listdir(path) if i.endswith(".png")]  #取出/mnt/Pictures下所有.png结尾的文件组成li列表
length=len(li)   #计算列表中元素个数
for i in range(length):
    oldfile=li[i]
    newfile=li[i]+'_fc'  #使用列表支持拼接的特性在每个元素后面加上_fc
    os.rename(os.path.join(path,oldfile),os.path.join(path,newfile)) #os.rename("old","new")表示修改文件名称,os.path.join("dir1","dir2")表示以/连接元素使之成为一个路径
end_time=time.time()
print "共处理了%s张图片,用时%s" %(len(li),end_time-start_time)
[root@centos01 python]# python test.py
共处理了2张图片,用时7.70092010498e-05
[root@centos01 python]# ls /mnt/Pictures/
a.png_fc  b.png_fc