【dlib代码解读】人脸关键点检测器的训练
转载: https://blog.csdn.net/elaine_bao/article/details/53054533
1. 源代码
先给出测试的结果,关键点并不是特别准,原因是训练样本数据量太少。 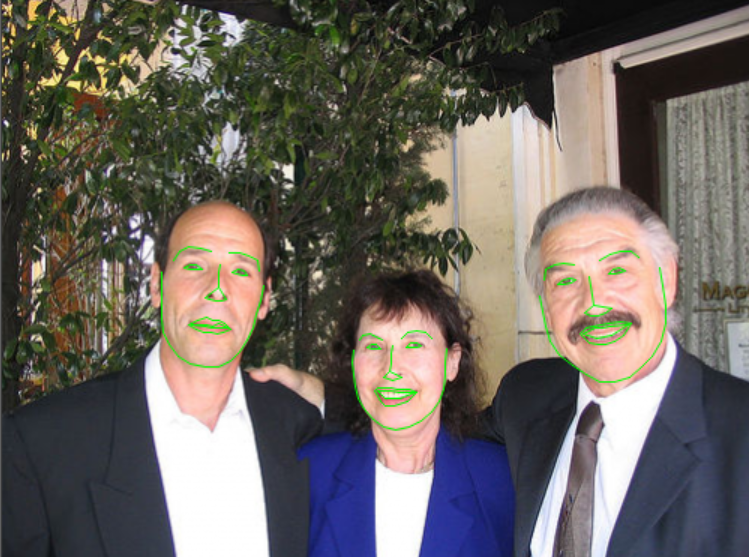
以下给出完整的人脸关键点检测器训练代码。详细的代码解读请看第二部分。
/* faceLandmarksTrain.cpp
function:借助dlib训练自己的人脸关键点检测器(参考dlib/examples/train_shape_predictor_ex)
date:2016/11/6
author:Elaine_Bao
*/

#include <dlib/image_processing.h>
#include <dlib/data_io.h>
#include <iostream>

using namespace dlib;
using namespace std;

// ----------------------------------------------------------------------------------------
//获取两眼间距离,输出D[i][j]表示objects[i][j]中人脸的两眼间距离
std::vector<std::vector<double> > get_interocular_distances(
    const std::vector<std::vector<full_object_detection> >& objects
    );

// ----------------------------------------------------------------------------------------

int main(int argc, char** argv)
{
    try
    {
        //一、preprocessing
        //1. 载入训练集,测试集
        const std::string faces_directory = "faces";
        dlib::array<array2d<unsigned char> > images_train, images_test;
        std::vector<std::vector<full_object_detection> > faces_train, faces_test;

        load_image_dataset(images_train, faces_train, faces_directory + "/training_with_face_landmarks.xml");
        load_image_dataset(images_test, faces_test, faces_directory + "/testing_with_face_landmarks.xml");

        // 二、training
        //1. 定义trainer类型
        shape_predictor_trainer trainer;
        //设置训练参数
        trainer.set_oversampling_amount(300);
        trainer.set_nu(0.05);
        trainer.set_tree_depth(2);
        trainer.be_verbose();

        // 2. 训练,生成人脸关键点检测器
        shape_predictor sp = trainer.train(images_train, faces_train);


        // 三、测试
        cout << "mean training error: " <<
            test_shape_predictor(sp, images_train, faces_train, get_interocular_distances(faces_train)) << endl;
        cout << "mean testing error:  " <<
            test_shape_predictor(sp, images_test, faces_test, get_interocular_distances(faces_test)) << endl;

        // 四、存储
        serialize("sp.dat") << sp;
    }
    catch (exception& e)
    {
        cout << "\nexception thrown!" << endl;
        cout << e.what() << endl;
    }
}

// ----------------------------------------------------------------------------------------

double interocular_distance(
    const full_object_detection& det
    )
{
    dlib::vector<double, 2> l, r;
    double cnt = 0;
    // Find the center of the left eye by averaging the points around
    // the eye.
    for (unsigned long i = 36; i <= 41; ++i)
    {
        l += det.part(i);
        ++cnt;
    }
    l /= cnt;

    // Find the center of the right eye by averaging the points around
    // the eye.
    cnt = 0;
    for (unsigned long i = 42; i <= 47; ++i)
    {
        r += det.part(i);
        ++cnt;
    }
    r /= cnt;

    // Now return the distance between the centers of the eyes
    return length(l - r);
}

std::vector<std::vector<double> > get_interocular_distances(
    const std::vector<std::vector<full_object_detection> >& objects
    )
{
    std::vector<std::vector<double> > temp(objects.size());
    for (unsigned long i = 0; i < objects.size(); ++i)
    {
        for (unsigned long j = 0; j < objects[i].size(); ++j)
        {
            temp[i].push_back(interocular_distance(objects[i][j]));
        }
    }
    return temp;
}

// ----------------------------------------------------------------------------------------
2. 代码解读 step by step
2.1 预处理阶段
2.1.1 载入训练集、测试集
const std::string faces_directory = "faces";
dlib::array<array2d<unsigned char> > images_train, images_test;
std::vector<std::vector<full_object_detection> > faces_train, faces_test;
load_image_dataset(images_train, faces_train, faces_directory + "/training_with_face_landmarks.xml");
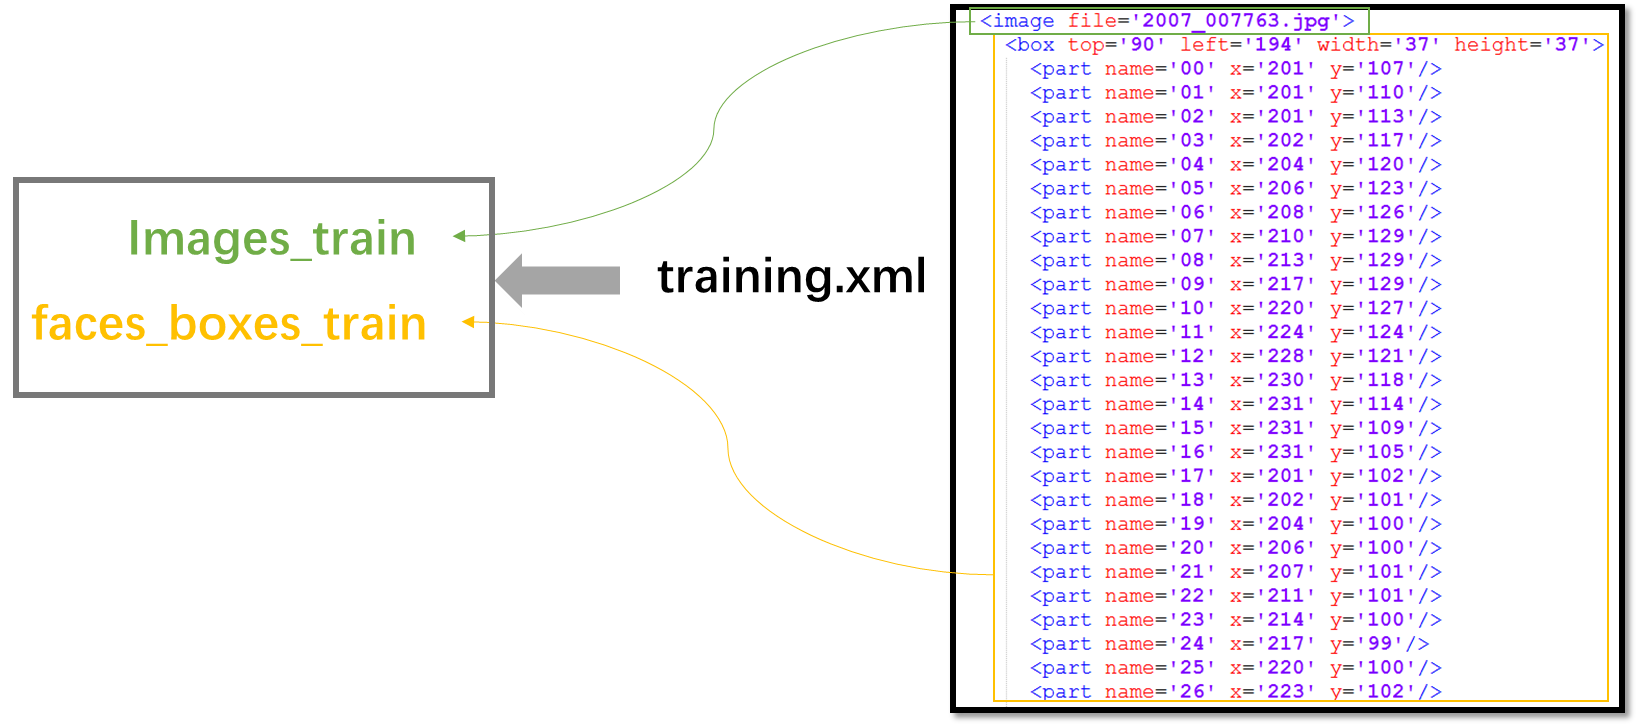
load_image_dataset(images_test, faces_test, faces_directory + "/testing_with_face_landmarks.xml");训练集和测试集图片存储在”faces”文件夹下,另外该文件夹下还需包含training_with_face_landmarks.xml,testing_with_face_landmarks.xml,包含图片中人脸bounding box的位置、68个人脸关键点的位置。组织形式为:
其中faces_train, faces_test的类型中包含full_object_detection,其原型如下(在full_object_detection.h中定义),其中rect存储的是人脸bounding box的位置,parts则存储68个关键点的位置。
full_object_detection(
            const rectangle& rect_,
            const std::vector<point>& parts_
        ) : rect(rect_), parts(parts_) {}
2.2 训练阶段
2.2.1 定义trainer,用于训练人脸关键点检测器
shape_predictor_trainer trainer;
//设置训练参数
trainer.set_oversampling_amount(300);
trainer.set_nu(0.05);
trainer.set_tree_depth(2);
trainer.be_verbose();
人脸关键点检测器的算法原理主要来自于文章[1]中的方法。简单地说就是通过多级级联的回归树进行关键点回归,在[1]中表述为如下式子: 
其中S^(t)S^(t)表示第t级回归器的形状,rtrt表示第t级回归器的更新量,更新策略采用GBDT,即每级回归器学习的都是当前形状与groundtruth形状的残差。
其中训练器shape_predictor_trainer在shape_predictor.h中定义如下:
shape_predictor_trainer (
)
{
    _cascade_depth = 10;
    _tree_depth = 4;
    _num_trees_per_cascade_level = 500;
    _nu = 0.1;
    _oversampling_amount = 20;
    _feature_pool_size = 400;
    _lambda = 0.1;
    _num_test_splits = 20;
    _feature_pool_region_padding = 0;
    _verbose = false;
}
逐项解释每个参数的意思:
(1) _cascade_depth: 表示级联的级数,默认为10级级联。
(2) _tree_depth: 树深,则树的叶子节点个数为2(_tree_depth)2(_tree_depth)个。
(3) _num_trees_per_cascade_level: 每个级联包含的树的数目,默认每级500棵树。则整个模型中树的总数为_cascade_depth * _num_trees_per_cascade_level,默认为5000棵树。
(4) _nu:正则项,nu越大,表示对训练样本fit越好,当然也越有可能发生过拟合。_nu取值范围(0,1],默认取0.1。
(5) _oversampling_amount:通过对训练样本进行随机变形扩大样本数目。比如你原来有N张训练图片,通过该参数的设置,训练样本数将变成N*_oversampling_amount张。所以通常该值越大越好,只是训练耗时也会越久。
(6) _feature_pool_size:在每级级联中,我们从图片中随机采样_feature_pool_size个pixel用来作为训练回归树的特征池,这种稀疏的采样能够保证复杂度相比于从原图像所有pixel中进行训练的复杂度要低。当然该参数值越大通常精度越高,只是训练耗时也会越久。_feature_pool_size取值范围>1。
(7) _lambda:在回归树中是否分裂节点是通过计算pixel pairs的强度差是否满足阈值来决定的。如下式所示,如果所选的pixel pairs的强度大于阈值,则表示回归树需要进一步分裂。 
这些pixel pairs是通过在上述特征池中随机采样得到的,倾向于选择邻近的pixels。这个_lambda就是控制选择pixel的远近程度的,值小表示倾向于选择离得近的pixel,值大表示并不太在意是否选取邻近的pixel pairs。_lambda取值范围(0,1)。
(8) _num_test_splits:如何分裂节点?在生成回归树时我们在每个节点随机生成_num_test_splits个可能的分裂,然后从中选取最佳的分裂。该参数值越大结果越精确,只是训练耗时也会越久。
(9) _feature_pool_region_padding:当我们要从图像中随机采样pixel来构建特征池时,我们会在training landmarks周围_feature_pool_region_padding范围内进行特征采样。当_feature_pool_region_padding=0时,则表示在landmark的1*1 box内采样。
通过以上对参数的理解我们基本可以知道每个参数设什么值合适。例如在本例中,选择设置_oversampling_amount=300,这是因为我们的训练样本很少,通过oversampling来增加样本量。对_nu和_tree_depth的设置也是为了防止过拟合。
2.2.2 训练,生成人脸关键点检测器
shape_predictor sp = trainer.train(images_train, faces_train);- 1
训练过程则是通过GBDT建立各级回归树。
2.3 测试
cout << "mean training error: " <<
            test_shape_predictor(sp, images_train, faces_train, get_interocular_distances(faces_train)) << endl;
cout << "mean testing error:  " <<
            test_shape_predictor(sp, images_test, faces_test, get_interocular_distances(faces_test)) << endl;

//模型存储
serialize("sp.dat") << sp;
这样就可以将sp.dat用于其他图片的人脸关键点检测了。具体使用方法可以参见dlib/examples/face_landmark_detection_ex.cpp。
[1] One Millisecond Face Alignment with an Ensemble of Regression Trees by Vahid Kazemi and Josephine Sullivan, CVPR 2014.