文章目录
一 人脸关键点检测器的训练
人脸关键点检测器的训练使用的是级联回归算法(参考examples/train_shape_predictor_ex.cpp)。
1.1 原理
1.1.1 级联回归公式
dlib库使用级联回归树算法的原理出自文章:One Millisecond Face Alignment with an Ensemble of Regression Trees by Vahid Kazemi and Josephine Sullivan, CVPR 2014。
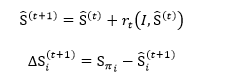
首先,级联回归公式为:

其中S ̂^((t))表示第t级回归器的形状(68个特征点坐标),I为图像(数据),r_t表示第t级回归器的更新量,更新策略采用GBDT(梯度提升决策树),即每级回归器学习的都是当前形状与groundtruth形状的残差。
1.1.2 回归方程求解
首先,为了求解回归方程r_0,需要先设置初始形状,假设已有训练数据

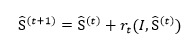
利用级联回归公式,进行迭代后:
其中r_t(包括r_0)的求解采用GBDT算法,过程如下:
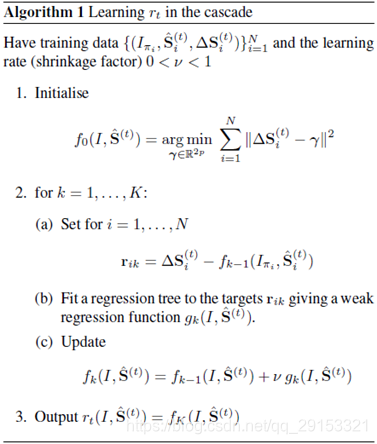
算法步骤解释:
1.初始化,估计使损失函数极小化的常数,只有一个根节点的树,ganma为常数。
2.(a)计算残差
(b)估计回归树叶节点区域,拟合残差的近似值,得到这一轮的回归树
(c)更新回归树
(d)得到回归方程
1.1.3 分裂点
回归树有很多个分裂点和叶节点,是否分裂节点由以下公式判定:

1.2 源代码
完整的人脸关键点检测器训练代码如下(含注释):

function:借助dlib训练自己的人脸关键点检测器(参考dlib/examples/train_shape_predictor_ex)

#include <dlib/image_processing.h>
#include <dlib/data_io.h>
#include <iostream>

using namespace dlib;
using namespace std;
// ----------------------------------------------------------------------------------------
//获取两眼间距离,输出D[i][j]表示objects[i][j]中人脸的两眼间距离
std::vector<std::vector<double> > get_interocular_distances(
    const std::vector<std::vector<full_object_detection> >& objects
    );
// ----------------------------------------------------------------------------------------

int main(int argc, char** argv)
{
    try
    {
        //一、preprocessing
        //1. 载入训练集,测试集
        const std::string faces_directory = "faces";
        dlib::array<array2d<unsigned char> > images_train, images_test;
        std::vector<std::vector<full_object_detection> > faces_train, faces_test;

        load_image_dataset(images_train, faces_train, faces_directory + "/training_with_face_landmarks.xml");
        load_image_dataset(images_test, faces_test, faces_directory + "/testing_with_face_landmarks.xml");

        // 二、training
        //1. 定义trainer类型
        shape_predictor_trainer trainer;
        //设置训练参数
        trainer.set_oversampling_amount(300);
        trainer.set_nu(0.05);
        trainer.set_tree_depth(2);
        trainer.be_verbose();

        // 2. 训练,生成人脸关键点检测器
        shape_predictor sp = trainer.train(images_train, faces_train);

        // 三、测试
        cout << "mean training error: " <<
            test_shape_predictor(sp, images_train, faces_train, get_interocular_distances(faces_train)) << endl;
        cout << "mean testing error:  " <<
            test_shape_predictor(sp, images_test, faces_test, get_interocular_distances(faces_test)) << endl;

        // 四、存储
        serialize("sp.dat") << sp;
    }
    catch (exception& e)
    {
        cout << "\nexception thrown!" << endl;
        cout << e.what() << endl;
    }
}

// ----------------------------------------------------------------------------------------
double interocular_distance(
    const full_object_detection& det
    )
{
    dlib::vector<double, 2> l, r;
    double cnt = 0;
    // Find the center of the left eye by averaging the points around
    // the eye.
    for (unsigned long i = 36; i <= 41; ++i)
    {
        l += det.part(i);
        ++cnt;
    }
    l /= cnt;

    // Find the center of the right eye by averaging the points around
    // the eye.
    cnt = 0;
    for (unsigned long i = 42; i <= 47; ++i)
    {
        r += det.part(i);
        ++cnt;
    }
    r /= cnt;

    // Now return the distance between the centers of the eyes
    return length(l - r);
}
// 获取两眼间距离函数
std::vector<std::vector<double> > get_interocular_distances(
    const std::vector<std::vector<full_object_detection> >& objects
    )
{
    std::vector<std::vector<double> > temp(objects.size());
    for (unsigned long i = 0; i < objects.size(); ++i)
    {
        for (unsigned long j = 0; j < objects[i].size(); ++j)
        {
            temp[i].push_back(interocular_distance(objects[i][j]));
        }
    }
    return temp;
}
// ----------------------------------------------------------------------------------------
1.3 代码解读
1.3.1 预处理阶段
1、载入训练集、测试集
load_image_dataset(images_train, faces_train, faces_directory + "/training_with_face_landmarks.xml");
load_image_dataset(images_test, faces_test, faces_directory + "/testing_with_face_landmarks.xml");
其中训练集和测试集图片存储在example/faces目录下,同目录下还需包含training_with_face_landmarks.xml,testing_with_face_landmarks.xml,包含图片中人脸bounding box的位置、68个人脸关键点的位置。
load_image_dataset在load_image_dataset.h中定义(第427行为关键代码),images_train, images_test为图片数据,faces_train, faces_test的类型中包含full_object_detection,其原型在full_object_detection.h中定义,其中rect存储的是人脸bounding box的位置,parts则存储68个关键点的位置。
full_object_detection(
            const rectangle& rect_,
            const std::vector<point>& parts_
        ) : rect(rect_), parts(parts_) {}
1.3.2 训练阶段
1、定义trainer,用于训练人脸关键点检测器
shape_predictor_trainer trainer;
//设置训练参数
trainer.set_oversampling_amount(300);
trainer.set_nu(0.05);
trainer.set_tree_depth(2);
trainer.be_verbose();
人脸关键点检测器的算法原理主要通过多级级联的回归树进行关键点回归,表述为如下式子:
其中S ̂^((t))表示第t级回归器的形状,r_t表示第t级回归器的更新量,更新策略采用GBDT,即每级回归器学习的都是当前形状与groundtruth形状的残差。
其中训练器shape_predictor_trainer在shape_predictor_trainer.h中定义,参数如下:
shape_predictor_trainer (
)
{
    _cascade_depth = 10;
    _tree_depth = 4;
    _num_trees_per_cascade_level = 500;
    _nu = 0.1;
    _oversampling_amount = 20;
    _feature_pool_size = 400;
    _lambda = 0.1;
    _num_test_splits = 20;
    _feature_pool_region_padding = 0;
    _verbose = false;
}
逐项解释每个参数:
(1) _cascade_depth: 表示级联的级数,默认为10级级联。
(2) _tree_depth: 树深,则树的叶子节点个数为2(_tree_depth)个。
(3) _num_trees_per_cascade_level: 每个级联包含的树的数目,默认每级500棵树。则整个模型中树的总数为_cascade_depth* _num_trees_per_cascade_level,默认为5000棵树。
(4) _nu:正则项,nu越大,表示对训练样本fit越好,当然也越有可能发生过拟合。_nu取值范围(0,1],默认取0.1。
(5) _oversampling_amount:通过对训练样本进行随机变形扩大样本数目。比如你原来有N张训练图片,通过该参数的设置,训练样本数将变成N*_oversampling_amount张。通常该值越大越好,只是训练耗时也会越久。
(6) _feature_pool_size:在每级级联中,从图片中随机采样_feature_pool_size个pixel用来作为训练回归树的特征池,这种稀疏的采样能够保证复杂度相比于从原图像所有pixel中进行训练的复杂度要低。当然该参数值越大通常精度越高,只是训练耗时也会越久。_feature_pool_size取值范围>1。
(7) _lambda:在回归树中是否分裂节点:通过计算pixel pairs的强度差是否满足阈值来决定的。如下式所示,如果所选的pixel pairs的强度大于阈值,则表示回归树需要进一步分裂。

这些pixel pairs是通过在上述特征池中随机采样得到的,倾向于选择邻近的pixels。这个_lambda就是控制选择pixel的远近程度的,值小表示倾向于选择离得近的pixel,值大表示并不太在意是否选取邻近的pixel pairs。_lambda取值范围(0,1)。
(8) _num_test_splits:在生成回归树时,在每个节点随机生成_num_test_splits个可能的分裂,然后从中选取最佳的分裂。该参数值越大结果越精确,只是训练耗时也会越久。
(9) _feature_pool_region_padding:当从图像中随机采样pixel来构建特征池时,我们会在training landmarks周围_feature_pool_region_padding范围内进行特征采样。当_feature_pool_region_padding=0时,则表示在landmark的1*1 box内采样。
通过以上对参数的理解我们基本可以知道每个参数设什么值合适。例如在本例中,选择设置_oversampling_amount=300,这是因为我们的训练样本很少,通过oversampling来增加样本量。对_nu和_tree_depth的设置也是为了防止过拟合。
2、训练,生成人脸关键点检测器
shape_predictor sp = trainer.train(images_train, faces_train);
训练过程则是通过GBDT建立各级回归树。
1.3.3 测试及保存
cout << "mean training error: " <<
            test_shape_predictor(sp, images_train, faces_train, get_interocular_distances(faces_train)) << endl;
cout << "mean testing error:  " <<
            test_shape_predictor(sp, images_test, faces_test, get_interocular_distances(faces_test)) << endl;
//模型存储
serialize("sp.dat") << sp;
这样就可以将sp.dat用于其他图片的人脸关键点检测了。具体使用方法可以参照dlib/examples/face_landmark_detection_ex.cpp。
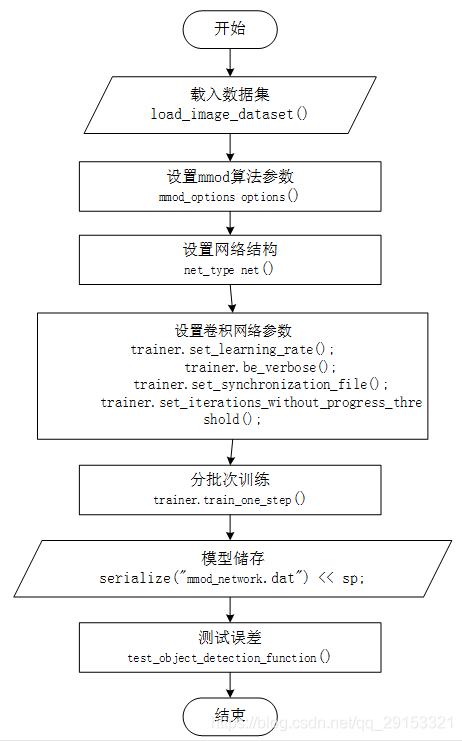
1.4 代码流程图
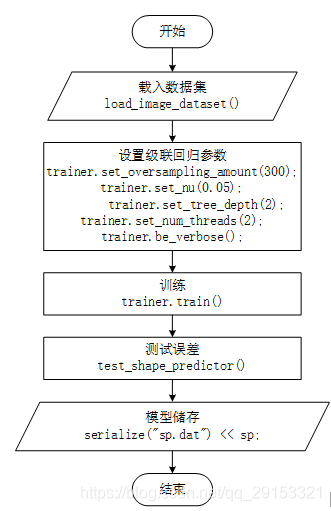
代码流程图如上所示,主要关键步骤均在主程序examples/train_shape_predictor_ex.cpp体现。
载入数据集load_image_dataset()实现细节在load_image_dataset.h中体现,图片数据及标注位置的数据来源:


训练trainer.train()实现细节在shape_predictor_trainer.h中体现,首先下列函数求初始化形状:

进入该函数发现还实现了回归方程的求解迭代过程,如下所示:
通过下列函数建立10级回归树。

最终通过下列函数返回人脸关键点检测器。

二 人脸检测器的训练(HOG+SVM)
人脸检测器使用的是HOG特征+svm算法
(参考examples/fhog_object_detector_ex.cpp)
2.1 原理
2.1.1 常规的HOG特征
方向梯度直方图(Histogram of Oriented Gradient, HOG)特征是一种在计算机视觉和图像处理中用来进行物体检测的特征描述子。它通过计算和统计图像局部区域的梯度方向直方图来构成特征。Hog特征结合SVM分类器已经被广泛应用于图像识别中,尤其在行人检测中获得了极大的成功。
HOG特征提取image实现完整流程:
1)灰度化;
2)采用Gamma校正法对输入图像进行颜色空间的标准化(归一化);目的是调节图像的对比度,降低图像局部的阴影和光照变化所造成的影响,同时可以抑制噪音的干扰;
3)计算图像每个像素的梯度(包括大小和方向);主要是为了捕获轮廓信息,同时进一步弱化光照的干扰。
4)将图像划分成小cells(例如66像素/cell);
5)统计每个cell的梯度直方图(不同梯度的个数),即可形成每个cell的descriptor;
6)将每几个cell组成一个block(例如33个cell/block),一个block内所有cell的特征descriptor串联起来便得到该block的HOG特征descriptor。
7)将图像image内的所有block的HOG特征descriptor串联起来就可以得到该image(要检测的目标)的HOG特征descriptor了。这个就是最终的可供分类使用的特征向量了。
下面重点讲解下第3)和5)步:
第3)步图像中像素点(x,y)的梯度求解为:
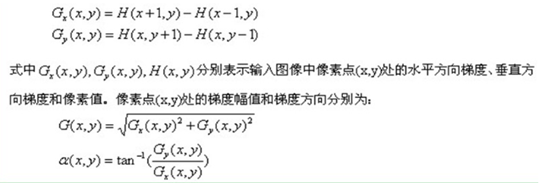
最常用的方法是:首先用[-1,0,1]梯度算子对原图像做卷积运算,得到x方向(水平方向,以向右为正方向)的梯度分量gradscalx,然后用[1,0,-1]T梯度算子对原图像做卷积运算,得到y方向(竖直方向,以向上为正方向)的梯度分量gradscaly。然后再用以上公式计算该像素点的梯度大小和方向。
第5)步统计每个cell的梯度直方图,假设每个cell为66个像素,采用9个bin的直方图(方向360度分为9份)来表示这66个像素,对cell内每个像素用梯度方向在直方图中进行加权投影计算,得到该cell对应的9维向量。
总的HOG特征计算:假设9个直方图通道,33个cell/block,扫描步长为6像素,image为9696像素,则共产生3391414个HOG特征。
2.1.2 源代码中的HOG特征
源代码中提取的HOG特征来自于Felzenszwalb版本的HOG(论文Object Detection with Discriminatively Trained Part Based Models by P. Felzenszwalb, R. Girshick, D. McAllester, D. Ramanan, IEEE Transactions on Pattern Analysis and Machine Intelligence, Vol. 32, No. 9, Sep. 2010)。
此方法与常规的HOG特征有所不同,提取的HOG特征是对每个8*8像素大小的cell(而不是像素)提取31维的fhog算子,如下图所示,来自两部分的串联:
(1) 18D来自于对cell做18个bin的梯度方向直方图,即将360°划分为18个bin,然后令cell中的每个像素根据其梯度方向加权投影到直方图相应的bin中,这样就得到了18维有符号的fhog梯度。
(2)提取无符号的HOG梯度,0-180°将产生9个梯度向量。将会产生9*4=36维特征,将其看成矩阵形式,并将行和列分别相加,产生4+9=13D。
2.2 源代码
以下给出完整的人脸检测器训练代码(含注释):
function:借助dlib训练自己的人脸检测器(参考dlib/examples/fhog_object_detector_ex)

#include <dlib/svm_threaded.h>
#include <dlib/gui_widgets.h>
#include <dlib/image_processing.h>
#include <dlib/data_io.h>

#include <iostream>
#include <fstream>

using namespace std;
using namespace dlib;

// ----------------------------------------------------------------------------------------

int main(int argc, char** argv)
{

    try
    {
        //一、preprocessing
        //1. 载入训练集,测试集
        const std::string faces_directory = "faces";
        dlib::array<array2d<unsigned char> > images_train, images_test;
        std::vector<std::vector<rectangle> > face_boxes_train, face_boxes_test;

        load_image_dataset(images_train, face_boxes_train, faces_directory + "/training.xml");
        load_image_dataset(images_test, face_boxes_test, faces_directory + "/testing.xml");

        //2.图片上采样
        upsample_image_dataset<pyramid_down<2> >(images_train, face_boxes_train);
        upsample_image_dataset<pyramid_down<2> >(images_test, face_boxes_test);

        //3.训练图片做镜像处理,扩充训练集
        add_image_left_right_flips(images_train, face_boxes_train);

        //二、training
        //1.定义scanner类型,用于扫描图片并提取特征(HOG)
        typedef scan_fhog_pyramid<pyramid_down<6> > image_scanner_type;
        image_scanner_type scanner;

        //2. 设置scanner扫描窗口大小
        scanner.set_detection_window_size(80, 80);

        //3.定义trainer类型(SVM),用于训练人脸检测器
    structural_object_detection_trainer<image_scanner_type> trainer(scanner);
        // Set this to the number of processing cores on your machine.
        trainer.set_num_threads(4);
        // 设置SVM的参数C,C越大表示更好地去拟合训练集,当然也有可能造成过拟合。通过尝试不同C在测试集上的效果得到最佳值
        trainer.set_c(1);
        trainer.be_verbose();
        //设置训练结束条件,"risk gap"<0.01时训练结束,值越小表示SVM优化问题越精确,训练时间也会越久。
        //通常取0.1-0.01.在verbose模式下每一轮的risk gap都会打印出来。
        trainer.set_epsilon(0.01);

        //4.训练,生成object_detector
        object_detector<image_scanner_type> detector = trainer.train(images_train, face_boxes_train);

        //三、测试
        // 输出precision, recall, average precision.
        cout << "training results: " << test_object_detection_function(detector, images_train, face_boxes_train) << endl;
        cout << "testing results:  " << test_object_detection_function(detector, images_test, face_boxes_test) << endl;

        //显示hog
        image_window hogwin(draw_fhog(detector), "Learned fHOG detector");

        // 显示测试集的人脸检测结果
        image_window win;
        for (unsigned long i = 0; i < images_test.size(); ++i)
        {
            // Run the detector and get the face detections.
            std::vector<rectangle> dets = detector(images_test[i]);
            win.clear_overlay();
            win.set_image(images_test[i]);
            win.add_overlay(dets, rgb_pixel(255, 0, 0));
            cout << "Hit enter to process the next image..." << endl;
            cin.get();
        }

        //四、模型存储
        serialize("face_detector.svm") << detector;
        // you can recall it using the deserialize() function.
        object_detector<image_scanner_type> detector2;
        deserialize("face_detector.svm") >> detector2;
    }
    catch (exception& e)
    {
        cout << "\nexception thrown!" << endl;
        cout << e.what() << endl;
    }
}
2.3 代码解读
2.3.1 预处理阶段
1、载入训练集、测试集
load_image_dataset(images_train, face_boxes_train, faces_directory + "/training.xml");
load_image_dataset(images_test, face_boxes_test, faces_directory + "/testing.xml");
和上一章过程类似,训练集和测试集图片存储在example/faces目录下,另外该目录下还需包含training.xml,testing.xml,包含图片中人脸bounding box的位置。
2、图片上采样
upsample_image_dataset<pyramid_down<2> >(images_train, face_boxes_train);
upsample_image_dataset<pyramid_down<2> >(images_test, face_boxes_test);
即图片放大两倍,这样有助于检测较小的人脸。 上述函数在对图片进行上采样的同时,也相应地调整了人脸bounding box的位置。
3、镜像图片
add_image_left_right_flips(images_train, face_boxes_train);
对训练所用图片做镜像处理,扩充训练集的训练样本。
2.3.2 训练阶段
1、定义scanner,用于扫描图片并提取特征
typedef scan_fhog_pyramid<pyramid_down<6>> image_scanner_type;
image_scanner_type scanner;
scan_fhog_pyramid类定义来自于scan_fhog_pyramid.h,原型如下:
template <typename Pyramid_type, typename Feature_extractor_type = default_fhog_feature_extractor>
class scan_fhog_pyramid{...}
类模板中参数1表示图像金字塔的类型,本文使用的是pyramid_down<6>,表示图像金字塔进行下采样的比率为5/6,即对原图像不断缩小5/6,构成多级金字塔。当图像的大小<扫描窗口大小的时候停止下采样。
参数2表示特征提取器,默认情况下使用fhog.h中的extract_fhog_feature()提取特征,函数原型为:
void extract_fhog_features(
        const image_type& img,
        array2d<matrix<T,31,1>,mm>& hog,
        int cell_size = 8,
        int filter_rows_padding = 1,
        int filter_cols_padding = 1
    );
此函数提取的HOG特征来自于Felzenszwalb版本的HOG (简称fhog),它是对每个8*8像素大小的cell提取31维的fhog算子。
2、设置scanner扫描窗口大小
scanner.set_detection_window_size(80, 80);
设置扫描窗口大小为8080,即扫描窗口是固定大小的,通过放缩图像(图像金字塔)以达到在不同尺度上检测人脸的目的。 由于在预处理中图像放大了2倍,则图像中最小能检测到的人脸大小为4040。
3、定义trainer,用于训练人脸检测器
structural_object_detection_trainer<image_scanner_type> trainer(scanner);
// 设置训练参数
trainer.set_num_threads(4);
// 设置SVM的参数C,C越大表示更好地去拟合训练集,当然也有可能造成过拟合。通过尝试不同C在测试集上的效果得到最佳值
trainer.set_c(1);
trainer.be_verbose();
//设置训练结束条件,"risk gap"<0.01时训练结束,值越小表示SVM优化问题越精确,训练时间也会越久。
//通常取0.1-0.01.在verbose模式下每一轮的risk gap都会打印出来。
trainer.set_epsilon(0.01);
structural_object_detection_trainer定义来自于structural_object_detection_trainer.h,通过scanner来初始化trainer。
4、训练,生成人脸检测器
object_detector<image_scanner_type> detector = trainer.train(images_train, face_boxes_train)
train()的函数原型在structural_object_detection_trainer.h有4个,这里用的是其中一个,即输入参数为图片和图片中人脸的正确位置,输出一个object_detector。
注意这种情况下除了已经标出的人脸位置为正样本以外,图片的其他位置随机取负样本,因此在标注训练图片的人脸时,应确保所有人脸都已标注出来。如果出现不太确定是不是人脸的图片,应调用另一个版本的train()函数并设置ignore区域。
关于train()的内部实现,其实就是训练一个SVM模型,当模型loss小于之前所设的epsilon的时候,输出训练好的模型到object_detector。
2.3.3 测试及保存
1、模型测试
// 显示测试集的人脸检测结果
image_window win;
for (unsigned long i = 0; i < images_test.size(); ++i)
{
// Run the detector and get the face detections.
std::vector<rectangle> dets = detector(images_test[i]);
win.clear_overlay();
win.set_image(images_test[i]);
win.add_overlay(dets, rgb_pixel(255, 0, 0));
cout << "Hit enter to process the next image..." << endl;
cin.get();
}
detector()函数直接返回图片中所有检测到的人脸的bounding box信息。
2、模型存储
通过serialize()可以实现对模型的保存,而deserialize()可以将磁盘中保存的模型取出来用。
serialize("face_detector.svm") << detector;

// Then you can recall it using the deserialize() function.
object_detector<image_scanner_type> detector2;
deserialize("face_detector.svm") >> detector2;
3、多个detector联合使用
上述人脸检测器比较适用于正脸的检测,对于侧脸的检测效果并不好。那么可以单独训练侧脸的人脸检测器,然后多个detector联合使用。
std::vector<object_detector<image_scanner_type> > my_detectors;
my_detectors.push_back(detector);
std::vector<rectangle> dets = evaluate_detectors(my_detectors, images_train[0]);
串联所有人脸检测器一起使用的好处是,全图的fhog特征只需要提取一遍即可。 例如,在dlib自带的人脸检测器中就用了5个HOG-based detector,分别用于检测front looking, left looking, right looking, front looking but rotated left, and a front looking but rotated right one. 下面是这五个detector的训练参数log:
/*
The front detector:
    trained on mirrored set of labeled_faces_in_the_wild/frontal_faces.xml
    upsampled each image by 2:1
    used pyramid_down<6>
    loss per missed target: 1
    epsilon: 0.05
    padding: 0
    detection window size: 80 80
    C: 700
    nuclear norm regularizer: 9
    cell_size: 8
    num filters: 78
    num images: 4748
    Train detector (precision,recall,AP): 0.999793 0.895517 0.895368
    singular value threshold: 0.15

The left detector:
    trained on labeled_faces_in_the_wild/left_faces.xml
    upsampled each image by 2:1
    used pyramid_down<6>
    loss per missed target: 2
    epsilon: 0.05
    padding: 0
    detection window size: 80 80
    C: 250
    nuclear norm regularizer: 8
    cell_size: 8
    num filters: 63
    num images: 493
    Train detector (precision,recall,AP): 0.991803  0.86019 0.859486
    singular value threshold: 0.15

The right detector:
    trained left-right flip of labeled_faces_in_the_wild/left_faces.xml
    upsampled each image by 2:1
    used pyramid_down<6>
    loss per missed target: 2
    epsilon: 0.05
    padding: 0
    detection window size: 80 80
    C: 250
    nuclear norm regularizer: 8
    cell_size: 8
    num filters: 66
    num images: 493
    Train detector (precision,recall,AP): 0.991781  0.85782 0.857341
    singular value threshold: 0.19

The front-rotate-left detector:
    trained on mirrored set of labeled_faces_in_the_wild/frontal_faces.xml
    upsampled each image by 2:1
    used pyramid_down<6>
    rotated left 27 degrees
    loss per missed target: 1
    epsilon: 0.05
    padding: 0
    detection window size: 80 80
    C: 700
    nuclear norm regularizer: 9
    cell_size: 8
    num images: 4748
    singular value threshold: 0.12

The front-rotate-right detector:
    trained on mirrored set of labeled_faces_in_the_wild/frontal_faces.xml
    upsampled each image by 2:1
    used pyramid_down<6>
    rotated right 27 degrees
    loss per missed target: 1
    epsilon: 0.05
    padding: 0
    detection window size: 80 80
    C: 700
    nuclear norm regularizer: 9
    cell_size: 8
    num filters: 89
    num images: 4748
    Train detector (precision,recall,AP):        1 0.897369 0.897369
    singular value threshold: 0.15
*/
2.3.4 代码流程图

三 人脸检测器的训练(CNN)
3.1 源代码
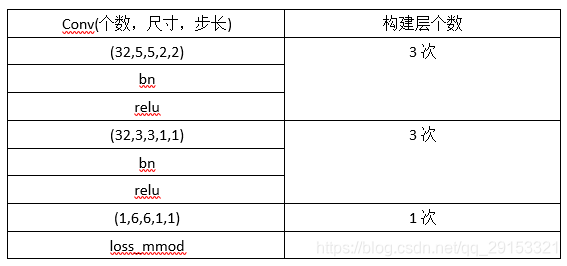
源代码为dlib/examples/dnn_mmod_ex.cpp,主要网络构建部分:
// A 5x5 conv layer that does 2x downsampling
template <long num_filters, typename SUBNET> using con5d = con<num_filters, 5, 5, 2, 2, SUBNET>;
// A 3x3 conv layer that doesn't do any downsampling
template <long num_filters, typename SUBNET> using con3 = con<num_filters, 3, 3, 1, 1, SUBNET>;

// Now we can define the 8x downsampling block in terms of conv5d blocks.  We
// also use relu and batch normalization in the standard way.
template <typename SUBNET> using downsampler = relu<bn_con<con5d<32, relu<bn_con<con5d<32, relu<bn_con<con5d<32, SUBNET>>>>>>>>>;

// The rest of the network will be 3x3 conv layers with batch normalization and
// relu.  So we define the 3x3 block we will use here.
template <typename SUBNET> using rcon3 = relu<bn_con<con3<32, SUBNET>>>;

// Finally, we define the entire network.   The special input_rgb_image_pyramid
// layer causes the network to operate over a spatial pyramid, making the detector
// scale invariant.
using net_type = loss_mmod<con<1, 6, 6, 1, 1, rcon3<rcon3<rcon3<downsampler<input_rgb_image_pyramid<pyramid_down<6>>>>>>>>;
3.2 卷积网络模型结构
3.3 代码流程图