
上一节说到Activity是Android程序的表示层,程序的每一个显示屏幕就是一个Activity。但是Activity是不能直接显示在屏幕上的,直接显示在屏幕上的是Layout文件中放置的各种View(Button,TextView...)控件,学习过.Net开发的就会感觉很像WebForm,Activity相当于页面的后台.cs代码,而Layout就相当于前台的.aspx页面。通常在一个Layout文件中放置多个控件之前,我们需要先定义这个Layout所用的布局方式,布局方式的定义在Layouts内包含的控件中:

这些Layouts布局控件全部继承于ViewGroup这个抽象类,同时View也继承于ViewGroup。ViewGroup的功能就是装载和管理下一层的View对象或ViewGroup对象,也就说它是一个容纳其它元素的的容器。ViewGroup中,还定义了一个内部类ViewGroup.LayoutParams。这个类定义了对象的位置、大小等属性,View通过LayoutParams中的这些属性值来告诉父级,它们将如何放置。
1.帧布局 FrameLayout:
FrameLayout是最简单的布局对象。在它里面的的所有显示对象都将固定在屏幕的左上角,不能指定位置,后一个会直接覆盖在前一个之上显示:

如图所示第二个TextView直接覆盖在了第一个TextView上面。
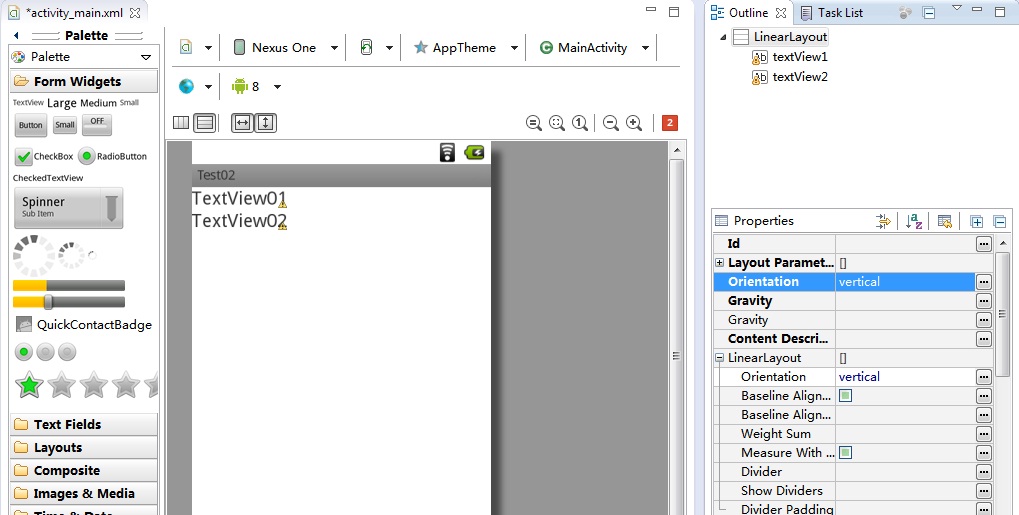
2.线性布局 LinearLayout:
LinearLayout是最常用的布局之一,也是RadioGroup, TabWidget, TableLayout, TableRow, ZoomControls类的父类,它里面所有显示的对象都以垂直或水平的方式排列(通过设置LinearLayout的Orentation属性来设置排列方式):
3.相对布局 RelativeLayout:
RelativeLayout 允许子元素指定它们相对于其父元素或兄弟元素的位置,是实际布局中最常用的布局方式之一。它灵活性大、属性也多,操作难度比较大,属性之间产生冲突的的可能性也大,使用相对布局时需要多做测试。

 1     <RelativeLayout xmlns:android="http://schemas.android.com/apk/res/android"
 2         android:layout_width="fill_parent"
 3         android:layout_height="fill_parent" >
 4
 5         <ImageView
 6             android:id="@+id/imageView1"
 7             android:layout_width="wrap_content"
 8             android:layout_height="wrap_content"
 9             android:layout_alignParentTop="true"
10             android:layout_centerHorizontal="true"
11             android:layout_marginTop="20dp"
12             android:src="@drawable/test" />
13
14         <TextView
15             android:id="@+id/textView1"
16             android:layout_width="wrap_content"
17             android:layout_height="wrap_content"
18             android:layout_below="@id/imageView1"
19             android:layout_centerHorizontal="true"
20             android:text="在imageView1下方"
21             android:textSize="15sp" />
22
23         <TextView
24             android:id="@+id/textView2"
25             android:layout_width="wrap_content"
26             android:layout_height="wrap_content"
27             android:layout_below="@id/textView1"
28             android:layout_centerHorizontal="true"
29             android:text="在testView1下方"
30             android:textSize="15sp" />
31
32     </RelativeLayout>
RelativeLayout用到的一些重要的属性:
第一类:属性值为true或false
android:layout_centerHrizontal -------------------------------水平居中
android:layout_centerVertical ---------------------------------垂直居中
android:layout_centerInparent --------------------------------相对于父元素完全居中
android:layout_alignParentBottom ----------------------------贴紧父元素的下边缘
android:layout_alignParentLeft --------------------------------贴紧父元素的左边缘
android:layout_alignParentRight ------------------------------贴紧父元素的右边缘
android:layout_alignParentTop --------------------------------贴紧父元素的上边缘
android:layout_alignWithParentIfMissing ----------------------如果对应的兄弟元素找不到的话就以父元素做参照物
第二类:属性值必须为id的引用名“@id/id-name”
android:layout_below -----------------------------------------在某元素的下方
android:layout_above ----------------------------------------在某元素的的上方
android:layout_toLeftOf --------------------------------------在某元素的左边
android:layout_toRightOf -------------------------------------在某元素的右边
android:layout_alignTop --------------------------------------本元素的上边缘和某元素的的上边缘对齐
android:layout_alignLeft --------------------------------------本元素的左边缘和某元素的的左边缘对齐
android:layout_alignBottom ----------------------------------本元素的下边缘和某元素的的下边缘对齐
android:layout_alignRight -------------------------------------本元素的右边缘和某元素的的右边缘对齐
第三类:属性值为具体的像素值,如30dip,40px
android:layout_marginBottom --------------------------------离某元素底边缘的距离
android:layout_marginLeft ------------------------------------离某元素左边缘的距离
android:layout_marginRight ----------------------------------离某元素右边缘的距离
android:layout_marginTop ------------------------------------离某元素上边缘的距离
4.表格布局 TableLayout:
TableLayout以行列的形式管理子元素,每一行是一个TableRow布局对象,当然也可以是普通的View对象,TableRow离每放一个元素就是一列,总列数由列数最多的那一行决定。

 1     <TableLayout xmlns:android="http://schemas.android.com/apk/res/android"
 2         android:layout_width="fill_parent"
 3         android:layout_height="fill_parent"
 4         android:stretchColumns="*" >
 5
 6         <TableRow
 7             android:id="@+id/tableRow1"
 8             android:layout_width="fill_parent"
 9             android:layout_height="fill_parent" >
10
11             <TextView
12                 android:id="@+id/textView1"
13                 android:layout_width="wrap_content"
14                 android:layout_height="wrap_content"
15                 android:layout_gravity="center"
16                 android:layout_span="2"
17                 android:text="第一行合并两列居中"
18                 android:textSize="20sp" />
19
20         </TableRow>
21
22         <TableRow
23             android:id="@+id/tableRow2"
24             android:layout_width="wrap_content"
25             android:layout_height="wrap_content" >
26
27             <TextView
28                 android:id="@+id/textView2"
29                 android:layout_width="wrap_content"
30                 android:layout_height="wrap_content"
31                 android:text="第一行第一列" />
32
33             <TextView
34                 android:id="@+id/textView3"
35                 android:layout_width="wrap_content"
36                 android:layout_height="wrap_content"
37                 android:text="第一行第二列" />
38
39         </TableRow>
40
41         <TableRow
42             android:id="@+id/tableRow3"
43             android:layout_width="wrap_content"
44             android:layout_height="wrap_content" >
45
46             <Button
47                 android:id="@+id/button1"
48                 android:layout_width="wrap_content"
49                 android:layout_height="wrap_content"
50                 android:text="第二行第一列" />
51
52             <Button
53                 android:id="@+id/button2"
54                 android:layout_width="wrap_content"
55                 android:layout_height="wrap_content"
56                 android:text="第二行第二列" />
57
58         </TableRow>
59
60     </TableLayout>
android:layout_span="2"是设置该TextView占据2列(我在界面设计器里面没找到TextView的Span属性,所以是在xml文件里面直接添加的),android:stretchColumns="*"是设置该TableLayout的所有列都自动扩展,如果不设置自动扩展每行列宽会根据显示的内容改变。

TableLayout的几个重要属性:
stretchColumns ------------------------------设置自动伸展那些列,列ID从0开始,多个列的话用”,”分隔
shrinkColumns -------------------------------设置自动收缩那些列,列ID从0开始,多个列的话用”,”分隔
转载于:https://my.oschina.net/secyaher/blog/274464