1. 前言
对于Java/Android开发工程师来说,已经掌握了Java语言,这时再学其他语言(C/C++除外),都是比较容易的,可能花上几个小时就能入门了。
作为一个Android开发工程师,这两天一时兴起,学了下Python,在此记录下。
站在Java/Android开发工程师的角度,本文只保留最重要、能满足日常使用的python语法,让Java/Android开发工程师在尽可能少的时间里,看一眼、敲一遍代码,就能入门Python。
2. 配置环境
2.1 安装Python
首先,我们需要安装Python
Python下载地址 : https://www.python.org/downloads/

当然,官网下载可能会比较慢,所以可以从我提供的网盘里下载 : python-3.8.6-amd64.zip
2.2 安装pycharm
编写Python可以用pycharm这个IDE,和Android Studio、IntelliJ IDEA一样,都是JetBrains出品的,快捷键啥的都一样,对于Java/Android工程师来说几乎没有适应成本。这里入门的话使用社区版(免费版)就可以了。
pycharm下载地址 : https://www.jetbrains.com/zh-cn/pycharm/

同样,官网下载可能会比较慢,可以从我提供的网盘里下载 pycharm-community-2023.2.1.exe
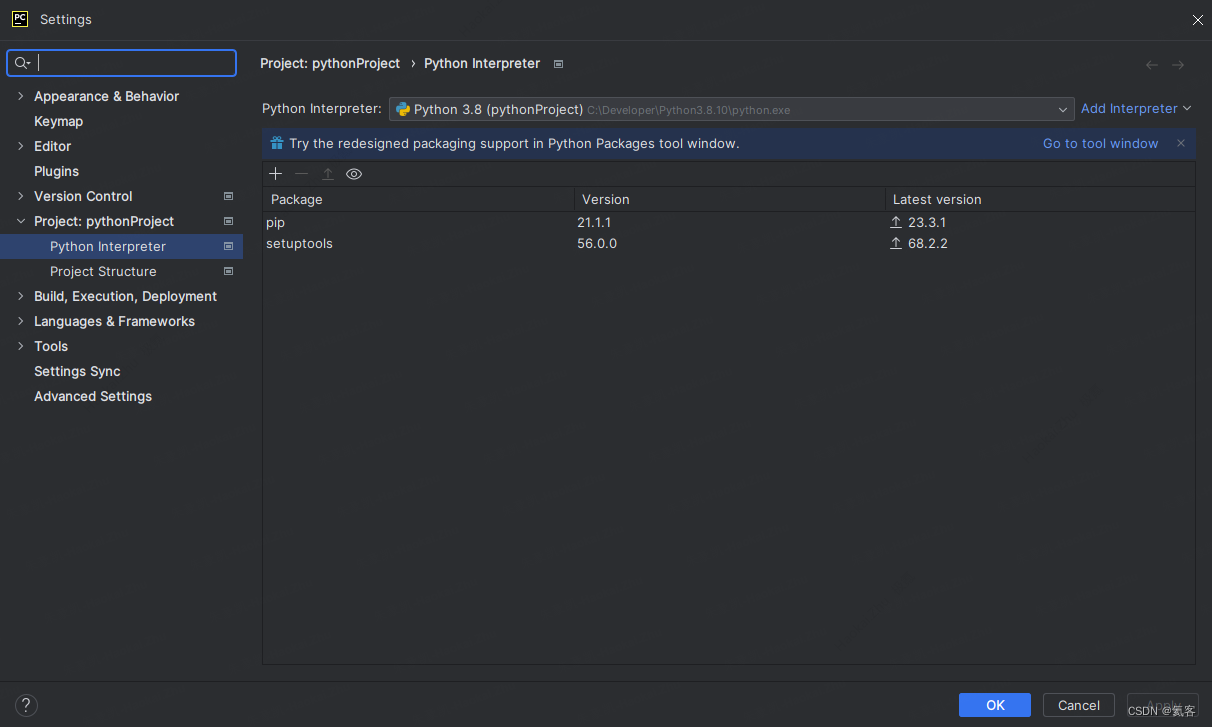
2.3 配置pycharm
安装好pycharm后,记得配置Python解释器(Python Interceptor),选择Python安装路径中的python.exe
3. Python基础
3.1 定义变量
和java不同的是,Python是一种动态类型语言,这意味着不需要预先声明变量的类型。Python会根据赋予给变量的值自动确定变量的类型。

name = "Heiko"
3.2 数据类型
python的主要数据类型有如下这些
- 整数 :
int - 浮点型 :
float - 布尔类型 :
bool- 真
Ture:1 - 假
False:0
- 真
- 字符串 :
str,引号引起来的就是字符串 - 列表 :
list,[1,2,3,4] - 字典 :
dict,{'name':'小明',age:20}
type()函数可以获取变量的数据类型
3.3 类型转换
int(): 转成int类型float(): 转成float类型str(): 转成字符串类型
value = "10"
intValue = int(value)
floatValue = float(value)
3.4 打印日志
print('hello world')
3.5 输入
用键盘输入内容,回车后,input()会获取到输入的内容
result = input('请输入名字')
print(result)
3.6 格式化内容
%为格式化占位符
%d: 填充整形数据digit%f: 填充浮点型数据float%s: 占位,填充 字符串数据string(其实可以填充任意类型的数据)
name = "Heiko"
age = 20
height = 1.90
print('我的名字是%s,年龄是%d,身高是%.2f' %(name, age, height))
3.7 f 字符串格式化
name = "Heiko"
age = 20
height = 1.90
print(f'我的名字是{

      name},年龄是{

      age},身高是{

      height}')
3.8 算数运算符
| 运算符 | 描述 |
|---|---|
| + | 加 |
| - | 减 |
| * | 乘 |
| / | 除 |
| // | 求商 |
| % | 求余数 |
| ** | 指数运算 |
3.9 比较运算符
>大于<小于>=大于等于<=小于等于==等于!=不等于
3.10 逻辑运算符
and逻辑与or逻辑或not逻辑非,取反
3.11 if-else
price = 5.6
if price > 10:
    print("太贵了")
else:
    print("还能接受")
输出结果
还能接受
3.12 while循环
i = 0
while i < 5:
    print(f"i:{

      i}")
    i += 1
输出结果
i:0
i:1
i:2
i:3
i:4
3.13 for循环
for i in 容器
	重复执行的代码
例如
my_text = "hello world!"
for i in my_text:
	print(i)
打印结果
h
e
l
l
o

w
o
r
l
d
!
4. 容器
4.1 字符串
字符串是容器,因为字符串中可以包含多个字符
my_text = "hello world!"
print(my_text[3:7])  # 从索引3开始,到索引7
find = my_text.find("world")
print(f"是否找到:{

      find}") # 如果没找到返回-1,如果找到返回具体索引
re_text = my_text.replace("h","g")  # 替换
print(re_text)
split_text = my_text.split(" ")  # 以空格为分隔符进行分割
print(split_text)
list1 = ['good','good','study']
join_text = " ".join(list1)  # 使用空格连起来 good good study
print(join_text)
执行结果
lo w
是否找到:6
gello world!
['hello', 'world!']
good good study
4.2 列表
list2 = list("hello")  # 转换字符串会将字符串中的每个字符作为一个数据存储到列表中
list3 = []
list4 = [1, "Heiko", 190, True]
# 获取第一个数据
print(list2[0])
# 获取最后一个数据
print(list2[-1])
# 第一第二个数据
print(list2[0:2])
# 获取列表长度
print(len(list2))
# 查找下标
index = list2.index("e")
print(f"e的下标:{

      index}")
# 判断是否存在
exist = "e" in list2
print(f"e是否在list2中存在:{

      exist}")
# 统计出现的次数
e_count = list2.count("e")
print(f"e出现的次数:{

      e_count}")
# 添加数据
list3.append("w")
print(list3)
list3.extend(list4)
print(list3)
# 修改操作
list3[0] = "Q"
print(list3)
# 删除操作
deleteItem = list3.pop(0)
print(f"删除了:{

      deleteItem} list3:{

      list3}")
deleteItem = list3.remove(190)
print(f"list3:{

      list3}")
执行结果
h
o
['h', 'e']
5
e的下标:1
e是否在list2中存在:True
e出现的次数:1
['w']
['w', 1, 'Heiko', 190, True]
['Q', 1, 'Heiko', 190, True]
删除了:Q list3:[1, 'Heiko', 190, True]
list3:[1, 'Heiko', True]
4.3 元组
元组和列表非常相似,元组中可以存放任意类型的数据。
区别在于元组中的数据内容不能改变,列表中的可以改变,元组使用(),列表使用[]。
应用:在函数的传参或返回值中使用,保证数据不会被修改
由于元组中的数据不能修改,所以只有查看的方法 index、count、in、len()
# 定义元组
tuple1 = tuple()
tuple2 = tuple([1, 2, 3])
print(tuple2)
tuple3 = tuple("hello")
print(tuple3)
tuple4 = (1, "Heiko", 190, False)
print(tuple4)
# 定义只有一个数据的元组时,数据后边必须有一个逗号
tuple5 = (1,)
print(tuple5)
执行结果
(1, 2, 3)
('h', 'e', 'l', 'l', 'o')
(1, 'Heiko', 190, False)
(1,)
4.4 字典
# 字典 : 由键(key)值(value)对组成
# 定义字典
dict1 = dict()
dict2 = {

    }
dict3 = {

    "name": "Heiko", "age": 20, "like": ["写程序", "摄影"]}
print(dict3)
# 修改
dict3["age"] = 25
print(dict3)

# 遍历
for value in dict3:
    print(value)

# 删除
dict3.pop("age")
print(dict3)
# 清空
dict3.clear()
print(dict3)
执行结果
{'name': 'Heiko', 'age': 20, 'like': ['写程序', '摄影']}
{'name': 'Heiko', 'age': 25, 'like': ['写程序', '摄影']}
name
age
like
{'name': 'Heiko', 'like': ['写程序', '摄影']}
{}
5. 函数
5.1 定义函数
在Python中,可以使用def关键字来定义一个函数
def 函数名(参数列表):
    函数体
例如
def func_test():
    print("hahaha")
    print("func test")
然后在main函数中进行调用即可
if __name__ == '__main__':
5.2 函数返回多个值
函数返回多个值,其实就是使用元祖返回
def func_test1():
    tuple1 = ("Heiko", 20)
    return tuple1
可以进行简化
def func_test1():
    return "Heiko", 20
进行调用,返回值
name, age = func_test1()
    print(f"名字:{

      name} 年龄:{

      age}")
执行结果
名字:Heiko 年龄:20
6. 面向对象
6.1 定义对象
这里定义了一个Student对象,然后声明了eat()、sleep()、year()这几个方法,__init__()方法是初始化方法,__str__()方法相当于Java中的toString()方法
class Student:
    def __init__(self, name, age):
        self.name = name
        self.age = age

    def __str__(self):
        return f"姓名:{

      self.name},年龄:{

      self.age} 岁"

    def eat(self):
        print(f"{

      self.name} 要吃饭")

    def sleep(self):
        print(f"{

      self.name} 要睡觉")

    def year(self):
        self.age += 1
进行调用
student1 = Student("Heiko", 18)
print(student1)
student1.eat()
student1.sleep()
student1.year()
执行结果
姓名:Heiko,年龄:18 岁
Heiko 要吃饭
Heiko 要睡觉
6.2 类继承
Python中的类继承是写在()里面的,即 class 子类(父类):
class Amimal :
    def eat(self):
        print("要吃东西")

class Dog(Amimal):
    def bark(self):
        print("汪汪汪")
进行调用
dog = Dog()
dog.bark()
dog.eat()
执行结果
汪汪汪
要吃东西