本文实现flutter代码调用Android原生Webview(本文比较长)
1.新建一个Flutter项目
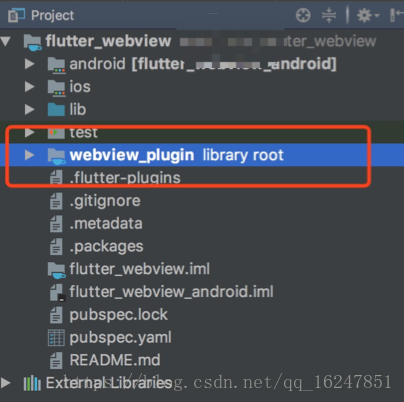
2.在项目根目录下右键new>module>flutter plugin
3.自动生成如下图所示项目结构
其中webview_plugin就是我们新建的WebView插件,名字可以自由命名。
展开webview_plugin文件夹的结构如下:
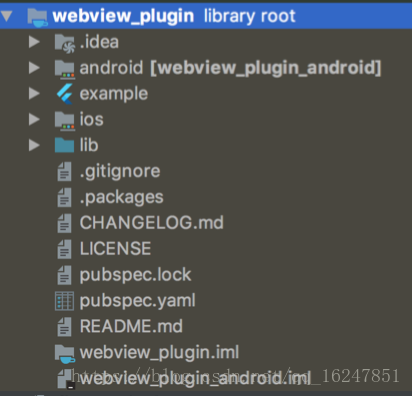
我们目前只关注Android的,所以我们只需要在android文件下写,其他不变,android文件下有个WebviewPlugin.java文件,以下是我修改完的代码:
/**
 * WebviewPlugin
 */
public class WebviewPlugin implements MethodCallHandler {
    private Activity activity;
    private WebView webView;
    private Result result;
    /**
     * Plugin registration.
     */
    public static void registerWith(Registrar registrar) {
        final MethodChannel channel = new MethodChannel(registrar.messenger(), "webview_plugin");
        channel.setMethodCallHandler(new WebviewPlugin(registrar.activity()));
    }

    @TargetApi(Build.VERSION_CODES.ECLAIR_MR1)
    public WebviewPlugin(Activity activity) {
        this.activity = activity;
        webView=new WebView(activity);
        webView.getSettings().setJavaScriptEnabled(true);
        webView.getSettings().setLoadWithOverviewMode(true);
        webView.getSettings().setCacheMode(WebSettings.LOAD_NO_CACHE);
        webView.getSettings().setLoadsImagesAutomatically(true);// 加载网页中的图片
        webView.getSettings().setUseWideViewPort(true); //设置使用视图的宽端口
        webView.getSettings().setAllowFileAccess(true);// 可以读取文件缓存(manifest生效)
        if (Build.VERSION.SDK_INT >= Build.VERSION_CODES.LOLLIPOP) {
         webView.getSettings().setMixedContentMode(WebSettings.MIXED_CONTENT_ALWAYS_ALLOW);
        }
    }

    @Override
    public void onMethodCall(MethodCall call, Result result) {
        this.result=result;
        switch (call.method) {
            case "load":
                FrameLayout.LayoutParams params = buildLayoutParams(call);
                LinearLayout linearLayout=new LinearLayout(activity);
                linearLayout.setOrientation(LinearLayout.VERTICAL);
                final TextView titleView=new TextView(activity);
                titleView.setSingleLine(true);
                titleView.setEllipsize(TextUtils.TruncateAt.END);
                titleView.setTextColor(Color.parseColor("#FFFFFF"));
              titleView.setPadding(dp2px(activity,10),dp2px(activity,20),dp2px(activity,10),0);
                ViewGroup.LayoutParams titleViewParams= new ViewGroup.LayoutParams(ViewGroup.LayoutParams.MATCH_PARENT,ViewGroup.LayoutParams.MATCH_PARENT);
                titleView.setLayoutParams(titleViewParams);
                titleView.setText("我是标题");
                titleView.setGravity(Gravity.CENTER);
                ViewGroup.LayoutParams layoutParams= new ViewGroup.LayoutParams(ViewGroup.LayoutParams.MATCH_PARENT,dp2px(activity,70));
                titleView.setLayoutParams(layoutParams);
                titleView.setBackgroundColor(Color.parseColor("#4876FF"));
                linearLayout.addView(titleView);
                linearLayout.addView(webView);
                activity.addContentView(linearLayout, params);
                webView.setWebViewClient(new MyWebViewClient(activity, (title, isError) -> titleView.setText(title)));

                webView.loadUrl(call.argument("url").toString());
                break;
        }
    }


    public class MyWebViewClient extends WebViewClient {
        private final WebClientLoadListener loadListener;
        Activity activity;

        private boolean isError;

        public MyWebViewClient(Activity activity, WebClientLoadListener loadListener) {
            this.activity = activity;
            this.loadListener = loadListener;
        }

        @Override
        public boolean shouldOverrideUrlLoading(WebView view, String url) {
            return super.shouldOverrideUrlLoading(view, url);
        }

        @Override
        public void onPageStarted(WebView view, String url, Bitmap favicon) {
            super.onPageStarted(view, url, favicon);
            isError = false;
        }

        @Override
        public void onReceivedError(WebView view, WebResourceRequest request, WebResourceError error) {
            super.onReceivedError(view, request, error);
            isError = true;
        }

        /**
         * 界面加载完后回调
         *
         * @param view
         * @param url
         */
        @Override
        public void onPageFinished(WebView view, String url) {
            String title = view.getTitle(); // 获取网页标题
            loadListener.loadFinished(title, isError);
            super.onPageFinished(view, url);
        }

    }

    public interface WebClientLoadListener {
        void loadFinished(String title, boolean isError);
    }


    @TargetApi(Build.VERSION_CODES.HONEYCOMB_MR2)
    private FrameLayout.LayoutParams buildLayoutParams(MethodCall call) {
        Map<String, Number> rc = call.argument("rect");
        FrameLayout.LayoutParams params;
        if (rc != null) {
            params = new FrameLayout.LayoutParams(
                    dp2px(activity, rc.get("width").intValue()), dp2px(activity, rc.get("height").intValue()));
            params.setMargins(dp2px(activity, rc.get("left").intValue()), dp2px(activity, rc.get("top").intValue()),
                    0, 0);
        } else {
            Display display = activity.getWindowManager().getDefaultDisplay();
            Point size = new Point();
            display.getSize(size);
            int width = size.x;
            int height = size.y;
            params = new FrameLayout.LayoutParams(width, height);
        }
        return params;
    }

    private int dp2px(Context context, float dp) {
        final float scale = context.getResources().getDisplayMetrics().density;
        return (int) (dp * scale + 0.5f);
    }
}
其中registerWith(Registrar registrar)就是注册插件的方法,这个不用改
   public static void registerWith(Registrar registrar) {
        final MethodChannel channel = new MethodChannel(registrar.messenger(), "webview_plugin");
        channel.setMethodCallHandler(new WebviewPlugin(registrar.activity()));
    }
最主要的是onMethodCall(MethodCall call, Result result)方法,以下call.method是约定的方法名,外面通过此方法与原生的进行通讯,在此plugin里我只约定了“load”这个方法,其他方法照写,我这个plugin比较简单,就一个LinnearLayout里包含一个Textview(标题)和WebView,详情代码见如下,最后执行activity.addContentView(linearLayout, params)来实现创建布局。
    @Override
    public void onMethodCall(MethodCall call, Result result) {
        this.result=result;
        switch (call.method) {
            case "load":
                FrameLayout.LayoutParams params = buildLayoutParams(call);
                LinearLayout linearLayout=new LinearLayout(activity);
                linearLayout.setOrientation(LinearLayout.VERTICAL);
                final TextView titleView=new TextView(activity);
                titleView.setSingleLine(true);
                titleView.setEllipsize(TextUtils.TruncateAt.END);
                titleView.setTextColor(Color.parseColor("#FFFFFF"));
                titleView.setPadding(dp2px(activity,10),dp2px(activity,20),dp2px(activity,10),0);
                ViewGroup.LayoutParams titleViewParams= new ViewGroup.LayoutParams(ViewGroup.LayoutParams.MATCH_PARENT,ViewGroup.LayoutParams.MATCH_PARENT);
                titleView.setLayoutParams(titleViewParams);
                titleView.setText("我是标题");
                titleView.setGravity(Gravity.CENTER);
                ViewGroup.LayoutParams layoutParams= new ViewGroup.LayoutParams(ViewGroup.LayoutParams.MATCH_PARENT,dp2px(activity,70));
                titleView.setLayoutParams(layoutParams);
                titleView.setBackgroundColor(Color.parseColor("#4876FF"));
                linearLayout.addView(titleView);
                linearLayout.addView(webView);
                activity.addContentView(linearLayout, params);
                webView.setWebViewClient(new MyWebViewClient(activity, (title, isError) -> titleView.setText(title)));
                webView.loadUrl(call.argument("url").toString());
                break;
        }
    }
接下来就是写plugin包下的的WebviewPlugin.dart文件,这个文件才是相当于一个桥梁,连接着我们的Android代码,也提供了供flutter代码调用的方法,以下我们只声明了一个 launch(String url,Function callback, { Rect rect,}) 方法,url和callback(相当于java中的接口)和可选参数Rect(设置plugin的位置和大小),完成这几个文件,我们就基本完成了Plugin的构建了。
import 'dart:async';
import 'dart:ui';
import 'package:flutter/services.dart';

class WebviewPlugin {
  static const MethodChannel _channel = const MethodChannel('webview_plugin');

  static Future<String> get platformVersion async {
    final String version = await _channel.invokeMethod('getPlatformVersion');
    return version;
  }

  //声明plugin加载的方法,参数为url,callback回调,和可选参数Rect(控制)plugin的大小
  Future<Null> launch(
    String url,
    Function callback, {
    Rect rect,
  }) async {
    Map<String, dynamic> args = {
      "url": url,
    };
    if (rect != null) {
      args["rect"] = {
        "left": rect.left,
        "top": rect.top,
        "width": rect.width,
        "height": rect.height
      };
    }
    final String result = await _channel.invokeMethod('load', args);

    if (callback != null) {
      callback(result);
    }
  }
}
下面我们开始来示范如何调用我们完成的了的这个webview_plugin,以下看我们主项目中lib文件夹下的main.dart的代码
首先声明final flutterWebviewPlugin = new WebviewPlugin();
然后点击事件触发以下flutterWebviewPlugin.launch方法,参数依次是url,callbacl和Rect
flutterWebviewPlugin.launch( "https://blog.csdn.net/qq_16247851/article/details/81210771", (data) { setState(() { title = data; }); },rect: new Rect.fromLTWH(0.0, 0.0, MediaQuery.of(context).size.width, MediaQuery.of(context).size.height));
import 'dart:async';
import 'package:flutter/material.dart';
import 'package:webview_plugin/webview_plugin.dart';

void main() => runApp(new MyApp());

class MyApp extends StatelessWidget {
  @override
  Widget build(BuildContext context) {
    return new MaterialApp(
      title: 'Webview',
      theme: new ThemeData(
        primarySwatch: Colors.blue,
      ),
      home: new MyHomePage(title: 'Flutter Demo Home Page'),
    );
  }
}

class MyHomePage extends StatefulWidget {
  MyHomePage({Key key, this.title}) : super(key: key);

  final String title;

  @override
  _MyHomePageState createState() => new _MyHomePageState();

  @override
  initState() {}
}

class _MyHomePageState extends State<MyHomePage> {
  StreamSubscription<String> _back;
  var title = "demo";

  final flutterWebviewPlugin = new WebviewPlugin();

  @override
  Widget build(BuildContext context) {
    return new Scaffold(body: new Center(
      child: new RaisedButton(onPressed: () {
        flutterWebviewPlugin.launch(
            "https://blog.csdn.net/qq_16247851/article/details/81210771",
            (data) {
          setState(() {
            title = data;
          });
        },
            rect: new Rect.fromLTWH(0.0, 0.0, MediaQuery.of(context).size.width,
                MediaQuery.of(context).size.height));
      }),
    ));
  }

  @override
  void initState() {
    // TODO: implement initState
    super.initState();
  }
}
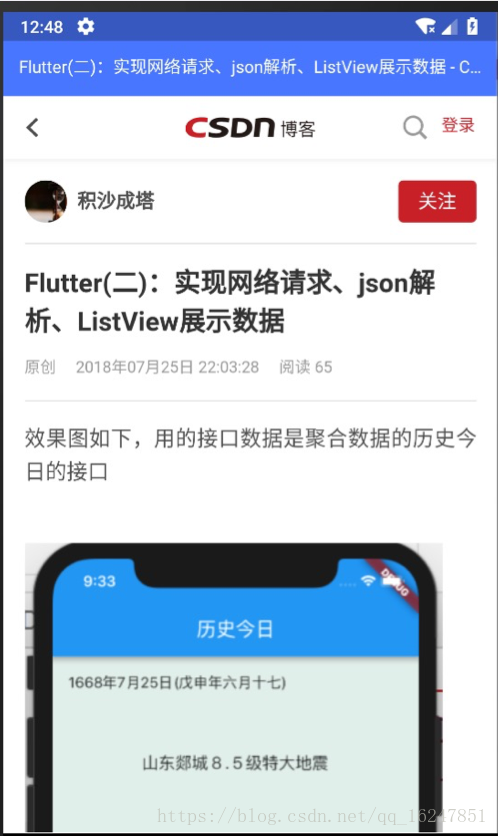
这样下来整个项目基本完成了,效果图如下(蓝色部分为头部,内容为网页的title,下面部分是webview):