背景
Flutter是谷歌的移动UI框架,可以快速在iOS和Android上构建高质量的原生用户界面。 Flutter可以与现有的代码一起工作。在全世界,Flutter正在被越来越多的开发者和组织使用,并且Flutter是完全免费、开源的。1.0版本于2018年12月5日(北京时间)发布。

安装环境和配置
1.获取 Flutter SDK
-
下载下面的安装包以获取最新版本 stable 的 Flutter SDK
flutter_windows_v1.5.4-hotfix.2-stable.zip
要查看其他发行通道和以往的版本,请参阅SDK 归档页面。
-
将压缩包解压,然后把其中的
flutter目录整个放在你预想的 Flutter SDK 安装目录中(比如C:\src\flutter;请勿将该目录放在一些需要额外操作权限的目录,比如C:\Program Files\)。 -
找到
flutter目录中的 `flutter_console.bat’ 文件,双击执行该批处理脚本。
好的,现在你可以在控制台当中使用 Flutter 的命令了。
2.更新 path 环境变量
如果你想要在普通的 Windows 控制台中使用 Flutter 命令,那就需要按照下面的步骤来将 Flutter 的二进制文件路径加入到 PATH环境变量。
- 在开始菜单的搜索功能键入“env”,然后选择编辑当前用户的环境变量
- 在 User variables 一栏中,检查是否有 Path 这个条目:
- 如果存在,直接把
flutter\bin目录的完整路径以;作为分隔加到已有的值后面。 - 如果不存在的话,在用户环境变量中创建一个新的
Path变量,然后将flutter\bin所在的完整路径作为新变量的值。
- 如果存在,直接把
注意,你需要关闭和重新启动已经打开的各个控制台窗口,这样下次启动控制台时才能访问到刚才修改的变量。
3.运行 flutter doctor
在将 Path 变量更新后,打开一个新的控制台窗口,然后将下面的命令输入进去执行。如果它提示有任何的平台相关依赖,那么你就需要按照指示完成这些配置:
C:\src\flutter>flutter doctorcm
上述命令会检查你的现有环境,然后把检测结果以报告形式呈现出来。仔细阅读它显示的内容,检查是否有尚未安装的软件或是有其他的步骤需要完成(通常会以粗体呈现)。
举个例子:
[-] Android toolchain - develop for Android devices
    • Android SDK at D:\Android\sdk
    ✗ Android SDK is missing command line tools; download from https://goo.gl/XxQghQ
    • Try re-installing or updating your Android SDK,
      visit https://flutter-io.cn/setup/#android-setup for detailed instructions.
对于安卓开发者来说,Android Studio 为 Flutter 提供了一个完整的集成开发环境。安装过程如下:
- 打开 Android Studio。
- 打开插件设置(macOS 系统打开 Preferences > Plugins, Windows 和 Linux 系统打开 File > Settings > Plugins)。
- 选择 Browse repositories,然后选择 Flutter 插件并点击 安装。
- 当弹出安装 Dart 插件提示时,点击 Yes。
- 当弹出重新启动提示时,点击 Restart。
创建应用
- 打开 Android Studio,选择 新 Flutter 项目 (Start a new Flutter project).
- 选择 Flutter 应用程序 作为项目类型, 然后点 下一步
- 确认 Flutter SDK 路径 区域所示路径是正确的 SDK 路径。 如果你还没有安装 SDK,需要先进行安装,选择 Install SDK…。
- 输入项目名称(比如 ‘myapp’), 然后点击下一步。
- 点击 完成。
- 待 Android Studio 安装 SDK 后,创建项目。
运行程序
- 找到 Android Studio 的工具条:

- 在 目标选择器, 选择一个 Android 设备来运行程序。 如果列表里没有可用设备,选择 **工具 > Android > AVD Manager 然后在这个窗口中创建一个新的虚拟机。更多详细介绍,参见管理 AVDs。
- 点击工具栏中的 Run 图标,或者在菜单中选择 Run > Run。
当应用编译完成后,就可以在设备上运行这个起步应用了。
 Starter app
尝试热重载 (hot reload)
Flutter 通过 热重载 提供快速开发周期,该功能支持应用程序在运行状态下重载代码 而无需重新启动应用程序或者丢失程序运行状态。 修改一下代码,然后告诉IDE或者命令行工具你需要热重载, 然后看一下模拟器或者设备上应用的变化
-
打开
lib/main.dart。import 'package:flutter/material.dart'; void main() => runApp(MyApp()); class MyApp extends StatelessWidget { // This widget is the root of your application. @override Widget build(BuildContext context) { return MaterialApp( title: 'Flutter Demo', theme: ThemeData( // This is the theme of your application. // // Try running your application with "flutter run". You'll see the // application has a blue toolbar. Then, without quitting the app, try // changing the primarySwatch below to Colors.green and then invoke // "hot reload" (press "r" in the console where you ran "flutter run", // or simply save your changes to "hot reload" in a Flutter IDE). // Notice that the counter didn't reset back to zero; the application // is not restarted. primarySwatch: Colors.blue, ), home: MyHomePage(title: 'Flutter Demo Home Page'), ); } } class MyHomePage extends StatefulWidget { MyHomePage({Key key, this.title}) : super(key: key); // This widget is the home page of your application. It is stateful, meaning // that it has a State object (defined below) that contains fields that affect // how it looks. // This class is the configuration for the state. It holds the values (in this // case the title) provided by the parent (in this case the App widget) and // used by the build method of the State. Fields in a Widget subclass are // always marked "final". final String title; @override _MyHomePageState createState() => _MyHomePageState(); } class _MyHomePageState extends State<MyHomePage> { int _counter = 0; void _incrementCounter() { setState(() { // This call to setState tells the Flutter framework that something has // changed in this State, which causes it to rerun the build method below // so that the display can reflect the updated values. If we changed // _counter without calling setState(), then the build method would not be // called again, and so nothing would appear to happen. _counter++; }); } @override Widget build(BuildContext context) { // This method is rerun every time setState is called, for instance as done // by the _incrementCounter method above. // // The Flutter framework has been optimized to make rerunning build methods // fast, so that you can just rebuild anything that needs updating rather // than having to individually change instances of widgets. return Scaffold( appBar: AppBar( // Here we take the value from the MyHomePage object that was created by // the App.build method, and use it to set our appbar title. title: Text(widget.title), ), body: Center( // Center is a layout widget. It takes a single child and positions it // in the middle of the parent. child: Column( // Column is also layout widget. It takes a list of children and // arranges them vertically. By default, it sizes itself to fit its // children horizontally, and tries to be as tall as its parent. // // Invoke "debug painting" (press "p" in the console, choose the // "Toggle Debug Paint" action from the Flutter Inspector in Android // Studio, or the "Toggle Debug Paint" command in Visual Studio Code) // to see the wireframe for each widget. // // Column has various properties to control how it sizes itself and // how it positions its children. Here we use mainAxisAlignment to // center the children vertically; the main axis here is the vertical // axis because Columns are vertical (the cross axis would be // horizontal). mainAxisAlignment: MainAxisAlignment.center, children: <Widget>[ Text( 'You have clicked the button this many times:', ), Text( '$_counter', style: Theme.of(context).textTheme.display1, ), ], ), ), floatingActionButton: FloatingActionButton( onPressed: _incrementCounter, tooltip: 'Increment', child: Icon(Icons.add), ), // This trailing comma makes auto-formatting nicer for build methods. ); } } -
修改字符串
'You have pushed the button this many times'改为
'You have clicked the button this many times'
3.保存修改: 选择 Save All,或者点击热重载
你会发现修改后的字符串几乎马上出现在正在运行的应用程序上。
Helloworld来了
替换 lib/main.dart
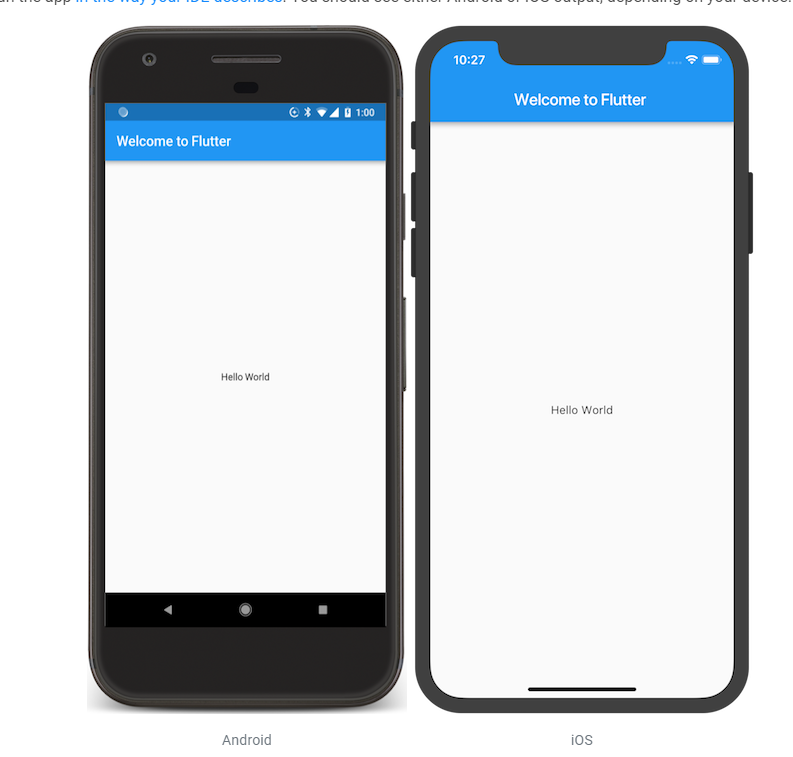
删除 lib/main.dart 中的所有代码,然后替换为下面的代码,它将在屏幕的中心显示”Hello World”。
lib/main.dart
import 'package:flutter/material.dart';

void main() => runApp(MyApp());

class MyApp extends StatelessWidget {
  @override
  Widget build(BuildContext context) {
    return MaterialApp(
      title: 'Welcome to Flutter',
      home: Scaffold(
        appBar: AppBar(
          title: Text('Welcome to Flutter'),
        ),
        body: Center(
          child: Text('Hello World'),
        ),
      ),
    );
  }
}
运行你的工程项目, 根据不同的操作系统,你会看到如下运行结果界面:
观察和分析
- 本示例创建了一个具有 Material Design 风格的应用, Material 是一种移动端和网页端通用的视觉设计语言, Flutter 提供了丰富的 Material 风格的 widgets。
- 主函数(main)使用了 (
=>) 符号,这是 Dart 中单行函数或方法的简写。 - 该应用程序继承了
StatelessWidget,这将会使应用本身也成为一个 widget。 在 Flutter 中,几乎所有都是 widget, 包括对齐 (alignment)、填充 (padding) 和布局 (layout)。 Scaffold是 Material 库中提供的一个 widget, 它提供了默认的导航栏、标题和包含主屏幕 widget 树的 body 属性。 widget 树可以很复杂。- 一个 widget 的主要工作是提供一个
build()方法来描述如何根据其他较低级别的 widgets 来显示自己。 - 本示例中的 body 的 widget 树中包含了一个
Centerwidget, Center widget 又包含一个Text子 widget, Center widget 可以将其子 widget 树对齐到屏幕中心。
遇到的问题
会遇到提示 Waiting for another flutter command to release the startup lock…
然后就一直卡着不动了。
解决办法:
1.先关闭Android Studio,打开任务管理器,看看有没有Dart.exe运行着,有的话全部结束了,然后重启试试
2.还是不行的话就删除掉 flutter\bin\cache目录下的lockfile文件,然后再次重启Android Studio即可
flutter issue: https://github.com/flutter/flutter/issues/7768