简介:
此章介绍一个最基本的SpringBoot Web 应用。体验快速开发、无配置,以及基本的注解。
环境:
1、JDK 1.8
2、开发工具 IDEA 或 STS(下载地址:https://spring.io/tools)
3、Maven (3.3.9)注意配置阿里云镜像,具体配置根据自身开发要求查阅资料。
快速构建:
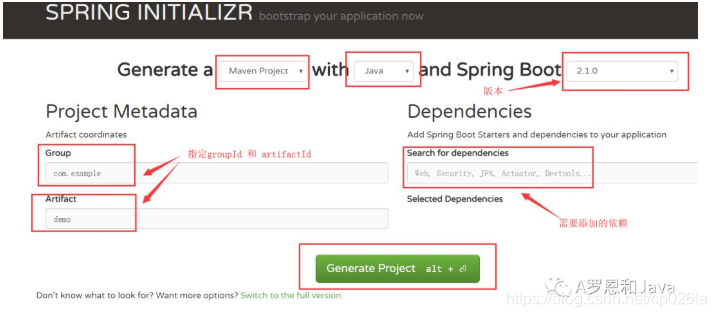
通过官网地址快速构建:https://start.spring.io/ 如下图
解压快速生成的压缩包导入开发工具即可。
1. 主要 pom 依赖如下
根据自己开发需求选择版本、添加依赖:
 <parent>
     <groupId>org.springframework.boot</groupId>
     <artifactId>spring-boot-starter-parent</artifactId>
     <version>1.5.18.BUILD-SNAPSHOT</version>
     <relativePath/> <!-- lookup parent from repository -->
 </parent>

 <properties>
     <project.build.sourceEncoding>UTF-8</project.build.sourceEncoding>
    <project.reporting.outputEncoding>UTF-8</project.reporting.outputEncoding>
    <java.version>1.8</java.version>
</properties>

<dependencies>
    <dependency>
        <groupId>org.springframework.boot</groupId>
        <artifactId>spring-boot-starter-web</artifactId>
    </dependency>

    <dependency>
        <groupId>org.springframework.boot</groupId>
        <artifactId>spring-boot-starter-test</artifactId>
        <scope>test</scope>
    </dependency>
</dependencies>
2. 程序入口类:
 import org.springframework.boot.SpringApplication;
 import org.springframework.boot.autoconfigure.SpringBootApplication;
 /**
  * @Auther: xf
  * @Date: 2018/10/01 13:48
  * @Description:  入口程序
  */
 @SpringBootApplication
 public class DemoApplication {
    public static void main(String[] args) {
        SpringApplication.run(DemoApplication.class, args);
   }
}
@SpringBootApplication 注解: 声明此类为该springboot application 入口类,一个模块有且仅有一个此注解。
3. 测试controller:
 // @RestController 注解: 相当于 @Controller + @ResponseBody
 @RestController
 public class HelloController {

    // @RequestMapping(value = "hello", method = RequestMethod.GET)
    // 等价上面
    @GetMapping(value = "hello")
    public String index() {
        return "Who is your little fox, and who is your rose?";
    }
}
4. 配置文件:
src\main\resources下: application.properties(或者 .yml)
# 项目路径默认/
server.context-path=/demo
# 端口号默认8080
server.port=9000
5. 项目启动、测试:
运行入口类 main 函数即可启动。
Get请求可以使用浏览器输入:http://localhost:9000/demo/hello
至此,一个最简单的 SpringBoot 应用创建完成。
说明:
此博客主要是以学习、分享为主。互联网相关的文章很多,如有雷同,还望包涵,如有错误,希望留言或联系我指出。
联系我:
QQ:1421925880
相关springboot、springcloud、docker等文章关注微信公众号:
