准备工作
1)新建JavaWeb的maven工程
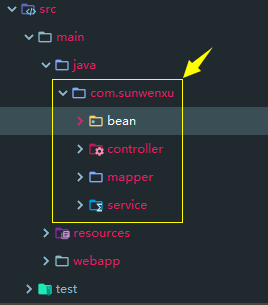
2)建立目录结果如下:
3)配置完下面配置文件,就不要改动了,然后编码时需要注意一下几点就够了
- bean和mapper可以完全可以由逆向工程生成
- service层开发,实现类上面加注解 ** @Service** spring容器会自动扫描并持有该对象
在service需要使用的mapper直接使用** @Autowired ** 注入即可(spring整合mybatis已经自动扫描了全部mapper并完成了映射)
注意事务也是在server中添加的
例:
@Service
@Transactional(isolation = Isolation.DEFAULT,propagation = Propagation.REQUIRED)
public class UserServiceImpl implements UserService {
    @Autowired
    private UserMapper userMapper;
    。。。实现接口方法。。。
 }
- controller层开发,实现类上添加 ** @Controller ** ,然后使用 ** @RequestMapping("/xxxx") ** 配置映射路径即可
在controller中调用service中的类直接使用注入即可(和service层调用mapper一样)
例:
@Controller
public class ProductController {
    @Autowired
    private UserService userService;
    @RequestMapping("/product/getProducts")
    public ModelAndView getProducts(){}
    。。。其他方法。。。
配置文件
1)数据库连接基本信息(db.properties)
jdbc.driver=com.mysql.jdbc.Driver
jdbc.url=jdbc:mysql://localhost:3306/mydb01?characterEncoding=UTF-8
jdbc.username=root
jdbc.password=123456
2)配置日志文件(log4j.properties)
# Global logging configuration
#在开发环境下日志级别设置为debug,生产环境下设置成info或error
log4j.rootLogger=debug, stdout
# Console output...
log4j.appender.stdout=org.apache.log4j.ConsoleAppender
log4j.appender.stdout.layout=org.apache.log4j.PatternLayout
log4j.appender.stdout.layout.ConversionPattern=%5p [%t] - %m%n
3)配置mybatis配置文件(sqlMapconfig.xml)
<?xml version="1.0" encoding="UTF-8" ?>
<!DOCTYPE configuration
        PUBLIC "-//mybatis.org//DTD Config 3.0//EN"
        "http://mybatis.org/dtd/mybatis-3-config.dtd">
<configuration>
    <!--别名-->
    <typeAliases>
        <package name="com.sunwenxu.bean"></package>
    </typeAliases>
</configuration>
4)配置Spring核心配置文件(applicationContext.xml)
<?xml version="1.0" encoding="UTF-8"?>
<beans xmlns:xsi="http://www.w3.org/2001/XMLSchema-instance"
       xmlns="http://www.springframework.org/schema/beans"
       xmlns:context="http://www.springframework.org/schema/context"
       xmlns:aop="http://www.springframework.org/schema/aop"
       xmlns:tx="http://www.springframework.org/schema/tx"
       xsi:schemaLocation="http://www.springframework.org/schema/beans http://www.springframework.org/schema/beans/spring-beans-4.2.xsd
							http://www.springframework.org/schema/context http://www.springframework.org/schema/context/spring-context-4.2.xsd
							http://www.springframework.org/schema/aop http://www.springframework.org/schema/aop/spring-aop-4.2.xsd
							http://www.springframework.org/schema/tx http://www.springframework.org/schema/tx/spring-tx-4.2.xsd ">
    <!--与mybatis整合相关注入-->
    <!--C3P0连接池-->
    <context:property-placeholder location="classpath:db.properties"></context:property-placeholder>
    <bean name="dataSource" class="com.mchange.v2.c3p0.ComboPooledDataSource">
        <property name="driverClass" value="${jdbc.driver}"></property>
        <property name="jdbcUrl" value="${jdbc.url}"></property>
        <property name="user" value="${jdbc.username}"></property>
        <property name="password" value="${jdbc.password}"></property>
    </bean>
    <!--Spring与mybtis整合的包注入-->
    <bean class="org.mybatis.spring.SqlSessionFactoryBean" name="sqlSessionFactory">
        <property name="configLocation" value="classpath:sqlMapconfig.xml"></property>
        <property name="dataSource" ref="dataSource"></property>
    </bean>
    <!--
            Mapper扫描:从Mapper包中扫描出Mapper接口,自动创建代理对象并在spring容器中注册
            遵循规范:Mapper.java接口和Mapper.xml映射文件,文件名一致,并且在同一个目录下
            扫描出来的Mapper的bean的名字为Mapper的类名,首字母小写
    -->
    <bean class="org.mybatis.spring.mapper.MapperScannerConfigurer">
        <property name="sqlSessionFactoryBeanName" value="sqlSessionFactory"></property>
        <!--指定扫描的包,如果扫描多个包,每个包之前用半角的逗号分隔-->
        <property name="basePackage" value="com.sunwenxu.mapper"></property>
    </bean>
    <!--核心事务管理器-->
    <bean class="org.springframework.jdbc.datasource.DataSourceTransactionManager"
          name="transactionManager">
        <property name="dataSource" ref="dataSource"></property>
    </bean>

    <!--开启注解事务管理-->
    <tx:annotation-driven />
	<!--开启类注解扫描-->
    <context:component-scan base-package="com.sunwenxu"></context:component-scan>
</beans>
5)配置springMvc配置文件(springmvc.xml)
<?xml version="1.0" encoding="UTF-8"?>
<beans xmlns="http://www.springframework.org/schema/beans"
       xmlns:xsi="http://www.w3.org/2001/XMLSchema-instance" xmlns:p="http://www.springframework.org/schema/p"
       xmlns:context="http://www.springframework.org/schema/context"
       xmlns:mvc="http://www.springframework.org/schema/mvc"
       xsi:schemaLocation="http://www.springframework.org/schema/beans http://www.springframework.org/schema/beans/spring-beans-4.0.xsd
        http://www.springframework.org/schema/mvc http://www.springframework.org/schema/mvc/spring-mvc-4.0.xsd
        http://www.springframework.org/schema/context http://www.springframework.org/schema/context/spring-context-4.0.xsd">
    <!--扫描控制器-->
    <context:component-scan base-package="com.sunwenxu.controller"></context:component-scan>
</beans>
6)配置web.xml
<?xml version="1.0" encoding="UTF-8"?>
<web-app xmlns="http://xmlns.jcp.org/xml/ns/javaee"
         xmlns:xsi="http://www.w3.org/2001/XMLSchema-instance"
         xsi:schemaLocation="http://xmlns.jcp.org/xml/ns/javaee http://xmlns.jcp.org/xml/ns/javaee/web-app_4_0.xsd"
         version="4.0">
    <!--springMvc前端控制器配置-->
    <servlet>
        <servlet-name>springMvc</servlet-name>
        <servlet-class>org.springframework.web.servlet.DispatcherServlet</servlet-class>
        <init-param>
            <param-name>contextConfigLocation</param-name>
            <param-value>classpath:springmvc.xml</param-value>
        </init-param>
    </servlet>
    <servlet-mapping>
        <servlet-name>springMvc</servlet-name>
        <url-pattern>/api/*</url-pattern>
    </servlet-mapping>
    <!--配置监听器:spring容器随着项目启动而创建-->
    <listener>
        <listener-class>org.springframework.web.context.ContextLoaderListener</listener-class>
    </listener>
    <context-param>
        <param-name>contextConfigLocation</param-name>
        <param-value>classpath:applicationContext.xml</param-value>
    </context-param>
</web-app>