来自:https://github.com/machinelearningmindset/TensorFlow-Course
从源码安装Tensorflow
安装原链接
代码安装
安装Bazel
安装cuda
NIDIA文档
安装在TensorFlow_上可用。 建议从源代码安装,因为用户可以为特定体系结构构建所需的TensorFlow二进制文件。 它丰富了TensoFlow,具有更好的系统兼容性,运行速度更快。 从源代码安装TensorFlow可以从源代码安装。 官方的TensorFlow解释简明扼要。 然而。 在我们完成安装时,很少有事情可能会变得很重要。 我们尝试逐步投射以避免任何混淆。 必须在书面订单中考虑以下部分。
假设需要使用“GPU支持”来在“Ubuntu”中安装TensorFlow。 选择Python2.7进行安装。
注意请参阅此’‘youtube’’'以获得直观的解释。
环境准备
应按顺序完成以下操作:
- TensorFlow Python依赖项安装
- Bazel安装
- TensorFlow GPU先决条件设置
TensorFlow Python依赖项安装
要安装所需的依赖项,必须在终端中执行以下命令:
    sudo apt-get install python-numpy python-dev python-pip python-wheel python-virtualenv
    sudo apt-get install python3-numpy python3-dev python3-pip python3-wheel python3-virtualenv
第二行是python3安装。
Bazel 安装
请参阅Bazel安装。
警告:Bazel安装可能会改变GPU支持的内核! 之后,您可能需要刷新GPU安装或更新它,否则,在评估TensorFlow安装时可能会出现以下错误:
kernel version X does not match DSO version Y -- cannot find working devices in this configuration

For solving that error you may need to purge all NVIDIA drivers and install or update them again. Please refer to `CUDA Installation`_ for further detail.
TensorFlow GPU先决条件设置
必须满足以下要求:

- NVIDIA的Cuda Toolkit及其相关驱动程序(建议使用8.0版)。 安装在
CUDA Installation_中解释。 - cuDNN库(建议使用版本5.1)。 有关更多详细信息,请参阅“NIDIA文档”。
- 使用以下命令安装
libcupti-dev:sudo apt-get install libcupti-dev
创建虚拟环境(可选)
假设需要在“python虚拟环境”中安装TensorFlow。 首先,我们需要创建一个包含所有环境的目录。 可以通过在终端中执行以下命令来完成:
sudo mkdir ~/virtualenvs
现在通过使用virtualenv命令,可以创建虚拟环境:
sudo virtualenv --system-site-packages ~/virtualenvs/tensorflow
环境激活
到目前为止,已经创建了名为* tensorflow *的虚拟环境。 对于环境激活,必须执行以下操作:
source ~/virtualenvs/tensorflow/bin/activate
但是,命令太冗长了!
别名
解决方案是使用别名让生活变得轻松! 让我们执行以下命令:
   echo 'alias tensorflow="source $HOME/virtualenvs/tensorflow/bin/activate" ' >> ~/.bash_aliases
        bash
运行上一个命令后,请再次关闭并打开终端。 现在,通过运行以下简单脚本,将激活tensorflow环境。
tensorflow
检查 ~/.bash_aliases
要仔细检查,我们使用sudo gedit~ / .bash_aliases命令从终端检查〜/ .bash_aliases。 该文件应包含以下脚本:
alias tensorflow="source $HO~/virtualenvs/tensorflow/bin/activate"
检查.bashrc
另外,让我们使用sudo gedit~ / .bashrc命令检查.bashrc shell脚本。 它应包含以下内容:
if [ -f ~/.bash_aliases ]; then
  . ~/.bash_aliases
  fi
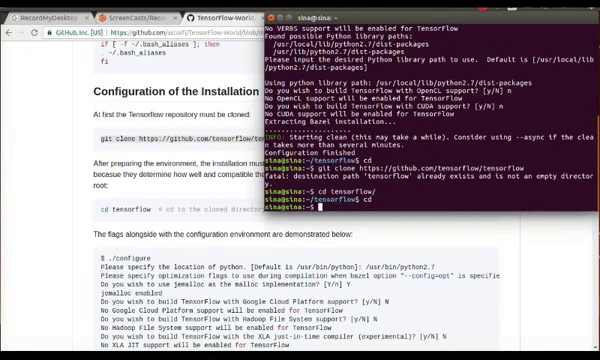
配置安装
首先,必须克隆Tensorflow存储库:
git clone https://github.com/tensorflow/tensorflow
准备好环境后,必须配置安装。 配置的“标志”非常重要,因为它们决定了TensorFlow的安装性能和兼容性! 首先,我们必须转到TensorFlow根目录:
cd tensorflow # cd to the cloned directory
下面将说明标志和配置环境:
$ ./configure
    Please specify the location of python. [Default is /usr/bin/python]: /usr/bin/python2.7
    Please specify optimization flags to use during compilation when bazel option "--config=opt" is specified [Default is -march=native]:
    Do you wish to use jemalloc as the malloc implementation? [Y/n] Y
    jemalloc enabled
    Do you wish to build TensorFlow with Google Cloud Platform support? [y/N] N
    No Google Cloud Platform support will be enabled for TensorFlow
    Do you wish to build TensorFlow with Hadoop File System support? [y/N] N
    No Hadoop File System support will be enabled for TensorFlow
    Do you wish to build TensorFlow with the XLA just-in-time compiler (experimental)? [y/N] N
    No XLA JIT support will be enabled for TensorFlow
    Found possible Python library paths:
      /usr/local/lib/python2.7/dist-packages
      /usr/lib/python2.7/dist-packages
    Please input the desired Python library path to use.  Default is [/usr/local/lib/python2.7/dist-packages]
    Using python library path: /usr/local/lib/python2.7/dist-packages
    Do you wish to build TensorFlow with OpenCL support? [y/N] N
    No OpenCL support will be enabled for TensorFlow
    Do you wish to build TensorFlow with CUDA support? [y/N] Y
    CUDA support will be enabled for TensorFlow
    Please specify which gcc should be used by nvcc as the host compiler. [Default is /usr/bin/gcc]:
    Please specify the Cuda SDK version you want to use, e.g. 7.0. [Leave empty to use system default]: 8.0
    Please specify the location where CUDA 8.0 toolkit is installed. Refer to README.md for more details. [Default is /usr/local/cuda]:
    Please specify the cuDNN version you want to use. [Leave empty to use system default]: 5.1.10
    Please specify the location where cuDNN 5 library is installed. Refer to README.md for more details. [Default is /usr/local/cuda]:
    Please specify a list of comma-separated Cuda compute capabilities you want to build with.
    You can find the compute capability of your device at: https://developer.nvidia.com/cuda-gpus.
    Please note that each additional compute capability significantly increases your build time and binary size.
    [Default is: "3.5,5.2"]: "5.2"
注意:
- 必须使用/ usr / local / cuda中的相关文件准确确定cuDNN版本
- 计算能力与系统架构中的“可用GPU模型”相关。 例如,
Geforce GTX Titan XGPU的计算能力为5.2。 - 如果需要重新配置,建议使用
bazel clean。
警告:
- 如果需要在虚拟环境中安装TwnsorFlow,必须首先激活环境,然后再运行`./ configure``脚本。
测试 Bazel (可选)
我们可以使用Bazel运行测试以确保一切正常:
./configure
    bazel test ...
构建.whl包
配置完设置后,需要由Bazel构建pip包。
要构建支持GPU的TensorFlow包,请执行以下命令:
bazel build --config=opt --config=cuda //tensorflow/tools/pip_package:build_pip_package
bazel build命令构建一个名为build_pip_package的脚本。 运行以下脚本在〜/ tensorflow_package目录中构建.whl文件:
bazel-bin/tensorflow/tools/pip_package/build_pip_package ~/tensorflow_package
安装Pip包
可以使用两种类型的安装。 使用系统root和虚拟环境安装的本机安装。
本机安装
以下命令将安装Bazel build创建的pip包:
sudo pip install ~/tensorflow_package/file_name.whl
使用虚拟环境
首先,必须激活环境。 由于我们已经将环境别名定义为“tensorflow”,通过终端执行简单的“tensorflow”命令,环境将被激活。 然后像前一部分一样,我们执行以下操作:
pip install ~/tensorflow_package/file_name.whl
警告:
- 通过使用虚拟环境安装方法,不应再使用sudo命令,因为如果我们使用sudo,它指向本机系统包而不是虚拟环境中可用的包。
- 由于
sudo mkdir~ / virtualenvs用于创建虚拟环境,使用pip install返回permission error。 在这种情况下,必须使用sudo chmod -R 777~ / virtualenvs命令更改环境目录的root权限。
验证安装
在终端中,必须正确运行以下脚本(在主目录中),没有任何错误,最好是任何警告:
    python
    >> import tensorflow as tf
    >> hello = tf.constant('Hello, TensorFlow!')
    >> sess = tf.Session()
    >> print(sess.run(hello))
常见错误
报告阻止编译和运行TensorFlow的不同错误。
支持的内核版本之间不匹配:本文档前面提到的此错误。天真的解决方案报告是重新安装CUDA驱动程序。ImportError:无法导入名称pywrap_tensorflow:当Python从错误的目录加载tensorflow库时,通常会发生此错误,即不是用户在根目录中安装的版本。第一步是确保我们在系统根目录中,以便正确使用python库。所以基本上我们可以打开一个新终端并再次测试TensorFlow安装。ImportError:没有名为packaging.version的模块“:它很可能与pip安装有关。使用python -m pip install -U pip或sudo python重新安装它-m pip install -U pip可以解决它!
摘要
在本教程中,我们描述了如何从源安装TensorFlow,这样可以更好地兼容系统配置。还研究了Python虚拟环境安装,以将TensorFlow环境与其他环境分离。可以使用Conda环境以及Python虚拟环境,这将在单独的帖子中进行解释。在任何情况下,从源安装的TensorFlow可以比TensorFlow提供的预构建二进制包运行得快得多,尽管它增加了安装过程的复杂性。