在开发Android应用程序的时候,相信用的最多的组件应该是Activity和Service,也许你对Activity和Service的生命周期早已了如指掌,当然这也是Android的基本功,但是你了解Activity和Service是如何被系统启动的,生命周期何时被调用吗?今天我们就从源码的角度来初探启动流程。
本次探索的源码是基于Android5.1系统,其他版本系统如果有源码差异,请按照各自方式分析。
在正式源码分析之前,先简要说明一下接下来会遇到的Java类。
(1)ActivityManagerService.java:
源码路径\frameworks\base\services\java\com\android\server\am\ActivityManagerService.java,简称AMS,是系统级服务管理所有Activity,当启动一个Activity或者停止一个Activity都是由AMS去调控,甚至在内存不足时,可以主动杀死后台的Activity,该类是一个Binder类,可实现跨进程通信,因此可接受从客户端,例如Instrumentation,Context等调用过来的信息。
(2)ActivityThread.java:
源码路径\frameworks\base\core\java\android\app\ActivityThread.java,该类是应用程序所对应进程的主线程类,即我们通常所说的UI线程,一个ActivityThread对应一个进程,另每一个应用程序的入口是该类的main函数。
(3)ApplicationThread.java:
源码路径\frameworks\base\core\java\android\app\ActivityThread.java,该类是ActivityThread.java类的内部类,也是一个Binder类,可实现跨进程通信,主要用于接收从AMS发送过来的信息,进而做进一步处理。
(4)Instrumentation.java:
源码路径\frameworks\base\core\java\android\app\Instrumentation.java,该类主要用于操作具体Activity功能,调用AMS方法,一个Instrumentation类对应一个进程,每个Activity内部都有一个Instrumentation对象的引用。
接下来将进入今天的主题,开始分析ActivityManagerService与应用程序如何通信,我们就以Activity的启动流程来一步一步的分析源码。
1、首先先看三个接口:
/**
 * Base class for Binder interfaces.  When defining a new interface,
 * you must derive it from IInterface.
 */
public interface IInterface
{
    /**
     * Retrieve the Binder object associated with this interface.
     * You must use this instead of a plain cast, so that proxy objects
     * can return the correct result.
     */
    public IBinder asBinder();
}/**
* System private API for talking with the activity manager service. This
* provides calls from the application back to the activity manager.
*
* {@hide}
*/
public interface IActivityManager extends IInterface {
public int startActivity(IApplicationThread caller, String callingPackage, Intent intent,
String resolvedType, IBinder resultTo, String resultWho, int requestCode, int flags,
ProfilerInfo profilerInfo, Bundle options) throws RemoteException;
public int startActivityAsUser(IApplicationThread caller, String callingPackage, Intent intent,
String resolvedType, IBinder resultTo, String resultWho, int requestCode, int flags,
ProfilerInfo profilerInfo, Bundle options, int userId) throws RemoteException;
public int startActivityAsCaller(IApplicationThread caller, String callingPackage,
Intent intent, String resolvedType, IBinder resultTo, String resultWho, int requestCode,
int flags, ProfilerInfo profilerInfo, Bundle options, int userId) throws RemoteException;
public WaitResult startActivityAndWait(IApplicationThread caller, String callingPackage,
Intent intent, String resolvedType, IBinder resultTo, String resultWho,
int requestCode, int flags, ProfilerInfo profilerInfo, Bundle options,
int userId) throws RemoteException;
public int startActivityWithConfig(IApplicationThread caller, String callingPackage,
Intent intent, String resolvedType, IBinder resultTo, String resultWho,
int requestCode, int startFlags, Configuration newConfig,
Bundle options, int userId) throws RemoteException;
public int startActivityIntentSender(IApplicationThread caller,
IntentSender intent, Intent fillInIntent, String resolvedType,
IBinder resultTo, String resultWho, int requestCode,
int flagsMask, int flagsValues, Bundle options) throws RemoteException;
public int startVoiceActivity(String callingPackage, int callingPid, int callingUid,
Intent intent, String resolvedType, IVoiceInteractionSession session,
IVoiceInteractor interactor, int flags, ProfilerInfo profilerInfo, Bundle options,
int userId) throws RemoteException;
public boolean startNextMatchingActivity(IBinder callingActivity,
Intent intent, Bundle options) throws RemoteException;
public int startActivityFromRecents(int taskId, Bundle options) throws RemoteException;
public boolean finishActivity(IBinder token, int code, Intent data, boolean finishTask)
throws RemoteException;
public void finishSubActivity(IBinder token, String resultWho, int requestCode) throws RemoteException;
public boolean finishActivityAffinity(IBinder token) throws RemoteException
...
}/**
* System private API for communicating with the application. This is given to
* the activity manager by an application when it starts up, for the activity
* manager to tell the application about things it needs to do.
*
* {@hide}
*/
public interface IApplicationThread extends IInterface {
void schedulePauseActivity(IBinder token, boolean finished, boolean userLeaving,
int configChanges, boolean dontReport) throws RemoteException;
void scheduleStopActivity(IBinder token, boolean showWindow,
int configChanges) throws RemoteException;
void scheduleWindowVisibility(IBinder token, boolean showWindow) throws RemoteException;
void scheduleSleeping(IBinder token, boolean sleeping) throws RemoteException;
void scheduleResumeActivity(IBinder token, int procState, boolean isForward, Bundle resumeArgs)
throws RemoteException;
void scheduleSendResult(IBinder token, List<ResultInfo> results) throws RemoteException;
void scheduleLaunchActivity(Intent intent, IBinder token, int ident,
ActivityInfo info, Configuration curConfig, CompatibilityInfo compatInfo,
String referrer, IVoiceInteractor voiceInteractor, int procState, Bundle state,
PersistableBundle persistentState, List<ResultInfo> pendingResults,
List<ReferrerIntent> pendingNewIntents, boolean notResumed, boolean isForward,
ProfilerInfo profilerInfo) throws RemoteException;
void scheduleRelaunchActivity(IBinder token, List<ResultInfo> pendingResults,
List<ReferrerIntent> pendingNewIntents, int configChanges,
boolean notResumed, Configuration config) throws RemoteException;
void scheduleNewIntent(List<ReferrerIntent> intent, IBinder token) throws RemoteException;
void scheduleDestroyActivity(IBinder token, boolean finished,
int configChanges) throws RemoteException;
void scheduleReceiver(Intent intent, ActivityInfo info, CompatibilityInfo compatInfo,
...
}该类也是一个接口且也继承于IInterface,是ApplicationThread的基类,用于定义启动和销毁组件的方法,如scheduleLaunchActivity,schedulePauseActivity,scheduleCreateService等。
由于本篇文章主要分析的是应用程序组件的启动过程,所以当中涉及的跨进程通信Binder在本文中暂不做介绍,后续会有专门的博客详细阐述。
2、我们以Activity的启动开始分析
Activity的启动方式有两种,但是无论是startActivity()或startActivityForResult(),最终都会调用Activity的如下方法
    public void startActivityForResult(Intent intent, int requestCode, @Nullable Bundle options) {
        if (mParent == null) {
//会调用Instrumentation类的execStartActivity方法
            Instrumentation.ActivityResult ar =
                mInstrumentation.execStartActivity(
                    this, mMainThread.getApplicationThread(), mToken, this,
                    intent, requestCode, options);
            if (ar != null) {
                mMainThread.sendActivityResult(
                    mToken, mEmbeddedID, requestCode, ar.getResultCode(),
                    ar.getResultData());
            }
...
}
从代码中看出会调用Instrumentation类的execStartActivity方法,我们进入到该方法。
public ActivityResult execStartActivity(
            Context who, IBinder contextThread, IBinder token, Activity target,
            Intent intent, int requestCode, Bundle options) {
        IApplicationThread whoThread = (IApplicationThread) contextThread;
...
        try {
            intent.migrateExtraStreamToClipData();
            intent.prepareToLeaveProcess();
//在这里会调用了ActivityManagerNative.getDefault().startActivity()方法
            int result = ActivityManagerNative.getDefault()
                .startActivity(whoThread, who.getBasePackageName(), intent,
                        intent.resolveTypeIfNeeded(who.getContentResolver()),
                        token, target != null ? target.mEmbeddedID : null,
                        requestCode, 0, null, options);
            checkStartActivityResult(result, intent);
        } catch (RemoteException e) {
        }
        return null;
}public abstract class ActivityManagerNative extends Binder implements IActivityManager
{
/**
* Cast a Binder object into an activity manager interface, generating
* a proxy if needed.
*/
static public IActivityManager asInterface(IBinder obj) {
if (obj == null) {
return null;
}
IActivityManager in =
(IActivityManager)obj.queryLocalInterface(descriptor);
if (in != null) {
return in;
}
//(4)返回ActivityManagerProxy对象
return new ActivityManagerProxy(obj);
}
/**
* Retrieve the system's default/global activity manager.
*/
//(1)静态getDefault()方法获得IActivityManager对象
static public IActivityManager getDefault() {
return gDefault.get();
}
private static final Singleton<IActivityManager> gDefault = new Singleton<IActivityManager>() {
protected IActivityManager create() {
//(2)此处的create方法实际上就是(1)处调用的get()方法</span>
IBinder b = ServiceManager.getService("activity");
if (false) {
Log.v("ActivityManager", "default service binder = " + b);
}
//(3)此处调用asInterface()方法,其实就是ActivityManagerProxy对象,然后返回</span>
IActivityManager am = asInterface(b);
if (false) {
Log.v("ActivityManager", "default service = " + am);
}
return am;
}
};
}通过ActivityManagerNative的源码中注释的(1)(2)(3)(4)步骤可知,ActivityManagerNative.getDefault()实际上获得的是ActivityManagerProxy对象(即ActivityManager的代理)。
所以在之前的execStartActivity方法中,ActivityManagerNative.getDefault().startActivity()调用的startActivity方法即ActivityManagerProxy对象中的startActivity()方法。
接下来我们将进入ActivityManagerProxy类的startActivity()方法。
class ActivityManagerProxy implements IActivityManager
//(1)该类实现IActivityManager接口,并实现其所有的抽象方法
{
//(2)该类构造器的形参是一个IBinder对象,即之前asInterface方法传递过来的ServiceManager.getService("activity")的返回值,后通过asBinder方法返回该IBinder对象。
    public ActivityManagerProxy(IBinder remote)
    {
        mRemote = remote;
    }

    public IBinder asBinder()
    {
        return mRemote;
    }

    public int startActivity(IApplicationThread caller, String callingPackage, Intent intent,
            String resolvedType, IBinder resultTo, String resultWho, int requestCode,
            int startFlags, ProfilerInfo profilerInfo, Bundle options) throws RemoteException {
        Parcel data = Parcel.obtain();
        Parcel reply = Parcel.obtain();
        data.writeInterfaceToken(IActivityManager.descriptor);
        data.writeStrongBinder(caller != null ? caller.asBinder() : null);
        data.writeString(callingPackage);
        intent.writeToParcel(data, 0);
        data.writeString(resolvedType);
        data.writeStrongBinder(resultTo);
        data.writeString(resultWho);
        data.writeInt(requestCode);
        data.writeInt(startFlags);
        if (profilerInfo != null) {
            data.writeInt(1);
            profilerInfo.writeToParcel(data, Parcelable.PARCELABLE_WRITE_RETURN_VALUE);
        } else {
            data.writeInt(0);
        }
        if (options != null) {
            data.writeInt(1);
            options.writeToParcel(data, 0);
        } else {
            data.writeInt(0);
        }
        mRemote.transact(START_ACTIVITY_TRANSACTION, data, reply, 0);
        reply.readException();
        int result = reply.readInt();
        reply.recycle();
        data.recycle();
        return result;
    }
//该类其他的重写方法
public int startActivityAsUser(IApplicationThread caller, String callingPackage, Intent intent,
            String resolvedType, IBinder resultTo, String resultWho, int requestCode, int flags,
            ProfilerInfo profilerInfo, Bundle options, int userId) throws RemoteException;
    public int startActivityAsCaller(IApplicationThread caller, String callingPackage,
            Intent intent, String resolvedType, IBinder resultTo, String resultWho, int requestCode,
            int flags, ProfilerInfo profilerInfo, Bundle options, int userId) throws RemoteException;
    public WaitResult startActivityAndWait(IApplicationThread caller, String callingPackage,
            Intent intent, String resolvedType, IBinder resultTo, String resultWho,
            int requestCode, int flags, ProfilerInfo profilerInfo, Bundle options,
            int userId) throws RemoteException;
    public int startActivityWithConfig(IApplicationThread caller, String callingPackage,
...
}
进入该类的源码后有三点我们需要重点关注一下:
(1)ActivityManagerProxy类实现IActivityManager接口,并实现其所有的抽象方法。
(2)该类构造器的参数是IBinder对象,其值即之前asInterface传递过来的参数,最终的值是ServiceManager.getService("activity")的返回值。
(3)该类是一个内部类,是ActivityManagerNative的内部类。
我们继续往下分析,进入StartActivity方法,通过设置一堆参数后最终会调用mRemote.transact(START_ACTIVITY_TRANSACTION, data, reply, 0);方法,进而调用ActivityManagerNative类的onTransact方法,其识别码code为START_ACTIVITY_TRANSACTION(对本节调用跳转不是很清楚的可以先了解一下Binder机制)。
接下来我们进入ActivityManagerNative的onTransact方法。
@Override
    public boolean onTransact(int code, Parcel data, Parcel reply, int flags)
            throws RemoteException {
        switch (code) {
        case START_ACTIVITY_TRANSACTION:
        {
            data.enforceInterface(IActivityManager.descriptor);
            IBinder b = data.readStrongBinder();
            IApplicationThread app = ApplicationThreadNative.asInterface(b);
            String callingPackage = data.readString();
            Intent intent = Intent.CREATOR.createFromParcel(data);
            String resolvedType = data.readString();
            IBinder resultTo = data.readStrongBinder();
            String resultWho = data.readString();
            int requestCode = data.readInt();
            int startFlags = data.readInt();
            ProfilerInfo profilerInfo = data.readInt() != 0
                    ? ProfilerInfo.CREATOR.createFromParcel(data) : null;
            Bundle options = data.readInt() != 0
                    ? Bundle.CREATOR.createFromParcel(data) : null;
//(1)调用startActivity方法
            int result = startActivity(app, callingPackage, intent, resolvedType,
                    resultTo, resultWho, requestCode, startFlags, profilerInfo, options);
            reply.writeNoException();
            reply.writeInt(result);
            return true;
        }
...
}
进入到onTransact后发现源码是通过switch条件去进行判断的,找到之前的识别码START_ACTIVITY_TRANSACTION的代码块后,通过设置一堆参数后调用startActivity()方法,这里的startActivity方法的真正实现者其实就是ActivityManagerService类。
这里进入到ActivityManagerService类源码中:
public class ActivityManagerService extends ActivityManagerNative
        implements Watchdog.Monitor, BatteryStatsImpl.BatteryCallback {
@Override
    public final int startActivity(IApplicationThread caller, String callingPackage,
            Intent intent, String resolvedType, IBinder resultTo, String resultWho, int requestCode,
            int startFlags, ProfilerInfo profilerInfo, Bundle options) {
        return startActivityAsUser(caller, callingPackage, intent, resolvedType, resultTo,
            resultWho, requestCode, startFlags, profilerInfo, options,
            UserHandle.getCallingUserId());
    }
...
}
特别注意该类是继承自ActivityManagerNative类,并重写ActivityManagerNative类的startActivity方法。
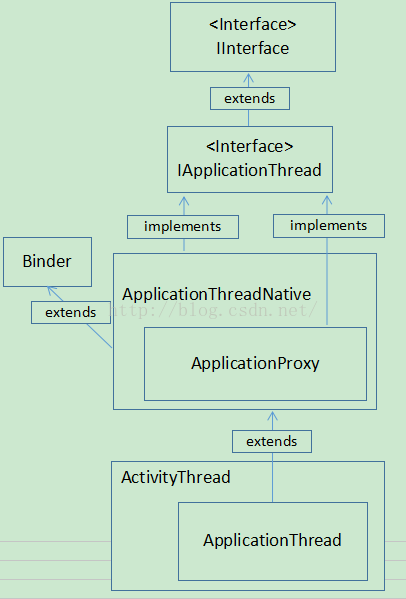
好啦,截止到目前为止Activity的启动流程我们已经分析一半了,我们在此画张图来理一下前面几个类的关系。

这张图可以很清晰的表达了几个类之间的关系,根据前面代码的讲解相信大家应该已经了解了。
好啦,接下来我们将进入剩下一半的学习。
之前说进入到ActivityManagerService类的startActivity方法,中间经过一步步调用最终会调用到ApplicationThreadProxy类的scheduleLaunchActivity()方法(这段跳转的中间过程我们以后再分析),ApplicationThreadProxy类和之前ActivityManagerProxy结构基本上是一样的,我们接下来理一下ApplicationThreadProxy类的关系。
ApplicationThreadProxy是ApplicationThreadNative类的内部类,先看一下ApplicationThreadNative的代码
public abstract class ApplicationThreadNative extends Binder
        implements IApplicationThread {
    /**
     * Cast a Binder object into an application thread interface, generating
     * a proxy if needed.
     */
    static public IApplicationThread asInterface(IBinder obj) {
        if (obj == null) {
            return null;
        }
        IApplicationThread in =
            (IApplicationThread)obj.queryLocalInterface(descriptor);
        if (in != null) {
            return in;
        }
        //创建ApplicationThreadProxy对象返回
        return new ApplicationThreadProxy(obj);
    }

public IBinder asBinder()
    {
        return this;
    }

@Override
    public boolean onTransact(int code, Parcel data, Parcel reply, int flags)
            throws RemoteException {
...
return super.onTransact(code, data, reply, flags);
    }
...
}class ApplicationThreadProxy implements IApplicationThread {
private final IBinder mRemote;
public ApplicationThreadProxy(IBinder remote) {
mRemote = remote;
}
public final IBinder asBinder() {
return mRemote;
}
public final void scheduleLaunchActivity(Intent intent, IBinder token, int ident,
ActivityInfo info, Configuration curConfig, CompatibilityInfo compatInfo,
String referrer, IVoiceInteractor voiceInteractor, int procState, Bundle state,
PersistableBundle persistentState, List<ResultInfo> pendingResults,
List<ReferrerIntent> pendingNewIntents, boolean notResumed, boolean isForward,
ProfilerInfo profilerInfo) throws RemoteException {
Parcel data = Parcel.obtain();
data.writeInterfaceToken(IApplicationThread.descriptor);
intent.writeToParcel(data, 0);
data.writeStrongBinder(token);
data.writeInt(ident);
info.writeToParcel(data, 0);
curConfig.writeToParcel(data, 0);
compatInfo.writeToParcel(data, 0);
data.writeString(referrer);
data.writeStrongBinder(voiceInteractor != null ? voiceInteractor.asBinder() : null);
data.writeInt(procState);
data.writeBundle(state);
data.writePersistableBundle(persistentState);
data.writeTypedList(pendingResults);
data.writeTypedList(pendingNewIntents);
data.writeInt(notResumed ? 1 : 0);
data.writeInt(isForward ? 1 : 0);
if (profilerInfo != null) {
data.writeInt(1);
profilerInfo.writeToParcel(data, Parcelable.PARCELABLE_WRITE_RETURN_VALUE);
} else {
data.writeInt(0);
}
//调用onTransact方法中code为SCHEDULE_LAUNCH_ACTIVITY_TRANSACTION的代码
mRemote.transact(SCHEDULE_LAUNCH_ACTIVITY_TRANSACTION, data, null,
IBinder.FLAG_ONEWAY);
data.recycle();
}
...
}通过以上两段代码可以发现ApplicationThreadNative和ApplicationThreadProxy都实现了IApplicationThread接口,并且和之前的ActivityManager处的代码逻辑是一样的,所以这里就简要概括说明了。
调用ApplicationThreadProxy类的scheduleLaunchActivity()方法后通过识别码SCHEDULE_LAUNCH_ACTIVITY_TRANSACTION会调用到onTransact方法中的SCHEDULE_LAUNCH_ACTIVITY_TRANSACTION条件下,通过设置各种属性后最后调用scheduleLaunchActivity()方法,这个方法的具体实现是在ApplicationThread类中,我们来看一下ApplicationThread类的源码。
private class ApplicationThread extends ApplicationThreadNative {

// we use token to identify this activity without having to send the
        // activity itself back to the activity manager. (matters more with ipc)
        public final void scheduleLaunchActivity(Intent intent, IBinder token, int ident,
                ActivityInfo info, Configuration curConfig, CompatibilityInfo compatInfo,
                String referrer, IVoiceInteractor voiceInteractor, int procState, Bundle state,
                PersistableBundle persistentState, List<ResultInfo> pendingResults,
                List<ReferrerIntent> pendingNewIntents, boolean notResumed, boolean isForward,
                ProfilerInfo profilerInfo) {

            updateProcessState(procState, false);

            ActivityClientRecord r = new ActivityClientRecord();

            r.token = token;
            r.ident = ident;
            r.intent = intent;
            r.referrer = referrer;
            r.voiceInteractor = voiceInteractor;
            r.activityInfo = info;
            r.compatInfo = compatInfo;
            r.state = state;
            r.persistentState = persistentState;

            r.pendingResults = pendingResults;
            r.pendingIntents = pendingNewIntents;

            r.startsNotResumed = notResumed;
            r.isForward = isForward;

            r.profilerInfo = profilerInfo;

            updatePendingConfiguration(curConfig);
//(1)通过Handler发送code为LAUNCH_ACTIVITY的Message
            sendMessage(H.LAUNCH_ACTIVITY, r);
        }
...
}
ApplicationThread类是ActivityThread类的内部类,并且继承自ApplicationThreadNative类,scheduleLaunchActivity方法通过设置一些参数后最终会通过(1)处的Handler发送Message,然后我们跟踪到handleMessage()方法中
public void handleMessage(Message msg) {
            if (DEBUG_MESSAGES) Slog.v(TAG, ">>> handling: " + codeToString(msg.what));
            switch (msg.what) {
                case LAUNCH_ACTIVITY: {
                    Trace.traceBegin(Trace.TRACE_TAG_ACTIVITY_MANAGER, "activityStart");
                    final ActivityClientRecord r = (ActivityClientRecord) msg.obj;

                    r.packageInfo = getPackageInfoNoCheck(
                            r.activityInfo.applicationInfo, r.compatInfo);
                    handleLaunchActivity(r, null);
                    Trace.traceEnd(Trace.TRACE_TAG_ACTIVITY_MANAGER);
                } break;
}
可以看出会调用handleLaunchActivity()方法,进入该方法。
private void handleLaunchActivity(ActivityClientRecord r, Intent customIntent) {
        ...

        // Make sure we are running with the most recent config.
        handleConfigurationChanged(null, null);

        // Initialize before creating the activity
        WindowManagerGlobal.initialize();
//(1)此处最终会调用Activity的OnCreate()方法
        Activity a = performLaunchActivity(r, customIntent);

        if (a != null) {
            r.createdConfig = new Configuration(mConfiguration);
            Bundle oldState = r.state;
//(2)此处最终会调用Activity的OnResume()方法
            handleResumeActivity(r.token, false, r.isForward,
                    !r.activity.mFinished && !r.startsNotResumed);
...
}
...
}
(2)处的代码逻辑后面你会发现和(1)处是相同的,所以这里我们就分析一下(1)处的代码,我们进入到performLaunchActivity这个方法中。
private Activity performLaunchActivity(ActivityClientRecord r, Intent customIntent) {
        // System.out.println("##### [" + System.currentTimeMillis() + "] ActivityThread.performLaunchActivity(" + r + ")");

        ActivityInfo aInfo = r.activityInfo;
        if (r.packageInfo == null) {
            r.packageInfo = getPackageInfo(aInfo.applicationInfo, r.compatInfo,
                    Context.CONTEXT_INCLUDE_CODE);
        }

        ComponentName component = r.intent.getComponent();
        if (component == null) {
            component = r.intent.resolveActivity(
                mInitialApplication.getPackageManager());
            r.intent.setComponent(component);
        }

        if (r.activityInfo.targetActivity != null) {
            component = new ComponentName(r.activityInfo.packageName,
                    r.activityInfo.targetActivity);
        }

        Activity activity = null;
        try {
            java.lang.ClassLoader cl = r.packageInfo.getClassLoader();
//(1)此处调用Instrumentation对象的newActivity方法,用于创建新的Activity
            activity = mInstrumentation.newActivity(
                    cl, component.getClassName(), r.intent);
            StrictMode.incrementExpectedActivityCount(activity.getClass());
            r.intent.setExtrasClassLoader(cl);
            r.intent.prepareToEnterProcess();
            if (r.state != null) {
                r.state.setClassLoader(cl);
            }
        } catch (Exception e) {
            if (!mInstrumentation.onException(activity, e)) {
                throw new RuntimeException(
                    "Unable to instantiate activity " + component
                    + ": " + e.toString(), e);
            }
        }

        try {
//(2)此处通过makeApplicationf方法创建Application对象
            Application app = r.packageInfo.makeApplication(false, mInstrumentation);

            if (localLOGV) Slog.v(TAG, "Performing launch of " + r);
            if (localLOGV) Slog.v(
                    TAG, r + ": app=" + app
                    + ", appName=" + app.getPackageName()
                    + ", pkg=" + r.packageInfo.getPackageName()
                    + ", comp=" + r.intent.getComponent().toShortString()
                    + ", dir=" + r.packageInfo.getAppDir());

            if (activity != null) {
                Context appContext = createBaseContextForActivity(r, activity);
                CharSequence title = r.activityInfo.loadLabel(appContext.getPackageManager());
                Configuration config = new Configuration(mCompatConfiguration);
                if (DEBUG_CONFIGURATION) Slog.v(TAG, "Launching activity "
                        + r.activityInfo.name + " with config " + config);
//(3)此处调用Activity的attach方法,在后续博客中会阐述该方法
                activity.attach(appContext, this, getInstrumentation(), r.token,
                        r.ident, app, r.intent, r.activityInfo, title, r.parent,
                        r.embeddedID, r.lastNonConfigurationInstances, config,
                        r.referrer, r.voiceInteractor);

                if (customIntent != null) {
                    activity.mIntent = customIntent;
                }
                r.lastNonConfigurationInstances = null;
                activity.mStartedActivity = false;
                int theme = r.activityInfo.getThemeResource();
                if (theme != 0) {
                    activity.setTheme(theme);
                }

                /* SPRD: add log for activity performance @{ */
                final long onCreateStart = SystemClock.uptimeMillis();
                /* @} */

                activity.mCalled = false;
//(4)此处调用Instrumentation对象的callActivityOnCreate方法
                if (r.isPersistable()) {
                    mInstrumentation.callActivityOnCreate(activity, r.state, r.persistentState);
                } else {
                    mInstrumentation.callActivityOnCreate(activity, r.state);
                }

                /* SPRD: add log for activity performance @{ */
                final long onCreateEnd = SystemClock.uptimeMillis();
                String c = component == null ? "null" : component.getClassName();
                String str = c + ", onCreate cost " + (onCreateEnd - onCreateStart) + "ms";
                EventLog.writeEvent(LOG_ON_PERFORMANCE,
                        UserHandle.myUserId(), str);
                /* @} */

                if (!activity.mCalled) {
                    throw new SuperNotCalledException(
                        "Activity " + r.intent.getComponent().toShortString() +
                        " did not call through to super.onCreate()");
                }
                r.activity = activity;
                r.stopped = true;
                if (!r.activity.mFinished) {
                    activity.performStart();
                    r.stopped = false;
                }
                if (!r.activity.mFinished) {
//(5)此处会调用Instrumentation的callActivityOnRestoreInstanceState方法
                    if (r.isPersistable()) {
                        if (r.state != null || r.persistentState != null) {
                            mInstrumentation.callActivityOnRestoreInstanceState(activity, r.state,
                                    r.persistentState);
                        }
                    } else if (r.state != null) {
                        mInstrumentation.callActivityOnRestoreInstanceState(activity, r.state);
                    }
                }
                if (!r.activity.mFinished) {
                    activity.mCalled = false;
//(6)此处调用Instrumentation的callActivityOnPostCreate方法
                    if (r.isPersistable()) {
                        mInstrumentation.callActivityOnPostCreate(activity, r.state,
                                r.persistentState);
                    } else {
                        mInstrumentation.callActivityOnPostCreate(activity, r.state);
                    }
                    if (!activity.mCalled) {
                        throw new SuperNotCalledException(
                            "Activity " + r.intent.getComponent().toShortString() +
                            " did not call through to super.onPostCreate()");
                    }
                }
            }
            r.paused = true;

            mActivities.put(r.token, r);

        } catch (SuperNotCalledException e) {
            throw e;

        } catch (Exception e) {
            if (!mInstrumentation.onException(activity, e)) {
                throw new RuntimeException(
                    "Unable to start activity " + component
                    + ": " + e.toString(), e);
            }
        }

        return activity;
}(1)处通过ClassLoader加载新的Class类,用于创建Activity,(2)(3)(5)(6)我们目前不做分析,接下来我们重点分析一下(4)处的代码逻辑,此处会调用Instrumentation对象的callActivityOnCreate方法。
/**
     * Perform calling of an activity's {@link Activity#onCreate}
     * method.  The default implementation simply calls through to that method.
     *  @param activity The activity being created.
     * @param icicle The previously frozen state (or null) to pass through to
     * @param persistentState The previously persisted state (or null)
     */
    public void callActivityOnCreate(Activity activity, Bundle icicle,
            PersistableBundle persistentState) {
        prePerformCreate(activity);
        activity.performCreate(icicle, persistentState);
        postPerformCreate(activity);
    }
进入该方法发现其调用了三个方法,其中prePerformCreate和postPerformCreate方法是为调用OnCreate方法做准备和结尾工作,我们重点分析Activity对象的performCreate方法。
final void performCreate(Bundle icicle, PersistableBundle persistentState) {
        onCreate(icicle, persistentState);
        mActivityTransitionState.readState(icicle);
        performCreateCommon();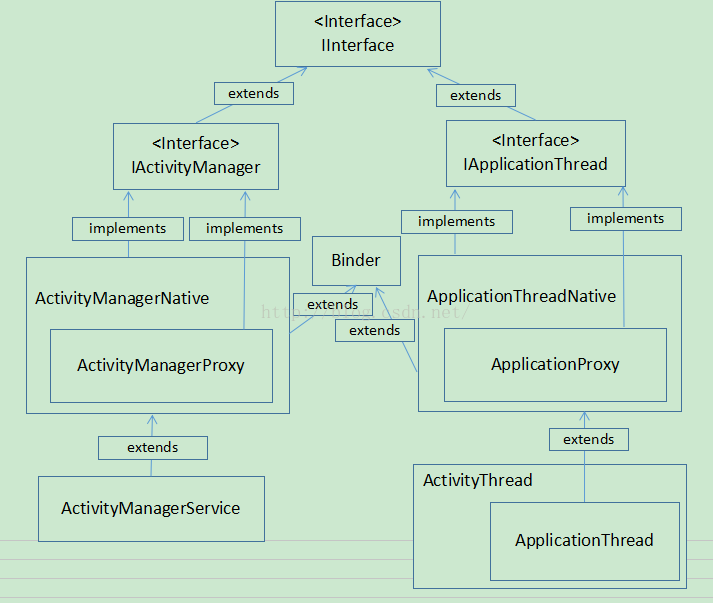
}好啦,以上就是本篇文章的下半部分啦,和之前一样我们也用一张图来表示各类之间的关系。
通过该图相信你已经了解了各个类之间的继承关系,好啦以上就是这篇博客的主要内容了,接下来我们将对以上内容做个总结。
总结
其实这篇博客主要阐述了应用程序组件如Activity或Service等是如何从startActivity或startService开始启动,直至调用其生命周期方法的过程,整个过程的代码逻辑还是比较复杂的,以下我们将之前的类关系图完成的展示一下。
这张图可以清楚的表示几个类之间的继承关系,另ActivityManagerService和ActivityThread之间是通过Binder进行通信的,所以我们还可以用另一张图表示(此图来源于网络)
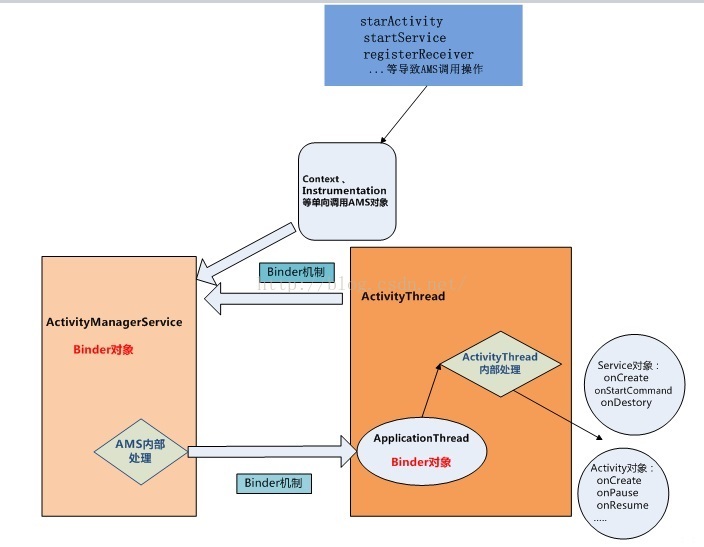
具体二者之间的通信方式Binder我们将在以后的博客中详细分析,那今天就到这里吧,感谢大家。