前文简要介绍了Android应用程序的Activity的启动过程。在Android系统中,应用程序是由Activity组成的,因此,应用程序的启动过程实际上就是应用程序中的默认Activity的启动过程,本文将详细分析应用程序框架层的源代码,了解Android应用程序的启动过程。
在上一篇文章Android应用程序的Activity启动过程简要介绍和学习计划中,我们举例子说明了启动Android应用程序中的Activity的两种情景,其中,在手机屏幕中点击应用程序图标的情景就会引发Android应用程序中的默认Activity的启动,从而把应用程序启动起来。这种启动方式的特点是会启动一个新的进程来加载相应的Activity。这里,我们继续以这个例子为例来说明Android应用程序的启动过程,即MainActivity的启动过程。
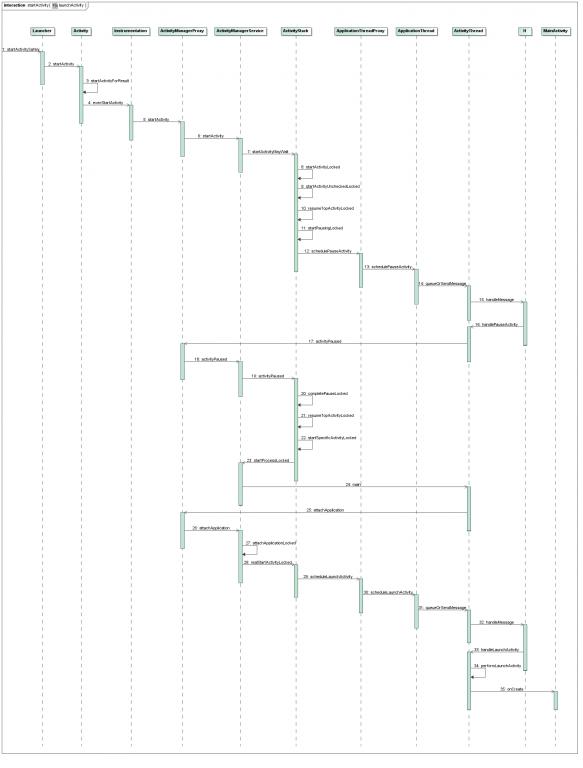
MainActivity的启动过程如下图所示:
下面详细分析每一步是如何实现的。
Step 1. Launcher.startActivitySafely
在Android系统中,应用程序是由Launcher启动起来的,其实,Launcher本身也是一个应用程序,其它的应用程序安装后,就会Launcher的界面上出现一个相应的图标,点击这个图标时,Launcher就会对应的应用程序启动起来。
Launcher的源代码工程在packages/apps/Launcher2目录下,负责启动其它应用程序的源代码实现在src/com/android/launcher2/Launcher.java文件中:
/**
* Default launcher application.
*/
public final class Launcher extends Activity
implements View.OnClickListener, OnLongClickListener, LauncherModel.Callbacks, AllAppsView.Watcher {
......
/**
* Launches the intent referred by the clicked shortcut.
*
* @param v The view representing the clicked shortcut.
*/
public void onClick(View v) {
Object tag = v.getTag();
if (tag instanceof ShortcutInfo) {
// Open shortcut
final Intent intent = ((ShortcutInfo) tag).intent;
int[] pos = new int[2];
v.getLocationOnScreen(pos);
intent.setSourceBounds(new Rect(pos[0], pos[1],
pos[0] + v.getWidth(), pos[1] + v.getHeight()));
startActivitySafely(intent, tag);
} else if (tag instanceof FolderInfo) {
......
} else if (v == mHandleView) {
......
}
}
void startActivitySafely(Intent intent, Object tag) {
intent.addFlags(Intent.FLAG_ACTIVITY_NEW_TASK);
try {
startActivity(intent);
} catch (ActivityNotFoundException e) {
......
} catch (SecurityException e) {
......
}
}
......
}
回忆一下前面一篇文章Android应用程序的Activity启动过程简要介绍和学习计划说到的应用程序Activity,它的默认Activity是MainActivity,这里是AndroidManifest.xml文件中配置的:
<activity android:name=".MainActivity"
android:label="@string/app_name">
<intent-filter>
<action android:name="android.intent.action.MAIN" />
<category android:name="android.intent.category.LAUNCHER" />
</intent-filter>
</activity>
因此,这里的intent包含的信息为:action = "android.intent.action.Main",category="android.intent.category.LAUNCHER", cmp="shy.luo.activity/.MainActivity",表示它要启动的Activity为shy.luo.activity.MainActivity。Intent.FLAG_ACTIVITY_NEW_TASK表示要在一个新的Task中启动这个Activity,注意,Task是Android系统中的概念,它不同于进程Process的概念。简单地说,一个Task是一系列Activity的集合,这个集合是以堆栈的形式来组织的,遵循后进先出的原则。事实上,Task是一个非常复杂的概念,有兴趣的读者可以到官网http://developer.android.com/guide/topics/manifest/activity-element.html查看相关的资料。这里,我们只要知道,这个MainActivity要在一个新的Task中启动就可以了。
Step 2. Activity.startActivity
在Step 1中,我们看到,Launcher继承于Activity类,而Activity类实现了startActivity函数,因此,这里就调用了Activity.startActivity函数,它实现在frameworks/base/core/java/android/app/Activity.java文件中:
view plain
public class Activity extends ContextThemeWrapper
implements LayoutInflater.Factory,
Window.Callback, KeyEvent.Callback,
OnCreateContextMenuListener, ComponentCallbacks {
......
@Override
public void startActivity(Intent intent) {
startActivityForResult(intent, -1);
}
......
}
这个函数实现很简单,它调用startActivityForResult来进一步处理,第二个参数传入-1表示不需要这个Actvity结束后的返回结果。
Step 3. Activity.startActivityForResult
这个函数也是实现在frameworks/base/core/java/android/app/Activity.java文件中:
view plain
public class Activity extends ContextThemeWrapper
implements LayoutInflater.Factory,
Window.Callback, KeyEvent.Callback,
OnCreateContextMenuListener, ComponentCallbacks {
......
public void startActivityForResult(Intent intent, int requestCode) {
if (mParent == null) {
Instrumentation.ActivityResult ar =
mInstrumentation.execStartActivity(
this, mMainThread.getApplicationThread(), mToken, this,
intent, requestCode);
......
} else {
......
}
......
}
这里的mInstrumentation是Activity类的成员变量,它的类型是Intrumentation,定义在frameworks/base/core/java/android/app/Instrumentation.java文件中,它用来监控应用程序和系统的交互。
这里的mMainThread也是Activity类的成员变量,它的类型是ActivityThread,它代表的是应用程序的主线程,我们在Android系统在新进程中启动自定义服务过程(startService)的原理分析一文中已经介绍过了。这里通过mMainThread.getApplicationThread获得它里面的ApplicationThread成员变量,它是一个Binder对象,后面我们会看到,ActivityManagerService会使用它来和ActivityThread来进行进程间通信。这里我们需注意的是,这里的mMainThread代表的是Launcher应用程序运行的进程。
这里的mToken也是Activity类的成员变量,它是一个Binder对象的远程接口。
Step 4. Instrumentation.execStartActivity
这个函数定义在frameworks/base/core/java/android/app/Instrumentation.java文件中:
view plain
public class Instrumentation {
....
public ActivityResult execStartActivity(
Context who, IBinder contextThread, IBinder token, Activity target,
Intent intent, int requestCode) {
IApplicationThread whoThread = (IApplicationThread) contextThread;
if (mActivityMonitors != null) {
......
}
try {
int result = ActivityManagerNative.getDefault()
.startActivity(whoThread, intent,
intent.resolveTypeIfNeeded(who.getContentResolver()),
null, 0, token, target != null ? target.mEmbeddedID : null,
requestCode, false, false);
......
} catch (RemoteException e) {
}
return null;
}
.....
}
这里的ActivityManagerNative.getDefault返回ActivityManagerService的远程接口,即ActivityManagerProxy接口,具体可以参考Android系统在新进程中启动自定义服务过程(startService)的原理分析一文。
这里的intent.resolveTypeIfNeeded返回这个intent的MIME类型,在这个例子中,没有AndroidManifest.xml设置MainActivity的MIME类型,因此,这里返回null。
这里的target不为null,但是target.mEmbddedID为null,我们不用关注。
Step 5. ActivityManagerProxy.startActivity
这个函数定义在frameworks/base/core/java/android/app/ActivityManagerNative.java文件中:
view plain
class ActivityManagerProxy implements IActivityManager
{
.....
public int startActivity(IApplicationThread caller, Intent intent,
String resolvedType, Uri[] grantedUriPermissions, int grantedMode,
IBinder resultTo, String resultWho,
int requestCode, boolean onlyIfNeeded,
boolean debug) throws RemoteException {
Parcel data = Parcel.obtain();
Parcel reply = Parcel.obtain();
data.writeInterfaceToken(IActivityManager.descriptor);
data.writeStrongBinder(caller != null ? caller.asBinder() : null);
intent.writeToParcel(data, 0);
data.writeString(resolvedType);
data.writeTypedArray(grantedUriPermissions, 0);
data.writeInt(grantedMode);
data.writeStrongBinder(resultTo);
data.writeString(resultWho);
data.writeInt(requestCode);
data.writeInt(onlyIfNeeded ? 1 : 0);
data.writeInt(debug ? 1 : 0);
mRemote.transact(START_ACTIVITY_TRANSACTION, data, reply, 0);
reply.readException();
int result = reply.readInt();
reply.recycle();
data.recycle();
return result;
}
......
}
这里的参数比较多,我们先整理一下。从上面的调用可以知道,这里的参数resolvedType、grantedUriPermissions和resultWho均为null;参数caller为ApplicationThread类型的Binder实体;参数resultTo为一个Binder实体的远程接口,我们先不关注它;参数grantedMode为0,我们也先不关注它;参数requestCode为-1;参数onlyIfNeeded和debug均空false。
Step 6. ActivityManagerService.startActivity
上一步Step 5通过Binder驱动程序就进入到ActivityManagerService的startActivity函数来了,它定义在frameworks/base/services/java/com/android/server/am/ActivityManagerService.java文件中:
view plain
public final class ActivityManagerService extends ActivityManagerNative
implements Watchdog.Monitor, BatteryStatsImpl.BatteryCallback {
......
public final int startActivity(IApplicationThread caller,
Intent intent, String resolvedType, Uri[] grantedUriPermissions,
int grantedMode, IBinder resultTo,
String resultWho, int requestCode, boolean onlyIfNeeded,
boolean debug) {
return mMainStack.startActivityMayWait(caller, intent, resolvedType,
grantedUriPermissions, grantedMode, resultTo, resultWho,
requestCode, onlyIfNeeded, debug, null, null);
}
......
}
这里只是简单地将操作转发给成员变量mMainStack的startActivityMayWait函数,这里的mMainStack的类型为ActivityStack。
Step 7. ActivityStack.startActivityMayWait
这个函数定义在frameworks/base/services/java/com/android/server/am/ActivityStack.java文件中:
view plain
public class ActivityStack {
......
final int startActivityMayWait(IApplicationThread caller,
Intent intent, String resolvedType, Uri[] grantedUriPermissions,
int grantedMode, IBinder resultTo,
String resultWho, int requestCode, boolean onlyIfNeeded,
boolean debug, WaitResult outResult, Configuration config) {
......
boolean componentSpecified = intent.getComponent() != null;
// Don't modify the client's object!
intent = new Intent(intent);
// Collect information about the target of the Intent.
ActivityInfo aInfo;
try {
ResolveInfo rInfo =
AppGlobals.getPackageManager().resolveIntent(
intent, resolvedType,
PackageManager.MATCH_DEFAULT_ONLY
| ActivityManagerService.STOCK_PM_FLAGS);
aInfo = rInfo != null ? rInfo.activityInfo : null;
} catch (RemoteException e) {
......
}
if (aInfo != null) {
// Store the found target back into the intent, because now that
// we have it we never want to do this again. For example, if the
// user navigates back to this point in the history, we should
// always restart the exact same activity.
intent.setComponent(new ComponentName(
aInfo.applicationInfo.packageName, aInfo.name));
......
}
synchronized (mService) {
int callingPid;
int callingUid;
if (caller == null) {
......
} else {
callingPid = callingUid = -1;
}
mConfigWillChange = config != null
&& mService.mConfiguration.diff(config) != 0;
......
if (mMainStack && aInfo != null &&
(aInfo.applicationInfo.flags&ApplicationInfo.FLAG_CANT_SAVE_STATE) != 0) {
......
}
int res = startActivityLocked(caller, intent, resolvedType,
grantedUriPermissions, grantedMode, aInfo,
resultTo, resultWho, requestCode, callingPid, callingUid,
onlyIfNeeded, componentSpecified);
if (mConfigWillChange && mMainStack) {
......
}
......
if (outResult != null) {
......
}
return res;
}
}
......
}
注意,从Step 6传下来的参数outResult和config均为null,此外,表达式(aInfo.applicationInfo.flags&ApplicationInfo.FLAG_CANT_SAVE_STATE) != 0为false,因此,这里忽略了无关代码。
下面语句对参数intent的内容进行解析,得到MainActivity的相关信息,保存在aInfo变量中:
view plain
ActivityInfo aInfo;
try {
ResolveInfo rInfo =
AppGlobals.getPackageManager().resolveIntent(
intent, resolvedType,
PackageManager.MATCH_DEFAULT_ONLY
| ActivityManagerService.STOCK_PM_FLAGS);
aInfo = rInfo != null ? rInfo.activityInfo : null;
} catch (RemoteException e) {
......
}
解析之后,得到的aInfo.applicationInfo.packageName的值为"shy.luo.activity",aInfo.name的值为"shy.luo.activity.MainActivity",这是在这个实例的配置文件AndroidManifest.xml里面配置的。
此外,函数开始的地方调用intent.getComponent()函数的返回值不为null,因此,这里的componentSpecified变量为true。
接下去就调用startActivityLocked进一步处理了。
Step 8. ActivityStack.startActivityLocked
这个函数定义在frameworks/base/services/java/com/android/server/am/ActivityStack.java文件中:
view plain
public class ActivityStack {
......
final int startActivityLocked(IApplicationThread caller,
Intent intent, String resolvedType,
Uri[] grantedUriPermissions,
int grantedMode, ActivityInfo aInfo, IBinder resultTo,
String resultWho, int requestCode,
int callingPid, int callingUid, boolean onlyIfNeeded,
boolean componentSpecified) {
int err = START_SUCCESS;
ProcessRecord callerApp = null;
if (caller != null) {
callerApp = mService.getRecordForAppLocked(caller);
if (callerApp != null) {
callingPid = callerApp.pid;
callingUid = callerApp.info.uid;
} else {
......
}
}
......
ActivityRecord sourceRecord = null;
ActivityRecord resultRecord = null;
if (resultTo != null) {
int index = indexOfTokenLocked(resultTo);
......
if (index >= 0) {
sourceRecord = (ActivityRecord)mHistory.get(index);
if (requestCode >= 0 && !sourceRecord.finishing) {
......
}
}
}
int launchFlags = intent.getFlags();
if ((launchFlags&Intent.FLAG_ACTIVITY_FORWARD_RESULT) != 0
&& sourceRecord != null) {
......
}
if (err == START_SUCCESS && intent.getComponent() == null) {
......
}
if (err == START_SUCCESS && aInfo == null) {
......
}
if (err != START_SUCCESS) {
......
}
......
ActivityRecord r = new ActivityRecord(mService, this, callerApp, callingUid,
intent, resolvedType, aInfo, mService.mConfiguration,
resultRecord, resultWho, requestCode, componentSpecified);
......
return startActivityUncheckedLocked(r, sourceRecord,
grantedUriPermissions, grantedMode, onlyIfNeeded, true);
}
......
}
从传进来的参数caller得到调用者的进程信息,并保存在callerApp变量中,这里就是Launcher应用程序的进程信息了。
前面说过,参数resultTo是Launcher这个Activity里面的一个Binder对象,通过它可以获得Launcher这个Activity的相关信息,保存在sourceRecord变量中。
再接下来,创建即将要启动的Activity的相关信息,并保存在r变量中:
view plain
ActivityRecord r = new ActivityRecord(mService, this, callerApp, callingUid,
intent, resolvedType, aInfo, mService.mConfiguration,
resultRecord, resultWho, requestCode, componentSpecified);
接着调用startActivityUncheckedLocked函数进行下一步操作。
Step 9. ActivityStack.startActivityUncheckedLocked
这个函数定义在frameworks/base/services/java/com/android/server/am/ActivityStack.java文件中:
view plain
public class ActivityStack {
......
final int startActivityUncheckedLocked(ActivityRecord r,
ActivityRecord sourceRecord, Uri[] grantedUriPermissions,
int grantedMode, boolean onlyIfNeeded, boolean doResume) {
final Intent intent = r.intent;
final int callingUid = r.launchedFromUid;
int launchFlags = intent.getFlags();
// We'll invoke onUserLeaving before onPause only if the launching
// activity did not explicitly state that this is an automated launch.
mUserLeaving = (launchFlags&Intent.FLAG_ACTIVITY_NO_USER_ACTION) == 0;
......
ActivityRecord notTop = (launchFlags&Intent.FLAG_ACTIVITY_PREVIOUS_IS_TOP)
!= 0 ? r : null;
// If the onlyIfNeeded flag is set, then we can do this if the activity
// being launched is the same as the one making the call... or, as
// a special case, if we do not know the caller then we count the
// current top activity as the caller.
if (onlyIfNeeded) {
......
}
if (sourceRecord == null) {
......
} else if (sourceRecord.launchMode == ActivityInfo.LAUNCH_SINGLE_INSTANCE) {
......
} else if (r.launchMode == ActivityInfo.LAUNCH_SINGLE_INSTANCE
|| r.launchMode == ActivityInfo.LAUNCH_SINGLE_TASK) {
......
}
if (r.resultTo != null && (launchFlags&Intent.FLAG_ACTIVITY_NEW_TASK) != 0) {
......
}
boolean addingToTask = false;
if (((launchFlags&Intent.FLAG_ACTIVITY_NEW_TASK) != 0 &&
(launchFlags&Intent.FLAG_ACTIVITY_MULTIPLE_TASK) == 0)
|| r.launchMode == ActivityInfo.LAUNCH_SINGLE_TASK
|| r.launchMode == ActivityInfo.LAUNCH_SINGLE_INSTANCE) {
// If bring to front is requested, and no result is requested, and
// we can find a task that was started with this same
// component, then instead of launching bring that one to the front.
if (r.resultTo == null) {
// See if there is a task to bring to the front. If this is
// a SINGLE_INSTANCE activity, there can be one and only one
// instance of it in the history, and it is always in its own
// unique task, so we do a special search.
ActivityRecord taskTop = r.launchMode != ActivityInfo.LAUNCH_SINGLE_INSTANCE
? findTaskLocked(intent, r.info)
: findActivityLocked(intent, r.info);
if (taskTop != null) {
......
}
}
}
......
if (r.packageName != null) {
// If the activity being launched is the same as the one currently
// at the top, then we need to check if it should only be launched
// once.
ActivityRecord top = topRunningNonDelayedActivityLocked(notTop);
if (top != null && r.resultTo == null) {
if (top.realActivity.equals(r.realActivity)) {
......
}
}
} else {
......
}
boolean newTask = false;
// Should this be considered a new task?
if (r.resultTo == null && !addingToTask
&& (launchFlags&Intent.FLAG_ACTIVITY_NEW_TASK) != 0) {
// todo: should do better management of integers.
mService.mCurTask++;
if (mService.mCurTask <= 0) {
mService.mCurTask = 1;
}
r.task = new TaskRecord(mService.mCurTask, r.info, intent,
(r.info.flags&ActivityInfo.FLAG_CLEAR_TASK_ON_LAUNCH) != 0);
......
newTask = true;
if (mMainStack) {
mService.addRecentTaskLocked(r.task);
}
} else if (sourceRecord != null) {
......
} else {
......
}
......
startActivityLocked(r, newTask, doResume);
return START_SUCCESS;
}
......
}
函数首先获得intent的标志值,保存在launchFlags变量中。
这个intent的标志值的位Intent.FLAG_ACTIVITY_NO_USER_ACTION没有置位,因此 ,成员变量mUserLeaving的值为true。
这个intent的标志值的位Intent.FLAG_ACTIVITY_PREVIOUS_IS_TOP也没有置位,因此,变量notTop的值为null。
由于在这个例子的AndroidManifest.xml文件中,MainActivity没有配置launchMode属值,因此,这里的r.launchMode为默认值0,表示以标准(Standard,或者称为ActivityInfo.LAUNCH_MULTIPLE)的方式来启动这个Activity。Activity的启动方式有四种,其余三种分别是ActivityInfo.LAUNCH_SINGLE_INSTANCE、ActivityInfo.LAUNCH_SINGLE_TASK和ActivityInfo.LAUNCH_SINGLE_TOP,具体可以参考官方网站http://developer.android.com/reference/android/content/pm/ActivityInfo.html。
传进来的参数r.resultTo为null,表示Launcher不需要等这个即将要启动的MainActivity的执行结果。
由于这个intent的标志值的位Intent.FLAG_ACTIVITY_NEW_TASK被置位,而且Intent.FLAG_ACTIVITY_MULTIPLE_TASK没有置位,因此,下面的if语句会被执行:
这段代码的逻辑是查看一下,当前有没有Task可以用来执行这个Activity。由于r.launchMode的值不为ActivityInfo.LAUNCH_SINGLE_INSTANCE,因此,它通过findTaskLocked函数来查找存不存这样的Task,这里返回的结果是null,即taskTop为null,因此,需要创建一个新的Task来启动这个Activity。
接着往下看:
view plain
if (r.packageName != null) {
// If the activity being launched is the same as the one currently
// at the top, then we need to check if it should only view plain
if (((launchFlags&Intent.FLAG_ACTIVITY_NEW_TASK) != 0 &&
(launchFlags&Intent.FLAG_ACTIVITY_MULTIPLE_TASK) == 0)
|| r.launchMode == ActivityInfo.LAUNCH_SINGLE_TASK
|| r.launchMode == ActivityInfo.LAUNCH_SINGLE_INSTANCE) {
// If bring to front is requested, and no result is requested, and
// we can find a task that was started with this same
// component, then instead of launching bring that one to the front.
if (r.resultTo == null) {
// See if there is a task to bring to the front. If this is
// a SINGLE_INSTANCE activity, there can be one and only one
// instance of it in the history, and it is always in its own
// unique task, so we do a special search.
ActivityRecord taskTop = r.launchMode != ActivityInfo.LAUNCH_SINGLE_INSTANCE
? findTaskLocked(intent, r.info)
: findActivityLocked(intent, r.info);
if (taskTop != null) {
......
}
}
} be launched
// once.
ActivityRecord top = topRunningNonDelayedActivityLocked(notTop);
if (top != null && r.resultTo == null) {
if (top.realActivity.equals(r.realActivity)) {
......
}
}
}
这段代码的逻辑是看一下,当前在堆栈顶端的Activity是否就是即将要启动的Activity,有些情况下,如果即将要启动的Activity就在堆栈的顶端,那么,就不会重新启动这个Activity的别一个实例了,具体可以参考官方网站http://developer.android.com/reference/android/content/pm/ActivityInfo.html。现在处理堆栈顶端的Activity是Launcher,与我们即将要启动的MainActivity不是同一个Activity,因此,这里不用进一步处理上述介绍的情况。
执行到这里,我们知道,要在一个新的Task里面来启动这个Activity了,于是新创建一个Task:
view plain
if (r.resultTo == null && !addingToTask
&& (launchFlags&Intent.FLAG_ACTIVITY_NEW_TASK) != 0) {
// todo: should do better management of integers.
mService.mCurTask++;
if (mService.mCurTask <= 0) {
mService.mCurTask = 1;
}
r.task = new TaskRecord(mService.mCurTask, r.info, intent,
(r.info.flags&ActivityInfo.FLAG_CLEAR_TASK_ON_LAUNCH) != 0);
......
newTask = true;
if (mMainStack) {
mService.addRecentTaskLocked(r.task);
}
}
新建的Task保存在r.task域中,同时,添加到mService中去,这里的mService就是ActivityManagerService了。
最后就进入startActivityLocked(r, newTask, doResume)进一步处理了。这个函数定义在frameworks/base/services/java/com/android/server/am/ActivityStack.java文件中:
view plain
public class ActivityStack {
......
private final void startActivityLocked(ActivityRecord r, boolean newTask,
boolean doResume) {
final int NH = mHistory.size();
int addPos = -1;
if (!newTask) {
......
}
// Place a new activity at top of stack, so it is next to interact
// with the user.
if (addPos < 0) {
addPos = NH;
}
// If we are not placing the new activity frontmost, we do not want
// to deliver the onUserLeaving callback to the actual frontmost
// activity
if (addPos < NH) {
......
}
// Slot the activity into the history stack and proceed
mHistory.add(addPos, r);
r.inHistory = true;
r.frontOfTask = newTask;
r.task.numActivities++;
if (NH > 0) {
// We want to show the starting preview window if we are
// switching to a new task, or the next activity's process is
// not currently running.
......
} else {
// If this is the first activity, don't do any fancy animations,
// because there is nothing for it to animate on top of.
......
}
......
if (doResume) {
resumeTopActivityLocked(null);
}
}
......
}
这里的NH表示当前系统中历史任务的个数,这里肯定是大于0,因为Launcher已经跑起来了。当NH>0时,并且现在要切换新任务时,要做一些任务切的界面操作,这段代码我们就不看了,这里不会影响到下面启Activity的过程,有兴趣的读取可以自己研究一下。
这里传进来的参数doResume为true,于是调用resumeTopActivityLocked进一步操作。
Step 10. Activity.resumeTopActivityLocked
这个函数定义在frameworks/base/services/java/com/android/server/am/ActivityStack.java文件中:
\view plain
public class ActivityStack {
......
/**
* Ensure that the top activity in the stack is resumed.
*
* @param prev The previously resumed activity, for when in the process
* of pausing; can be null to call from elsewhere.
*
* @return Returns true if something is being resumed, or false if
* nothing happened.
*/
final boolean resumeTopActivityLocked(ActivityRecord prev) {
// Find the first activity that is not finishing.
ActivityRecord next = topRunningActivityLocked(null);
// Remember how we'll process this pause/resume situation, and ensure
// that the state is reset however we wind up proceeding.
final boolean userLeaving = mUserLeaving;
mUserLeaving = false;
if (next == null) {
......
}
next.delayedResume = false;
// If the top activity is the resumed one, nothing to do.
if (mResumedActivity == next && next.state == ActivityState.RESUMED) {
......
}
// If we are sleeping, and there is no resumed activity, and the top
// activity is paused, well that is the state we want.
if ((mService.mSleeping || mService.mShuttingDown)
&& mLastPausedActivity == next && next.state == ActivityState.PAUSED) {
......
}
......
// If we are currently pausing an activity, then don't do anything
// until that is done.
if (mPausingActivity != null) {
......
}
......
// We need to start pausing the current activity so the top one
// can be resumed...
if (mResumedActivity != null) {
......
startPausingLocked(userLeaving, false);
return true;
}
......
}
......
}
函数先通过调用topRunningActivityLocked函数获得堆栈顶端的Activity,这里就是MainActivity了,这是在上面的Step 9设置好的,保存在next变量中。
接下来把mUserLeaving的保存在本地变量userLeaving中,然后重新设置为false,在上面的Step 9中,mUserLeaving的值为true,因此,这里的userLeaving为true。
这里的mResumedActivity为Launcher,因为Launcher是当前正被执行的Activity。
当我们处理休眠状态时,mLastPausedActivity保存堆栈顶端的Activity,因为当前不是休眠状态,所以mLastPausedActivity为null。
有了这些信息之后,下面的语句就容易理解了:
view plain
// If the top activity is the resumed one, nothing to do.
if (mResumedActivity == next && next.state == ActivityState.RESUMED) {
......
}
// If we are sleeping, and there is no resumed activity, and the top
// activity is paused, well that is the state we want.
if ((mService.mSleeping || mService.mShuttingDown)
&& mLastPausedActivity == next && next.state == ActivityState.PAUSED) {
......
}
它首先看要启动的Activity是否就是当前处理Resumed状态的Activity,如果是的话,那就什么都不用做,直接返回就可以了;否则再看一下系统当前是否休眠状态,如果是的话,再看看要启动的Activity是否就是当前处于堆栈顶端的Activity,如果是的话,也是什么都不用做。
上面两个条件都不满足,因此,在继续往下执行之前,首先要把当处于Resumed状态的Activity推入Paused状态,然后才可以启动新的Activity。但是在将当前这个Resumed状态的Activity推入Paused状态之前,首先要看一下当前是否有Activity正在进入Pausing状态,如果有的话,当前这个Resumed状态的Activity就要稍后才能进入Paused状态了,这样就保证了所有需要进入Paused状态的Activity串行处理。
这里没有处于Pausing状态的Activity,即mPausingActivity为null,而且mResumedActivity也不为null,于是就调用startPausingLocked函数把Launcher推入Paused状态去了。
Step 11. ActivityStack.startPausingLocked
这个函数定义在frameworks/base/services/java/com/android/server/am/ActivityStack.java文件中:
view plain
public class ActivityStack {
......
private final void startPausingLocked(boolean userLeaving, boolean uiSleeping) {
if (mPausingActivity != null) {
......
}
ActivityRecord prev = mResumedActivity;
if (prev == null) {
......
}
......
mResumedActivity = null;
mPausingActivity = prev;
mLastPausedActivity = prev;
prev.state = ActivityState.PAUSING;
......
if (prev.app != null && prev.app.thread != null) {
......
try {
......
prev.app.thread.schedulePauseActivity(prev, prev.finishing, userLeaving,
prev.configChangeFlags);
......
} catch (Exception e) {
......
}
} else {
......
}
......
}
......
}
函数首先把mResumedActivity保存在本地变量prev中。在上一步Step 10中,说到mResumedActivity就是Launcher,因此,这里把Launcher进程中的ApplicationThread对象取出来,通过它来通知Launcher这个Activity它要进入Paused状态了。当然,这里的prev.app.thread是一个ApplicationThread对象的远程接口,通过调用这个远程接口的schedulePauseActivity来通知Launcher进入Paused状态。
参数prev.finishing表示prev所代表的Activity是否正在等待结束的Activity列表中,由于Laucher这个Activity还没结束,所以这里为false;参数prev.configChangeFlags表示哪些config发生了变化,这里我们不关心它的值。
Step 12. ApplicationThreadProxy.schedulePauseActivity
这个函数定义在frameworks/base/core/java/android/app/ApplicationThreadNative.java文件中:
view plain
class ApplicationThreadProxy implements IApplicationThread {
......
public final void schedulePauseActivity(IBinder token, boolean finished,
boolean userLeaving, int configChanges) throws RemoteException {
Parcel data = Parcel.obtain();
data.writeInterfaceToken(IApplicationThread.descriptor);
data.writeStrongBinder(token);
data.writeInt(finished ? 1 : 0);
data.writeInt(userLeaving ? 1 :0);
data.writeInt(configChanges);
mRemote.transact(SCHEDULE_PAUSE_ACTIVITY_TRANSACTION, data, null,
IBinder.FLAG_ONEWAY);
data.recycle();
}
......
}
这个函数通过Binder进程间通信机制进入到ApplicationThread.schedulePauseActivity函数中。
Step 13. ApplicationThread.schedulePauseActivity
这个函数定义在frameworks/base/core/java/android/app/ActivityThread.java文件中,它是ActivityThread的内部类:
view plain
public final class ActivityThread {
......
private final class ApplicationThread extends ApplicationThreadNative {
......
public final void schedulePauseActivity(IBinder token, boolean finished,
boolean userLeaving, int configChanges) {
queueOrSendMessage(
finished ? H.PAUSE_ACTIVITY_FINISHING : H.PAUSE_ACTIVITY,
token,
(userLeaving ? 1 : 0),
configChanges);
}
......
}
......
}
这里调用的函数queueOrSendMessage是ActivityThread类的成员函数。
上面说到,这里的finished值为false,因此,queueOrSendMessage的第一个参数值为H.PAUSE_ACTIVITY,表示要暂停token所代表的Activity,即Launcher。
Step 14. ActivityThread.queueOrSendMessage
这个函数定义在frameworks/base/core/java/android/app/ActivityThread.java文件中:
view plain
public final class ActivityThread {
......
private final void queueOrSendMessage(int what, Object obj, int arg1) {
queueOrSendMessage(what, obj, arg1, 0);
}
private final void queueOrSendMessage(int what, Object obj, int arg1, int arg2) {
synchronized (this) {
......
Message msg = Message.obtain();
msg.what = what;
msg.obj = obj;
msg.arg1 = arg1;
msg.arg2 = arg2;
mH.sendMessage(msg);
}
}
......
}
这里首先将相关信息组装成一个msg,然后通过mH成员变量发送出去,mH的类型是H,继承于Handler类,是ActivityThread的内部类,因此,这个消息最后由H.handleMessage来处理。
Step 15. H.handleMessage
这个函数定义在frameworks/base/core/java/android/app/ActivityThread.java文件中:
view plain
public final class ActivityThread {
......
private final class H extends Handler {
......
public void handleMessage(Message msg) {
......
switch (msg.what) {
......
case PAUSE_ACTIVITY:
handlePauseActivity((IBinder)msg.obj, false, msg.arg1 != 0, msg.arg2);
maybeSnapshot();
break;
......
}
......
}
......
}
这里调用ActivityThread.handlePauseActivity进一步操作,msg.obj是一个ActivityRecord对象的引用,它代表的是Launcher这个Activity。
Step 16. ActivityThread.handlePauseActivity
这个函数定义在frameworks/base/core/java/android/app/ActivityThread.java文件中:
view plain
public final class ActivityThread {
......
private final void handlePauseActivity(IBinder token, boolean finished,
boolean userLeaving, int configChanges) {
ActivityClientRecord r = mActivities.get(token);
if (r != null) {
//Slog.v(TAG, "userLeaving=" + userLeaving + " handling pause of " + r);
if (userLeaving) {
performUserLeavingActivity(r);
}
r.activity.mConfigChangeFlags |= configChanges;
Bundle state = performPauseActivity(token, finished, true);
// Make sure any pending writes are now committed.
QueuedWork.waitToFinish();
// Tell the activity manager we have paused.
try {
ActivityManagerNative.getDefault().activityPaused(token, state);
} catch (RemoteException ex) {
}
}
}
......
}
函数首先将Binder引用token转换成ActivityRecord的远程接口ActivityClientRecord,然后做了三个事情:1. 如果userLeaving为true,则通过调用performUserLeavingActivity函数来调用Activity.onUserLeaveHint通知Activity,用户要离开它了;2. 调用performPauseActivity函数来调用Activity.onPause函数,我们知道,在Activity的生命周期中,当它要让位于其它的Activity时,系统就会调用它的onPause函数;3. 它通知ActivityManagerService,这个Activity已经进入Paused状态了,ActivityManagerService现在可以完成未竟的事情,即启动MainActivity了。
Step 17. ActivityManagerProxy.activityPaused
这个函数定义在frameworks/base/core/java/android/app/ActivityManagerNative.java文件中:
view plain
class ActivityManagerProxy implements IActivityManager
{
......
public void activityPaused(IBinder token, Bundle state) throws RemoteException
{
Parcel data = Parcel.obtain();
Parcel reply = Parcel.obtain();
data.writeInterfaceToken(IActivityManager.descriptor);
data.writeStrongBinder(token);
data.writeBundle(state);
mRemote.transact(ACTIVITY_PAUSED_TRANSACTION, data, reply, 0);
reply.readException();
data.recycle();
reply.recycle();
}
......
}
这里通过Binder进程间通信机制就进入到ActivityManagerService.activityPaused函数中去了。
Step 18. ActivityManagerService.activityPaused
这个函数定义在frameworks/base/services/java/com/android/server/am/ActivityManagerService.java文件中:
view plain
public final class ActivityManagerService extends ActivityManagerNative
implements Watchdog.Monitor, BatteryStatsImpl.BatteryCallback {
......
public final void activityPaused(IBinder token, Bundle icicle) {
......
final long origId = Binder.clearCallingIdentity();
mMainStack.activityPaused(token, icicle, false);
......
}
......
}
这里,又再次进入到ActivityStack类中,执行activityPaused函数。
Step 19. ActivityStack.activityPaused
这个函数定义在frameworks/base/services/java/com/android/server/am/ActivityStack.java文件中:
view plain
public class ActivityStack {
......
final void activityPaused(IBinder token, Bundle icicle, boolean timeout) {
......
ActivityRecord r = null;
synchronized (mService) {
int index = indexOfTokenLocked(token);
if (index >= 0) {
r = (ActivityRecord)mHistory.get(index);
if (!timeout) {
r.icicle = icicle;
r.haveState = true;
}
mHandler.removeMessages(PAUSE_TIMEOUT_MSG, r);
if (mPausingActivity == r) {
r.state = ActivityState.PAUSED;
completePauseLocked();
} else {
......
}
}
}
}
......
}
这里通过参数token在mHistory列表中得到ActivityRecord,从上面我们知道,这个ActivityRecord代表的是Launcher这个Activity,而我们在Step 11中,把Launcher这个Activity的信息保存在mPausingActivity中,因此,这里mPausingActivity等于r,于是,执行completePauseLocked操作。
Step 20. ActivityStack.completePauseLocked
这个函数定义在frameworks/base/services/java/com/android/server/am/ActivityStack.java文件中:
view plain
public class ActivityStack {
......
private final void completePauseLocked() {
ActivityRecord prev = mPausingActivity;
......
if (prev != null) {
......
mPausingActivity = null;
}
if (!mService.mSleeping && !mService.mShuttingDown) {
resumeTopActivityLocked(prev);
} else {
......
}
......
}
......
}
函数首先把mPausingActivity变量清空,因为现在不需要它了,然后调用resumeTopActivityLokced进一步操作,它传入的参数即为代表Launcher这个Activity的ActivityRecord。
Step 21. ActivityStack.resumeTopActivityLokced
这个函数定义在frameworks/base/services/java/com/android/server/am/ActivityStack.java文件中:
view plain
public class ActivityStack {
......
final boolean resumeTopActivityLocked(ActivityRecord prev) {
......
// Find the first activity that is not finishing.
ActivityRecord next = topRunningActivityLocked(null);
// Remember how we'll process this pause/resume situation, and ensure
// that the state is reset however we wind up proceeding.
final boolean userLeaving = mUserLeaving;
mUserLeaving = false;
......
next.delayedResume = false;
// If the top activity is the resumed one, nothing to do.
if (mResumedActivity == next && next.state == ActivityState.RESUMED) {
......
return false;
}
// If we are sleeping, and there is no resumed activity, and the top
// activity is paused, well that is the state we want.
if ((mService.mSleeping || mService.mShuttingDown)
&& mLastPausedActivity == next && next.state == ActivityState.PAUSED) {
......
return false;
}
.......
// We need to start pausing the current activity so the top one
// can be resumed...
if (mResumedActivity != null) {
......
return true;
}
......
if (next.app != null && next.app.thread != null) {
......
} else {
......
startSpecificActivityLocked(next, true, true);
}
return true;
}
......
}
通过上面的Step 9,我们知道,当前在堆栈顶端的Activity为我们即将要启动的MainActivity,这里通过调用topRunningActivityLocked将它取回来,保存在next变量中。之前最后一个Resumed状态的Activity,即Launcher,到了这里已经处于Paused状态了,因此,mResumedActivity为null。最后一个处于Paused状态的Activity为Launcher,因此,这里的mLastPausedActivity就为Launcher。前面我们为MainActivity创建了ActivityRecord后,它的app域一直保持为null。有了这些信息后,上面这段代码就容易理解了,它最终调用startSpecificActivityLocked进行下一步操作。
Step 22. ActivityStack.startSpecificActivityLocked
这个函数定义在frameworks/base/services/java/com/android/server/am/ActivityStack.java文件中:
view plain
public class ActivityStack {
......
private final void startSpecificActivityLocked(ActivityRecord r,
boolean andResume, boolean checkConfig) {
// Is this activity's application already running?
ProcessRecord app = mService.getProcessRecordLocked(r.processName,
r.info.applicationInfo.uid);
......
if (app != null && app.thread != null) {
try {
realStartActivityLocked(r, app, andResume, checkConfig);
return;
} catch (RemoteException e) {
......
}
}
mService.startProcessLocked(r.processName, r.info.applicationInfo, true, 0,
"activity", r.intent.getComponent(), false);
}
......
}
注意,这里由于是第一次启动应用程序的Activity,所以下面语句:
view plain
ProcessRecord app = mService.getProcessRecordLocked(r.processName,
r.info.applicationInfo.uid);
取回来的app为null。在Activity应用程序中的AndroidManifest.xml配置文件中,我们没有指定Application标签的process属性,系统就会默认使用package的名称,这里就是"shy.luo.activity"了。每一个应用程序都有自己的uid,因此,这里uid + process的组合就可以为每一个应用程序创建一个ProcessRecord。当然,我们可以配置两个应用程序具有相同的uid和package,或者在AndroidManifest.xml配置文件的application标签或者activity标签中显式指定相同的process属性值,这样,不同的应用程序也可以在同一个进程中启动。
函数最终执行ActivityManagerService.startProcessLocked函数进行下一步操作。
Step 23. ActivityManagerService.startProcessLocked
这个函数定义在frameworks/base/services/java/com/android/server/am/ActivityManagerService.java文件中:
view plain
public final class ActivityManagerService extends ActivityManagerNative
implements Watchdog.Monitor, BatteryStatsImpl.BatteryCallback {
......
final ProcessRecord startProcessLocked(String processName,
ApplicationInfo info, boolean knownToBeDead, int intentFlags,
String hostingType, ComponentName hostingName, boolean allowWhileBooting) {
ProcessRecord app = getProcessRecordLocked(processName, info.uid);
......
String hostingNameStr = hostingName != null
? hostingName.flattenToShortString() : null;
......
if (app == null) {
app = new ProcessRecordLocked(null, info, processName);
mProcessNames.put(processName, info.uid, app);
} else {
// If this is a new package in the process, add the package to the list
app.addPackage(info.packageName);
}
......
startProcessLocked(app, hostingType, hostingNameStr);
return (app.pid != 0) ? app : null;
}
......
}
这里再次检查是否已经有以process + uid命名的进程存在,在我们这个情景中,返回值app为null,因此,后面会创建一个ProcessRecord,并存保存在成员变量mProcessNames中,最后,调用另一个startProcessLocked函数进一步操作:
view plain
public final class ActivityManagerService extends ActivityManagerNative
implements Watchdog.Monitor, BatteryStatsImpl.BatteryCallback {
......
private final void startProcessLocked(ProcessRecord app,
String hostingType, String hostingNameStr) {
......
try {
int uid = app.info.uid;
int[] gids = null;
try {
gids = mContext.getPackageManager().getPackageGids(
app.info.packageName);
} catch (PackageManager.NameNotFoundException e) {
......
}
......
int debugFlags = 0;
......
int pid = Process.start("android.app.ActivityThread",
mSimpleProcessManagement ? app.processName : null, uid, uid,
gids, debugFlags, null);
......
} catch (RuntimeException e) {
......
}
}
......
}
这里主要是调用Process.start接口来创建一个新的进程,新的进程会导入android.app.ActivityThread类,并且执行它的main函数,这就是为什么我们前面说每一个应用程序都有一个ActivityThread实例来对应的原因。
Step 24. ActivityThread.main
这个函数定义在frameworks/base/core/java/android/app/ActivityThread.java文件中:
view plain
public final class ActivityThread {
......
private final void attach(boolean system) {
......
mSystemThread = system;
if (!system) {
......
IActivityManager mgr = ActivityManagerNative.getDefault();
try {
mgr.attachApplication(mAppThread);
} catch (RemoteException ex) {
}
} else {
......
}
}
......
public static final void main(String[] args) {
.......
ActivityThread thread = new ActivityThread();
thread.attach(false);
......
Looper.loop();
.......
thread.detach();
......
}
}
这个函数在进程中创建一个ActivityThread实例,然后调用它的attach函数,接着就进入消息循环了,直到最后进程退出。
函数attach最终调用了ActivityManagerService的远程接口ActivityManagerProxy的attachApplication函数,传入的参数是mAppThread,这是一个ApplicationThread类型的Binder对象,它的作用是用来进行进程间通信的。
Step 25. ActivityManagerProxy.attachApplication
这个函数定义在frameworks/base/core/java/android/app/ActivityManagerNative.java文件中:
view plain
class ActivityManagerProxy implements IActivityManager
{
......
public void attachApplication(IApplicationThread app) throws RemoteException
{
Parcel data = Parcel.obtain();
Parcel reply = Parcel.obtain();
data.writeInterfaceToken(IActivityManager.descriptor);
data.writeStrongBinder(app.asBinder());
mRemote.transact(ATTACH_APPLICATION_TRANSACTION, data, reply, 0);
reply.readException();
data.recycle();
reply.recycle();
}
......
}
这里通过Binder驱动程序,最后进入ActivityManagerService的attachApplication函数中。
Step 26. ActivityManagerService.attachApplication
这个函数定义在frameworks/base/services/java/com/android/server/am/ActivityManagerService.java文件中:
view plain
public final class ActivityManagerService extends ActivityManagerNative
implements Watchdog.Monitor, BatteryStatsImpl.BatteryCallback {
......
public final void attachApplication(IApplicationThread thread) {
synchronized (this) {
int callingPid = Binder.getCallingPid();
final long origId = Binder.clearCallingIdentity();
attachApplicationLocked(thread, callingPid);
Binder.restoreCallingIdentity(origId);
}
}
......
}
这里将操作转发给attachApplicationLocked函数。
Step 27. ActivityManagerService.attachApplicationLocked
这个函数定义在frameworks/base/services/java/com/android/server/am/ActivityManagerService.java文件中:
view plain
public final class ActivityManagerService extends ActivityManagerNative
implements Watchdog.Monitor, BatteryStatsImpl.BatteryCallback {
......
private final boolean attachApplicationLocked(IApplicationThread thread,
int pid) {
// Find the application record that is being attached... either via
// the pid if we are running in multiple processes, or just pull the
// next app record if we are emulating process with anonymous threads.
ProcessRecord app;
if (pid != MY_PID && pid >= 0) {
synchronized (mPidsSelfLocked) {
app = mPidsSelfLocked.get(pid);
}
} else if (mStartingProcesses.size() > 0) {
......
} else {
......
}
if (app == null) {
......
return false;
}
......
String processName = app.processName;
try {
thread.asBinder().linkToDeath(new AppDeathRecipient(
app, pid, thread), 0);
} catch (RemoteException e) {
......
return false;
}
......
app.thread = thread;
app.curAdj = app.setAdj = -100;
app.curSchedGroup = Process.THREAD_GROUP_DEFAULT;
app.setSchedGroup = Process.THREAD_GROUP_BG_NONINTERACTIVE;
app.forcingToForeground = null;
app.foregroundServices = false;
app.debugging = false;
......
boolean normalMode = mProcessesReady || isAllowedWhileBooting(app.info);
......
boolean badApp = false;
boolean didSomething = false;
// See if the top visible activity is waiting to run in this process...
ActivityRecord hr = mMainStack.topRunningActivityLocked(null);
if (hr != null && normalMode) {
if (hr.app == null && app.info.uid == hr.info.applicationInfo.uid
&& processName.equals(hr.processName)) {
try {
if (mMainStack.realStartActivityLocked(hr, app, true, true)) {
didSomething = true;
}
} catch (Exception e) {
......
}
} else {
......
}
}
......
return true;
}
......
}
在前面的Step 23中,已经创建了一个ProcessRecord,这里首先通过pid将它取回来,放在app变量中,然后对app的其它成员进行初始化,最后调用mMainStack.realStartActivityLocked执行真正的Activity启动操作。这里要启动的Activity通过调用mMainStack.topRunningActivityLocked(null)从堆栈顶端取回来,这时候在堆栈顶端的Activity就是MainActivity了。
Step 28. ActivityStack.realStartActivityLocked
这个函数定义在frameworks/base/services/java/com/android/server/am/ActivityStack.java文件中:
view plain
public class ActivityStack {
......
final boolean realStartActivityLocked(ActivityRecord r,
ProcessRecord app, boolean andResume, boolean checkConfig)
throws RemoteException {
......
r.app = app;
......
int idx = app.activities.indexOf(r);
if (idx < 0) {
app.activities.add(r);
}
......
try {
......
List<ResultInfo> results = null;
List<Intent> newIntents = null;
if (andResume) {
results = r.results;
newIntents = r.newIntents;
}
......
app.thread.scheduleLaunchActivity(new Intent(r.intent), r,
System.identityHashCode(r),
r.info, r.icicle, results, newIntents, !andResume,
mService.isNextTransitionForward());
......
} catch (RemoteException e) {
......
}
......
return true;
}
......
}
这里最终通过app.thread进入到ApplicationThreadProxy的scheduleLaunchActivity函数中,注意,这里的第二个参数r,是一个ActivityRecord类型的Binder对象,用来作来这个Activity的token值。
Step 29. ApplicationThreadProxy.scheduleLaunchActivity
这个函数定义在frameworks/base/core/java/android/app/ApplicationThreadNative.java文件中:
view plain
class ApplicationThreadProxy implements IApplicationThread {
......
public final void scheduleLaunchActivity(Intent intent, IBinder token, int ident,
ActivityInfo info, Bundle state, List<ResultInfo> pendingResults,
List<Intent> pendingNewIntents, boolean notResumed, boolean isForward)
throws RemoteException {
Parcel data = Parcel.obtain();
data.writeInterfaceToken(IApplicationThread.descriptor);
intent.writeToParcel(data, 0);
data.writeStrongBinder(token);
data.writeInt(ident);
info.writeToParcel(data, 0);
data.writeBundle(state);
data.writeTypedList(pendingResults);
data.writeTypedList(pendingNewIntents);
data.writeInt(notResumed ? 1 : 0);
data.writeInt(isForward ? 1 : 0);
mRemote.transact(SCHEDULE_LAUNCH_ACTIVITY_TRANSACTION, data, null,
IBinder.FLAG_ONEWAY);
data.recycle();
}
......
}
这个函数最终通过Binder驱动程序进入到ApplicationThread的scheduleLaunchActivity函数中。
Step 30. ApplicationThread.scheduleLaunchActivity
这个函数定义在frameworks/base/core/java/android/app/ActivityThread.java文件中:
view plain
public final class ActivityThread {
......
private final class ApplicationThread extends ApplicationThreadNative {
......
// we use token to identify this activity without having to send the
// activity itself back to the activity manager. (matters more with ipc)
public final void scheduleLaunchActivity(Intent intent, IBinder token, int ident,
ActivityInfo info, Bundle state, List<ResultInfo> pendingResults,
List<Intent> pendingNewIntents, boolean notResumed, boolean isForward) {
ActivityClientRecord r = new ActivityClientRecord();
r.token = token;
r.ident = ident;
r.intent = intent;
r.activityInfo = info;
r.state = state;
r.pendingResults = pendingResults;
r.pendingIntents = pendingNewIntents;
r.startsNotResumed = notResumed;
r.isForward = isForward;
queueOrSendMessage(H.LAUNCH_ACTIVITY, r);
}
......
}
......
}
函数首先创建一个ActivityClientRecord实例,并且初始化它的成员变量,然后调用ActivityThread类的queueOrSendMessage函数进一步处理。
Step 31. ActivityThread.queueOrSendMessage
这个函数定义在frameworks/base/core/java/android/app/ActivityThread.java文件中:
view plain
public final class ActivityThread {
......
private final class ApplicationThread extends ApplicationThreadNative {
......
// if the thread hasn't started yet, we don't have the handler, so just
// save the messages until we're ready.
private final void queueOrSendMessage(int what, Object obj) {
queueOrSendMessage(what, obj, 0, 0);
}
......
private final void queueOrSendMessage(int what, Object obj, int arg1, int arg2) {
synchronized (this) {
......
Message msg = Message.obtain();
msg.what = what;
msg.obj = obj;
msg.arg1 = arg1;
msg.arg2 = arg2;
mH.sendMessage(msg);
}
}
......
}
......
}
函数把消息内容放在msg中,然后通过mH把消息分发出去,这里的成员变量mH我们在前面已经见过,消息分发出去后,最后会调用H类的handleMessage函数。
Step 32. H.handleMessage
这个函数定义在frameworks/base/core/java/android/app/ActivityThread.java文件中:
view plain
public final class ActivityThread {
......
private final class H extends Handler {
......
public void handleMessage(Message msg) {
......
switch (msg.what) {
case LAUNCH_ACTIVITY: {
ActivityClientRecord r = (ActivityClientRecord)msg.obj;
r.packageInfo = getPackageInfoNoCheck(
r.activityInfo.applicationInfo);
handleLaunchActivity(r, null);
} break;
......
}
......
}
......
}
这里最后调用ActivityThread类的handleLaunchActivity函数进一步处理。
Step 33. ActivityThread.handleLaunchActivity
这个函数定义在frameworks/base/core/java/android/app/ActivityThread.java文件中:
view plain
public final class ActivityThread {
......
private final void handleLaunchActivity(ActivityClientRecord r, Intent customIntent) {
......
Activity a = performLaunchActivity(r, customIntent);
if (a != null) {
r.createdConfig = new Configuration(mConfiguration);
Bundle oldState = r.state;
handleResumeActivity(r.token, false, r.isForward);
......
} else {
......
}
}
......
}
这里首先调用performLaunchActivity函数来加载这个Activity类,即shy.luo.activity.MainActivity,然后调用它的onCreate函数,最后回到handleLaunchActivity函数时,再调用handleResumeActivity函数来使这个Activity进入Resumed状态,即会调用这个Activity的onResume函数,这是遵循Activity的生命周期的。
Step 34. ActivityThread.performLaunchActivity
这个函数定义在frameworks/base/core/java/android/app/ActivityThread.java文件中:
view plain
public final class ActivityThread {
......
private final Activity performLaunchActivity(ActivityClientRecord r, Intent customIntent) {
ActivityInfo aInfo = r.activityInfo;
if (r.packageInfo == null) {
r.packageInfo = getPackageInfo(aInfo.applicationInfo,
Context.CONTEXT_INCLUDE_CODE);
}
ComponentName component = r.intent.getComponent();
if (component == null) {
component = r.intent.resolveActivity(
mInitialApplication.getPackageManager());
r.intent.setComponent(component);
}
if (r.activityInfo.targetActivity != null) {
component = new ComponentName(r.activityInfo.packageName,
r.activityInfo.targetActivity);
}
Activity activity = null;
try {
java.lang.ClassLoader cl = r.packageInfo.getClassLoader();
activity = mInstrumentation.newActivity(
cl, component.getClassName(), r.intent);
r.intent.setExtrasClassLoader(cl);
if (r.state != null) {
r.state.setClassLoader(cl);
}
} catch (Exception e) {
......
}
try {
Application app = r.packageInfo.makeApplication(false, mInstrumentation);
......
if (activity != null) {
ContextImpl appContext = new ContextImpl();
appContext.init(r.packageInfo, r.token, this);
appContext.setOuterContext(activity);
CharSequence title = r.activityInfo.loadLabel(appContext.getPackageManager());
Configuration config = new Configuration(mConfiguration);
......
activity.attach(appContext, this, getInstrumentation(), r.token,
r.ident, app, r.intent, r.activityInfo, title, r.parent,
r.embeddedID, r.lastNonConfigurationInstance,
r.lastNonConfigurationChildInstances, config);
if (customIntent != null) {
activity.mIntent = customIntent;
}
r.lastNonConfigurationInstance = null;
r.lastNonConfigurationChildInstances = null;
activity.mStartedActivity = false;
int theme = r.activityInfo.getThemeResource();
if (theme != 0) {
activity.setTheme(theme);
}
activity.mCalled = false;
mInstrumentation.callActivityOnCreate(activity, r.state);
......
r.activity = activity;
r.stopped = true;
if (!r.activity.mFinished) {
activity.performStart();
r.stopped = false;
}
if (!r.activity.mFinished) {
if (r.state != null) {
mInstrumentation.callActivityOnRestoreInstanceState(activity, r.state);
}
}
if (!r.activity.mFinished) {
activity.mCalled = false;
mInstrumentation.callActivityOnPostCreate(activity, r.state);
if (!activity.mCalled) {
throw new SuperNotCalledException(
"Activity " + r.intent.getComponent().toShortString() +
" did not call through to super.onPostCreate()");
}
}
}
r.paused = true;
mActivities.put(r.token, r);
} catch (SuperNotCalledException e) {
......
} catch (Exception e) {
......
}
return activity;
}
......
}
函数前面是收集要启动的Activity的相关信息,主要package和component信息:
view plain
ActivityInfo aInfo = r.activityInfo;
if (r.packageInfo == null) {
r.packageInfo = getPackageInfo(aInfo.applicationInfo,
Context.CONTEXT_INCLUDE_CODE);
}
ComponentName component = r.intent.getComponent();
if (component == null) {
component = r.intent.resolveActivity(
mInitialApplication.getPackageManager());
r.intent.setComponent(component);
}
if (r.activityInfo.targetActivity != null) {
component = new ComponentName(r.activityInfo.packageName,
r.activityInfo.targetActivity);
}
然后通过ClassLoader将shy.luo.activity.MainActivity类加载进来:
view plain
Activity activity = null;
try {
java.lang.ClassLoader cl = r.packageInfo.getClassLoader();
activity = mInstrumentation.newActivity(
cl, component.getClassName(), r.intent);
r.intent.setExtrasClassLoader(cl);
if (r.state != null) {
r.state.setClassLoader(cl);
}
} catch (Exception e) {
......
}
接下来是创建Application对象,这是根据AndroidManifest.xml配置文件中的Application标签的信息来创建的:
view plain
Application app = r.packageInfo.makeApplication(false, mInstrumentation);
后面的代码主要创建Activity的上下文信息,并通过attach方法将这些上下文信息设置到MainActivity中去:
view plain
activity.attach(appContext, this, getInstrumentation(), r.token,
r.ident, app, r.intent, r.activityInfo, title, r.parent,
r.embeddedID, r.lastNonConfigurationInstance,
r.lastNonConfigurationChildInstances, config);
最后还要调用MainActivity的onCreate函数:
view plain
mInstrumentation.callActivityOnCreate(activity, r.state);
这里不是直接调用MainActivity的onCreate函数,而是通过mInstrumentation的callActivityOnCreate函数来间接调用,前面我们说过,mInstrumentation在这里的作用是监控Activity与系统的交互操作,相当于是系统运行日志。
Step 35. MainActivity.onCreate
这个函数定义在packages/experimental/Activity/src/shy/luo/activity/MainActivity.java文件中,这是我们自定义的app工程文件:
view plain
public class MainActivity extends Activity implements OnClickListener {
......
@Override
public void onCreate(Bundle savedInstanceState) {
......
Log.i(LOG_TAG, "Main Activity Created.");
}
......
}
这样,MainActivity就启动起来了,整个应用程序也启动起来了。
整个应用程序的启动过程要执行很多步骤,但是整体来看,主要分为以下五个阶段:
一. Step1 - Step 11:Launcher通过Binder进程间通信机制通知ActivityManagerService,它要启动一个Activity;
二. Step 12 - Step 16:ActivityManagerService通过Binder进程间通信机制通知Launcher进入Paused状态;
三. Step 17 - Step 24:Launcher通过Binder进程间通信机制通知ActivityManagerService,它已经准备就绪进入Paused状态,于是ActivityManagerService就创建一个新的进程,用来启动一个ActivityThread实例,即将要启动的Activity就是在这个ActivityThread实例中运行;
四. Step 25 - Step 27:ActivityThread通过Binder进程间通信机制将一个ApplicationThread类型的Binder对象传递给ActivityManagerService,以便以后ActivityManagerService能够通过这个Binder对象和它进行通信;
五. Step 28 - Step 35:ActivityManagerService通过Binder进程间通信机制通知ActivityThread,现在一切准备就绪,它可以真正执行Activity的启动操作了。
这里不少地方涉及到了Binder进程间通信机制,相关资料请参考Android进程间通信(IPC)机制Binder简要介绍和学习计划一文。
这样,应用程序的启动过程就介绍完了,它实质上是启动应用程序的默认Activity,在下一篇文章中,我们将介绍在应用程序内部启动另一个Activity的过程,即新的Activity与启动它的Activity将会在同一个进程(Process)和任务(Task)运行,敬请关注。