拦截请求
在第一篇中,我们看到一个特别简单的Spring Security配置,在这个默认的配置中,会要求所有请求都要经过认证。当然了,我们不会也没有必要要求所有请求都经过认证。
对每个请求进行细粒度安全性控制的关键在于重载configure(HttpSecurity)方法。
@Override
    protected void configure(HttpSecurity http) throws Exception {
        http.authorizeRequests()
                .antMatchers("/test").authenticated()
                //.antMatchers("/test","/tests").authenticated()
                .antMatchers(HttpMethod.POST,"/tests").authenticated()
                .anyRequest().permitAll();
    }
我们首先调用authorizeRequests(),然后调用该方法所返回的对象的方法来配置请求级别的安全性细节。其中,第一次调用antMatchers()指定了对/test路径的请求需要认证。第二次调用antMatchers()更为具体,说明对/tests路径的HTTP POST请求必须要经过认证。最后anyRequest().permitAll()说明其他所有的请求都是允许的,不需要认证和任何的权限。
antMatchers()方法中设定的路径支持Ant风格的通配符。
.antMatchers("/haha/**").authenticated()antMatchers()同时也可以指定多个路径
.antMatchers("/test","/tests").authenticated()authenticated()要求在执行该请求时,必须已经登录了应用,否则会出现如下错误。permitAll()方法允许请求没有任何的安全限制。

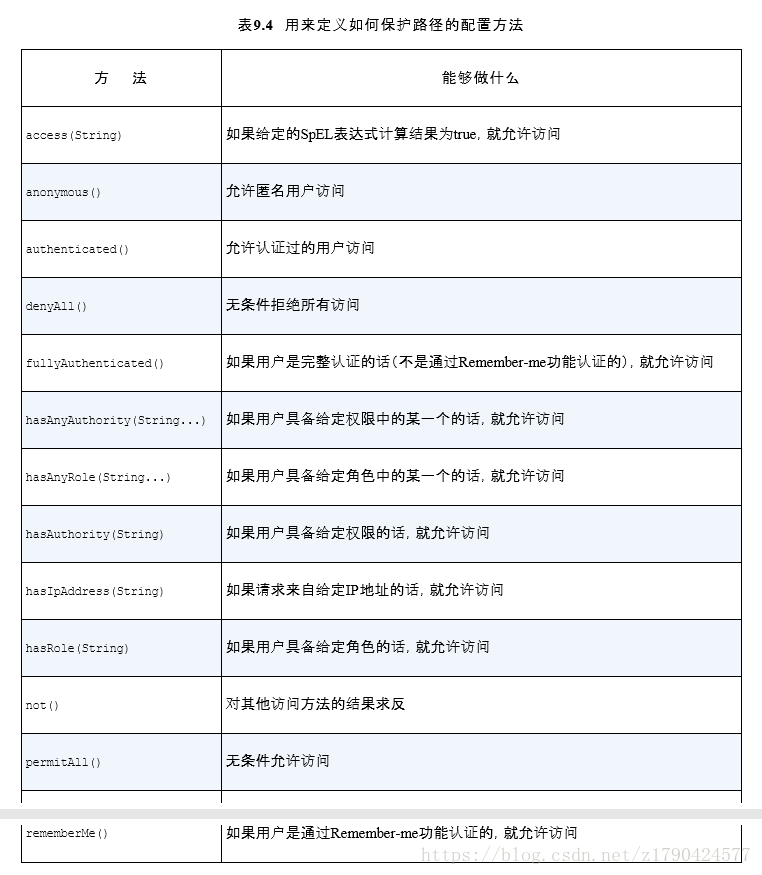
用来定义如何保护路径的方法
我们还可以修改之前的configure()方法,要求用户不仅需要认证,还要具备ROLE_USER权限。
@Override
    protected void configure(HttpSecurity http) throws Exception {
        http.authorizeRequests()
                //.antMatchers("/test","/tests").authenticated()
                .antMatchers("/haha/**").hasAuthority("ROLE_USER")
                .antMatchers("/haha/**").hasRole("USER")
                //.antMatchers(HttpMethod.POST,"/tests").authenticated()
                .anyRequest().permitAll();
    }
hasRole()是hasAuthority()的缩写,它会自动使用ROLE_前缀。
我们可以将任意的antMatchers()、anyRequest()连接起来,以满足Web应用安全规则的需要。
使用Spring表达式进行保护
表9.4.大多数方法都是一维的,也就是说不能叠加使用。但借助access()方法,我们也可以将SpEL作为声明访问限制的一种方式。
.antMatchers("/haha/**").hasRole("USER")
.antMatchers("/haha/**").access("hasRole('USER')")
这两个效果是等价的。表9.5列出了Spring Security支持的所有SpEL表达式。

掌握了Spring Security的SpEL表达式,我们就能够不再局限于基于用户的权限进行访问了。例如:对/haha/**的请求认证不仅需要USER权限还需要来自指定的IP地址。
.antMatchers("/haha/**").access("hasRole('USER') and hasIpAddress('211.143.161.130')")强制通道的安全性
我们都知道HTTP发送的数据都是不加密的,所以对于一些敏感信息要通过HTTPS来加密发送。
传递到config()方法中HttpSecurity对象,除了具有authorizeRequests()方法以外,还有一个requiresChannel()方法,借助这个方法能够为各种URL模式声明所要求的通道。
@Override
    protected void configure(HttpSecurity http) throws Exception {
        http
                .authorizeRequests()
                .antMatchers("/test","/tests").authenticated()
                .anyRequest().permitAll()
                .and()
                .requiresChannel()
                .antMatchers("/haha/ha").requiresSecure()    //需要HTTPS
                ;
    }
与之相反,有些页面不需要通过HTTPS传送,我们可以使用requiresInsecure()代替requiresSecure()方法。
防止跨站请求伪造(cross-site request forgery,CSRF)
如果一个站点欺骗用户提交请求到其他服务器的话,就会发生CSRF攻击。
Spring Security3.2开启,默认会启用CSRF防护。因为我没怎么用到,所以细节就不多说了。
.csrf().disable() //禁用CSRF防护认证用户
如果你使用最简单的Spring Security配置的话,那么就能无偿得到一个登陆页。实际上,在重写configure(HttpSecurity)之前,我们都能使用一个简单却功能完备的登陆页,但是一旦重写了configure(HttpSecurity)方法,就失去了这个简单的登录页面。
不过我们可以通过formLogin()方法把它找回来。
@Override
    protected void configure(HttpSecurity http) throws Exception {
        http
               .formLogin()
               .and()
               .csrf().disable()  //禁用CSRF
                .authorizeRequests()
                .antMatchers("/test","/tests").authenticated()
                .anyRequest().permitAll()
                ;
    }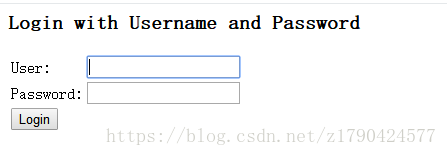
添加自定义登录页面
login.jsp
<%@ page language="java" contentType="text/html; charset=UTF-8"
    pageEncoding="UTF-8"%>
<!DOCTYPE html>
<html>
<head>
<meta http-equiv="Content-Type" content="text/html; charset=UTF-8">
<title>Insert title here</title>
</head>
<body onload='document.f.username.focus();'>
    <h3>自定义的登陆页面</h3>
    <form name='f' action='${pageContext.request.contextPath }/login'
        method='POST'>
        <table>
            <tr>
                <td>User:</td>
                <td><input type='text' name='username' value=''></td>
            </tr>
            <tr>
                <td>Password:</td>
                <td><input type='password' name='password' /></td>
            </tr>
            <tr>
                <td colspan='2'><input name="submit" type="submit"
                    value="Login" /></td>
            </tr>
        </table>
    </form>
</body>
</html>
修改configure(HttpSecurity http)方法如下
@Override
    protected void configure(HttpSecurity http) throws Exception {
        http
               .formLogin()
               .loginPage("/login").defaultSuccessUrl("/success").failureUrl("/error")
               .and()
               .csrf().disable()
                .authorizeRequests()
                .antMatchers("/test","/tests").authenticated()
                .anyRequest().permitAll()
                ;
}@RequestMapping("/login")
public String login()
{
return "login";
}注意action的提交路径。loginPage()指定自定义登陆页访问请求,defaultSuccessUrl()登陆成功后浏览器需要重定向到”/success”,failureUrl()登陆失败后浏览器需要重定向到”/error”。

注意:自定义的登陆页也需要username和password输入域!否则会一直认证失败!!!!同时,loginPage()与自定义登陆页的action访问路径是一样的!!!
Spring Security使用Authentication获取当前用户信息
Spring Security使用一个Authentication对象来描述当前用户的相关信息。SecurityContextHolder中持有的是当前用户的SecurityContext,而SecurityContext持有的是代表当前用户相关信息的Authentication的引用。这个Authentication对象不需要我们自己去创建,在与系统交互的过程中,Spring Security会自动为我们创建相应的Authentication对象,然后赋值给当前的SecurityContext。但是往往我们需要在程序中获取当前用户的相关信息,比如最常见的是获取当前登录用户的用户名。在程序的任何地方,通过如下方式我们可以获取到当前用户的用户名:
 public String getCurrentUsername() {

      Object principal = SecurityContextHolder.getContext().getAuthentication().getPrincipal();

      if (principal instanceof UserDetails) {

         return ((UserDetails) principal).getUsername();

      }

      if (principal instanceof Principal) {

         return ((Principal) principal).getName();

      }

      return String.valueOf(principal);

   }
通过Authentication.getPrincipal()可以获取到代表当前用户的信息,这个对象通常是UserDetails的实例。获取当前用户的用户名是一种比较常见的需求,关于上述代码其实Spring Security在Authentication中的实现类中已经为我们做了相关实现,所以获取当前用户的用户名最简单的方式应当如下:
public String getCurrentUsername() {
return SecurityContextHolder.getContext().getAuthentication().getName();
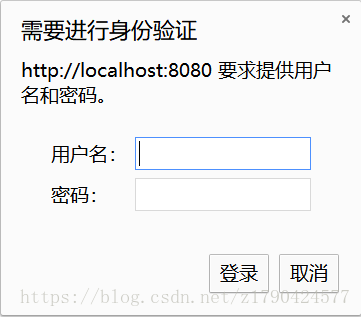
}启用HTTP Basic认证
当在Web浏览器中使用时,它将向用户弹出一个简单的模拟对话框。
http
.httpBasic()
.and()
...
退出
退出功能是通过Servlet容器中的Filter实现的(默认情况下),这个Filter会拦截针对”/logout”的请求。因此,为应用添加退出功能只需要添加以下的链接即可。
<a href="${pageContext.request.contextPath }/logout">退出</a>在退出完成后,浏览器会重定向到“login?logout”,从而允许用户进行再次登录。如果你希望重定向到其他页面可以
.logout().logoutSuccessUrl("/error")logoutSuccessUrl(“/error”)表明在退出成功后,浏览器需要重定向到”/error”。我们还可以重写默认的LogoutFilter拦截路径。
.logout().logoutSuccessUrl("/error").logoutUrl("/tuichu")前面说到LogoutFilter默认会拦截针对”/logout”的请求,在这里我们通过logoutUrl(“/tuichu”)设置为拦截”/tuichu”的请求。同时将退出的请求路径更改为如下所示:
<a href="${pageContext.request.contextPath }/tuichu">退出</a>保护视图
当为浏览器渲染HTML内容时,你可能希望视图中能够反映安全限制和相关的信息。或者你想根据用户被授予了什么权限,有条件的渲染特定的视图内容。渲染视图的两个重要方案就是:JSP和Thymeleaf。
Spring Security本身提供了一个JSP标签库,而Thymeleaf通过特定的方言实现了与Spring Security的集成。
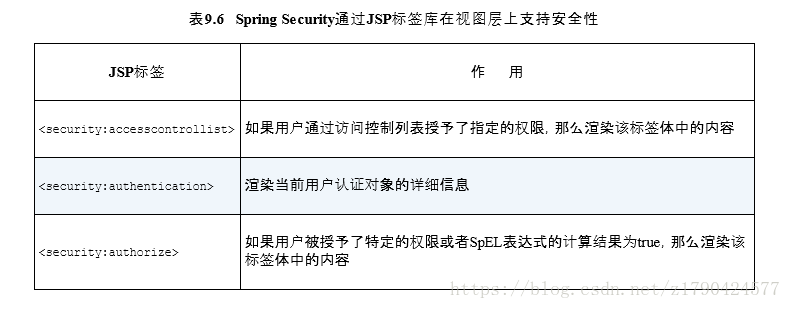
Spring Security的JSP标签库
Spring Security的JSP标签库很小,就三个标签。
为了使用JSP标签库,我们需要在JSP文件中声明它:
<%@ taglib prefix="security" uri="http://www.springframework.org/security/tags" %>访问认证信息的细节
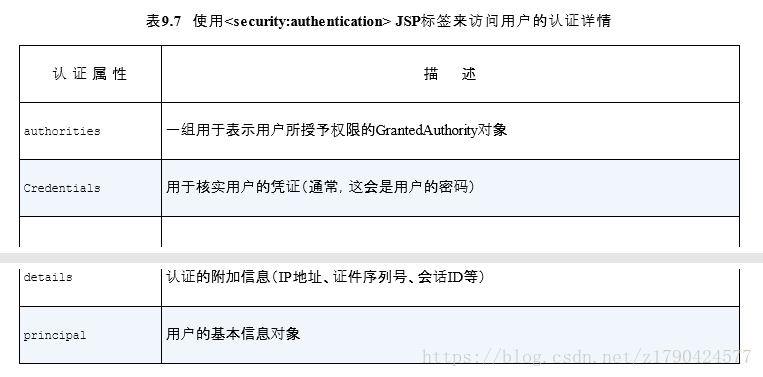
借助Spring Security的JSP标签库,所做的最简单的一件事就是便利的访问用户的认证信息。这恰恰是
< security:authentication >能为我们做的事情。例如:
hello<security:authentication property="principal.username" />property用来标示用户认证对象的一个属性。可用的属性取决于用户认证的方式。
我们也可以将渲染属性的值赋给一个变量,那只需要在var属性中指明变量的名字即可。
<security:authentication property="principal.username" var="name" />这个变量默认是定义在页面作用域内的,我们可以通过scope属性来更改变量作用域。
<security:authentication property="principal.username" var="name" scope="request" />判断用户登录
isAnonymous() 为 true则表示未登录,isAuthenticated()为true则表示已登录!
<!–匿名–>
<security:authorize access="isAnonymous()">
    未登录,点击 <a>登录</a>
</security:authorize>
<!–登录–>
<security:authorize access="isAuthenticated()">
    <h3>登录成功!</h3>
</security:authorize>
条件性的渲染内容
有时候视图上的一部分内容需要根据用户被授予了什么权限来确定是否渲染。Spring Security的< security:authorize >JSP标签能够根据用户被授予的权限有条件的渲染页面的部分内容。
hello<security:authentication property="principal.username" />
<security:authorize access="hasRole('user')">
<h1>有条件性的渲染的内容</h1>
</security:authorize>
access属性被赋值给一个SpEL表达式,这个表达式的值确定< security:authorize >标签内主体内的内容是否渲染。
目前就写这么多吧,Thymeleaf的现在没怎么用到,后续补上。
以上只是学习Spring实战所写的笔记,如有错误,请指正。谢谢
Spring Security使用Authentication获取当前用户信息这一模块原文出处: https://blog.csdn.net/weixin_39967234/article/details/81508201