学习本章之前,可以先了解下上篇Spring Security基本配置。
本篇想要达到这样几个目的:
1、访问调用者服务时,如果是html请求,则跳转到登录页,否则返回401状态码和错误信息
2、调用方可自定义登录页面。如果没有配置,则使用认证中心的标准登录页
对于第一点,可以画个图:
接下来看具体的配置:
认证服务器:spring-oauth-server
先建一个认证中需要用到的常量类:
/**
 * Security相关常量类
 */
public class SecurityConst {

    /** 默认登录页url */
    public static final String AUTH_REQUIRE = "/authentication/require";

    /** 登录页请求url */
    public static final String AUTH_FORM = "/authentication/form";

}
在src/main/resources下再建立一个resources目录,用来放静态文件。然后在resources下建立login.html页面:
<!DOCTYPE html>
<html>
<head>
<meta charset="UTF-8">
<title>登录</title>
</head>
<body>
    <h2>标准登录页面</h2>
    <h3>表单登录</h3>
    <form action="/authentication/form" method="post">
        <table>
            <tr>
                <td>用户名:</td>
                <td><input type="text" name="username"></td>
            </tr>
            <tr>
                <td>密码:</td>
                <td><input type="password" name="password"></td>
            </tr>
            <tr>
                <td colspan="2">
                    <button type="submit">登录</button>
                </td>
            </tr>
        </table>
    </form>
</body>
</html>
建立配置类(方便服务调用者自定义配置):
/**
 * security相关配置(不能取名SecurityProperties,因为security中也有这个类名,不然会报错)
 */
@Getter
@Setter
@ConfigurationProperties(prefix = "security")
public class SecurityProperty {

    private BrowserProperty browser = new BrowserProperty();

}
/**
 * 登录类型枚举
 */
public enum LoginType {

    REDIRECT,

    JSON

}
/**
 * security-浏览器相关配置
 */
@Getter
@Setter
public class BrowserProperty {

    private String loginPage = "/login.html"; // 登录页

    private LoginType loginType = LoginType.JSON; //登录类型

}
修改下SecurityConfig类中的配置:
   @Autowired
    private SecurityProperty securityProperty;

    @Override
    protected void configure(HttpSecurity http) throws Exception {
        // formLogin()是默认的登录表单页,如果不配置 loginPage(url),则使用 spring security
        // 默认的登录页,如果配置了 loginPage()则使用自定义的登录页
        http.formLogin() // 表单登录
            .loginPage(SecurityConst.AUTH_REQUIRE)
            .loginProcessingUrl(SecurityConst.AUTH_FORM) // 登录请求拦截的url,也就是form表单提交时指定的action
            .and()
            .authorizeRequests() // 对请求授权
            .antMatchers(SecurityConst.AUTH_REQUIRE, securityProperty.getBrowser().getLoginPage()).permitAll() // 允许所有人访问login.html和自定义的登录页
            .anyRequest() // 任何请求
            .authenticated()// 需要身份认证
            .and()
            .csrf().disable() // 关闭跨站伪造
        ;
    }
配置代码分析:
从上面可以看出,当第一次请求时(如http://localhost:18081/user),会先跳转到loginPage配置的路径里,即/authentication/require
/authentication/require与/login.html这两个请求不需要认证授权(第二个url是登录页,可以在调用方自定义配置的)
接下来,建立一个Controller,用来处理/authentication/require请求:
@Slf4j
@RestController
public class SecurityController {

    private RequestCache requestCache = new HttpSessionRequestCache(); // 请求缓存

    private RedirectStrategy redirectStrategy = new DefaultRedirectStrategy();// 页面跳转

    @Autowired
    private SecurityProperty securityProperty;

    /**
     * 当需要身份认证时,跳转到这里 (如果是html请求,则跳转到登录页,否则返回401状态码和错误信息)
     */
    @SneakyThrows
    @RequestMapping(SecurityConst.AUTH_REQUIRE)
    @ResponseStatus(code = HttpStatus.UNAUTHORIZED) // 未授权状态码401
    public SimpleResponse requireAuthentication(HttpServletRequest request, HttpServletResponse response) {
        // 从session中取之前缓存的请求
        SavedRequest savedRequest = requestCache.getRequest(request, response);
        if (savedRequest != null) {
            String targetUrl = savedRequest.getRedirectUrl();
            log.info("引发跳转的请求是:" + targetUrl);
            if (StringUtils.endsWithIgnoreCase(targetUrl, ".html")) {
                // 跳转到指定的页面
                redirectStrategy.sendRedirect(request, response, securityProperty.getBrowser().getLoginPage());
            }
        }
        return new SimpleResponse("访问的服务需要身份认证,请引导用户到登录页");
    }

}
/**
 * 响应
 */
@Getter
@Setter
@AllArgsConstructor
public class SimpleResponse {

    private Object content;

}
关于SavedRequest和RedirectStrategy的用法,可以参考...
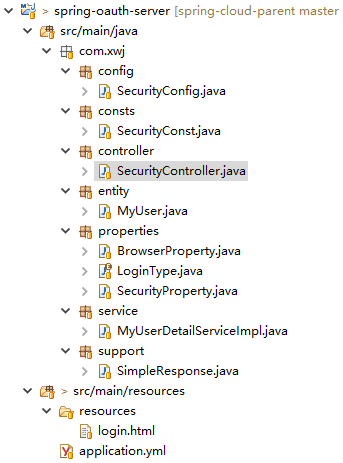
建立好之后的文件目录如下所示:
服务调用者:spring-cloud-provider
在src/main/resources下再建立一个resources目录,用来放静态文件。然后在resources下建立plogin.html页面
<!DOCTYPE html>
<html>
<head>
<meta charset="UTF-8">
<title>登录</title>
</head>
<body>
    <h2>自定义登录页面</h2>
</body>
</html>
启动调用者服务
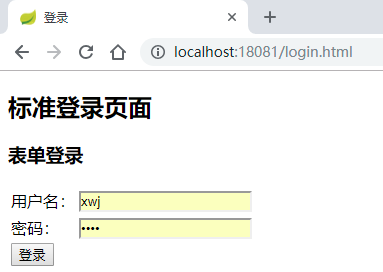
访问 http://localhost:18081/user,跳转到如下页面:


可以看到,访问/user时,需要授权认证,然后跳转到/authentication/require,直接返回401状态码和我们自定义的content数据
访问 http://localhost:18081/index.html,跳转到如下页面:

可以看到,访问 /index.html 时,需要授权认证,然后跳转到 /authentication/require,发现是html请求,重定向到 login.html 页面
接下面,在服务调用者的配置文件application.yml中,加上自定义的登录页配置:
security:
  browser:
    loginPage: /plogin.html
然后重启项目,访问http://localhost:18081/index.html,跳转到如下页面:
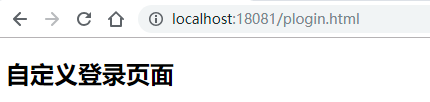
可以看到,现在跳转到了服务调用者配置的登录页面