转自:https://blog.csdn.net/dataiyangu/article/details/86573222
1. 线程池的基本使用
1.1. 为什么需要线程池
1.2. JDK为我们提供了哪些支持 内置线程池
1.2.1.
1.3. 线程池的使用
1.3.1. 线程池的种类
1.3.2. 不同线程池的共同性 线程池构造函数详解
1.4. 线程池使用的小例子
1.4.1. 简单线程池
1.4.2. ScheduledThreadPool
2. 扩展和增强线程池
2.1. 回调接口
2.2. 拒绝策略
拒绝策略举例:
AbortPolicy
DiscardPolicy
CallerRunsPolicy
DiscardOldestPolicy
小例子
2.3. 自定义ThreadFactory
简单的线程池实现的原理
4. ForkJoin
4.1. 思想
4.1.1.
4.2. 使用接口
4.2.1. RecursiveAction
4.2.2. RecursiveTask
4.3. 简单例子
4.4. 实现要素
workQueue
ctl
4.4.1. 工作窃取
1. 线程池的基本使用
1.1. 为什么需要线程池
为什么需要线程池?
线程创建和销毁的代价是比较高的,在多线程中,如果每次都要对线程进行创建和销毁,这两个操作,对于线程本身的业务来说其实是没有必要的,我只关心线程所执行的任务,希望吧尽可能多的cpu用在任务的执行上,而不是辅助性质的线程的创建和销毁上面,所以线程池应运而生。
线程池的作用?
它的作用就是把线程进行复用,比如执行一百个任务,如果分十次批量执行,如果没有线程池就需要创建销毁一百次,如果有线程池(假如线程池中有十个线程),这十个线程是不退出的,常驻线程的,如果没有任务的话是一个等待的状态,任务开始的时候就会执行任务,当前十个任务提交的时候,他们在线程池里跑,因为线程池的线程不会被销毁,所以前十个任务跑完之后,马上就能执行下面的十个任务,从始至终只关注线程的业务,而只创建了一次十个线程,节省cpu的时间。
简单的线程池实现
略
1.2. JDK为我们提供了哪些支持 内置线程池
1.2.1.
1.3. 线程池的使用
1.3.1. 线程池的种类
newFixedThreadPool 固定大小的线程池,线程池中的线程数量是固定的
newSingleThreadExecutor 单一线程的线程池,只有一个线程
newCachedThreadPool 缓存的线程池,当一下子好多任务的时候,就开好多线程去做,如果没有任务的时候,线程空闲下来的时候,慢慢线程的数量就会减少,自然消亡,简而言之就是线程的数量在某段时间内是会扩张或者收缩的
newScheduledThreadPool定时任务的线程池,支持定时及周期性任务执行,比如每个五分钟调一个什么任务。
1.3.2. 不同线程池的共同性 线程池构造函数详解
进入Executors类中
注意:代码中的参数详细意思,再往下面的代码中有详细介绍。
public static ExecutorService newFixedThreadPool(int nThreads) {
return new ThreadPoolExecutor(nThreads, nThreads,
0L, TimeUnit.MILLISECONDS,
new LinkedBlockingQueue<Runnable>());
}
public static ExecutorService newSingleThreadExecutor() {
return new FinalizableDelegatedExecutorService
(new ThreadPoolExecutor(1, 1,
0L, TimeUnit.MILLISECONDS,
new LinkedBlockingQueue<Runnable>()));
}
public static ExecutorService newCachedThreadPool() {
return new ThreadPoolExecutor(0, Integer.MAX_VALUE,
60L, TimeUnit.SECONDS,
new SynchronousQueue<Runnable>());
}
//第一个参数(线程池标准容量、初始容量)一开始是零,当任务进来就扩容,
//SynchronousQueue容量是零当试图往queue中
//塞任务的时候,是会失败的,就会线程池线程数从零开始往上增加到MAX_VALUE为止,
//60秒是超时时间,60秒没被使用就会被移除掉
发现都是new ThreadPoolExecutor(),只是传入了不同的参数
研究一下ThreadPoolExecutor这个构造函数
public ThreadPoolExecutor(int corePoolSize,//核心线程数(标准)
int maximumPoolSize,//最大的线程数
long keepAliveTime,//如果没有事情做,还能在当前线程存活多少时间
//超过指定的时间,将会被杀掉
TimeUnit unit,//上面需要的时间的单位
BlockingQueue<Runnable> workQueue//阻塞队列,如果当前没有多余线程来做任务,现在queue中排队,用来保存任务。
//注意这个queue的容量是有限度的。
) {
this(corePoolSize, maximumPoolSize, keepAliveTime, unit, workQueue,
Executors.defaultThreadFactory(), defaultHandler);
}
1
2
3
4
5
6
7
8
9
10
11
返回头来接着看上面的构造函数就有了很多眉目。
1.4. 线程池使用的小例子
1.4.1. 简单线程池
import java.util.concurrent.ExecutorService;
import java.util.concurrent.Executors;
public class ThreadPoolDemo {
public static class MyTask implements Runnable{
public void run() {
System.out.println(System.currentTimeMillis()+":Thread ID:"+Thread.currentThread().getId());
try {
Thread.sleep(1000);
} catch (InterruptedException e) {
e.printStackTrace();
}
}
}
public static void main(String[] args) {
MyTask task = new MyTask();
ExecutorService es = Executors.newFixedThreadPool(5);
for (int i = 0; i <10 ; i++) {
es.submit(task);
// es.execute(task);
}
}
}
运行结果
1549114075211Thread ID:9
1549114075213Thread ID:10
1549114085211Thread ID:11
1549114075211Thread ID:12
1549114075210Thread ID:13
1549114075213hread ID:10
1549114075415Thread ID:9
1549114075219Thread ID:13
1549114675217Thread ID:12
1549114075208hread ID:11
运行结果
1548114424
1548114425
1548114427
1548114428
1548114420
1548114422
1548114423
1548114426
1548114429
1548114430
1548114432
1548114433
1548114434
1548114435
1548114436
1548114437
1548114438
1548114439
1548114430
每过三秒钟执行一次。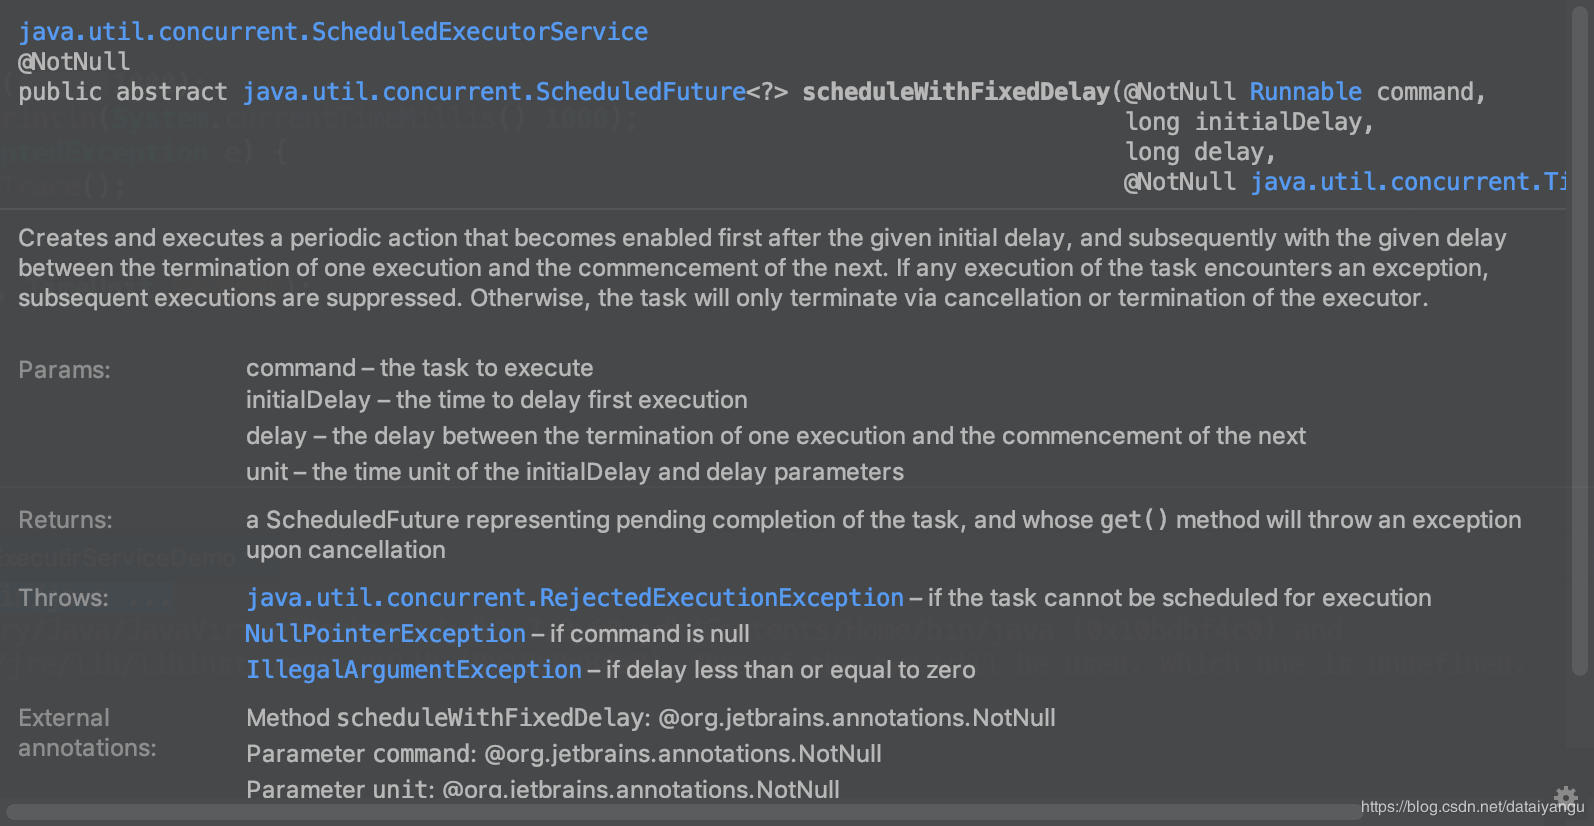
可以看到第一个参数是第一次各多少时间去调,第二个参数后面周期性的多长时间去调,第三个参数是事件的三围。
2. 扩展和增强线程池
2.1. 回调接口
beforeExecute afterExecute terminated
捕获线程池运行时一些信息,捕获当时的工作状态。
import java.util.concurrent.LinkedBlockingDeque;
import java.util.concurrent.ThreadPoolExecutor;
import java.util.concurrent.TimeUnit;
public class ExtThreadPool {
public static class Mytask implements Runnable{
public String name;
public Mytask(String name) {
this.name = name;
}
public void run() {
System.out.println("正在执行"+":Thread ID:"+Thread.currentThread().getId()+",Task Name = "+name);
try {
Thread.sleep(100);
} catch (InterruptedException e) {
e.printStackTrace();
}
}
}
public static void main(String[] args) throws InterruptedException {
ThreadPoolExecutor es = new ThreadPoolExecutor(5, 5, 0L, TimeUnit.MICROSECONDS,
new LinkedBlockingDeque<Runnable>()) {
@Override
protected void beforeExecute(Thread t, Runnable r) {
System.out.println("准备执行:"+((Mytask)r).name);
}
@Override
protected void afterExecute(Runnable r,Throwable t ) {
System.out.println("执行完成:"+((Mytask)r).name);
}
@Override
protected void terminated() {
System.out.println("线程池退出");
}
};
for (int i = 0; i < 5; i++) {
Mytask mytask = new Mytask("TASK_GEYM_" + i);
es.execute(mytask);
Thread.sleep(10);
}
es.shutdown();
}
}
结果
准备执行:TASK_CEYM_0
正在执行Thread ID:9,TASK Name = TASK_CEYM_0
准备执行:TASK_CEYM_1
正在执行Thread ID:9,TASK Name = TASK_CEYM_1
准备执行:TASK_CEYM_2
正在执行Thread ID:9,TASK Name = TASK_CEYM_2
准备执行:TASK_CEYM_3
正在执行Thread ID:9,TASK Name = TASK_CEYM_3
准备执行:TASK_CEYM_4
正在执行Thread ID:9,TASK Name = TASK_CEYM_4
执行完成:TASK_CEYM_0
执行完成:TASK_CEYM_1
执行完成:TASK_CEYM_2
执行完成:TASK_CEYM_3
执行完成:TASK_CEYM_4
线程池退出
beforeExecute 线程执行前做的事
afterExecute 线程执行完了之后做的事
terminated 线程池退出后做的事
2.2. 拒绝策略
不能有无限大小的缓存队列,因为如果有大量的任务进来,会导致内存的激增,如果一直激增而没有释放,会导致内存异常。
所以当发现负载到了一定的程度后,应该选择丢弃一些任务,而不是放在内存中,看着内存被耗掉,丢弃的时候希望把这些丢掉的任务(比如数量,具体是那些)记录下来。
public ThreadPoolExecutor(int corePoolSize,
int maximumPoolSize,
long keepAliveTime,
TimeUnit unit,
BlockingQueue<Runnable> workQueue,
ThreadFactory threadFactory,
RejectedExecutionHandler handler) {
if (corePoolSize < 0 ||
maximumPoolSize <= 0 ||
maximumPoolSize < corePoolSize ||
keepAliveTime < 0)
throw new IllegalArgumentException();
if (workQueue == null || threadFactory == null || handler == null)
throw new NullPointerException();
this.corePoolSize = corePoolSize;
this.maximumPoolSize = maximumPoolSize;
this.workQueue = workQueue;
this.keepAliveTime = unit.toNanos(keepAliveTime);
this.threadFactory = threadFactory;
this.handler = handler;
}
构造函数中多了两个参数
ThreadFactory//线程工厂(稍后介绍)
RejectedExecutionHandler//拒绝策略//如果任务不能执行了我应该怎么做
具体的实现包括
拒绝策略举例:
AbortPolicy
public static class AbortPolicy implements RejectedExecutionHandler {
/**
* Creates an {@code AbortPolicy}.
*/
public AbortPolicy() { }
/**
* Always throws RejectedExecutionException.
*
* @param r the runnable task requested to be executed
* @param e the executor attempting to execute this task
* @throws RejectedExecutionException always.
*/
public void rejectedExecution(Runnable r, ThreadPoolExecutor e) {
throw new RejectedExecutionException("Task " + r.toString() +
" rejected from " +
e.toString());
}
}
这个策略是如果不能执行了,就会抛出异常,并且将具体的任务信息打印出啦。
DiscardPolicy
public static class DiscardPolicy implements RejectedExecutionHandler {
/**
* Creates a {@code DiscardPolicy}.
*/
public DiscardPolicy() { }
/**
* Does nothing, which has the effect of discarding task r.
*
* @param r the runnable task requested to be executed
* @param e the executor attempting to execute this task
*/
public void rejectedExecution(Runnable r, ThreadPoolExecutor e) {
}
}
这个策略是如果不执行了,就直接丢弃掉,设么也不做。
CallerRunsPolicy
public static class CallerRunsPolicy implements RejectedExecutionHandler {
/**
* Creates a {@code CallerRunsPolicy}.
*/
public CallerRunsPolicy() { }
/**
* Executes task r in the caller's thread, unless the executor
* has been shut down, in which case the task is discarded.
*
* @param r the runnable task requested to be executed
* @param e the executor attempting to execute this task
*/
public void rejectedExecution(Runnable r, ThreadPoolExecutor e) {
if (!e.isShutdown()) {
r.run();
}
}
}
if (!e.isShutdown()) {
r.run();
}
如果线程池还活着,就让调用者执行这个任务,这个类本身自己不做处理。
DiscardOldestPolicy
public static class DiscardOldestPolicy implements RejectedExecutionHandler {
/**
* Creates a {@code DiscardOldestPolicy} for the given executor.
*/
public DiscardOldestPolicy() { }
/**
* Obtains and ignores the next task that the executor
* would otherwise execute, if one is immediately available,
* and then retries execution of task r, unless the executor
* is shut down, in which case task r is instead discarded.
*
* @param r the runnable task requested to be executed
* @param e the executor attempting to execute this task
*/
public void rejectedExecution(Runnable r, ThreadPoolExecutor e) {
if (!e.isShutdown()) {
e.getQueue().poll();
e.execute(r);
}
}
}
1
2
3
4
5
6
7
8
9
10
11
12
13
14
15
16
17
18
19
20
21
22
将队列中最老的丢弃掉。
小例子
import org.omg.PortableServer.THREAD_POLICY_ID;
import java.util.concurrent.*;
public class RejectThreadPoolDemo {
public static class MyTask implements Runnable{
@Override
public void run() {
System.out.println(System.currentTimeMillis()+":Thread Id:"+Thread.currentThread().getId());
try {
Thread.sleep(100);
} catch (InterruptedException e) {
e.printStackTrace();
}
}
}
public static void main(String[] args) throws InterruptedException {
MyTask task = new MyTask();
ExecutorService es = new ThreadPoolExecutor(5, 5, 0L, TimeUnit.MILLISECONDS,
new SynchronousQueue<Runnable>(),//永远都放不进去的对了,只有当我去拿的时候才能放进去,
// 因为放不进去,所以走拒绝策略
Executors.defaultThreadFactory(),
new RejectedExecutionHandler() {
@Override
public void rejectedExecution(final Runnable r, final ThreadPoolExecutor executor) {
System.out.println(r.toString()+"is discard");
}
});
for (int i = 0; i <Integer.MAX_VALUE ; i++) {
es.submit(task);
Thread.sleep(10);
}
}
}
结果
1548893374312:Thread Id:9
1548893374323:Thread Id:10
1548893374333:Thread Id:11
1548893374345:Thread Id:12
1548893374356:Thread Id:13
java.util.concurrent.FutureTask@655538e5is discard
java.util.concurrent.FutureTask@3e0a765cis discard
java.util.concurrent.FutureTask@20e0b1d6is discard
java.util.concurrent.FutureTask@7fbb6976is discard
1548893374418:Thread Id:9
1548893374433:Thread Id:10
1548893374446:Thread Id:11
1548893374456:Thread Id:12
1548893374466:Thread Id:13
java.util.concurrent.FutureTask@6c2fdbb1is discard
如上面,因为队列放不进去东西,任务每10ms执行一次,而每个任务要sleep 100ms,所以,必定会出现任务堆积,这个时候就走了我们自定义的拒绝策略。
2.3. 自定义ThreadFactory
能够在创造Thread的时候给Thread命名,或者使其变成守护线程的操作。
import java.util.concurrent.ThreadFactory;
import java.util.concurrent.atomic.AtomicInteger;
class TheadF{
static class DefaultThreadFactory implements ThreadFactory {
private static final AtomicInteger poolNumber = new AtomicInteger(1);
private final ThreadGroup group;
private final AtomicInteger threadNumber = new AtomicInteger(1);
private final String namePrefix;
DefaultThreadFactory(){
SecurityManager s = System.getSecurityManager();
group = (s != null) ? s.getThreadGroup() : Thread.currentThread().getThreadGroup();
namePrefix = "pool-" + poolNumber.getAndIncrement() + "-thread-";
}
DefaultThreadFactory(final ThreadGroup group, final String namePrefix) {
this.group = group;
this.namePrefix = namePrefix;
}
@Override
public Thread newThread(final Runnable r) {
Thread t = new Thread(group, r, namePrefix + threadNumber.getAndIncrement(),0);
if (t.isDaemon())
t.setDaemon(false);
if (t.getPriority()!=Thread.NORM_PRIORITY)
t.setPriority(Thread.NORM_PRIORITY);
return t;
}
}
}
简单的线程池实现的原理
execute方法(ThreadPollExecutor类中)
public void execute(Runnable command) {
if (command == null)
throw new NullPointerException();
/*
* Proceed in 3 steps:
*
* 1. If fewer than corePoolSize threads are running, try to
* start a new thread with the given command as its first
* task. The call to addWorker atomically checks runState and
* workerCount, and so prevents false alarms that would add
* threads when it shouldn't, by returning false.
*
* 2. If a task can be successfully queued, then we still need
* to double-check whether we should have added a thread
* (because existing ones died since last checking) or that
* the pool shut down since entry into this method. So we
* recheck state and if necessary roll back the enqueuing if
* stopped, or start a new thread if there are none.
*
* 3. If we cannot queue task, then we try to add a new
* thread. If it fails, we know we are shut down or saturated
* and so reject the task.
*/
int c = ctl.get();
if (workerCountOf(c) < corePoolSize) {
if (addWorker(command, true))
return;
c = ctl.get();
}
if (isRunning(c) && workQueue.offer(command)) {
int recheck = ctl.get();
if (! isRunning(recheck) && remove(command))
reject(command);
else if (workerCountOf(recheck) == 0)
addWorker(null, false);
}
else if (!addWorker(command, false))
reject(command);
}
可以看到是将线程放到了workqueue中,workQueue是一个blockingQueue,如果里面没有数据,就不拿,如果满了,就等待,构造参数中的long keepAliveTime就是如果规定时间内一直在等待,超出之后就退出
上述代码中的ctl是什么?
* The main pool control state, ctl, is an atomic integer packing
* 他是一个原子的整数
* two conceptual fields包装了两个逻辑上的字段:
* workerCount, indicating the effective number of threads线程总数
* runState, indicating whether running, shutting down etc线程池本身的状态
*
The runState provides the main lifecyle control, taking on values:
一些 线程池的状态
*
* RUNNING: Accept new tasks and process queued tasks可以添加新的task也可以处理一些任务
* SHUTDOWN: Don’t accept new tasks, but process queued tasks不接受task但是接受task
* STOP: Don’t accept new tasks, don’t process queued tasks,
* and interrupt in-progress tasks不接受task,不处理task
* TIDYING: All tasks have terminated, workerCount is zero,
* the thread transitioning to state TIDYING
* will run the terminated() hook method
* TERMINATED: terminated() has completed
下面这里:了解即可。
通过control+j看到CAPACITY是一个29位的数,左移一位,再减一,就是前二十八位
private static final int CAPACITY = (1 << COUNT_BITS) - 1;
// Packing and unpacking ctl
//c和CAPACITY的按位取反,最后再取与,就是前三位,表示线程池的状态
private static int runStateOf(int c) { return c & ~CAPACITY; }
//c和CAPACITY按位取与(都转化成二进制,每位进行与的操作),得到c的前二十八位
//得到了当前有多少个线程
private static int workerCountOf(int c) { return c & CAPACITY; }
接着往下看
int c = ctl.get();
//如果当前线程的数量小于核心线程数量
if (workerCountOf(c) < corePoolSize) {
//加入进去
if (addWorker(command, true))
return;
c = ctl.get();
}
// 如果加入失败了,就将这个操作放到workqueue中,
if (isRunning(c) && workQueue.offer(command)) {
int recheck = ctl.get();
//如果在往queue里面加的过程中,简称线程池,发现不再是running的状态
//就拒绝掉这个任务
if (! isRunning(recheck) && remove(command))
reject(command);
//如果检查发现正在跑的线程是零,就addwork进行初始化
else if (workerCountOf(recheck) == 0)
addWorker(null, false);
}
//首选的不是reject而是先进行上面的放入queue
//如果上面判断加如队列没有队列满了,塞不进去了,在这里再尝试加入任务
//第二个参数是false,线程的数量不在收到核心线程数量的限制,而是受到
//最大线程数的限制。如果这样都失败了,就进行reject拒绝策略。
else if (!addWorker(command, false))
reject(command);
4. ForkJoin
一个比较新的线程池
4.1. 思想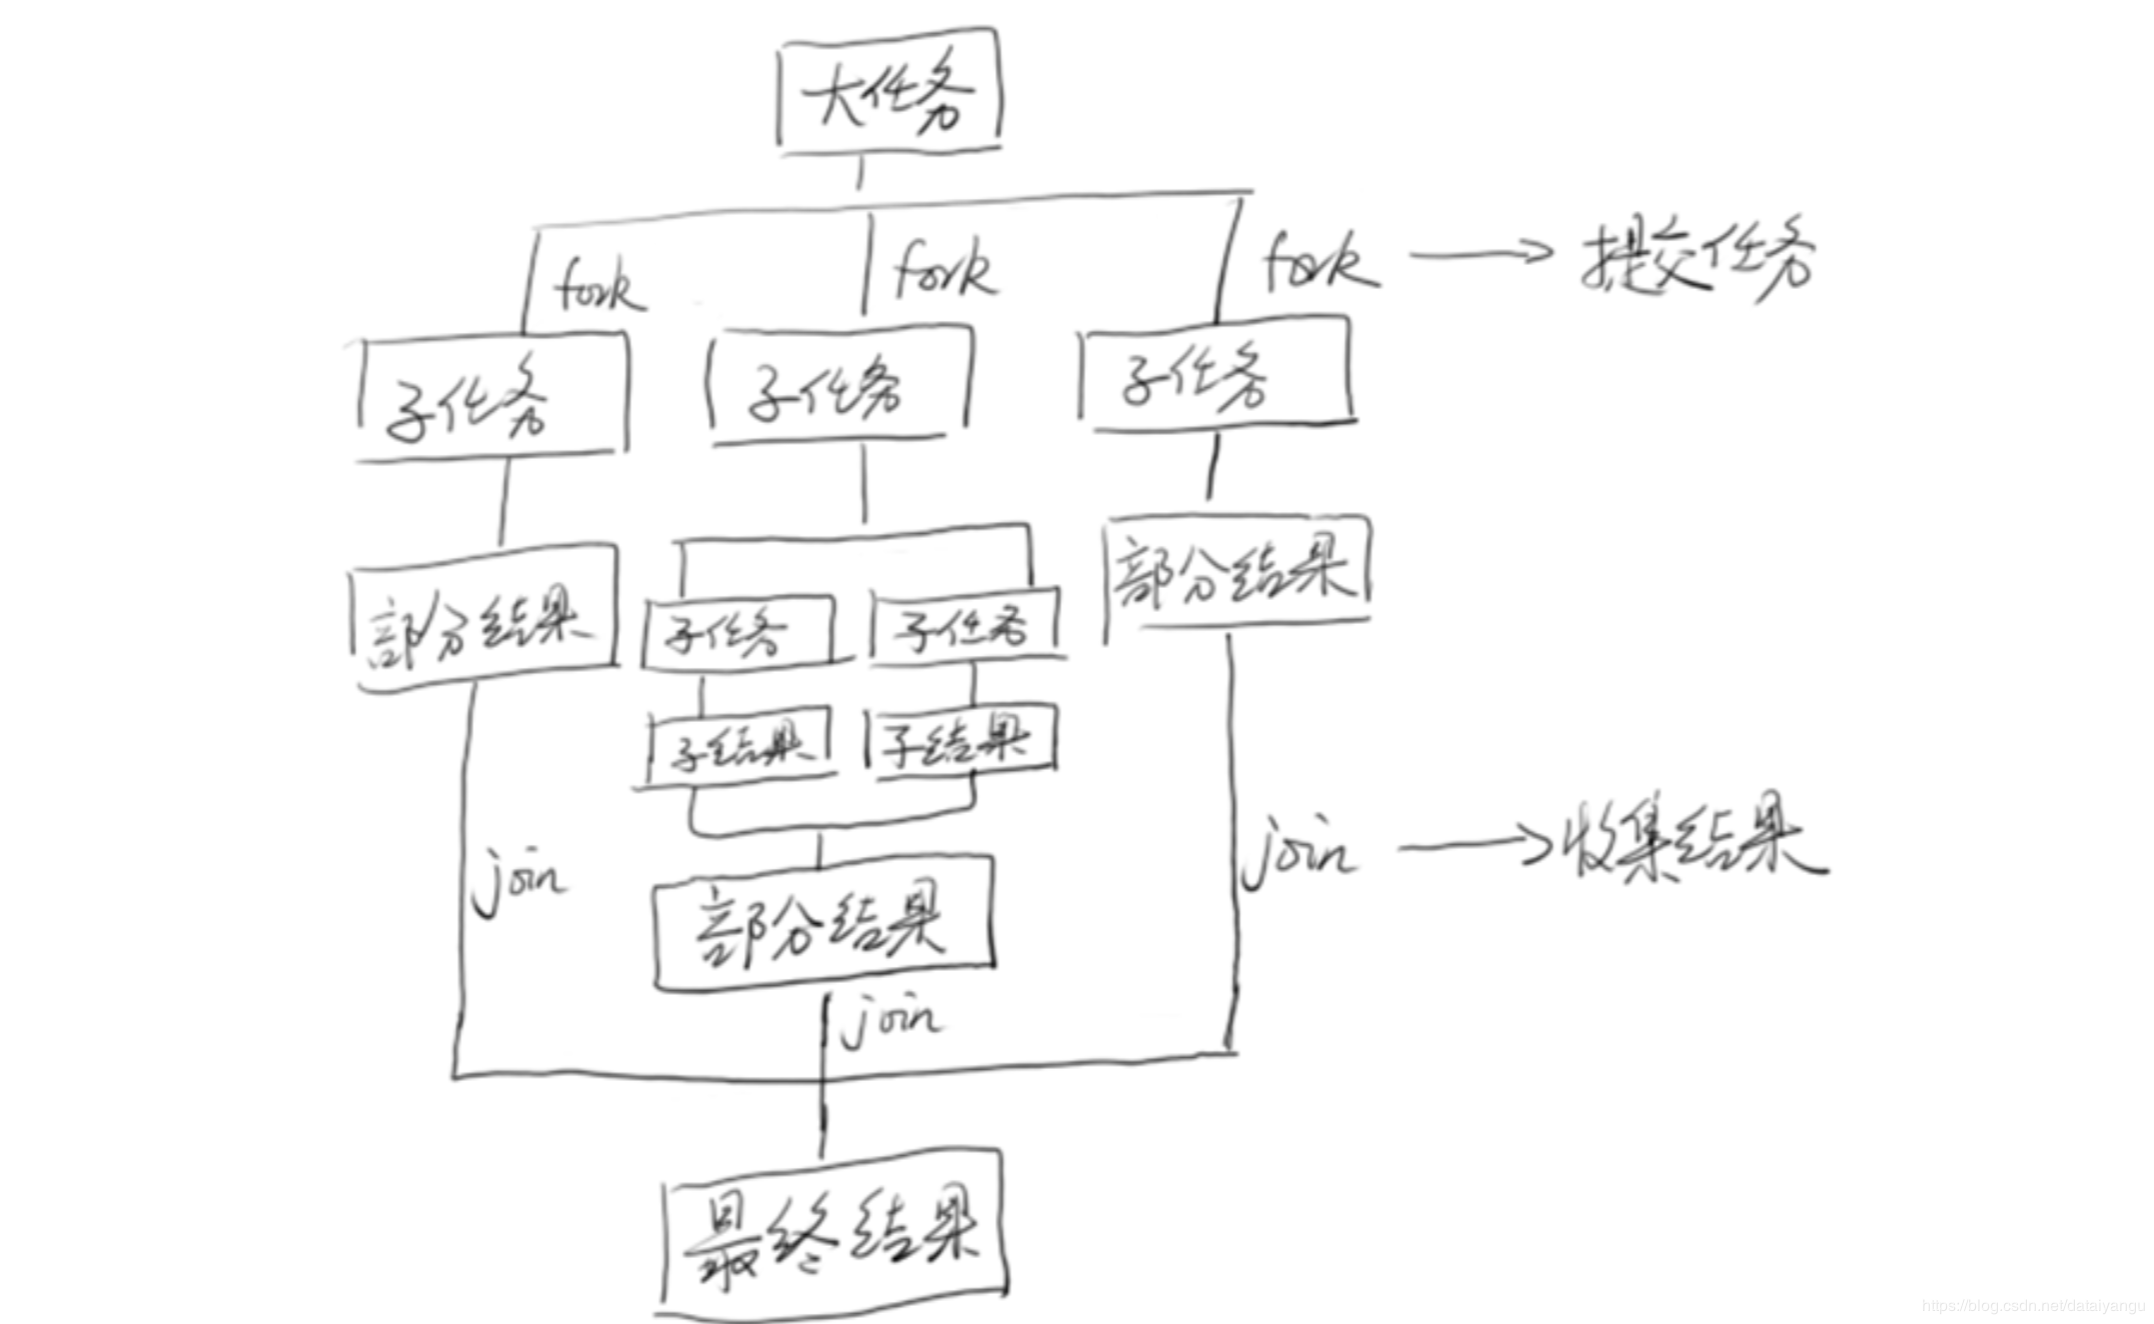
将大任务分成小任务,join等待所有的小任务结束再执行相应的操作,fork将小任务推向线程池。
4.2. 使用接口
4.2.1. RecursiveAction
无返回值
4.2.2. RecursiveTask
有返回值
4.3. 简单例子
import java.util.ArrayList;
import java.util.concurrent.ExecutionException;
import java.util.concurrent.ForkJoinPool;
import java.util.concurrent.ForkJoinTask;
import java.util.concurrent.RecursiveTask;
public class CountTask extends RecursiveTask<Long> {
private static final int ThRESHOLD = 10000;
private long start;
private long end;
public CountTask(long start,long end){
this.start = start;
this.end = end;
}
protected Long compute() {
long sum = 0;
boolean canCompute = (end - start) < ThRESHOLD;
if (canCompute) {
for (long i = start; i <= end; i++) {
sum += i;
}
}else{
//分成100个小任务
long step = (start + end) / 100;
ArrayList<CountTask> subTasks = new ArrayList<CountTask>();
long pos = start;
for (int i = 0; i <100 ; i++) {
long lastOne = pos + step;
if (lastOne>end) {
lastOne = end;
}
CountTask subTask = new CountTask(pos, lastOne);
pos += step + 1;
subTasks.add(subTask);
//将现任务加进去
subTask.fork();
}
for (CountTask t : subTasks) {
//等待所有的任务完成后再继续相应的操作
sum += t.join();
}
}
return sum;
}
public static void main(String[] args) {
ForkJoinPool forkJoinPool = new ForkJoinPool();
CountTask task = new CountTask(0, 20000L);
ForkJoinTask<Long> result = forkJoinPool.submit(task);
try {
long res = result.get();
System.out.println("sum="+res);
} catch (InterruptedException e) {
e.printStackTrace();
} catch (ExecutionException e) {
e.printStackTrace();
}
}
}
结果
sum=200010000
1
上面的例子要实现的是将 CountTask task = new CountTask(0, 20000L);
这句话中的start到end进行累加运算,如果end-start<ThRESHOLD,就直接累加,如果超过这个阈值就通过ForkJoin将任务分成多个子任务,进行累加,所有的子任务完成之后再求和。
4.4. 实现要素
源码解析
在ForkJoin中每个线程都有一个相关的工作队列WorkQueue在ForkJoinPool中有这个内部类
workQueue
@sun.misc.Contended
static final class WorkQueue {
/**
* Capacity of work-stealing queue array upon initialization.
* Must be a power of two; at least 4, but should be larger to
* reduce or eliminate cacheline sharing among queues.
* Currently, it is much larger, as a partial workaround for
* the fact that JVMs often place arrays in locations that
* share GC bookkeeping (especially cardmarks) such that
* per-write accesses encounter serious memory contention.
*/
static final int INITIAL_QUEUE_CAPACITY = 1 << 13;
/**
* Maximum size for queue arrays. Must be a power of two less
* than or equal to 1 << (31 - width of array entry) to ensure
* lack of wraparound of index calculations, but defined to a
* value a bit less than this to help users trap runaway
* programs before saturating systems.
*/
static final int MAXIMUM_QUEUE_CAPACITY = 1 << 26; // 64M
// Instance fields
volatile int scanState; // versioned, <0: inactive; odd:scanning
int stackPred; // 记录前一个栈顶的ctl
int nsteals; // number of steals
int hint; // randomization and stealer index hint
int config; // pool index and mode
volatile int qlock; // 1: locked, < 0: terminate; else 0
volatile int base; // index of next slot for poll
int top; // index of next slot for push
ForkJoinTask<?>[] array; // the elements (initially unallocated)
final ForkJoinPool pool; // the containing pool (may be null)
final ForkJoinWorkerThread owner; // owning thread or null if shared
volatile Thread parker; // == owner during call to park; else null
volatile ForkJoinTask<?> currentJoin; // task being joined in awaitJoin
volatile ForkJoinTask<?> currentSteal; // mainly used by helpStealer
WorkQueue(ForkJoinPool pool, ForkJoinWorkerThread owner) {
this.pool = pool;
this.owner = owner;
// Place indices in the center of array (that is not yet allocated)
base = top = INITIAL_QUEUE_CAPACITY >>> 1;
}
/**
* Returns an exportable index (used by ForkJoinWorkerThread).
*/
final int getPoolIndex() {
return (config & 0xffff) >>> 1; // ignore odd/even tag bit
}
/**
* Returns the approximate number of tasks in the queue.
*/
final int queueSize() {
int n = base - top; // non-owner callers must read base first
return (n >= 0) ? 0 : -n; // ignore transient negative
}
/**
* Provides a more accurate estimate of whether this queue has
* any tasks than does queueSize, by checking whether a
* near-empty queue has at least one unclaimed task.
*/
final boolean isEmpty() {
ForkJoinTask<?>[] a; int n, m, s;
return ((n = base - (s = top)) >= 0 ||
(n == -1 && // possibly one task
((a = array) == null || (m = a.length - 1) < 0 ||
U.getObject
(a, (long)((m & (s - 1)) << ASHIFT) + ABASE) == null)));
}
注意:上面的代码出自我本人idea jdk1.8,但是和视频中讲解的jdk1.8代码片不一样,主要讲解了workqueue中的某些字段,线面的讲解是视频中的字段,并非上面的代码片。
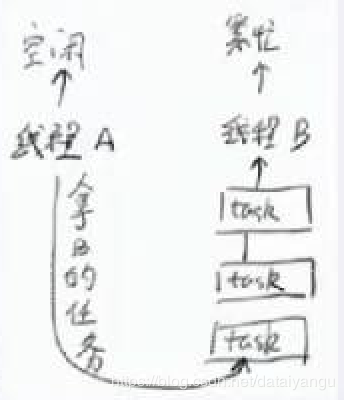
不是所有的线程一直都在工作,有的线程有时候会被挂起,挂起的时候线程池需要知道谁被挂起,这样就可以新的任务来的时候,就从挂起的线程里面唤醒一个线程去执行,forkjoin就做这件事情,所有被挂起的线程会被放到一个栈(先进后出)里面,栈的内部是通过链表实现的,nextwait就是链表中很重要的一个东西,会指向下一个等待的线程,poolindex,当前线程在线程池中的id编号,eventcount,当前的线程被挂起了多少次,每次被挂起都会做一个累加如果小于0,就是inactive的状态(没有被激活,)eventcount还有一个含义,就是当前的poolindex是多少,在相关的代码片中(我这里实在是找不到)在注册的时候poolindex和eventactive是赋予了同一个值,eventcount是一个32位的数字,第一个bite表示是否被激活,其他的bite表示poolindex,所有的内容放在array中,array中的base和top中间使我们的线程
ctl
在ForkJoinPool中同样有和上面的threadPool一样的ctl的字段
并不是原子的整数,是lang型的
//* Bits and masks for field ctl, packed with 4 16 bit subfields:
//* AC: Number of active running workers minus target parallelism 活跃的线程数减去目标并行度(大概就是几个cpu就是几个并行度)
//* TC: Number of total workers minus target parallelism总的线程数减去目标并行度(大概就是几个cpu就是几个并行度)
//* SS: version count and status of top waiting thread线程池本身是否是激活的
//EC eventcount顶部等待的堆栈顶端的线程的eventcount的值
//* ID: poolIndex of top of Treiber stack of waiters poolIndex顶部等待的堆栈顶端的线程的poolIndex的值
//注意tc ss id三个相加恰好是一个int,这里就是刚才所说的eventcount
volatile long ctl; // main pool control
声明一下:
明明有五个变量,为什么不分成五个,一定要打包在ctl中呢?看起来增加了数据的复杂性,可读性也变差了,为什么还要这么做呢?
因为加入多个线程来操作ForkJoin,一个操作了AC,一个操作了TC,这样如何保证AC和TC是属于一个的?用锁吗?这样对效率有很大的降低,但是如果将所有的数据放在一起,数据的一致性是一定能够保证的,读写的时候是原子性的,一次cas(无锁),就可以把所有的数据进行一次更新,并且保证不会和其他线程产生冲突,在性能上能得到大大的提升。通过无锁的操作,代替了多个Synchronize操作
目前是不支持对多个变量进行cas操作的。
就像如下代码
tryAddWorker:
private void tryAddWorker(long c) {
boolean add = false;
do {
long nc = ((AC_MASK & (c + AC_UNIT)) |
(TC_MASK & (c + TC_UNIT)));
if (ctl == c) {
int rs, stop; // check if terminating
if ((stop = (rs = lockRunState()) & STOP) == 0)
add = U.compareAndSwapLong(this, CTL, c, nc);
unlockRunState(rs, rs & ~RSLOCK);
if (stop != 0)
break;
if (add) {
createWorker();
break;
}
}
} while (((c = ctl) & ADD_WORKER) != 0L && (int)c == 0);
}
先将ctl中的每一个取出来做相应的操作,在叠加到一起进行cas的操作。
4.4.1. 工作窃取
scan方法:
private ForkJoinTask<?> scan(WorkQueue w, int r) {
WorkQueue[] ws; int m;
if ((ws = workQueues) != null && (m = ws.length - 1) > 0 && w != null) {
int ss = w.scanState; // initially non-negative
for (int origin = r & m, k = origin, oldSum = 0, checkSum = 0;;) {
WorkQueue q; ForkJoinTask<?>[] a; ForkJoinTask<?> t;
int b, n; long c;
if ((q = ws[k]) != null) {
if ((n = (b = q.base) - q.top) < 0 &&
(a = q.array) != null) { // non-empty
long i = (((a.length - 1) & b) << ASHIFT) + ABASE;
if ((t = ((ForkJoinTask<?>)
U.getObjectVolatile(a, i))) != null &&
q.base == b) {
if (ss >= 0) {
if (U.compareAndSwapObject(a, i, t, null)) {
q.base = b + 1;
if (n < -1) // signal others
signalWork(ws, q);
runtask();
//下面解释
return t;
}
}
else if (oldSum == 0 && // try to activate
w.scanState < 0)
tryRelease(c = ctl, ws[m & (int)c], AC_UNIT);
}
if (ss < 0) // refresh
ss = w.scanState;
r ^= r << 1; r ^= r >>> 3; r ^= r << 10;
origin = k = r & m; // move and rescan
oldSum = checkSum = 0;
continue;
}
checkSum += b;
}
//如果scan操作没有任务的话,activecount就减一,然后将poolindex,nextwait,等堆栈信息,
//保存到ctl中,并挂起当前线程。
if ((k = (k + 1) & m) == origin) { // continue until stable
if ((ss >= 0 || (ss == (ss = w.scanState))) &&
oldSum == (oldSum = checkSum)) {
if (ss < 0 || w.qlock < 0) // already inactive
break;
int ns = ss | INACTIVE; // try to inactivate
//UC_MASK & ((c = ctl) - AC_UNIT),activecount-1,activecount是前十六位,所以减去10000000000000,就是
long nc = ((SP_MASK & ns) |
(UC_MASK & ((c = ctl) - AC_UNIT)));
w.stackPred = (int)c; // hold prev stack top
U.putInt(w, QSCANSTATE, ns);
//然后通过rac操作将nc赋值到ctl上
if (U.compareAndSwapLong(this, CTL, c, nc))
ss = ns;
else
w.scanState = ss; // back out
}
checkSum = 0;
}
}
}
return null;
}
1
2
3
4
5
6
7
8
9
10
11
12
13
14
15
16
17
18
19
20
21
22
23
24
25
26
27
28
29
30
31
32
33
34
35
36
37
38
39
40
41
42
43
44
45
46
47
48
49
50
51
52
53
54
55
56
57
58
59
60
61
62
63
64
很好的体现出forkjoin是如何工作的,
可以看到,scan方法 虽然是在本线程,但是,是在执行其他的workqueue中的base,上面说到线程都保存在了workqueue中,就是说不是盲目的做自己的任务,还看一看周围的线程的任务是否饥饿,会有效的避免饥饿的现象发生。
runtask()
/**
* Executes the given task and any remaining local tasks.
*/
final void runTask(ForkJoinTask<?> task) {
if (task != null) {
scanState &= ~SCANNING; // mark as busy
(currentSteal = task).doExec();
U.putOrderedObject(this, QCURRENTSTEAL, null); // release for GC
execLocalTasks();
ForkJoinWorkerThread thread = owner;
if (++nsteals < 0) // collect on overflow
transferStealCount(pool);
scanState |= SCANNING;
if (thread != null)
thread.afterTopLevelExec();
}
}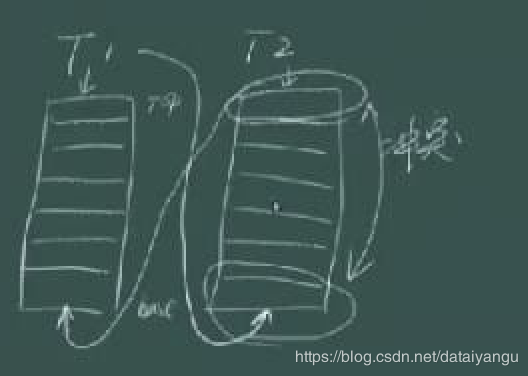
可以看到两个队列,当前线程对应t1队列,它需要看其他队列(t2)的base节点,然后从自己的top节点开始处理,其他线程对应t2队列,则同理,这样能很好的避免冲突。
帮助别人做可能比自己做自己的性能要好一点。