第3章 JDK并发包
1 synchronized的功能扩展:重入锁。使用java.util.concurrent.locks.ReentrantLock类来实现。
import java.util.concurrent.locks.ReentrantLock;

public class ReenterLock implements Runnable {

	public static ReentrantLock lock = new ReentrantLock();
	public static int i = 0;
	@Override
	public void run() {
		// TODO Auto-generated method stub
		for(int j=0;j<100000000;j++){
			lock.lock();
			try{
				i++;
			}finally{
				lock.unlock();
			}
		}
	}
	public static void main(String[] args) throws InterruptedException {
		ReenterLock tl = new ReenterLock();
		Thread t1 = new Thread(tl);
		Thread t2 = new Thread(tl);
		t1.start();t2.start();
		t1.join();t2.join();
		System.out.println(i);
	}

}
重入锁比synchronized灵活外,还提供一些高级功能
- 中断响应。synchronized必须要等到锁才能继续执行,而重入锁是支持线程可以被中断。
import java.util.concurrent.locks.ReentrantLock;

public class IntLock implements Runnable{

	public static ReentrantLock lock1 = new ReentrantLock();
	public static ReentrantLock lock2 = new ReentrantLock();
	int lock;

	public IntLock(int lock){
		this.lock = lock;
	}

	@Override
	public void run() {
		// TODO Auto-generated method stub
		try{
			if(lock == 1){
				lock1.lockInterruptibly();
				try{
					Thread.sleep(500);
				}catch(InterruptedException e){

				}
				lock2.lockInterruptibly();
			}else{
				lock2.lockInterruptibly();
				try{
					Thread.sleep(500);
				}catch(InterruptedException e){

				}
				lock1.lockInterruptibly();
			}
		}catch(InterruptedException e){
			e.printStackTrace();
		}finally{
			if(lock1.isHeldByCurrentThread())
				lock1.unlock();
			if(lock2.isHeldByCurrentThread())
				lock2.unlock();
			System.out.println(Thread.currentThread().getId()+":线程退出");
		}
	}
	public static void main(String[] args) throws InterruptedException{
		IntLock r1 = new IntLock(1);
		IntLock r2 = new IntLock(2);
		Thread t1 = new Thread(r1);
		Thread t2 = new Thread(r2);
		t1.start();t2.start();
		Thread.sleep(1000);
		t2.interrupt();
	}

}- 锁申请等待限时,使用tryLock()
import java.util.concurrent.TimeUnit;
import java.util.concurrent.locks.ReentrantLock;

public class TimeLock implements Runnable {

	public static ReentrantLock lock = new ReentrantLock();
	@Override
	public void run() {
		// TODO Auto-generated method stub
		try{
			if(lock.tryLock(5,TimeUnit.SECONDS)){  //5秒内无法申请到锁则失败
				Thread.sleep(6000);
			}else{
				System.out.println("get lock failed");
			}
		}catch(InterruptedException e){
			e.printStackTrace();
		}finally{
			if(lock.isHeldByCurrentThread())
				lock.unlock();
		}
	}
	public static void main(String[] args){
		TimeLock tl = new TimeLock();
		Thread t1 = new Thread(tl);
		Thread t2 = new Thread(tl);
		t1.start();
		t2.start();
	}

}- 公平锁,当参数fair为true时表示锁为公平。但公平锁的实现成本高性能相对不佳,默认锁是非公平的
public ReentrantLock( boolean fair )
import java.util.concurrent.locks.ReentrantLock;

public class FairLock implements Runnable{

	public static ReentrantLock fairLock = new ReentrantLock(true);
	@Override
	public void run() {
		// TODO Auto-generated method stub
		while(true){
			try{
				fairLock.lock();
				System.out.println(Thread.currentThread().getName()+" 获得锁");
			}finally{
				fairLock.unlock();
			}
		}
	}
	public static void main(String[] args) throws InterruptedException{
		FairLock fl = new FairLock();
		Thread t1 = new Thread(fl,"Thread_t1");
		Thread t2 = new Thread(fl,"Thread_t2");
		t1.start();t2.start();
	}

}
输出 (交替获取)
Thread_t1 获得锁
Thread_t2 获得锁
Thread_t1 获得锁
Thread_t2 获得锁
Thread_t1 获得锁
Thread_t2 获得锁
Thread_t1 获得锁
Thread_t2 获得锁
Thread_t1 获得锁
Thread_t2 获得锁
Thread_t1 获得锁
Thread_t2 获得锁
Thread_t1 获得锁
Thread_t2 获得锁
Thread_t1 获得锁
Thread_t2 获得锁
Thread_t1 获得锁
2 重入锁ReentrantLock的几个重要方法:
- lock( ) :获得锁,如果锁已经被占用则等待。
- lockInterruptibly( ):获得锁,但优先响应中断
- tryLock( ):尝试获得锁,如果成功返回true,失败返回false。不等待立即返回
- tryLock( long time , TimeUnit unit ):在给定时间内尝试获得锁
3 重入锁的好搭档:Condition条件。通过Lock接口的Condition newCondition( )方法可以生成一个与当前重入锁绑定的Condition实例。利用Condition对象,可以让线程在合适的时间等待或得到通知继续执行。接口基本方法如下
- void await( ) throws InterruptedException // 当前线程等待,释放锁,其他线程用signal()或signalAll()时,线程重新获取锁继续执行。或当线程被中断时也能跳出等待
- void awaitUninterruptibly( ) // 跟await()基本相同,只是它不会在等待过程中响应中断
- void awaitNanos(long nanosTimeout) throws InterruptedException
- boolean await(long time , TimeUnit unit) throws InterruptedException
- boolean awaitUntil(Date deadline) throws InterruptedException
- void signal( ) // 用于唤醒一个在等待中的线程
- void signalAll( )
import java.util.concurrent.locks.Condition;
import java.util.concurrent.locks.ReentrantLock;

public class ReentrantLockCondition implements Runnable {

	public static ReentrantLock lock = new ReentrantLock();
	public static Condition condition = lock.newCondition();
	@Override
	public void run() {
		// TODO Auto-generated method stub
		try{
			lock.lock();
			condition.await();    // 等待通知
			System.out.println("Thread is going on");
		}catch(InterruptedException e){
			e.printStackTrace();
		}finally{
			lock.unlock();
		}
	}
	public static void main(String[] args) throws InterruptedException{
		ReentrantLockCondition tl = new ReentrantLockCondition();
		Thread t1 = new Thread(tl);
		t1.start();
		Thread.sleep(2000);
		lock.lock();    // 调用signal()前要求当前线程先获取相关的锁
		condition.signal();
		lock.unlock();  // 调用signal()后要求释放当前锁谦让给唤醒的线程
	}

}
注:调用signal()前要求当前线程先获得相关的锁,调用后也要释放锁给唤醒的线程。
4 允许多个线程同时访问:信号量(Semaphore) ,可以指定多个线程同时访问某一个资源。函数如下
- public Semaphore(int permits) // 必须指定信号量的准入数,每个线程只能申请一个许可。
- public Semaphore(int permits , boolean fair) // 第二个参数指定是否公平
- public void acquire( ) // 尝试获得一个准入许可,无法获得则等待,直到有线程释放一个许可或当前线程被中断
- public void acquireUninterruptibly( ) // 跟acquire()基本一样,只是不响应中断
- public boolean tryAcquire( ) // 尝试获得一个准入许可,获得则返回true,失败则返回false。不会等待立即返回
- public boolean tryAcquire(long timeout , TimeUnit unit)
- public void release( ) // 用于在线程访问资源结束后释放一个许可
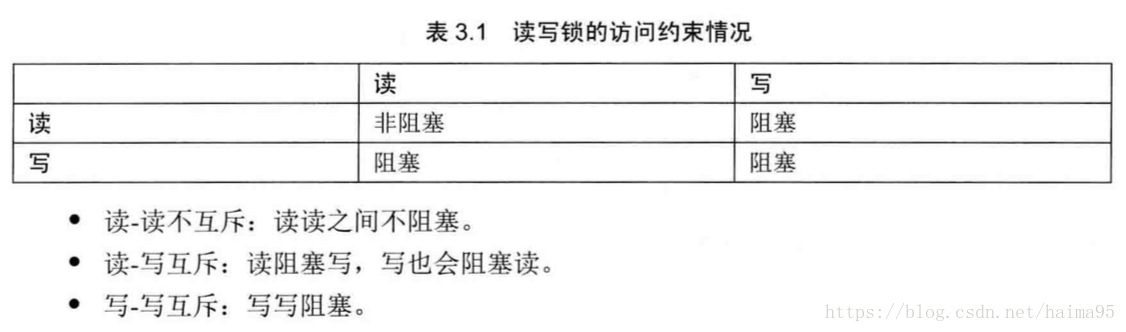
5 ReadWriteLock 读写锁,要比重入锁或内部锁更针对
6 倒计时器:CountDownLatch ,是一个非常实用的多线程控制工具类。通常用来控制线程等待,让一个某个线程等待直到倒计时结束再开始执行。构造函数如下
public CountDownLatch(int count) // count为计数器的计数个数
public class CountDownLatchDemo implements Runnable {

    // 设置计数10的倒计时器
	static final CountDownLatch end = new CountDownLatch(10);
	static final CountDownLatchDemo demo = new CountDownLatchDemo();
	@Override
	public void run() {
		// TODO Auto-generated method stub
		try{
			Thread.sleep(new Random().nextInt(10)*1000);
			System.out.println("check complete");
            // 倒计时器倒数一次
			end.countDown();
		}catch(InterruptedException e){
			e.printStackTrace();
		}
	}
	public static void main(String[] args) throws InterruptedException{
		ExecutorService exec = Executors.newFixedThreadPool(10);
		for(int i=0;i<10;i++){
			exec.submit(demo);
		}
        // 倒计时开始,一直等待,只有倒计时器倒数完成后才会往下执行
		end.await();
		System.out.println("Fire!");
		exec.shutdown();
	}

}
7 循环栅栏:CyclicBarrier,是一种多线程并发控制实用工具。跟CountDownLatch类似,但更复杂强大。构造函数如下
public CyclicBarrier( int parties , Runnable barrierAction ) // parties为计数总数,barrierAction为计数完成后要去执行的任务
public class CyclicBarrierDemo {

	public static class Soldier implements Runnable {
		private String soldier;
		private final CyclicBarrier cyclic;
		Soldier(CyclicBarrier cyclic,String soldierName){
			this.soldier = soldierName;
			this.cyclic = cyclic;
		}
		@Override
		public void run() {
			// TODO Auto-generated method stub
			try{
                // 调用一次倒计时一次,够计数总数后,cyclic会自动调用BarrierRun,继续执行下面的操作,即doWork()
				cyclic.await();
				doWork();
                // 又重新倒计时,调用一次倒计时一次,够计数总数后,cyclic会自动调用BarrierRun,继续执行下面的操作,即doWork()
				cyclic.await();
			}catch(InterruptedException e){
				e.printStackTrace();
			}catch(BrokenBarrierException e){
				e.printStackTrace();
			}
		}
		void doWork(){
			try{
				Thread.sleep(Math.abs(new Random().nextInt()%10000));
			}catch(InterruptedException e){
				e.printStackTrace();
			}
			System.out.println(soldier+": 任务完成");
		}

	}
	public static class BarrierRun implements Runnable{

		boolean flag;
		int N;
		public BarrierRun(boolean flag,int N){
			this.flag = flag;
			this.N = N;
		}
		@Override
		public void run() {
			// TODO Auto-generated method stub
			if(flag){
				System.out.println("司令: [士兵"+N+"个,任务完成!]");
			}else{
				System.out.println("司令: [士兵"+N+"个,集合完毕!]");
				flag = true;
			}
		}

	}
	public static void main(String[] args) throws InterruptedException {
		final int N = 10;
		Thread[] allSoldier = new Thread[N];
		boolean flag = false;
		CyclicBarrier cyclic = new CyclicBarrier(10,new BarrierRun(flag,N));
		System.out.println("集合队伍!");
		for(int i=0;i<N;i++){
			System.out.println("士兵"+i+" 报道!");
			allSoldier[i] = new Thread(new Soldier(cyclic,"士兵i"));
			allSoldier[i].start();
		}
	}
}
8 线程阻塞工具类:LockSupport,是一种非常方便实用的线程阻塞工具。可以在线程内任意位置让线程阻塞。
public class LockSupportDemo {

	public static Object u = new Object();
	static ChangeObjectThread t1 = new ChangeObjectThread("t1");
	static ChangeObjectThread t2 = new ChangeObjectThread("t2");

	public static class ChangeObjectThread extends Thread{
		public ChangeObjectThread(String name){
			super.setName(name);
		}

		@Override
		public void run() {
			// TODO Auto-generated method stub
			synchronized(u){
				System.out.println("in "+getName());
				LockSupport.park();  // 阻塞当前线程
			}
		}
	}
	public static void main(String[] args) throws InterruptedException{
		t1.start();
		Thread.sleep(100);
		t2.start();
		LockSupport.unpark(t1);  // 继续执行
		LockSupport.unpark(t2);  // 继续执行
		t1.join();
		t2.join();
	}
}
LockSupport类为每个线程准备了一个许可,如果许可可用,park()函数会立即返回并消费这个许可,即标记该许可为不可用;如果不可用则会阻塞。unpack()则是将许可变成可用。这样保证unpack()和pack()的顺序总是相对稳定的。
pack(Object)函数还可以为当前线程设置一个阻塞对象。
LockSupport.pack()支持中断,而且还不会抛出InterruptedException异常。如下
public static class ChangeObjectThread extends Thread{
		public ChangeObjectThread(String name){
			super.setName(name);
		}

		@Override
		public void run() {
			// TODO Auto-generated method stub
			synchronized(u){
				System.out.println("in "+getName());
				LockSupport.park();
				if(Thread.interrupted()){
					System.out.println(getName()+" 被中断了");
				}
			}
			System.out.println(getName()+" 执行结束");
		}
	}
	public static void main(String[] args) throws InterruptedException{
		t1.start();
		Thread.sleep(100);
		t2.start();
		t1.interrupt();
		LockSupport.unpark(t2);
	}
}
9 线程池为了避免系统频繁地创建和销毁线程,并且复用创建地线程。在线程池中,有几个活跃地线程,当需要线程时从中取一个空闲的线程。完成任务后再退回到线程池中。JDK提供了一套Executor框架帮助线程控制,其本质就是一个线程池。
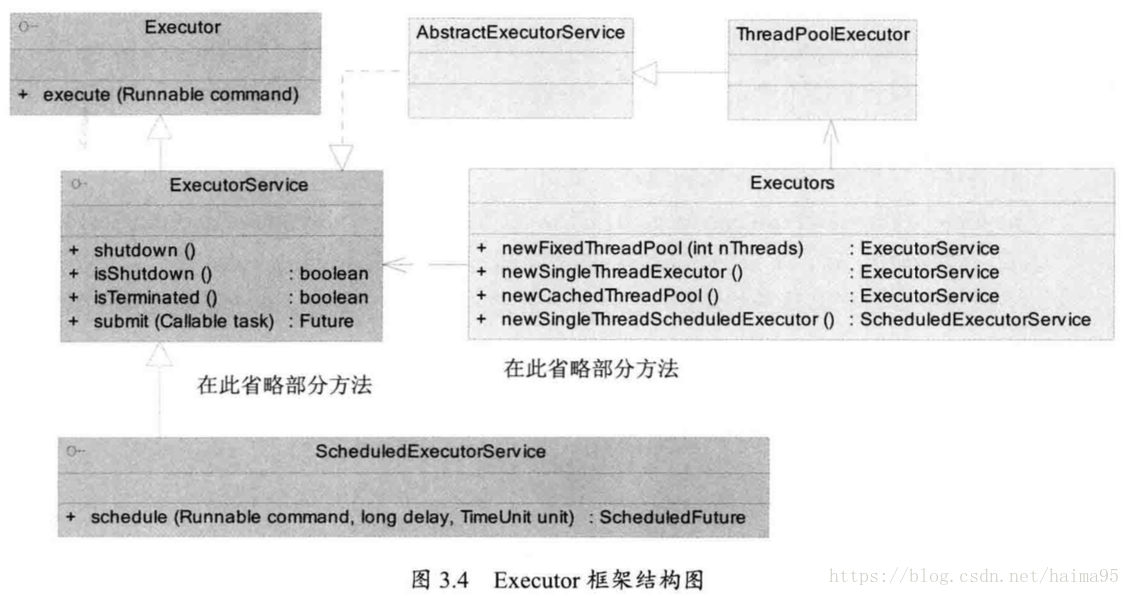
以上成员均在java.util.concurrent包中,是JDK并发包的核心类。其中ThreadPoolExecutor表示一个线程池。Executors类则扮演线程池工厂的角色。通过Executors可以取得一个拥有特定功能的线程池。
Executor框架提供了各种类型的线程池。主要有以下工厂方法
- public static ExecutorService newFixedThreadPool( int nThreads) //返回一个固定线程数量的线程池,该线程池中的线程数量固定不变。有新任务时,池中若有空闲线程则立即执行。否则存在任务队列中排队等候
- public static ExecutorService newSingleThreadExecutor() //该方法返回一个只有一个线程的线程池。若多余一个任务被提交到该线程池,任务会保存到任务队列排队执行
- public static ExecutorService newCachedThreadPool() // 该方法返回一个可根据实际情况调整线程数量的线程池。线程数量不确定。如有空闲线程可复用优先使用。如没有空闲则创建新的线程执行任务。
- public static ScheduledExecutorService newSingleThreadScheduledThreadPool() // 该方法返回一个ScheduledExecutorService对象,线程池大小为1。
- public static ScheduledExecutorService newScheduledThreadPool( int corePoolSize ) // 该方法返回一个ScheduledExecutorService对象,但该线程池可以指定线程数量
例子
public class ThreadPoolDemo {

	public static class MyTask implements Runnable{

		@Override
		public void run() {
			// TODO Auto-generated method stub
			System.out.println(System.currentTimeMillis()+": Thread ID: "+Thread.currentThread().getId());
			try{
				Thread.sleep(1000);
			}catch(InterruptedException e){
				e.printStackTrace();
			}
		}

	}
	public static void main(String[] args){
		MyTask task = new MyTask();
		ExecutorService es = Executors.newFixedThreadPool(5);
		//ExecutorService es = Executors.newSingleThreadExecutor();
		//ExecutorService es = Executors.newCachedThreadPool();
		for(int i=0;i<10;i++){
			es.submit(task);
		}
	}
}

// 当使用newFixedThreadPool(5),输出如下,5个线程复用
1535423404418: Thread ID: 9
1535423404418: Thread ID: 12
1535423404418: Thread ID: 11
1535423404418: Thread ID: 10
1535423404418: Thread ID: 8
1535423405420: Thread ID: 8
1535423405420: Thread ID: 9
1535423405420: Thread ID: 10
1535423405420: Thread ID: 11
1535423405420: Thread ID: 12

// 当使用newSingleThreadExecutor(),只有一个线程复用,输出如下
1535423548649: Thread ID: 8
1535423549655: Thread ID: 8
1535423550656: Thread ID: 8
1535423551660: Thread ID: 8
1535423552665: Thread ID: 8
1535423553667: Thread ID: 8
1535423554669: Thread ID: 8
1535423555673: Thread ID: 8
1535423556678: Thread ID: 8
1535423557683: Thread ID: 8

// 当使用newCachedThreadPool(),线程不够会创建新的,输出如下
1535423614559: Thread ID: 8
1535423614559: Thread ID: 12
1535423614559: Thread ID: 9
1535423614559: Thread ID: 10
1535423614560: Thread ID: 14
1535423614559: Thread ID: 11
1535423614560: Thread ID: 13
1535423614560: Thread ID: 15
1535423614560: Thread ID: 16
1535423614560: Thread ID: 17
10 计划任务,newScheduledThreadPool(),它返回一个ScheduledExecutorService对象,可以根据时间需要对线程进行调度,主要方法如下
public ScheduledFuture<?> schedule(Runnable command , long delay , TimeUnit unit ) // 会在给定时间对任务进行一次调度
public ScheduledFuture<?> scheduleAtFixedRate(Runnable command , long initialDelay , long period , TimeUnit unit ) // 会对任务进行周期性调度,调度的频率是一定的。是以上一个任务开始执行时间为起点,之后的period时间调度下一次任务
public ScheduledFuture<?> scheduleWithFixedDelay(Runnable command , long initialDelay , long delay , TimeUnit unit ) // 会对任务进行周期性调度,在上一个任务结束后再经过delay时间进行任务调度
跟其他线程池不用,ScheduledExecutorService并不一定会立即执行任务,它其实是起计划任务的作用。它会在指定的时间,对任务进行调度
- 如下代码,任务会每隔2秒执行,但因为scheduleAtFixedRate()是以上一个任务执行开始时间来算,如果任务执行时间长于调度时间,周期会无效。
public class ScheduledExecutorServiceDemo {

	public static void main(String[] args){
		ScheduledExecutorService ses = Executors.newScheduledThreadPool(10);
		ses.scheduleAtFixedRate(new Runnable(){

			@Override
			public void run() {
				// TODO Auto-generated method stub
				try{
					Thread.sleep(1000);
					System.out.println(System.currentTimeMillis()/1000);
				}catch(InterruptedException e){
					e.printStackTrace();
				}
			}

		}, 0, 2, TimeUnit.SECONDS);
	}
}- 如下代码,scheduleWithFixedDelay()是以上一个任务的结束开始算,所以任务间都间隔2秒
public class ScheduledExecutorServiceDemo {

	public static void main(String[] args){
		ScheduledExecutorService ses = Executors.newScheduledThreadPool(10);
		ses.scheduleWithFixedDelay(new Runnable(){

			@Override
			public void run() {
				// TODO Auto-generated method stub
				try{
					Thread.sleep(1000);
					System.out.println(System.currentTimeMillis()/1000);
				}catch(InterruptedException e){
					e.printStackTrace();
				}
			}

		}, 0, 2, TimeUnit.SECONDS);
	}
}
11 无论newFixedThreadPool,newSingleThreadExecutor,newCachedThreadPool()都只是ThreadPoolExecutor类的封装。ThreadPoolExecutor的构造函数如下
public ThreadPoolExecutor( int corePoolSize , int maximumPoolSize , long keepAliveTime , TimeUnit unit , BlockingQueue<Runnable> workQueue , ThreadFactory threadFactory , RejectedExecutionHandler handler )
- corePoolSize 指定了线程池中的线程数量
- maximumPoolSize 指定了线程池中的最大线程数量
- keepAliveTime 当线程池线程数量超过了corePoolSize时,多余的空闲线程的存活时间
- unit 是keepAliveTime的单位
- workQueue 任务队列,被提交但尚未被执行的任务,是一个BlockingQueue接口对象,仅用于存放Runnable对象。
- threadFactory 线程工厂,用于创建线程
- handler 拒绝策略,当任务太多来不及处理,如何拒绝任务
在ThreadPoolExecutor的构造函数中可使用如下几种BlockingQueue
- 直接提交的队列,该功能由SynchronousQueue对象提供。SynchronousQueue是一个特殊的BlockingQueue。SynchronousQueue没有容量,每个插入操作都要等待一个相应的删除操作。如果使用SynchronousQueue,提交的任务不会被真实的保存,而总是将新任务提交给线程执行,没有空闲的线程则尝试创建新的进程。当进程数据达到最大值则执行拒绝策略。所以使用SynchronousQueue队列,通常要设置很大的maximumPoolSize值否则很容易执行拒绝策略。
- 有界的任务队列,可以用ArrayBlockingQueue,它必须带有一个表示队列最大容量的参数。有新任务时,线程池的实际线程数小于corePoolSize,则优先创建新的线程;若大于则将新任务加入等待队列。队列若已满,则在总线程数不大于maximumPoolSize的前提下创建新的线程执行任务。若大于则执行拒绝策略。
- 无界的任务队列,可以用LinkedBlockingQueue类实现。除非系统资源耗尽,否则无界的任务队列不会存在任务入列失败。有新任务时,线程池的实际线程数小于corePoolSize,则优先创建新的线程;若大于则将新任务加入等待队列。
- 优先任务队列,可以用PriorityBlockingQueue类实现。它是一个无界队列,可以根据任务自身的优先级顺序先后执行。
JDK内置提供了四种拒绝策略,这些策略都实现了RejectedExecutionHandler接口
- AbortPolicy策略:该策略直接抛出异常,阻止系统正常工作。
- CallerRunsPolicy策略:只要线程池未关闭,该策略直接在调用者线程中,运行当前被丢弃的任务。
- DiscardOledestPolicy策略:丢弃即将被执行的任务,尝试再次提交当前任务
- DiscardPolicy策略:丢弃无法处理的任务
12 ThreadPoolExecutor也是一个可以扩展的线程池,提供了beforeExecute(),afterExecute()和terminated()三个接口对线程池进行控制。
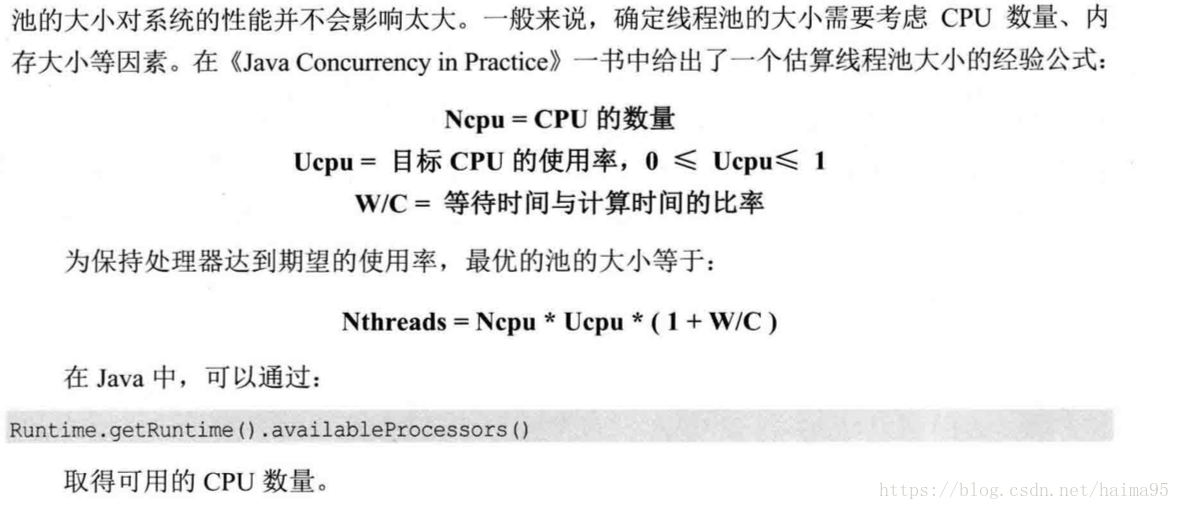
13 优化线程池线程数量
14 在线程池中寻找堆栈
public class DivTask implements Runnable {
	int a , b;
	public DivTask(int a, int b){
		this.a = a;
		this.b = b;
	}
	@Override
	public void run() {
		// TODO Auto-generated method stub
		double re = a/b;
		System.out.println(re);
	}
	public static void main(String[] args) throws InterruptedException,ExecutionException{
		ThreadPoolExecutor pools = new ThreadPoolExecutor(0,Integer.MAX_VALUE,
				0L,TimeUnit.SECONDS,
				new SynchronousQueue<Runnable>());
		for(int i=0;i<5;i++){
            pools.submit(new DivTask(100,i));    // 第一种,出现异常不会打印异常错误
			//pools.execute(new DivTask(100,i));  // 第二种,出现异常会打印部分堆栈信息
            /*  第三种,出现异常会打印部分堆栈信息
			Future re = pools.submit(new DivTask(100,i));
			re.get();
            */
		}
	}
}
15 分而治之:Fork / Join框架。在JDK中,有一个ForkJoinPool线程池,对于fork()方法并不急于开启线程,而是提交给ForkJoinPool线程池进行处理。
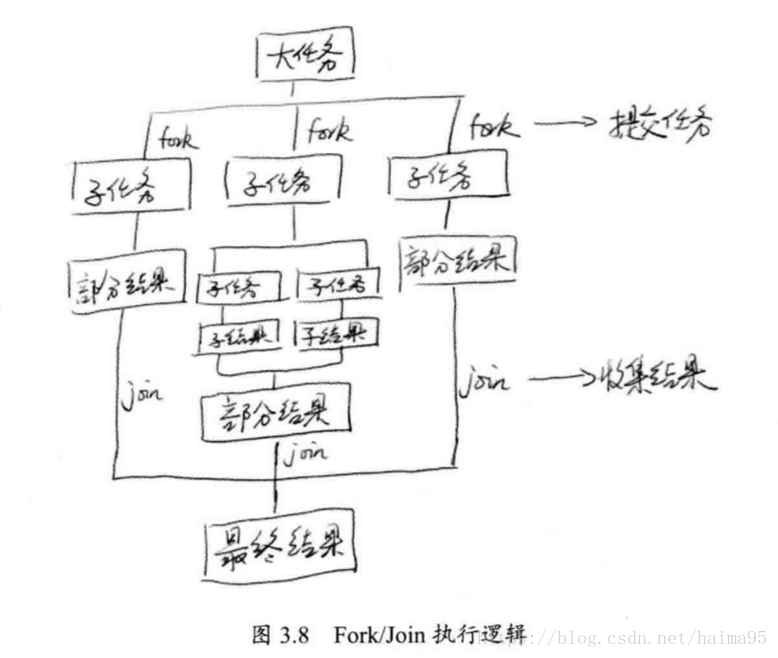
ForkJoinPool有一个重要的接口
public <T> ForkJoinTask<T> submit(ForkJoinTask<T> task)
可以向ForkJoinPool线程池提交一个ForkJoinTask任务,该任务就是支持fork()分解以及join()等待的任务。ForkJoinTask有两个重要的子类RecursiveAction和RecursiveTask,分别表示没有返回值的任务和可以携带返回值的任务。
16 JDK的并发容器,大部分在java.util.concurrent包中。
- ConcurrentHashMap:高效的并发HashMap,可以理解为线程安全的HashMap
- CopyOnWriteArrayList:在读多写少的场合,其性能要远比Vector好
- ConcurrentLinkedQueue:高效的并发队列,使用链表实现。可以看作一个线程安全的LinkedList
- BlockingQueue:这是一个接口,JDK内部通过链表,数组等方式实现这个接口。表示阻塞队列,非常适合用于数据共享的通道
- ConcurrentSkipListMap:跳表的实现。这是一个Map,使用跳表数据结构进行快速查找。
java.util下的Vector是线程安全,另外Collections工具类可以帮助我们将任意集合包装成线程安全的集合。
17 如果需要一个线程安全的HashMap,一种可行的方法是使用Collections.synchronizedMap()方法包装我们的HashMap。如下
public static Map m = Collections.synchronizedMap(new HashMap()) ;
另一种更专业的并发HashMap是ConcurrentHashMap,它更适合多线程的场合。
18 ArrayList和Vector都是使用数组作为内部实现,而Vector是线程安全,ArrayList不是。
第4章 锁的优化及注意事项
1 有助于提高“锁”性能的几点建议
- 减少锁持有时间,有助于降低锁冲突的可能性
- 减小锁粒度,即缩小锁定对象的范围
- 读写分离锁来替换独占锁
- 锁分离,如读写分离
- 锁粗化,即将所有的锁操作整合为锁的一次请求,减少对锁的请求同步次数。
2 JDK内部的几种”锁“优化策略
- 锁偏向,一个线程获得了锁,那么锁就进入偏向模式。当这个线程再次请求锁时无须再做任何同步操作。
- 轻量级锁,只是简单地将对象头部作为指针,指向持有锁的线程堆栈的内部,来判断一个线程是否持有对象锁
- 自旋锁,让当前线程做几个空循环(即自旋),如果可以得到锁则进入临界区,否则挂起
- 锁清除,去掉不可能存在共享资源竞争的锁
3 ThreadLocal,可以包装非线程安全的对象
public class Test1 {

	static ThreadLocal<SimpleDateFormat> tl = new ThreadLocal<SimpleDateFormat>();
	public static class ParseDate implements Runnable{

		int i = 0;
		public ParseDate(int i){
			this.i = i;
		}
		@Override
		public void run() {
			// TODO Auto-generated method stub
			try{
				if(tl.get() == null){
					tl.set(new SimpleDateFormat("yyyy-MM-dd HH:mm:ss"));
				}
				Date t = tl.get().parse("2018-08-30 02:38:"+i%60);
				System.out.println(i+": "+t);
			}catch(ParseException e){
				e.printStackTrace();
			}
		}

	}
	public static void main(String[] args){
		ExecutorService es = Executors.newFixedThreadPool(10);
		for(int i=0;i<1000;i++){
			es.execute(new ParseDate(i));
		}
	}
}
4 ThreadLocal模式下会比多线程共享一个对象要快很多很多,如下例子快了30多倍
public class Test2 {

	public static final int GEN_COUNT =  10000000;
	public static final int THREAD_COUNT = 4;
	static ExecutorService es = Executors.newFixedThreadPool(THREAD_COUNT);
	public static Random rnd = new Random(123);

	public static ThreadLocal<Random> tRnd = new ThreadLocal<Random>(){

		protected Random initialValue(){
			return new Random(123);
		}
	};
	public static class RndTask implements Callable<Long>{

		private int mode = 0;
		public RndTask(int mode){
			this.mode = mode;
		}
		public Random getRandom(){
			if(mode == 0)
				return rnd;
			else if(mode == 1)
				return tRnd.get();
			else
				return null;
		}
		@Override
		public Long call() throws Exception {
			// TODO Auto-generated method stub
			long b = System.currentTimeMillis();
			for(long i=0;i<GEN_COUNT;i++)
				getRandom().nextInt();
			long e = System.currentTimeMillis();
			System.out.println(Thread.currentThread().getName()+" spend "+(e-b)+" ms");
			return e-b;
		}

	}
	public static void main(String[] args) throws InterruptedException,ExecutionException{
		Future<Long>[] futs = new Future[THREAD_COUNT];
		for(int i =0 ;i<THREAD_COUNT;i++){
			futs[i] = es.submit(new RndTask(0));
		}
		long totalTime = 0;
		for(int i=0;i<THREAD_COUNT;i++){
			totalTime += futs[i].get();
		}
		System.out.println("多线程访问同一个Random实例:"+totalTime+" ms");
		for(int i=0;i<THREAD_COUNT;i++){
			futs[i] = es.submit(new RndTask(1));
		}
		totalTime = 0;
		for(int i=0;i<THREAD_COUNT;i++){
			totalTime += futs[i].get();
		}
		System.out.println("使用ThreadLocal包装Random实例:"+totalTime+" ms");
		es.shutdown();
	}
}
输出结果
pool-1-thread-1 spend 4911 ms
pool-1-thread-4 spend 4959 ms
pool-1-thread-3 spend 4961 ms
pool-1-thread-2 spend 4962 ms
多线程访问同一个Random实例:19793 ms
pool-1-thread-2 spend 130 ms
pool-1-thread-4 spend 131 ms
pool-1-thread-3 spend 133 ms
pool-1-thread-1 spend 134 ms
使用ThreadLocal包装Random实例:528 ms
5 一种无锁的策略:比较交换的技术(CAS Compare And Swap) 来鉴别线程冲突,一旦检测到冲突产生就重试当前操作直到没有冲突为止。
CAS算法的过程:共三个参数CAS(V , E , N)。V表示要更新的变量,E表示预期值,N表示新值。仅当V值等于E值时,才会将V值设为N。如果V值和E值不同则说明已经有其他线程做了更新,而当前线程什么都不做。最后CAS返回当前V的真实值。
6 JDK并发包有一个atomic包,有个最常用的类AtomicInteger,它是可变且线程安全。还有AtomicLong,AtomicBoolean,AtomicReference。
public class AtomicIntegerDemo {

	static AtomicInteger i = new AtomicInteger();
	public static class AddThread implements Runnable{

		@Override
		public void run() {
			// TODO Auto-generated method stub
			for(int k=0;k<10000;k++)
				i.incrementAndGet();
		}
	}
	public static void main(String[] args) throws InterruptedException{
		Thread[] ts = new Thread[10];
		for(int k=0;k<10;k++){
			ts[k] = new Thread(new AddThread());
		}
		for(int k=0;k<10;k++)
			ts[k].start();
		for(int k=0;k<10;k++)
			ts[k].join();
		System.out.println(i);
	}
}
AtomicInteger.incrementAndGet()采用CAS操作给自己加1,同时返回当前值。
7 AtomicReference是指对象引用,它可以保证在修改对象引用时的线程安全性
8 原子数组:AtomicIntegerArray,AtomicLongArray,AtomicReferenceArray
9 可以让普通变量也享受原子操作:AtomicIntegerFieldUpdater,AtomicLongFieldUpdater,AtomicReferenceFieldUpdater
public class AtomicIntegerFieldUpdaterDemo {

	public static class Candidate{
		int id;
		volatile int score;
	}
	public final static AtomicIntegerFieldUpdater<Candidate> scoreUpdater = AtomicIntegerFieldUpdater.newUpdater(Candidate.class, "score");
	public static AtomicInteger allScore = new AtomicInteger(0);
	public static void main(String[] args) throws InterruptedException{
		final Candidate stu = new Candidate();
		Thread[] t = new Thread[10000];
		for(int i=0;i<10000;i++){
			t[i] = new Thread(){
				public void run(){
					if(Math.random() > 0.4){
						scoreUpdater.incrementAndGet(stu);
						allScore.incrementAndGet();
					}
				}
			};
			t[i].start();
		}
		for(int i=0;i<10000;i++)
			t[i].join();
		System.out.println("score="+stu.score);
		System.out.println("allScore = "+allScore);
	}
}
注意事项:
- Updater只能修改可见氛围的变量,如score为private则无法修改
- 为了确保变量被正确的读取,必须是volatile类型
- 由于CAS操作会通过对象实例的偏移量直接进行赋值,所以它不支持static字段
第5章 并行模式与算法
1 单例模式是一种对象创建模式,用于产生一个对象的具体实例,确保系统中一个类只产生一个实例。
public class Singleton{
    private Singleton(){
        System.out.println("Singleton is create");
    }
    private static Singleton instance = new Singleton();
    public static Singleton getInstance(){
        return instance;
    }
}
注意:
- 构造函数被定义为private,无法随便创建这个实例。
- instance对象必须是private并且static
- getInstance()定义为静态函数
上面有一个明显不足,Singleton构造函数或者是Singleton实例在什么时候创建是不受控制。如下是改善后的代码
public class Singleton {

	public static int k = 0;
	private Singleton(){
		System.out.println("Singleton is created");
	}
	private static class SingletonHolder{
		private static Singleton instance = new Singleton();
	}

	public static Singleton getInstance(){
		return SingletonHolder.instance;
	}

	public static void main(String[] args){
		//Singleton t = Singleton.getInstance();
		System.out.println(Singleton.k);
	}
}
2 不变模式天生就是多线程友好的,它的核心思想是一个对象一旦被创建,则它的内部状态将永远不会发生改变。不变模式的主要使用场景需要满足以下2个条件:
- 当对象创建后,其内部状态和数据不再发生任何变化
- 对象需要被分享,被多线程频繁访问
不变模式的实现很简单,只需要注意以下4点:
- 去除setter方法以及所有修改自身属性的方法
- 将所有属性设置为私有,并用final标记确保其不可修改
- 确保没有子类可以重载修改它的行为
- 有一个可以创建完整对象的构造函数
public final class Product {    // 确保无子类

	private final String no;
	private final String name;
	private final double price;

	public Product(String no,String name,double price){
		this.no = no;
		this.name = name;
		this.price = price;
	}
	public String getNo(){
		return no;
	}
	public String getName(){
		return name;
	}
	public double getPrice(){
		return price;
	}
}
不变模式应用很广泛,最典型的就是java.lang.String类。此外所有的元数据类包装类都是不变模式实现的。如java.lang.String,java.lang.Boolean,java.lang.Byte,java.lang.Character,java.lang.Double,java.lang.Float,java.lang.Integer,java.lang.Long,java.lang.Short
3 生产者-消费者模式是一个经典的多线程设计模式。生产者线程负责提交用户请求,消费者线程则负责具体处理生产者提交的任务。生产者和消费者之间则通过共享内存缓冲区进行通信。生产者-消费者模式的核心组件是共享内存缓冲区。
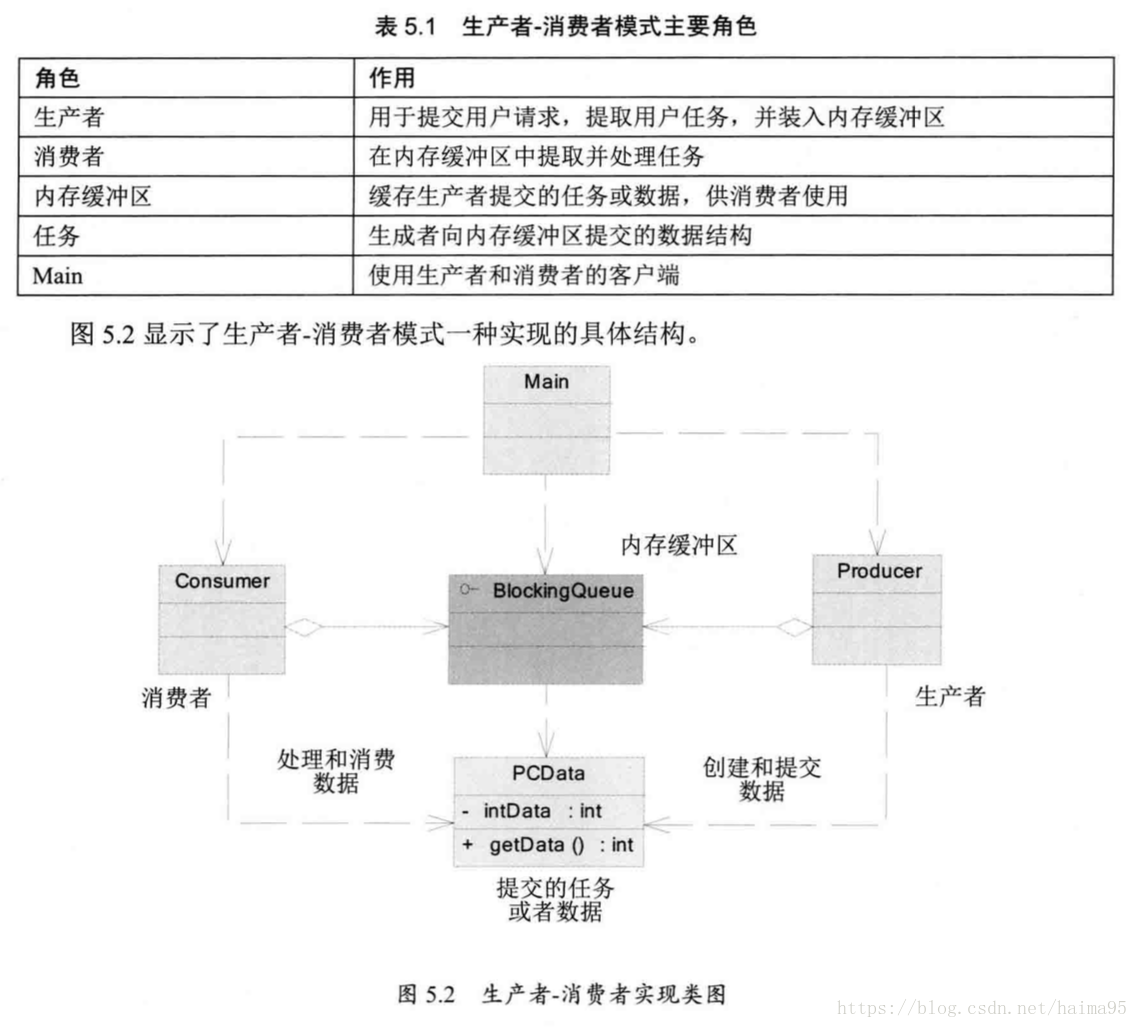
PCData对象表示一个生产任务,或者相关任务数据。生产者对象和消费者对象均引用同一个BlockingQueue实例。生产者负责创建PCData对象,并将它加入BlockingQueue中,消费者则从BlockingQueue队列中获取PCData。
public final class PCData {

	private final int intData;
	public PCData(int d){
		intData = d;
	}
	public PCData(String d){
		intData = Integer.valueOf(d);
	}
	public int getData(){
		return intData;
	}
	public String toString(){
		return "data:"+intData;
	}
}


//生产者
public class Producer implements Runnable {

	private volatile boolean isRunning = true;
	private BlockingQueue<PCData> queue;
	private static AtomicInteger count = new AtomicInteger();
	private static final int SLEEPTIME = 1000;

	public Producer(BlockingQueue<PCData> queue){
		this.queue = queue;
	}
	@Override
	public void run() {
		// TODO Auto-generated method stub
		PCData data = null;
		Random r = new Random();
		System.out.println("start producer id="+Thread.currentThread().getId());
		try{
			while(isRunning){
				Thread.sleep(r.nextInt(SLEEPTIME));
				data = new PCData(count.incrementAndGet());
				System.out.println(data+" is put into queue");
				if(!queue.offer(data,2,TimeUnit.SECONDS)){
					System.out.println("failed to put data: " +data);
				}
			}
		}catch(InterruptedException e){
			e.printStackTrace();
			Thread.currentThread().interrupt();
		}
	}
	public void stop(){
		isRunning = false;
	}

}


//消费者
public class Consumer implements Runnable {

	private BlockingQueue<PCData> queue;
	private static final int SLEEPTIME = 1000;

	public Consumer(BlockingQueue<PCData> queue){
		this.queue = queue;
	}
	@Override
	public void run() {
		// TODO Auto-generated method stub
		System.out.println("start Consumer id="+Thread.currentThread().getId());
		Random r = new Random();
		try{
			while(true){
				PCData data = queue.take();
				if(null != data){
					int re = data.getData() * data.getData();
					System.out.println(MessageFormat.format("{0}*{1}={2}", data.getData(),data.getData(),re));
					Thread.sleep(r.nextInt(SLEEPTIME));
				}
			}
		}catch(InterruptedException e){
			e.printStackTrace();
			Thread.currentThread().interrupt();
		}
	}

}


public class Main {

	public static void main(String[] args) throws InterruptedException {
		BlockingQueue<PCData> queue = new LinkedBlockingQueue<PCData>(10);
		Producer p1 = new Producer(queue);
		Producer p2 = new Producer(queue);
		Producer p3 = new Producer(queue);
		Consumer c1 = new Consumer(queue);
		Consumer c2 = new Consumer(queue);
		Consumer c3 = new Consumer(queue);
		ExecutorService es = Executors.newCachedThreadPool();
		es.execute(p1);
		es.execute(p2);
		es.execute(p3);
		es.execute(c1);
		es.execute(c2);
		es.execute(c3);
		Thread.sleep(10*1000);
		p1.stop();
		p2.stop();
		p3.stop();
		Thread.sleep(3000);
		es.shutdown();
	}
}
4 BlockingQueue是使用锁和阻塞等待来实现线程间的同步。对于高并发场合,它的性能并不是最优越。而ConcurrentLinkedQueue是一个高性能的队列,它使用了无锁的CAS操作。
5 Disruptor是个无锁的缓存框架,是由LMAX公司开发的一款高效的无锁内存队列。它使用无锁的方式实现了一个环形队列(RingBuffer),非常适合实现生产者和消费者模式。
public class PCData2 {

	private long value;
	public void set(long value){
		this.value = value;
	}
	public long get(){
		return value;
	}
}


// 工厂
public class PCDataFactory implements EventFactory<PCData2> {

	public PCData2 newInstance(){
		return new PCData2();
	}
}


//生产者
public class Producer2 {

	private final RingBuffer<PCData2> ringBuffer;
	public Producer2(RingBuffer<PCData2> ringBuffer){
		this.ringBuffer = ringBuffer;
	}
	public void pushData(ByteBuffer bb){
		long sequence = ringBuffer.next();
		try{
			PCData2 event = ringBuffer.get(sequence);
			event.set(bb.getLong(0));
		}finally{
			ringBuffer.publish(sequence);
		}
	}
}


//消费者
public class Consumer2 implements WorkHandler<PCData2>{

	@Override
	public void onEvent(PCData2 arg0) throws Exception {
		// TODO Auto-generated method stub
		System.out.println(Thread.currentThread().getId()+": Event: -- "
				+arg0.get()*arg0.get()+" --");
	}

}


//执行
public static void main(String[] args) throws Exception{
		Executor executor = Executors.newCachedThreadPool();
		PCDataFactory factory = new PCDataFactory();
		int bufferSize = 1024;
		Disruptor<PCData2> disruptor = new Disruptor<PCData2>(factory,bufferSize,executor,
				ProducerType.MULTI,new BlockingWaitStrategy());
		disruptor.handleEventsWithWorkerPool(
				new Consumer2(),
				new Consumer2(),
				new Consumer2(),
				new Consumer2());
		disruptor.start();
		RingBuffer<PCData2> ringBuffer = disruptor.getRingBuffer();
		Producer2 p = new Producer2(ringBuffer);
		ByteBuffer bb = ByteBuffer.allocate(8);
		for(long l = 0;true;l++){
			bb.putLong(0,l);
			p.pushData(bb);
			Thread.sleep(100);
			System.out.println("add data "+l);
		}
	}
6 Futur模式,也是一种多线程开发常见的模式,它的核心思想是异步调用。当一个函数执行很慢,可以先让调用者立即返回,让函数在后台慢慢处理请求。
7 并发流水线
public class Msg {
	public double i;
	public double j;
	public String orgStr = null;
}


public class Plus implements Runnable {
	public static BlockingQueue<Msg> bq = new LinkedBlockingQueue<Msg>();

	@Override
	public void run() {
		// TODO Auto-generated method stub
		while(true){
			try{
				Msg msg = bq.take();
				msg.j = msg.i+msg.j;
				Multiply.bq.add(msg);
			}catch(InterruptedException e){
				e.printStackTrace();
			}
		}
	}
}


public class Multiply implements Runnable {
	public static BlockingQueue<Msg> bq = new LinkedBlockingQueue<Msg>();

	@Override
	public void run() {
		// TODO Auto-generated method stub
		while(true){
			try{
				Msg msg = bq.take();
				msg.i = msg.i*msg.j;
				Div.bq.add(msg);
			}catch(InterruptedException e){
				e.printStackTrace();
			}
		}
	}
}


public class Div implements Runnable {
	public static BlockingQueue<Msg> bq = new LinkedBlockingQueue<Msg>();

	@Override
	public void run() {
		// TODO Auto-generated method stub
		while(true){
			try{
				Msg msg = bq.take();
				msg.i = msg.i/2;
				System.out.println(msg.orgStr+"="+msg.i);
			}catch(InterruptedException e){
				e.printStackTrace();
			}
		}
	}
}

public class PStreamMain {

	public static void main(String[] args){
		new Thread(new Plus()).start();
		new Thread(new Multiply()).start();
		new Thread(new Div()).start();

		for(int i=1;i<=10;i++){
			for(int j=1;j<=10;j++){
				Msg msg = new Msg();
				msg.i = i;
				msg.j = j;
				msg.orgStr = "(("+i+"+"+j+")*"+i+")/2";
				Plus.bq.add(msg);
			}
		}
	}

}
8 Java NIO是一套新的IO机制。