目录
 这个故事是该系列的第六部分,适用于Android 初学者的 Dagger 2。 如果您没有阅读上一个,可以从下面开始。
系列目录
- 适用于 Android 初学者的 Dagger 2 - 简介
- 适用于 Android 初学者的 Dagger 2 - DI 第一部分
- 适用于 Android 初学者的 Dagger 2 - DI 第二部分
- 适用于 Android 初学者的 Dagger 2 - Dagger 2 第一部分
- 适用于 Android 初学者的 Dagger 2 — Dagger 2 第二部分
- 适用于 Android 初学者的 Dagger 2 - Dagger 2 进阶第一部分(你在这里)
- 适用于 Android 初学者的 Dagger 2 - Dagger 2 进阶第二部分
Dagger2 前情回顾..
我们用分析了由 dagger 生成的类的解剖结构,我们发现了 dagger 如何利用构建器模式为我们提供所需的依赖关系。
我们还到处查看,看到了使用 @module 和 @provides 的基本示例。
前言
这篇文章可能有点长。我通常保持我的帖子不延伸800个字-只是为了公正地服务于我的读者的掌握能力。我想把文章分成几部分,但这篇文章之所以像马拉松,是因为,如果你中间有一个很长的休息时间,在解决硬依赖问题时,你可能会失去一些机会。
但更为安全的一面是,我在这篇文章中加入了检查点。 在括号中查找3虚线或单词(检查点)。 这就是你可以稍微休息一下并允许你的思维处理和吸收的地方 - 这适用于正在学习 Dagger 2 和 DI 的初学者。
我为什么要告诉你这一切?好吧,我也是一个看中用户体验的人-我重视各方面的共鸣和用户体验 :-P
阅读快乐!
Android 家族

图片来源: http://androidcentral.com/
到目前为止,我们一直在玩普通的 Java 项目。 我希望大多数人现在对 Dependency Injection 有所了解,以及Dagger 2 如何帮助我们实现它。 现在让我们深入了解实时 Android 场景,并尝试使用 Dagger 2 构建我们的项目。
为了让每个人都在同一页面,比如 Google code labs,我创建了一个小型的 kickstarter 项目。 我们的目标是消除该项目中的硬依赖。
Kickstarter Project
概念灵感
这一解释概念的灵感来源于我的一位好朋友 Chintan Soni 的GDD 演讲。我要感谢他允许我在这个项目中使用他的概念和他的一些作品。
项目说明
这是一个非常简单的项目 - 它使用 Random Users API 获取随机用户并将其显示在RecyclerView中。 我不会花很多时间来解释这个项目 - 可能只是一个抽象的。 但请阅读代码以获得更深入的理解,以便我们的 Dagger 2 集成变得更加容易。
#类和包
MainActivity.java— 请求 API 并在RecyclerView中显示条目Model包 — 用于 API 响应的 POJO,使用 JSON Schema to POJORandomUsersAdapter.java—RecyclerView 的适配器
涉及的依赖
为了通过 API 调用在 RecyclerView 中显示随机用户,涉及以下依赖项和库。
Retrofit—用于进行 API 调用GsonBuilder&Gson— 用于 JSON 解析和操作HttpLoggingInterceptor— 用于打印网络操作日志OkHttpClient—Retrofit 的客户端Picasso—图像处理(在适配器中)
正如我们在前面的示例中看到的,在我们的 MainActivity 中,我们有以下依赖项。 每次调用MainActivity时,都会一次又一次地创建这些实例。
public class MainActivity extends AppCompatActivity {

    Retrofit retrofit;
    RecyclerView recyclerView;
    RandomUserAdapter mAdapter;

    @Override
    protected void onCreate(Bundle savedInstanceState) {
        super.onCreate(savedInstanceState);
        setContentView(R.layout.activity_main);
        initViews();

        GsonBuilder gsonBuilder = new GsonBuilder();
        Gson gson = gsonBuilder.create();

        Timber.plant(new Timber.DebugTree());

        HttpLoggingInterceptor httpLoggingInterceptor = new
                HttpLoggingInterceptor(new HttpLoggingInterceptor.Logger() {
            @Override
            public void log(@NonNull String message) {
                Timber.i(message);
            }
        });

        httpLoggingInterceptor.setLevel(HttpLoggingInterceptor.Level.BODY);

        OkHttpClient okHttpClient = new OkHttpClient()
                .newBuilder()
                .addInterceptor(httpLoggingInterceptor)
                .build();

        retrofit = new Retrofit.Builder()
                .client(okHttpClient)
                .baseUrl("https://randomuser.me/")
                .addConverterFactory(GsonConverterFactory.create(gson))
                .build();

        populateUsers();

    }

    private void initViews() {
        recyclerView = findViewById(R.id.recyclerView);
        recyclerView.setLayoutManager(new LinearLayoutManager(this));
    }

    private void populateUsers() {
        Call<RandomUsers> randomUsersCall = getRandomUserService().getRandomUsers(10);
        randomUsersCall.enqueue(new Callback<RandomUsers>() {
            @Override
            public void onResponse(Call<RandomUsers> call, @NonNull Response<RandomUsers> response) {
                if(response.isSuccessful()) {
                    mAdapter = new RandomUserAdapter();
                    mAdapter.setItems(response.body().getResults());
                    recyclerView.setAdapter(mAdapter);
                }
            }

            @Override
            public void onFailure(Call<RandomUsers> call, Throwable t) {
                Timber.i(t.getMessage());
            }
        });
    }

    public RandomUsersApi getRandomUserService(){
        return retrofit.create(RandomUsersApi.class);
    }


}
(检查站)...
要解决的问题
如果您查看我们的 MainActivity,您可能会注意到以下问题
#笨拙的初始化
当你看到我们的 MainActivity 的 onCreate 方法时,你可能会发现所有的初始化都很笨拙。我们无法在继续添加更多初始化。我们需要一个适当的方法来做到这一点。
#可测试性
我们还需要找出一种方法来测试我们的代码。即使在我们的适配器中 Picasso 也打破了可测试性规则。是的,通过构造函数注入 Picasso 对象也不错。
public class RandomUserAdapter extends RecyclerView.Adapter<RandomUserAdapter.RandomUserViewHolder> {

    private List<Result> resultList = new ArrayList<>();


    public RandomUserAdapter() {
    }

    @Override
    public RandomUserViewHolder onCreateViewHolder(ViewGroup parent, int viewType) {
        View view = LayoutInflater.from(parent.getContext()).inflate(R.layout.list_item_random_user,
                parent, false);
        return new RandomUserViewHolder(view);
    }

    @Override
    public void onBindViewHolder(RandomUserViewHolder holder, int position) {
        Result result = resultList.get(position);
        holder.textView.setText(String.format("%s %s", result.getName().getFirst(),
                result.getName().getLast()));
        Picasso.with(holder.imageView.getContext())
                .load(result.getPicture().getLarge())
                .into(holder.imageView);
    }
......
让我们把事情弄复杂点
我在 MainActivity 中提到的依赖关系只是为了让您对 kickstarter 项目感到满意。 如果我们深入了解,我们的 MainActivity 中可能存在额外的依赖关系 - 在典型的实时项目中。 所以,让我们为 MainActivity 添加额外的依赖项。
请参阅以下分支以添加其他依赖项
除了上述依赖项之外,其他依赖项还包括
Filedependency — 用于维护缓存Cache— 用于网络缓存OkHttp3Downloader— 一个使用OkHttpClient下载图像的下载器Picasso— 用于处理网络图像
现在,完整的依赖项将如下所示
@Override
    protected void onCreate(Bundle savedInstanceState) {
        super.onCreate(savedInstanceState);
        setContentView(R.layout.activity_main);
        initViews();

        GsonBuilder gsonBuilder = new GsonBuilder();
        Gson gson = gsonBuilder.create();

        Timber.plant(new Timber.DebugTree());

        File cacheFile = new File(this.getCacheDir(), "HttpCache");
        cacheFile.mkdirs();

        Cache cache = new Cache(cacheFile, 10 * 1000 * 1000); //10 MB

        HttpLoggingInterceptor httpLoggingInterceptor = new
                HttpLoggingInterceptor(new HttpLoggingInterceptor.Logger() {
            @Override
            public void log(@NonNull String message) {
                Timber.i(message);
            }
        });

        httpLoggingInterceptor.setLevel(HttpLoggingInterceptor.Level.BODY);


        OkHttpClient okHttpClient = new OkHttpClient()
                .newBuilder()
                .cache(cache)
                .addInterceptor(httpLoggingInterceptor)
                .build();

        OkHttp3Downloader okHttpDownloader = new OkHttp3Downloader(okHttpClient);

        picasso = new Picasso.Builder(this).downloader(okHttpDownloader).build();

        retrofit = new Retrofit.Builder()
                .client(okHttpClient)
                .baseUrl("https://randomuser.me/")
                .addConverterFactory(GsonConverterFactory.create(gson))
                .build();

        populateUsers();

    }
在这个要点中只显示了 onCreate()
(检查站)...
秘密
我们中的许多人(包括我)发 DI 和 Dagger 2 有点难度,因为缺少了某些东西。连接节点的小部件丢失了。缺少的链接或秘密就是依赖关系图。
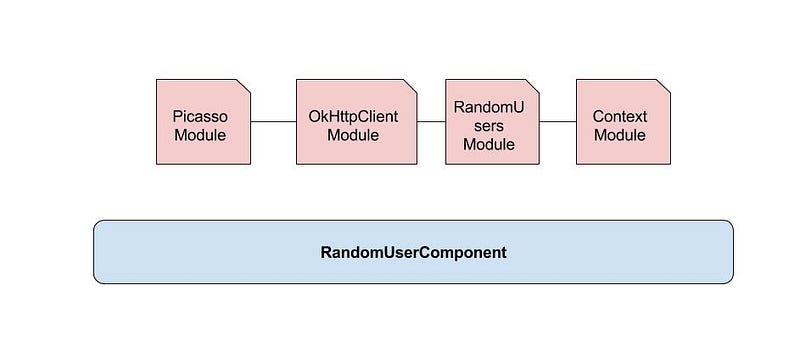
依赖关系图
依赖关系图只是一个图表,通过箭头标记或线条来解释类的依赖关系。 为项目编写 D-graph 将真正使我们的实现变得更加容易(最终你会意识到)。 这是我们项目的 DI 关系图。

依赖关系图
绿色框表示它们是依赖关系中的最高顺序,即任何人都不需要它们。 他们只需要下面的依赖项。
如何阅读/遍历图表? 就像 Picasso 有 2 个依赖项 - OkHttp3Downloader 和 Context。
要从 API 中获得随机用户,你需要 Retrofit。反过来,这需要两个依赖项 - GsonConvertFactory 和 OkHttpClient。反过来,他们也需要自己的依赖项等等。
慢慢看,边看
MainActivity 中的代码,边看图表以便更好地理解。
(检查站)...
使用 Dagger 2 处理依赖注入
请参考以下分支,你将找到 Dagger 2 的实现
注意 :
RandomUsersAPI和RandomUsersApi是一回事。只是创建图表时的拼写错误。- 当你比较上面的分支和我在这里使用的要点时,
RandomUsersComponent会有所不同。 我建议你采用以下分支和演练。 保留上述分支以供参考。 - 如果它真的有助于你的学习,请不要忘记 star项目
第1步:设置Dagger
要设置Dagger 2,请参考上面分支中的 app 的 build.gradle,或者就在 build.gradle 文件中添加以下行。
dependencies {
    implementation 'com.google.dagger:dagger:2.13'
    annotationProcessor 'com.google.dagger:dagger-compiler:2.13'
}
请记住在后续操作时更新最新版本
第2步:创建 Component
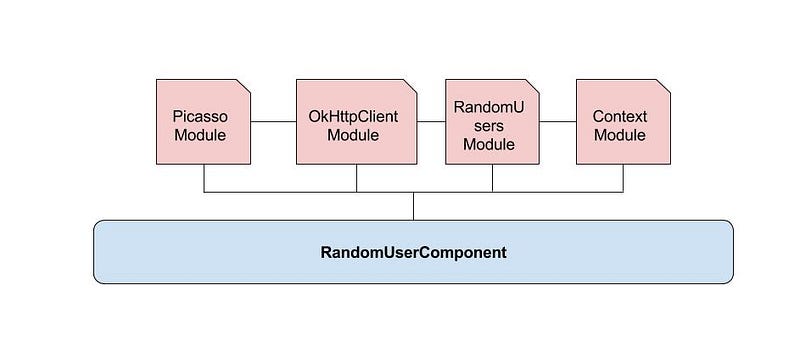
组件将充当整个依赖关系图的公共接口。 使用组件的最佳实践是只公开顶级依赖项,并使其他内部依赖保持在顶级依赖遮盖之下。
也就是指我在依赖关系图中用绿色突出显示的类。 它们是顶级依赖项 - RandomUsersAPI 和 Picasso。 我们只公开他们。
创建一个名为 RandomUserComponent 的组件,并公开以下类 RandomUserComponent 和 Picasso。
@Component
public interface RandomUserComponent {
    RandomUsersApi getRandomUserService();
    Picasso getPicasso();
}
现在,该组件将如何知道从哪里获取依赖项 RandomUsersApi 和 Picasso? 这就是 modules 的用武之地。
第3步:创建 Modules
Modules 将提供最外层依赖项的顶层依赖 - RandomUsersApi 和 Picasso。
我们现在需要将代码从 MainActivity 移动到不同的 modules。 通过查看 D-Graph 和 component,我们可以决定我们需要哪些模块。
首先是,RandomUsersModule - 提供 RandomUsersApi, GsonConverterFactory,Gson 和 Retrofit
@Module
public class RandomUsersModule {

    @Provides
    public RandomUsersApi randomUsersApi(Retrofit retrofit){
        return retrofit.create(RandomUsersApi.class);
    }

    @Provides
    public Retrofit retrofit(OkHttpClient okHttpClient,
                             GsonConverterFactory gsonConverterFactory, Gson gson){
        return new Retrofit.Builder()
                .client(okHttpClient)
                .baseUrl("https://randomuser.me/")
                .addConverterFactory(gsonConverterFactory)
                .build();
    }

    @Provides
    public Gson gson(){
        GsonBuilder gsonBuilder = new GsonBuilder();
        return gsonBuilder.create();
    }

    @Provides
    public GsonConverterFactory gsonConverterFactory(Gson gson){
        return GsonConverterFactory.create(gson);
    }


}其次,PicassoModule - 提供 Picasso 和 OkHttp3Downloader。
@Module
public class PicassoModule {

    @Provides
    public Picasso picasso(Context context, OkHttp3Downloader okHttp3Downloader){
        return new Picasso.Builder(context).
                downloader(okHttp3Downloader).
                build();
    }

    @Provides
    public OkHttp3Downloader okHttp3Downloader(OkHttpClient okHttpClient){
        return new OkHttp3Downloader(okHttpClient);
    }

}
对于 RandomUsersModule 中的 Retrofit ,我们需要 OkHttpClient。 这反过来却需要很少的依赖。 那么为什么不为它创建一个单独的 module 呢?
让我们创建 OkHttpClientModule- 它提供 OkHttpClient,Cache,HttpLoggingInterceptor 和 File
@Module
public class OkHttpClientModule {

    @Provides
    public OkHttpClient okHttpClient(Cache cache, HttpLoggingInterceptor httpLoggingInterceptor){
        return new OkHttpClient()
                .newBuilder()
                .cache(cache)
                .addInterceptor(httpLoggingInterceptor)
                .build();
    }

    @Provides
    public Cache cache(File cacheFile){
        return new Cache(cacheFile, 10 * 1000 * 1000); //10 MB
    }

    @Provides
    public File file(Context context){
        File file = new File(context.getCacheDir(), "HttpCache");
        file.mkdirs();
        return file;
    }

    @Provides
    public HttpLoggingInterceptor httpLoggingInterceptor(){
        HttpLoggingInterceptor httpLoggingInterceptor = new HttpLoggingInterceptor(new HttpLoggingInterceptor.Logger() {
            @Override
            public void log(String message) {
                Timber.d(message);
            }
        });
        httpLoggingInterceptor.setLevel(HttpLoggingInterceptor.Level.BODY);
        return httpLoggingInterceptor;
    }

}
我们的高级 modules 已准备就绪。 但是 PicassoModule 和 OkHttpClientModule 需要 Context,我们还将面临其他需要 Context 的情况。 那么为什么不给它一个 module 呢?
@Module
public class ContextModule {

    Context context;

    public ContextModule(Context context){
        this.context = context;
    }

    @Provides
    public Context context(){ return context.getApplicationContext(); }
}
第4步:连接所有 Modules
现在,我们已经准备好所有 modules 和 component - 如下图所示。 但是我们如何将 Context 传递给其他模块呢? 我们需要链接相互依赖的模块。

这正是 includes 属性发挥作用的地方。includes 属性包含当前 module 中所涉及到的其他 module 依赖项。
都需要包含哪些 modules 呢?
RandomUsersModule需要OkHttpClientModuleOkHttpClientModule需要ContextModulePicassoModule需要OkHttpClientModule和ContextModule。但是由于OkHttpClientModule已经与ContextModule链接,所以我们只包含 OkHttpClientModule
//在 RandomUsersModule.java 中
@Module(includes = OkHttpClientModule.class)
public class RandomUsersModule { ... }

//在 OkHttpClientModule.java 中
@Module(includes = ContextModule.class)
public class OkHttpClientModule { ... }

//在 PicassoModule.java 中
@Module(includes = OkHttpClientModule.class)
public class PicassoModule { ... }
通过提供上述内容,我们已经链接了所有模块。
已链接的所有模块:-)
第5步:训导 Component
我们所有的 modules 都已连接并可以相互通信。 我们现在只需要告诉或教育 component 需要依赖哪些 modules 来提供依赖关系。
就像通过 includes 属性告诉 modules 关于它们的依赖关系一样,我们需要告诉 component 它与 modules 属性的依赖关系。
考虑到 components 的需求(方法- getRandomUserService() 和 getPicasso()),让我们使用 modules 将模块 RandomUsersModule 和 PicassoModule 包含在 component 中。
@Component(modules = {RandomUsersModule.class, PicassoModule.class})
public interface RandomUserComponent {
    RandomUsersApi getRandomUserService();
    Picasso getPicasso();
}
Component 和 modules 连接好了:-)
第6步:构建它
是时候构建项目了。 如果您已完成上述所有步骤,Dagger 将使用构建器模式创建 RandomUserComponent,它现在可以根据我们的请求提供依赖项了。
现在,如果我们看看我们的 MainActivity - 我们可以在 RandomUserComponent 的帮助下轻松获得 Picasso 和 RandomUsersApi。
public class MainActivity extends AppCompatActivity {
  RandomUsersApi randomUsersApi;
  Picasso picasso;
  ....
  @Override
    protected void onCreate(Bundle savedInstanceState) {
        super.onCreate(savedInstanceState);
        setContentView(R.layout.activity_main);
        ...
        RandomUserComponent daggerRandomUserComponent = DaggerRandomUserComponent.builder()
                .contextModule(new ContextModule(this))
                .build();
        picasso = daggerRandomUserComponent.getPicasso();
        randomUsersApi = daggerRandomUserComponent.getRandomUserService();
        populateUsers();
        ...
    }
  ...
}
请参考分支,可能对 adapter 的构造函数进行了一些修改以传递 Picasso 对象。
第7步:祝贺你自己!
是! 你做到了。 您在Android应用程序中使用了 Dagger 2。 祝贺你自己,休息一下(Checkpoint)。 你可以随意使用生成的类。
但是有一个问题!
什么? 什么问题?
每次调用 <DaggerComponent>.build()时,它都会创建您指示它为您提供的所有对象或依赖项的新实例。 所以,在那种情况下,为什么 Dagger 不知道 Picasso 只需要一个实例? 换句话说,我们如何告诉 Dagger 为我们提供单例(单实例)依赖?
这就是 @Scope 注解的用武之地。
@Scope 注解
@Scope 注解告诉 dagger 创建单个实例,即使多次调用 <DaggerComponent>.build() 也是如此。 它将使依赖项以单例发挥作用。
我们需要创建一个新 interface 来创建自定义 scope。
@Scope
@Retention(RetentionPolicy.CLASS)
public @interface RandomUserApplicationScope {

}
@Retention -是注解的保留策略。这里我们已经指示将注解保留到类。在此阅读有关 retention 的更多信息。
自定义 Scope 用法
要使用我们的定制范围,我们需要从 component 级别开始,然后将我们需要的每个方法作为一个单例来使用。
@RandomUserApplicationScope
@Component(modules = {RandomUsersModule.class, PicassoModule.class})
public interface RandomUserComponent { ...}

@Module(includes = OkHttpClientModule.class)
public class PicassoModule {
  ...
    @RandomUserApplicationScope
    @Provides
    public Picasso picasso(Context context, OkHttp3Downloader okHttp3Downloader){
        return new Picasso.Builder(context).
                downloader(okHttp3Downloader).
                build();
    }
  ...
}

@Module(includes = OkHttpClientModule.class)
public class RandomUsersModule {
  ...
  @RandomUserApplicationScope
    @Provides
    public Retrofit retrofit(OkHttpClient okHttpClient,
                             GsonConverterFactory gsonConverterFactory, Gson gson){
        return new Retrofit.Builder()
                .client(okHttpClient)
                .baseUrl("https://randomuser.me/")
                .addConverterFactory(gsonConverterFactory)
                .build();
    }
    ...
}
这就是我们创建单个实例的方法!
现在,还有一个问题!
通常,对于每个 app,我们将使用两种类型的 context。AppicationContext 和 Activity context。 我们如何提供? 对于 ApplicationContext,我们可以使用 ContextModule 来提供。 因此,让我们创建另一个名为 ActivtiyModule 的 module 来提供 Activity context。
@Module
public class ActivityModule {

    private final Context context;

    ActivityModule(Activity context){
        this.context = context;
    }

    @RandomUserApplicationScope
    @Provides
    public Context context(){ return context; }
}
但这并不能解决我们的问题。 因为我们的 Dagger 会对使用哪种 context 感到困惑。 由于它有2个模块,每个都提供 Context,因此会抛出错误。
我们如何才能告诉 Dagger 使用 ApplicationContext 作为这个依赖项,使用 Activity context 作为那个依赖项?@Named 注解将为您完成这项工作。
@Named 注解
此注解帮助我们区分 Context。 让我们看看如何使用它们。 我们可以通过添加 @Named 注解来区分 ActivityModule 和 ContextModule 中的 context() 方法,如下所示。
@Module
public class ActivityModule {
    ....
    @Named("activity_context")
    @RandomUserApplicationScope
    @Provides
    public Context context(){ return context; }
}

@Module
public class ContextModule {
  ....
    @Named("application_context")
    @RandomUserApplicationScope
    @Provides
    public Context context(){ return context.getApplicationContext(); }
}
然后,我们告诉 Dagger 使用相应的 Context,如下所示
@Module(includes = ContextModule.class)
public class OkHttpClientModule {
  ....
    @Provides
    @RandomUserApplicationScope
    public File file(@Named("application_context") Context context){
        File file = new File(context.getCacheDir(), "HttpCache");
        file.mkdirs();
        return file;
    }
  ....
}

@Module(includes = OkHttpClientModule.class)
public class PicassoModule {
    ...
    @RandomUserApplicationScope
    @Provides
    public Picasso picasso(@Named("application_context")Context context, OkHttp3Downloader okHttp3Downloader){
        return new Picasso.Builder(context).
                downloader(okHttp3Downloader).
                build();
      ...
}
@Named注解的替代方案 - @Qualifier
@Named 注解的替代方案是 @Qualifier 注解。 要使用 @Qualifier 创建 ApplicationContext,我们需要创建一个单独的 @interface ,并在必要时使用它。 让我们先创建一个 @interfaceApplicationContext。
@Qualifier
public @interface ApplicationContext {}
然后我们将此接口映射到依赖项提供者方法-context()
@Module
public class ContextModule {
....
    @ApplicationContext
    @RandomUserApplicationScope
    @Provides
    public Context context(){ return context.getApplicationContext(); }
}
然后我们告诉所有参数使用这个 context。
@Module(includes = ContextModule.class)
public class OkHttpClientModule {
...
@Provides
    @RandomUserApplicationScope
    public File file(@ApplicationContext Context context){
        File file = new File(context.getCacheDir(), "HttpCache");
        file.mkdirs();
        return file;
    }
....
}

@Module(includes = OkHttpClientModule.class)
public class PicassoModule {

    @RandomUserApplicationScope
    @Provides
    public Picasso picasso(@ApplicationContext Context context, OkHttp3Downloader okHttp3Downloader){
        return new Picasso.Builder(context).
                downloader(okHttp3Downloader).
                build();
    }
  ....
}有关@Qualifier注解的用法,请参阅以下 commit。
总结
到目前为止,我们采用了一个示例 kickstarter 项目,并尝试使用 Dagger 2 APIs 和注解来解耦和注入依赖项。
我们还看到了 3 个新注解。 一个是 @Scope - 用于获取单例依赖项。 接下来是 @Named - 用于区分依赖提供者。 另一个是 @Qualifier 注解,是 @Named 注解的替代方案,我们看到了两者的实现。
下一步是什么?
目前为止,我们只看到了 application 级依赖项。 接下来,我们将看到 activity 级依赖关系,还可以创建多个 components 并与它们进行交互。