环境准备
- VMware上安装CentOS7
- XShell/Xftp
- NexusOSS-3.10
-
安装
使用root用户登录,将安装包均放置在/usr/local文件夹下 - 使用Xshell、Xftp、FileZilla或MobaXterm将上述jdk及nexus安装包上传至
/usr/local tar -zxvf jdk-8u211-linux-x64.tar.gztar -zxvf nexus-3.10.0-04-unix.tar.gz
此时安装就已经完成了,其实已经可以直接使用root用户启动了,但是为了方便以后管理,我这里添加了一些配置。参考设置小节。设置
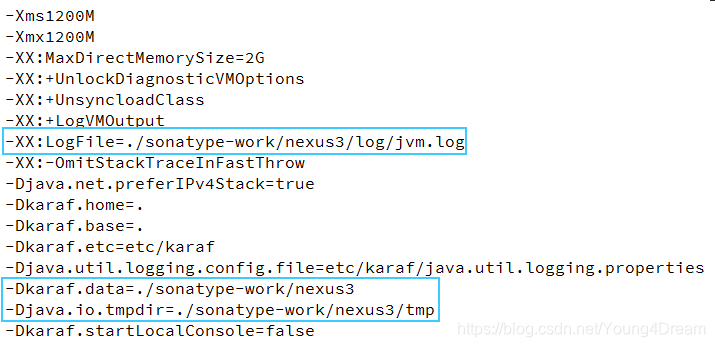
日志存放
nexus启动时,会产生日志和临时文件等,默认情况下会放在与Nexus安装目录同级文件夹sonatype-work中(第一次启动会自动生成),现将其默认位置修改为Nexus的根目录下vim /usr/local/nexus-3.10.0-04/bin/nexus.vmoptions
防火墙
基本参考
高级参考
firewall-cmd --zone=public --add-port=8081/tcp --permanent
HTTPS
端口
Nexus默认端口是8081,它的配置文件在/usr/local/nexus-3.10.0-04/etc/nexus-default.properties中,可以通过cat命令查看:
## DO NOT EDIT - CUSTOMIZATIONS BELONG IN $data-dir/etc/nexus.properties
##
# Jetty section
application-port=8081
application-host=0.0.0.0
nexus-args=${jetty.etc}/jetty.xml,${jetty.etc}/jetty-http.xml,${jetty.etc}/jetty-requestlog.xml
nexus-context-path=/

# Nexus section
nexus-edition=nexus-pro-edition
nexus-features=\
nexus-pro-feature添加https访问的形式涉及到端口设置,假如准备设置8443为https端口,那么需要修改两个地方:
- 新增
application-port-ssl=8443 在
nexus-args属性上追加,${jetty.etc}/jetty-https.xml: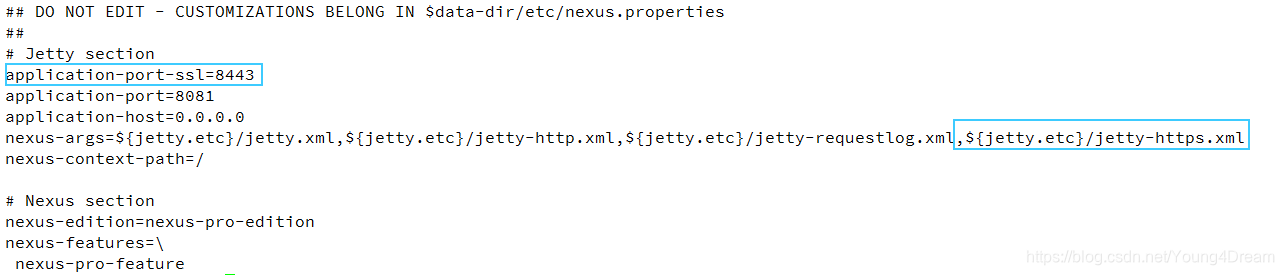
注:如果需要将http导向https访问,则追加
jetty-http-redirect-to-https.xml至nexus-args,这里我没有强制。
此时也别忘记开防火墙:firewall-cmd --zone=public --add-port=8443/tcp --permanentkeystore
如果此时启动肯定会报错1,因为还缺keystore.jks的配置,我们使用脚本生成,其中涉及keytool工具使用,因此先保证keytool可以正常使用:
- 添加JAVA_HOME环境变量
vim /etc/profile并在合适位置加入
shell export JAVA_HOME=/usr/local/jdk1.8.0_211 export PATH=$JAVA_HOME/bin:$PATH- 刷新环境变量使其立刻生效:
resource /etc/profile vim /usr/local/nexus-3.10.0-04/nexus-ssl-generate-keystore.sh
```shell
NEXUS_DOMAIN='Nexus'
if [[ -z $1 ]]; then
echo 'please input your ip_address!'
exit
fi
NEXUS_IP_ADDRESS=$1
PASSWORD='password'
keytool -genkeypair -keystore keystore.jks -storepass ${PASSWORD} -keypass \({PASSWORD} -alias nexus -keyalg RSA -keysize 2048 -validity 5000 -dname "CN=\){NEXUS_DOMAIN}, OU=Nexus, O=Nexus, L=Beijing, ST=Beijing, C=CN" -ext "SAN=IP:${NEXUS_IP_ADDRESS}" -ext "BC=ca:true"mv keystore.jks etc/ssl/
```
#keytool -export -alias nexus -keystore keystore.jks -file keystore.cer -storepass ${PASSWORD}
#mv keystore.cer etc/ssl/生成keystore
/usr/local/nexus-3.10.0-04/nexus-ssl-generate-keystore.sh 192.168.197.198,这里192.168.197.198是本机IP。
开机启动
参考
vim /usr/lib/systemd/system/nexus3.service
[Unit]
Description=nexus3 - private repository
After=network.target remote-fs.target nss-lookup.target

[Service]
Type=forking
ExecStart=/usr/local/nexus-3.10.0-04/bin/nexus start
ExecReload=/usr/local/nexus-3.10.0-04/bin/nexus restart
ExecStop=/usr/local/nexus-3.10.0-04/bin/nexus stop

[Install]
WantedBy=multi-user.target此时使用systemctl enable nexus3使配置生效即可。
使用说明
| OPTION | COMMAND |
|---|---|
| 启动 | systemctl start nexus3 |
| 停止 | systemctl stop nexus3 |
| 重启 | systemctl restart nexus3 |
用户
一般不能直接使用root用户,因此需要为nexus添加用户专门运行:
添加用户:adduser nexus
设置密码:passwd nexus
将拥有者设置为nexus:chown nexus:nexus -R /usr/local/nexus-3.10.0-04
将nexus添加至sudoers:
visudo- 添加
nexus ALL=(ALL) ALL su nexus启动
sudo systemctl start nexus3
/usr/local/nexus-3.10.0-04/etc/jetty/jetty-https.xml中会涉及读取keystore.jks↩