一、特征脸
特征脸EigenFace从思想上其实挺简单。就相当于把人脸从像素空间变换到另一个空间,在另一个空间中做相似性的计算。这么说,其实图像识别的基本思想都是一样的,首先选择一个合适的子空间,将所有的图像变换到这个子空间上,然后再在这个子空间上衡量相似性或者进行分类学习。
通过变换到另一个空间,同一个类别的图像会聚到一起,不同类别的图像会距离比较远,因为图像各种因素的影响,包括光照、视角、背景和形状等等不同,会造成同一个目标的图像都存在很大的视觉信息上的不同,在原像素空间中不同类别的图像在分布上很难用个简单的线或者面把他们切分开,但是如果变换到另一个空间,就可以很好的把他们分开了。
万千世界,同一类事物都存在共性,也存在个性,只要在我们把同一类目标的共性找出来就好了,而且这个共性最好和我们要区分的类是不一样的。那么要变换到什么空间,才具备上述这种良好类内相似、类间区分的效果?计算机视觉领域发展了几十年,就为了这一个问题倾注了无数研究者的智慧与心血。当然了,也诞生和孕育了很多经典和有效的解答。(实际上就是特征提取)。从一开始的颜色特征(颜色直方图)、纹理特征(Harr、LBP、HOG、SIFT等)、形状特征等到视觉表达Bag of Words,再到特征学习Deep Learning,技术的发展总能带给人希望,曙光也越来越清晰,但路还很远,是不?
上面说到,特征脸EigenFace的思想是把人脸从像素空间变换到另一个空间,在另一个空间中做相似性的计算。EigenFace选择的空间变换方法是PCA,也就是大名鼎鼎的主成分分析。它广泛的被用于预处理中以消去样本特征维度之间的相关性。当然了,这里不是说这个。
PCA原理请参见 :PCA的数学原理
EigenFace方法利用PCA得到人脸分布的主要成分,具体实现是对训练集中所有人脸图像的协方差矩阵进行特征值分解,得对对应的特征向量,这些特征向量就是“特征脸”。每个特征向量或者特征脸相当于捕捉或者描述人脸之间的一种变化或者特性。这就意味着每个人脸都可以表示为这些特征脸的线性组合。实际上,空间变换就等同于“基变换”,原始像素空间的基就是单位“基”,经过PCA后空间就是以每一个特征脸或者特征向量为基,在这个空间(或者坐标轴)下,每个人脸就是一个点,这个点的坐标就是这个人脸在每个特征基下的投影坐标。
下面就直接给出基于特征脸的人脸识别实现过程:
1)将训练集的每一个人脸图像都拉长一列,将他们组合在一起形成一个大矩阵A。假设每个人脸图像是MxM大小,那么拉成一列后每个人脸样本的维度就是N=MxM大小了。假设有20个人脸图像,那么样本矩阵A的维度就是20xN了。

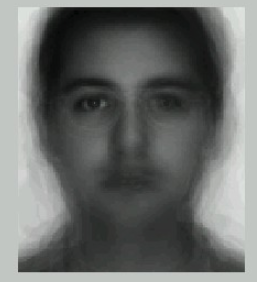
2)将所有的20个人脸在对应维度上加起来,然后求个平均,就得到了一个“平均脸”,这个“平均脸”矩阵E是一个1xN的向量,将这个向量reshape成MxM矩阵,你就可以把这个脸显示出来的话,还挺帅的哦。
3)将20个图像都减去那个平均脸图像(即矩阵A的每一行减去向量E),得到差值图像的数据矩阵Φ,矩阵Φ的维度也是20xN。
4)计算协方差矩阵 。协方差矩阵C的维度是NxN,(注意:协方差衡量的是不同像素位置间的相关性,并不是图像与图像之间的相关性)再对其进行特征值分解。就可以得到想要的特征向量(特征脸)。
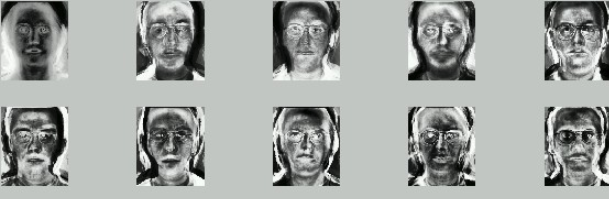
这些特征向量如果还原成像素排列的话,其实还蛮像人脸的,所以称之为特征脸(如下图)。图里有10个特征脸,有论文表明一般的应用40个特征脸已经足够了。论文Eigenface for recognition里只用了7个特征脸来表明实验。
5)将训练集图像和测试集的图像都投影到这些特征向量上了,再对测试集的每个图像找到训练集中的最近邻或者k近邻等处理,进行分类即可。
对于步骤4),涉及到求特征值分解。如果人脸的特征维度很大,例如256x256的人脸图像,N就是65536了。那么协方差矩阵C的维度就是NxN=65536x65536。对这个大矩阵求解特征值分解是很费力的。那怎么办呢?如果人脸的样本不多,如上例中20个人脸,我们可以通过求解矩阵来获得同样的特征向量。可以看到这个
只有20x20的大小。如果样本人脸数远远小于人脸维度(图像像素数)的话,那么这个力气就省得很值了。那为什么求解
矩阵的特征向量可以获得
的特征向量?万众瞩目时刻,数学以完美舞姿登上舞台。证明如下:(下面的推导中矩阵C和C'的含义与上文定义正好反了,博主懒得改了,请读者注意一下,推导原理很简单)
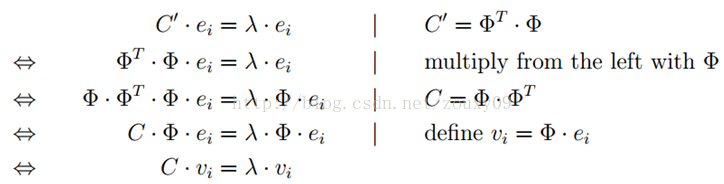
其中,ei是的第i个特征向量,vi是
的第i个特征向量,由证明可以看到,
。
所以通过求解的特征值分解得到
,再左乘Φ就得到
的特征向量vi了。也就是我们想要的特征脸。
from:https://blog.csdn.net/feirose/article/details/39552887
from:https://blog.csdn.net/zouxy09/article/details/45276053
OpenCV官方代码示例:
#include "opencv2/core.hpp"
#include "opencv2/face.hpp"
#include "opencv2/highgui.hpp"
#include "opencv2/imgproc.hpp"

#include <iostream>
#include <fstream>
#include <sstream>

using namespace cv;
using namespace cv::face;
using namespace std;

static Mat norm_0_255(InputArray _src) {
    Mat src = _src.getMat();
    // Create and return normalized image:
    Mat dst;
    switch(src.channels()) {
    case 1:
        cv::normalize(_src, dst, 0, 255, NORM_MINMAX, CV_8UC1);
        break;
    case 3:
        cv::normalize(_src, dst, 0, 255, NORM_MINMAX, CV_8UC3);
        break;
    default:
        src.copyTo(dst);
        break;
    }
    return dst;
}

static void read_csv(const string& filename, vector<Mat>& images, vector<int>& labels, char separator = ';') {
    std::ifstream file(filename.c_str(), ifstream::in);
    if (!file) {
        string error_message = "No valid input file was given, please check the given filename.";
        CV_Error(Error::StsBadArg, error_message);
    }
    string line, path, classlabel;
    while (getline(file, line)) {
        stringstream liness(line);
        getline(liness, path, separator);
        getline(liness, classlabel);
        if(!path.empty() && !classlabel.empty()) {
            images.push_back(imread(path, 0));
            labels.push_back(atoi(classlabel.c_str()));
        }
    }
}

int main(int argc, const char *argv[]) {
    // Check for valid command line arguments, print usage
    // if no arguments were given.
    if (argc < 2) {
        cout << "usage: " << argv[0] << " <csv.ext> <output_folder> " << endl;
        exit(1);
    }
    string output_folder = ".";
    if (argc == 3) {
        output_folder = string(argv[2]);
    }
    // Get the path to your CSV.
    string fn_csv = string(argv[1]);
    // These vectors hold the images and corresponding labels.
    vector<Mat> images;
    vector<int> labels;
    // Read in the data. This can fail if no valid
    // input filename is given.
    try {
        read_csv(fn_csv, images, labels);
    } catch (cv::Exception& e) {
        cerr << "Error opening file \"" << fn_csv << "\". Reason: " << e.msg << endl;
        // nothing more we can do
        exit(1);
    }
    // Quit if there are not enough images for this demo.
    if(images.size() <= 1) {
        string error_message = "This demo needs at least 2 images to work. Please add more images to your data set!";
        CV_Error(Error::StsError, error_message);
    }
    // Get the height from the first image. We'll need this
    // later in code to reshape the images to their original
    // size:
    int height = images[0].rows;
    // The following lines simply get the last images from
    // your dataset and remove it from the vector. This is
    // done, so that the training data (which we learn the
    // cv::BasicFaceRecognizer on) and the test data we test
    // the model with, do not overlap.
    Mat testSample = images[images.size() - 1];
    int testLabel = labels[labels.size() - 1];
    images.pop_back();
    labels.pop_back();
    // The following lines create an Eigenfaces model for
    // face recognition and train it with the images and
    // labels read from the given CSV file.
    // This here is a full PCA, if you just want to keep
    // 10 principal components (read Eigenfaces), then call
    // the factory method like this:
    //
    //      EigenFaceRecognizer::create(10);
    //
    // If you want to create a FaceRecognizer with a
    // confidence threshold (e.g. 123.0), call it with:
    //
    //      EigenFaceRecognizer::create(10, 123.0);
    //
    // If you want to use _all_ Eigenfaces and have a threshold,
    // then call the method like this:
    //
    //      EigenFaceRecognizer::create(0, 123.0);
    //
    Ptr<EigenFaceRecognizer> model = EigenFaceRecognizer::create();
    model->train(images, labels);
    // The following line predicts the label of a given
    // test image:
    int predictedLabel = model->predict(testSample);
    //
    // To get the confidence of a prediction call the model with:
    //
    //      int predictedLabel = -1;
    //      double confidence = 0.0;
    //      model->predict(testSample, predictedLabel, confidence);
    //
    string result_message = format("Predicted class = %d / Actual class = %d.", predictedLabel, testLabel);
    cout << result_message << endl;
    // Here is how to get the eigenvalues of this Eigenfaces model:
    Mat eigenvalues = model->getEigenValues();
    // And we can do the same to display the Eigenvectors (read Eigenfaces):
    Mat W = model->getEigenVectors();
    // Get the sample mean from the training data
    Mat mean = model->getMean();
    // Display or save:
    if(argc == 2) {
        imshow("mean", norm_0_255(mean.reshape(1, images[0].rows)));
    } else {
        imwrite(format("%s/mean.png", output_folder.c_str()), norm_0_255(mean.reshape(1, images[0].rows)));
    }
    // Display or save the Eigenfaces:
    for (int i = 0; i < min(10, W.cols); i++) {
        string msg = format("Eigenvalue #%d = %.5f", i, eigenvalues.at<double>(i));
        cout << msg << endl;
        // get eigenvector #i
        Mat ev = W.col(i).clone();
        // Reshape to original size & normalize to [0...255] for imshow.
        Mat grayscale = norm_0_255(ev.reshape(1, height));
        // Show the image & apply a Jet colormap for better sensing.
        Mat cgrayscale;
        applyColorMap(grayscale, cgrayscale, COLORMAP_JET);
        // Display or save:
        if(argc == 2) {
            imshow(format("eigenface_%d", i), cgrayscale);
        } else {
            imwrite(format("%s/eigenface_%d.png", output_folder.c_str(), i), norm_0_255(cgrayscale));
        }
    }

    // Display or save the image reconstruction at some predefined steps:
    for(int num_components = min(W.cols, 10); num_components < min(W.cols, 300); num_components+=15) {
        // slice the eigenvectors from the model
        Mat evs = Mat(W, Range::all(), Range(0, num_components));
        Mat projection = LDA::subspaceProject(evs, mean, images[0].reshape(1,1));
        Mat reconstruction = LDA::subspaceReconstruct(evs, mean, projection);
        // Normalize the result:
        reconstruction = norm_0_255(reconstruction.reshape(1, images[0].rows));
        // Display or save:
        if(argc == 2) {
            imshow(format("eigenface_reconstruction_%d", num_components), reconstruction);
        } else {
            imwrite(format("%s/eigenface_reconstruction_%d.png", output_folder.c_str(), num_components), reconstruction);
        }
    }
    // Display if we are not writing to an output folder:
    if(argc == 2) {
        waitKey(0);
    }
    return 0;
}
createEigenFaceRecognizer
使用的是将特征向量(直接将图像转换成1*mn)进行PCA降维,然后使用距离函数,循环训练的数据判断属于哪个类别