http://my.oschina.net/noahxiao/blog/61987?from=rss
长话短说,我喜欢比较直接的方式,好让我们开始吧!
AdMob(现被Google收购)提供了移动设备加入广告接口,并会分给发布者一定的经济利润。
对于Android程序员来说,午饭钱是有了。
1、注册AdMob
 点击这个链接
如果你有Google账户就好办了,直接选Sign in With your Google Account

然后输入Google的Password就可以登录了
填写基本账户信息,这个不关键,不是付款信息,Account Type选Publisher

然后完善付款信息

注意用英文填写,以上为招商银行的例子。(我也是刚用,不保证可以收到汇款)。
以下为网友总结:
1. 本人使用的是具有美元(子)账户的招商银行金卡(借记卡)
2. 在税务信息里面分别选择: 中国 - 个人 - 您的姓名 - 税务ID不填写
3. 在付款详细信息里面分别选择(这里面都是英文):
通过 ACH/电汇付款
收款人姓名: 填写银行卡上面的姓名拼音(银行卡上面有钢印的名字)
银行名称: 填写招商银行的名称(其他银行应该类似,可以质询具体的银行服务员) China Merchants Bank, H.O. Shenzhen, China
银行地址: 填写总部地址 China Merchants Bank Tower NO.7088, Shennan Boulevard, Shenzhen, China
收款人银行帐号/IBAN: 填写您的借记卡账户
银行 SWIFT 代码: 每个银行都有的,可以质询客服, 招商银行的是 CMBCCNBS(这里不用具体到下面的分行,直接填写国内总行的代码就可以了,电汇到总行后,银行会根据您的账户 自动转账给您的)
另外 admob电汇是在金额大于100美元(好像是这样吧)的时候才电汇的,不是那个最小支付额度,如果当月不想电汇 可以在收款人前面添加HOLD 来保留当前的汇款.
ok,账户的配置部分就先到这里。
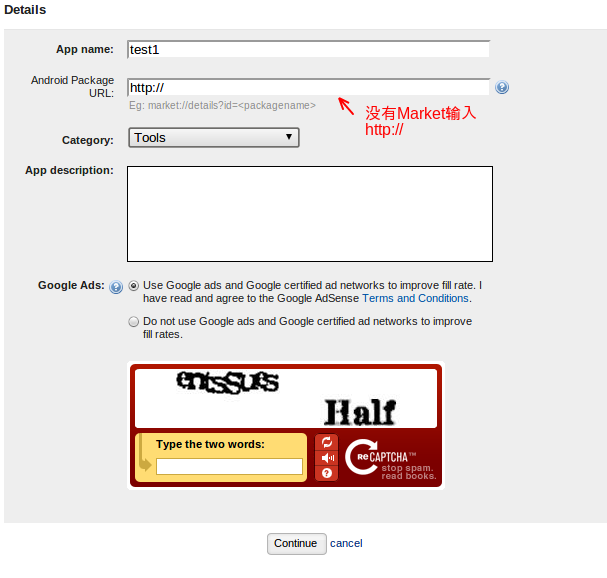
2、在AdMob中加入新应用
找到Sites&Apps菜单,选择里面的Add Site/App

打开后选择Android App,输入应用的一些基本信息
3、下载AdMob Android SDK
成功创建后会看到
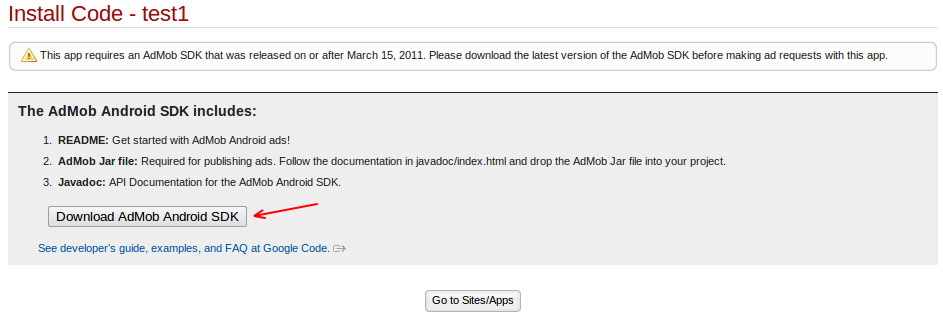
把AdMob Android SDK(googleadmobadssdkandroid.zip)下载下来。
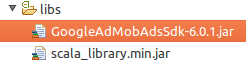
4、在你的Android应用中加入AdMob SDK
把下载的googleadmobadssdkandroid.zip解压开你会看到一个GoogleAdMobAdsSdk-6.0.1.jar
把这个文件copy到项目的libs中
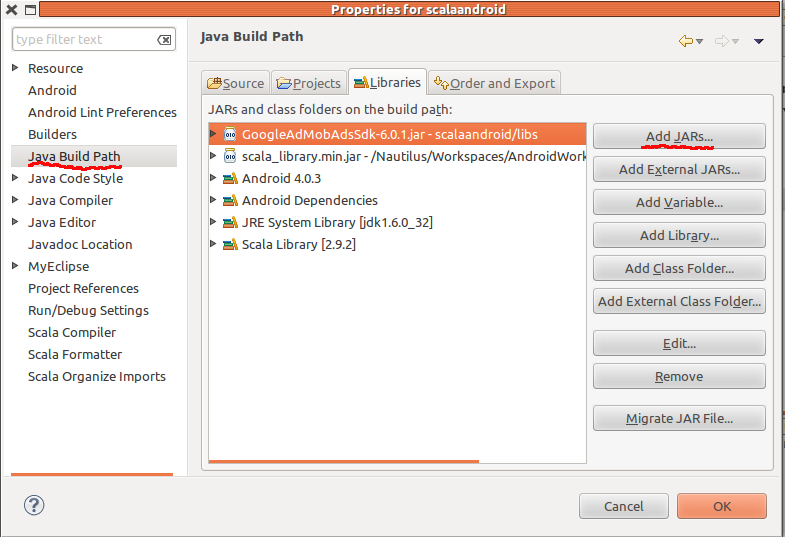
再把它添加到Java Build Path中
5、添加AdMob配置与布局
首先在AndroidManifest.xml中加入
<?xml version="1.0" encoding="utf-8"?>
<manifest xmlns:android="http://schemas.android.com/apk/res/android"
    package="org.noahx.scalaandroid"
    android:versionCode="1"
    android:versionName="1.0" >

    <uses-sdk android:minSdkVersion="15" />

    <uses-permission android:name="android.permission.INTERNET" />
    <uses-permission android:name="android.permission.ACCESS_NETWORK_STATE" />

    <application
        android:icon="@drawable/ic_launcher"
        android:label="@string/app_name" >
        <activity
            android:name=".ScalaAndroidActivity"
            android:label="@string/app_name" >
            <intent-filter>
                <action android:name="android.intent.action.MAIN" />

                <category android:name="android.intent.category.LAUNCHER" />
            </intent-filter>
        </activity>
        <activity
            android:name="com.google.ads.AdActivity"
            android:configChanges="keyboard|keyboardHidden|orientation|screenLayout|uiMode|screenSize|smallestScreenSize" />
    </application>

</manifest>
a.加入访问网络与internet权限
    <uses-permission android:name="android.permission.INTERNET" />
    <uses-permission android:name="android.permission.ACCESS_NETWORK_STATE" />
b.加入AdActivity
<activity
            android:name="com.google.ads.AdActivity"
            android:configChanges="keyboard|keyboardHidden|orientation|screenLayout|uiMode|screenSize|smallestScreenSize" />
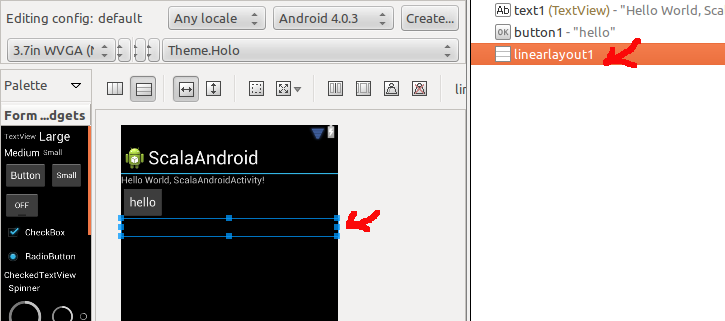
然后layout中加入一个LinearLayout准备放广告
6、修改你的主Activity,加入 AdMob代码
  <LinearLayout
      android:id="@+id/google_ad"
      android:layout_width="fill_parent"
      android:layout_height="wrap_content"
      android:layout_marginTop="340dp"
      android:orientation="vertical"
      ></LinearLayout>
	//Goolge AD
	private LinearLayout googleLy;
	private AdView adView;
	//\\

	/** Called when the activity is first created. */
	@Override
	public void onCreate(Bundle savedInstanceState) {
		super.onCreate(savedInstanceState);
		setContentView(R.layout.mainmenu);

		//Google ad
		googleLy = (LinearLayout)findViewById(R.id.google_ad);
		adView = new AdView(MainMenu.this, AdSize.BANNER, "a153030d46f348d");
		googleLy.addView(adView);
		adView.loadAd(new AdRequest());
		//\\
	}

	@Override
	protected void onDestroy() {
		//Google AD
		if (adView != null) {
			adView.destroy();
		}
		//\\
		super.onDestroy();
	}
注意a14xxxxxxxxxxx,这个ID在以下页面查看
进入Sites&Apps中Sites&Apps,在下面找到你建的test1这个app。点(Manage Settings)就可以打开以下页面

Publisher ID就是在new AdView的最后的参数。
7、运行效果
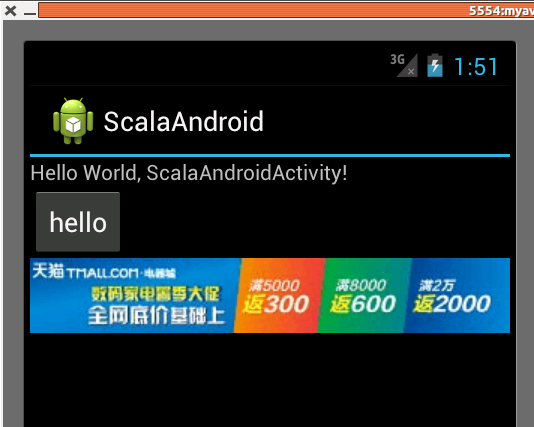
将广告放在底部, 布局文件可以参考下面的, 其中的height="0dip" ,weight="1" 可以达到自适应高度撑满 ,
如果广告布局在顶部则下面的布局文件height最好写成fill_parrent
<?xml version="1.0" encoding="utf-8"?>
<LinearLayout xmlns:android="http://schemas.android.com/apk/res/android"
    android:layout_width="fill_parent"
    android:layout_height="fill_parent"
    android:orientation="vertical" >

    <LinearLayout
        android:background="#ff0000"
        android:layout_width="fill_parent"
        android:layout_height="0dip"
        android:orientation="vertical"
        android:layout_weight="1"
        >


    </LinearLayout>
    <LinearLayout
        android:background="#ffff00"
        android:layout_width="fill_parent"
        android:layout_height="wrap_content"
        android:orientation="vertical"
        android:id="@+id/google_ad"
        >


    </LinearLayout>

</LinearLayout>