1.手动对焦
1.1思路:
我想在用户点击屏幕某个点时,以这个点做一个对焦区域,重新设定对焦区域后,会触发相机对焦,画面有明显的亮度变化。
触发图像亮度变化,实际上这已经不是对焦的范畴了,而是测光。从效果上看,系统相机响应手动对焦的同时根据焦点重新测光。
1.2相关方法
//        getMaxNumFocusAreas:获取支持的对焦区域的个数
//        setFocusAreas:设置对焦区域列表
//        getFocusAreas:获取对焦区域列表
//        getMaxNumMeteringAreas: 获取支持的测光区域的个数
//        setMeteringAreas:设置测光区域列表
//        getMeteringAreas:获取测光区域列表
Camera.Parameters parameters = camera.getParameters();
//不支持设置自定义聚焦,则使用自动聚焦,返回
if (parameters.getMaxNumFocusAreas() <= 0) {
    camera.autoFocus(autoFocusCallback);
    return;
}
1.3相关代码

解释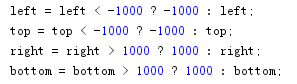
由于camera中area映射如下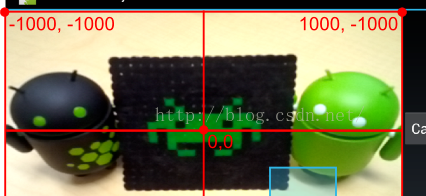
一般范围是横坐标x和纵坐标Y的取值范围为-1000到1000.
二.自定义变焦框
2.1思路
点击屏幕(onTouch())触发对焦和绘制对焦框,在对焦完成后,通过Camera.AutoFocusCallback()回调函数清除对焦框
2.2代码
public class CameraPointView extends AppCompatImageView {
    private Context context;

    private Rect touchFocusRect;//焦点附近设置矩形区域作为对焦区域
    private Paint touchFocusPaint;//新建画笔

    public CameraPointView(Context context){
        this(context, null, 0);
    }
    public CameraPointView(Context context, AttributeSet attrs){
        this(context, attrs, 0);
    }
    public CameraPointView(Context context, AttributeSet attrs, int defStyleAttr){
        super(context, attrs, defStyleAttr);
        init(context);
    }

    private void init(Context context){
        this.context = context;
        //画笔设置
        touchFocusPaint = new Paint();
        touchFocusPaint.setColor(Color.GREEN);
        touchFocusPaint.setStyle(Paint.Style.STROKE);
        touchFocusPaint.setStrokeWidth(3);
    }

    //对焦并绘制对焦矩形框
    public void setTouchFoucusRect(Camera camera, Camera.AutoFocusCallback autoFocusCallback, float x, float y){
        //以焦点为中心,宽度为200的矩形框
        touchFocusRect = new Rect((int)(x-100), (int)(y - 200), (int)(x+100), (int)(y));
        Log.d("lcb",getWidth()+"  "+this.getWidth()+"  x:"+x+" y:"+y);
   postInvalidate();//刷新界面,调用onDraw(Canvas canvas)函数绘制矩形框
}
//对焦完成后,清除对焦矩形框
public void disDrawTouchFocusRect(){
    touchFocusRect = null;//将对焦区域设置为null,刷新界面后对焦框消失
    postInvalidate();//刷新界面,调用onDraw(Canvas canvas)函数
}

@Override
protected void onDraw(Canvas canvas){ //在画布上绘图,postInvalidate()后自动调用
    drawTouchFocusRect(canvas);
    super.onDraw(canvas);
}

private void drawTouchFocusRect(Canvas canvas){
    if(null != touchFocusRect){
        Log.e("lcb","left:"+touchFocusRect.left+"  top"+touchFocusRect.top+" right:"+touchFocusRect.right+" botttom:"+touchFocusRect.bottom);
        //根据对焦区域targetFocusRect,绘制自己想要的对焦框样式,本文在矩形四个角取L形状
        //左下角
        canvas.drawRect(touchFocusRect.left-2, touchFocusRect.bottom, touchFocusRect.left+20, touchFocusRect.bottom+2, touchFocusPaint);
        canvas.drawRect(touchFocusRect.left-2, touchFocusRect.bottom-20, touchFocusRect.left, touchFocusRect.bottom, touchFocusPaint);
        //左上角
        canvas.drawRect(touchFocusRect.left-2, touchFocusRect.top-2, touchFocusRect.left+20, touchFocusRect.top, touchFocusPaint);
        canvas.drawRect(touchFocusRect.left-2, touchFocusRect.top, touchFocusRect.left, touchFocusRect.top+20, touchFocusPaint);
        //右上角
        canvas.drawRect(touchFocusRect.right-20, touchFocusRect.top-2, touchFocusRect.right+2, touchFocusRect.top, touchFocusPaint);
        canvas.drawRect(touchFocusRect.right, touchFocusRect.top, touchFocusRect.right+2, touchFocusRect.top+20, touchFocusPaint);
        //右下角
        canvas.drawRect(touchFocusRect.right-20, touchFocusRect.bottom, touchFocusRect.right+2, touchFocusRect.bottom+2, touchFocusPaint);
        canvas.drawRect(touchFocusRect.right, touchFocusRect.bottom-20, touchFocusRect.right+2, touchFocusRect.bottom, touchFocusPaint);
    }
}
关于画图和安卓坐标系问题可以参考我之前两篇文章:

ps:安卓画图的坐标和之前camera中area映射的坐标有区别。
drawRect(float left, float top, float right, float bottom
