前言
现在出现了很多使用卷积神经网络进行点云目标检测的工作,今天就分享一项这方面的工作,其最大优势是推理速度快。
论文:https://www.mdpi.com/1424-8220/18/10/3337
Github:https://github.com/traveller59/second.pytorch
KITTI 3D Object Detection Ranking:http://www.cvlibs.net/datasets/kitti/eval_object.php?obj_benchmark=3d
注:
- 该工作刚发表时,曾是第一名,不过刷榜的人太多,出现了更优秀的算法,所以排名下降了,但这是前几名中唯一开源的。
- 从作者简介中可以看出,作者是重庆大学的研究生,其导师(猜测)和主线科技的员工。这应该是一名研究生在公司实习时完成的工作,好生敬佩与羡慕。
- 对于研究生来说,最好还是接触实际的项目,尽量早点出去实习,但可能每个人都有各自的苦衷吧。
简单翻译一下摘要:
基于LiDAR或基于RGB-D的目标检测应用于从自动驾驶到机器人视觉的各种应用。基于体素的3D卷积网络已经使用了一段时间,以在处理LiDAR点云数据时增强信息的保留。然而,问题仍然存在,包括推理速度慢和方位估计性能差。因此,我们研究了一种改进的稀疏卷积方法用于这种网络,这显着地增加了对于训练和推理的速度。通过引入角度损失的方法来提高方向估计性能,以及一种新的能增强收敛速度和性能的数据增强方法。所提出的网络在KITTI 3D物体检测基准测试中产生最先进的结果,同时保持快速的推理速度。
主要贡献:
- We apply sparse convolution in LiDAR-based object detection, thereby greatly increasing the speeds of training and inference.
- We propose an improved method of sparse convolution that allows it to run faster.
- We propose a novel angle loss regression approach that demonstrates better orientation regression performance than - other methods do.
- We introduce a novel data augmentation method for LiDAR-only learning problems that greatly increases the convergence speed and performance.
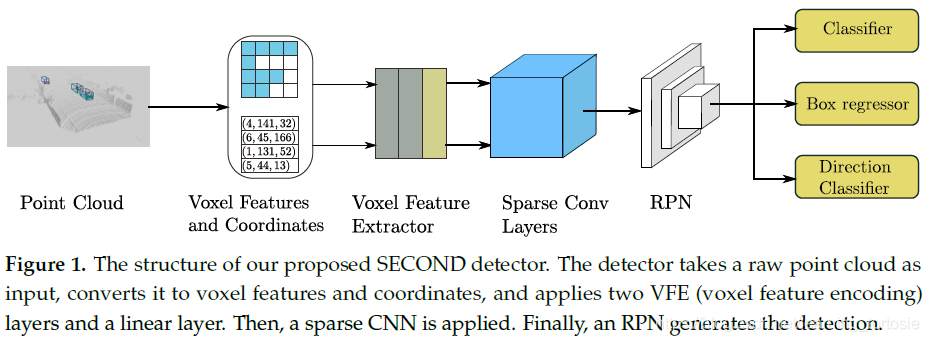
网络架构:
检测结果:
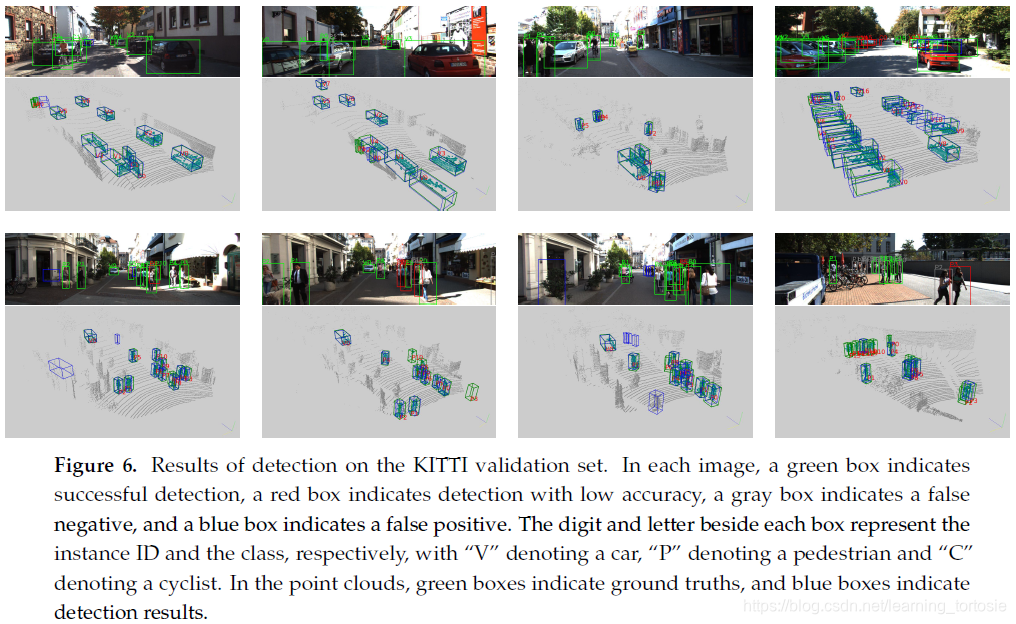
注:这里的图像只是用来验证点云目标检测的结果。
安装
0.环境
- Python 3.6+
- pytorch 1.0.0+
- Ubuntu 16.04/18.04
1.下载代码
git clone https://github.com/traveller59/second.pytorch.git
cd ./second.pytorch/second
2.安装Python依赖包
建议使用 Anaconda 包管理器。
pip install shapely fire pybind11 tensorboardX protobuf scikit-image numba pillow
如果你没有Anaconda:
pip install numba
按照spconv中的说明安装spconv。
3.为numba设置cuda
你需要为 numba.cuda 添加以下环境变量,你可以将它们添加到~/.bashrc:
export NUMBAPRO_CUDA_DRIVER=/usr/lib/x86_64-linux-gnu/libcuda.so
export NUMBAPRO_NVVM=/usr/local/cuda/nvvm/lib64/libnvvm.so
export NUMBAPRO_LIBDEVICE=/usr/local/cuda/nvvm/libdevice
4.将 second.pytorch/ 添加到 PYTHONPATH
准备数据集
数据集准备
1.下载 KITTI 数据集并首先创建一些目录:
└── KITTI_DATASET_ROOT
       ├── training    <-- 7481 train data
       |   ├── image_2 <-- for visualization
       |   ├── calib
       |   ├── label_2
       |   ├── velodyne
       |   └── velodyne_reduced <-- empty directory
       └── testing     <-- 7580 test data
           ├── image_2 <-- for visualization
           ├── calib
           ├── velodyne
           └── velodyne_reduced <-- empty directory
2.创建KITTI的相关信息:
python create_data.py create_kitti_info_file --data_path=KITTI_DATASET_ROOT
3.创建缩减点云(reduced point cloud):
python create_data.py create_reduced_point_cloud --data_path=KITTI_DATASET_ROOT
4.创建真值数据库(groundtruth-database)信息:
python create_data.py create_groundtruth_database --data_path=KITTI_DATASET_ROOT
5.修改配置文件
在配置文件中需要配置一些路径:
train_input_reader: {
  ...
  database_sampler {
    database_info_path: "/path/to/kitti_dbinfos_train.pkl"
    ...
  }
  kitti_info_path: "/path/to/kitti_infos_train.pkl"
  kitti_root_path: "KITTI_DATASET_ROOT"
}
...
eval_input_reader: {
  ...
  kitti_info_path: "/path/to/kitti_infos_val.pkl"
  kitti_root_path: "KITTI_DATASET_ROOT"
}
用法
训练
python ./pytorch/train.py train --config_path=./configs/car.fhd.config --model_dir=/path/to/model_dir
- 如果要训练新模型,请确保
/path/to/model_dir不存在。如果model_dir不存在,将创建一个新目录,否则将读取其中的检查点(checkpoints)。 - 训练过程使用
batchsize = 6作为 1080Ti 的默认值,如果 GPU 内存较少,则需要减少 batchsize 的大小。 - 目前仅支持单GPU训练,但在单个1080Ti中训练模型仅需要20小时(165个epoch),并且仅需要50个epoch以达到78.3 AP,with super converge in car moderate 3D in Kitti validation dateset。
评估
python ./pytorch/train.py evaluate --config_path=./configs/car.fhd.config --model_dir=/path/to/model_dir --measure_time=True --batch_size=1
- 如果使用
--pickle_result = False,检测结果将保存为model_dir/eval_results/step_xxx中的result.pkl文件或保存为官方KITTI标签格式。
预训练模型
您可以在谷歌硬盘中下载预训练模型。car_fhd模型对应于car.fhd.config。
请注意,此预训练模型是在修复稀疏卷积的错误之前训练的,因此评估结果可能稍差。
Docker(我没时间为SECOND-V1.5构建docker)
你可以使用预构建的docker进行测试:
docker pull scrin/second-pytorch
然后运行:
nvidia-docker run -it --rm -v /media/yy/960evo/datasets/:/root/data -v $HOME/pretrained_models:/root/model --ipc=host second-pytorch:latest
python ./pytorch/train.py evaluate --config_path=./configs/car.config --model_dir=/root/model/car
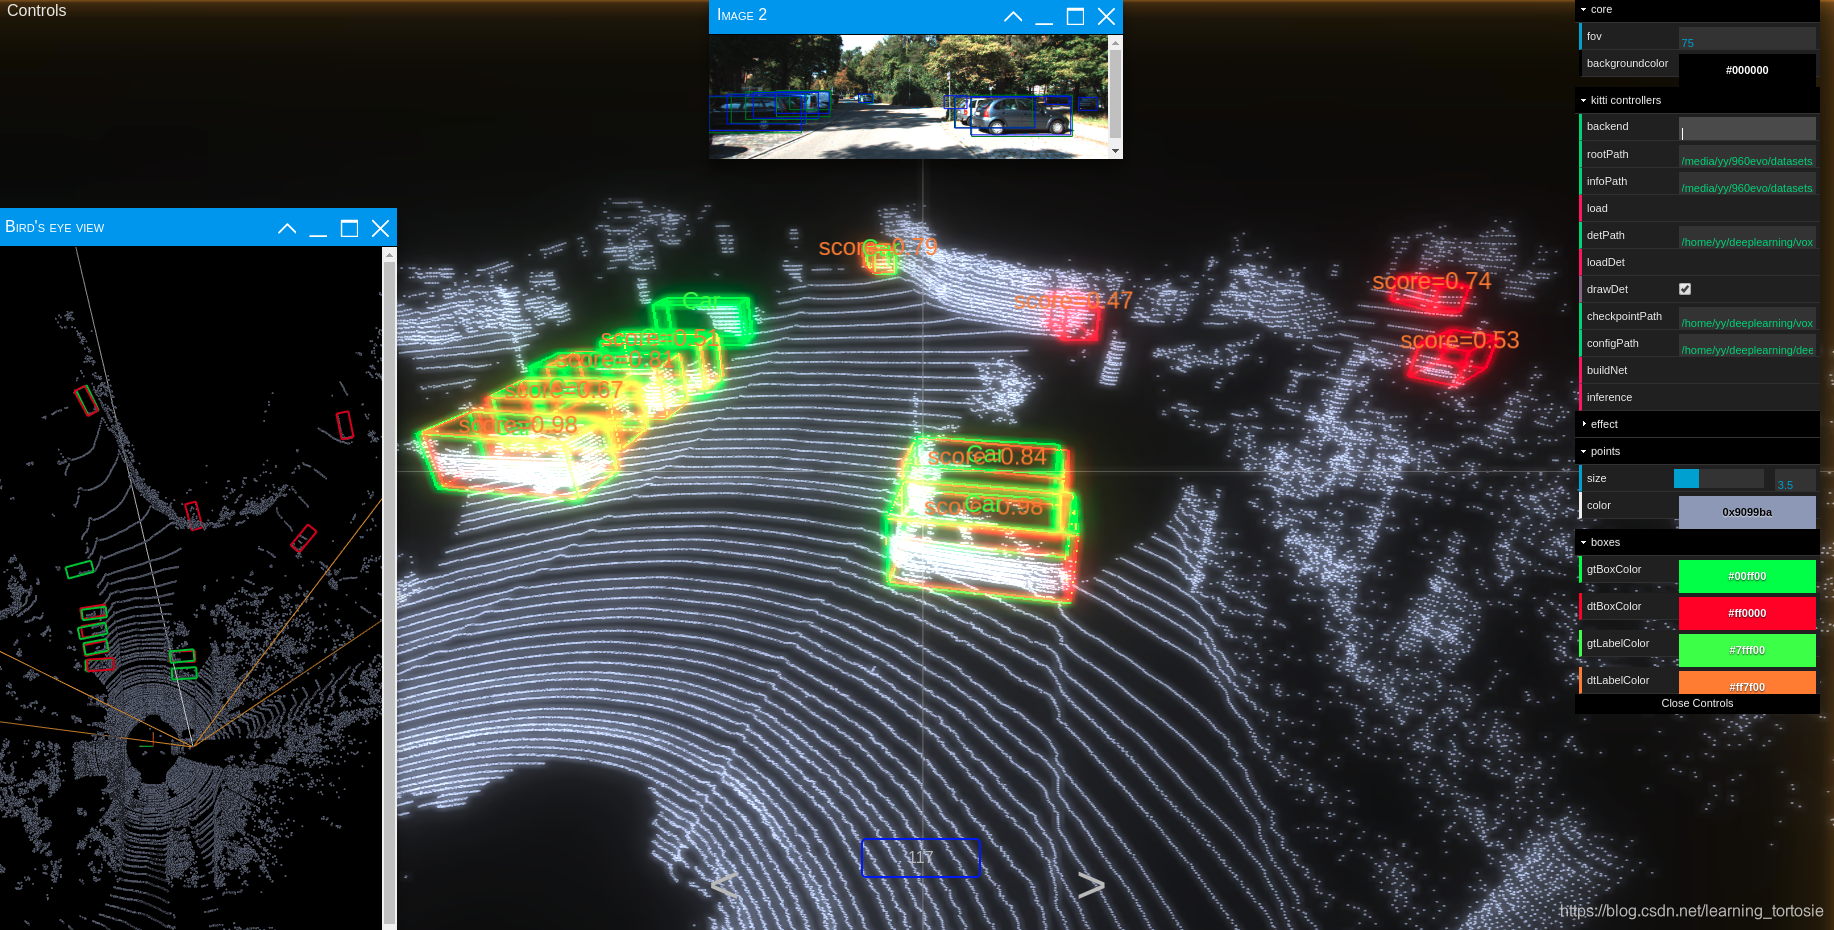
试用Kitti Viewer Web
主要步骤
1.在你的server/local运行python ./kittiviewer/backend.py main --port = xxxx。
2.运行cd ./kittiviewer/frontend && python -m http.server,以启动本地Web服务器。
3.打开浏览器并输入你的前端URL(例如,默认是http//127.0.0.18000)
4.输入后端网址(例如http://127.0.0.1:16666)
5.输入root路径,info路径和det路径(可选)
6.单击load,loadDet(可选),在屏幕中央底部输入图像索引,然后按Enter键。
推理步骤
首先,必须单击 load 按钮并成功加载。
- 输入checkpointPath和configPath
- 单击buildNet
- 点击inference
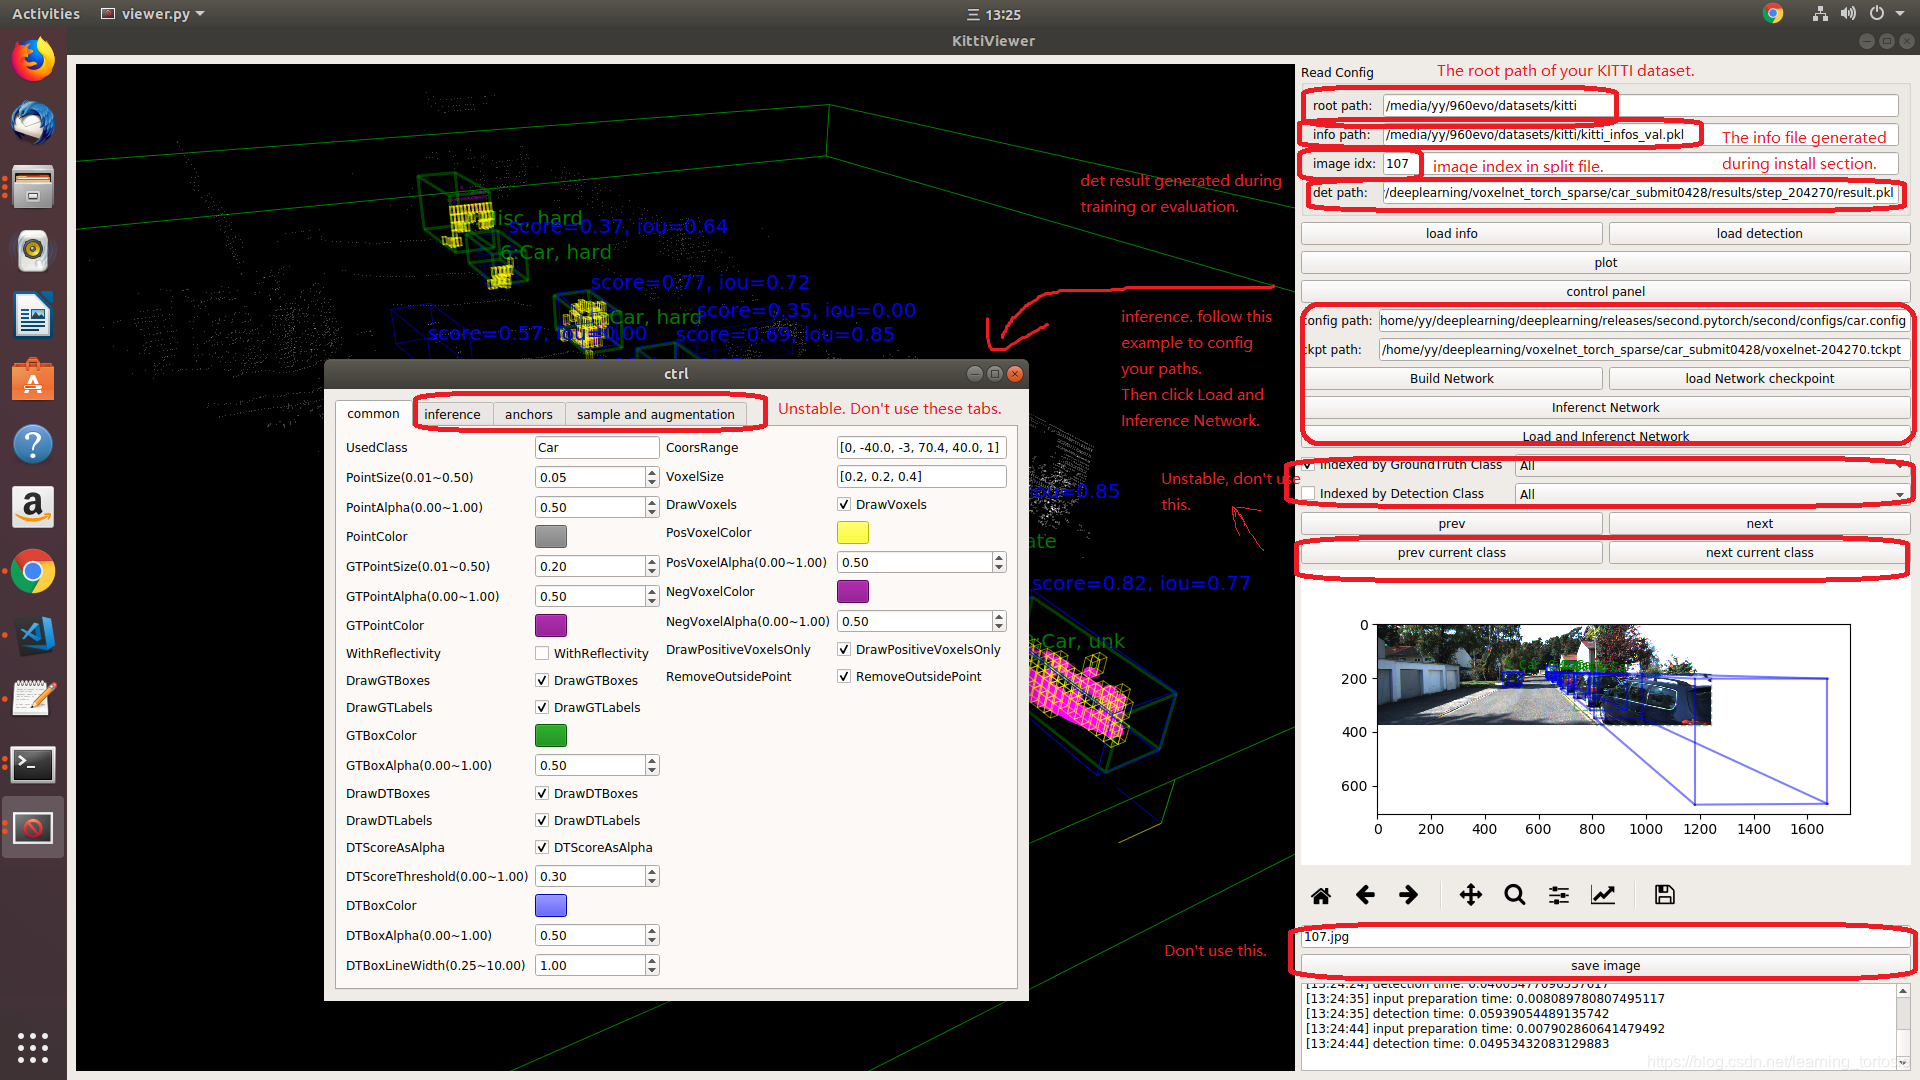
试用Kitti Viewer(已弃用)
在训练前,你应该使用基于pyqt和pyqtgraph的kitti viewer检查数据。
运行python ./kittiviewer/viewer.py,查看下面的图片以使用kitti viewer:
概念
- Kitti lidar box
kitti lidar box由7个元素组成:[x, y, z, w, l, h, rz],见下图:
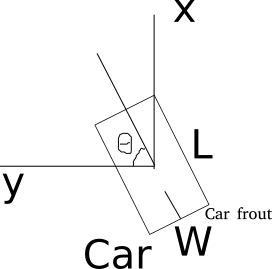
所有训练和推理代码均使用kitti box格式。所以我们需要在训练之前将其他格式转换为KITTI格式。
- Kitti camera box
kitti camera box由7个元素组成:[x, y, z, l, h, w, ry]。
注:更详尽的理论还是看论文,工程实现看代码。