在本教程中,您将学习如何使用OpenCV,深度学习和Python对黑白图像进行着色。
图像着色是获取输入灰度(黑白)图像然后输出彩色图像的过程,该彩色图像表示输入图像的语义颜色和色调(例如,晴天的海洋必须是“蓝色”,它不能被模型着色为“粉红色”。)
以前的图像着色方法有:
- 依赖于重要的人工注释
- 产生去饱和着色
今天在这里使用的新方法依赖于深度学习。我们将利用能够为黑白图像着色的卷积神经网络,其结果甚至可以“愚弄”人类!
1 基于OpenCV和深度学习的黑白图像着色
在本教程的第一部分中,我们将讨论如何利用深度学习来着色黑白图像。
我们将利用OpenCV为以下两者着色黑白图像:
- 图片
- 视频流
然后,我们将探讨我们工作的一些示例和演示。
1.1 我们如何通过深度学习为黑白图像着色?

今天要介绍的技术来自2016年 Zhang 等人的ECCV论文——彩色图像着色。
以前的黑白图像着色方法依赖于人的手工注释,并且经常产生不可称为真正着色的去饱和结果。
Zhang 等人决定通过使用卷积神经网络“幻觉化”输入灰度图像在着色时的样子来解决图像着色问题。
为了训练网络,Zhang 等人从 ImageNet 数据集开始,将所有图像从RGB颜色空间转换为 Lab 颜色空间。
与RGB颜色空间类似,Lab颜色空间有三个通道。但与RGB颜色空间不同,Lab对颜色信息进行了不同的编码:
- L通道仅对亮度和强度进行编码
- a通道编码绿-红色
- b通道编码蓝-黄色
Lab颜色空间的完整综述超出了本文的范围(有关 Lab 的更多信息,请参阅本指南),但这里的要点是 Lab 可以更好地代表人类如何看待颜色。
由于 L 通道仅对强度进行编码,因此我们可以使用 L 通道作为网络的灰度输入。
网络必须学会预测a和b通道。给定输入 L 通道和预测的 ab 通道,我们可以形成最终的输出图像。
整个(简化)过程可归纳为:
- 将所有训练图像从RGB颜色空间转换为Lab颜色空间
- 使用L通道作为网络的输入并训练网络预测ab通道
- 将输入L通道与预测的ab通道组合
- 将Lab图像转换回RGB
为了产生更合理的黑白图像着色,作者还利用了一些额外的技术,包括平均退火和用于颜色再平衡的专用损失函数(两者都超出了本文的范围)。
有关图像着色算法和深度学习模型的更多详细信息,请务必参考Zhang等人的论文。
项目结构
下载源代码,模型和示例图像,解压后进入项目目录,使用tree命令查看项目结构:
$ tree --dirsfirst
.
├── images
│   ├── adrian_and_janie.png
│   ├── albert_einstein.jpg
│   ├── mark_twain.jpg
│   └── robin_williams.jpg
├── model
│   ├── colorization_deploy_v2.prototxt
│   ├── colorization_release_v2.caffemodel
│   └── pts_in_hull.npy
├── bw2color_image.py
└── bw2color_video.py

2 directories, 9 files
在images/目录中有四个黑白图像样本,Caffe模型和prototxt与聚类点NumPy文件一起位于model/目录中。
有两个脚本:
- bw2color_image.py:处理传入的任何黑白(也称为灰度)图像
- bw2color_video.py:将使用网络摄像头或接受输入视频文件,然后执行着色
使用OpenCV着色黑白图像
打开bw2color_image.py文件并插入以下代码:
# import the necessary packages
import numpy as np
import argparse
import cv2

# construct the argument parser and parse the arguments
ap = argparse.ArgumentParser()
ap.add_argument("-i", "--image", type=str, required=True,
	help="path to input black and white image")
ap.add_argument("-p", "--prototxt", type=str, required=True,
	help="path to Caffe prototxt file")
ap.add_argument("-m", "--model", type=str, required=True,
	help="path to Caffe pre-trained model")
ap.add_argument("-c", "--points", type=str, required=True,
	help="path to cluster center points")
args = vars(ap.parse_args())
这个脚本只需要导入:NumPy,OpenCV和argparse。
argparse用来解析命令行参数,此脚本要求将这四个参数直接从终端传递给脚本:
--image: 输入黑/白图像的路径--prototxt: Caffe prototxt文件de 路径--model. Caffe预训练模型的途径--points: NumP聚类中心点文件的路径
使用上述四个标志和相应的参数,脚本将能够使用不同的输入运行而无需更改任何代码。
将模型和集群中心加载到内存中:
# load our serialized black and white colorizer model and cluster
# center points from disk
print("[INFO] loading model...")
net = cv2.dnn.readNetFromCaffe(args["prototxt"], args["model"])
pts = np.load(args["points"])

# add the cluster centers as 1x1 convolutions to the model
class8 = net.getLayerId("class8_ab")
conv8 = net.getLayerId("conv8_313_rh")
pts = pts.transpose().reshape(2, 313, 1, 1)
net.getLayer(class8).blobs = [pts.astype("float32")]
net.getLayer(conv8).blobs = [np.full([1, 313], 2.606, dtype="float32")]
OpenCV可以通过函数cv2.dnn.readNetFromCaffe读取Caffe模型。
加载,缩放和转换图像:
# load the input image from disk, scale the pixel intensities to the
# range [0, 1], and then convert the image from the BGR to Lab color
# space
image = cv2.imread(args["image"]) # 加载图像
scaled = image.astype("float32") / 255.0  # 将像素强度缩放到[0,1]的范围
lab = cv2.cvtColor(scaled, cv2.COLOR_BGR2LAB) # 从BGR转换为Lab颜色空间
继续进行预处理:
# resize the Lab image to 224x224 (the dimensions the colorization
# network accepts), split channels, extract the 'L' channel, and then
# perform mean centering
resized = cv2.resize(lab, (224, 224))
L = cv2.split(resized)[0]
L -= 50
将L通道输入到网络,以预测ab通道:
# pass the L channel through the network which will *predict* the 'a'
# and 'b' channel values
'print("[INFO] colorizing image...")'
net.setInput(cv2.dnn.blobFromImage(L))
ab = net.forward()[0, :, :, :].transpose((1, 2, 0))

# resize the predicted 'ab' volume to the same dimensions as our
# input image
ab = cv2.resize(ab, (image.shape[1], image.shape[0]))
后处理:
# grab the 'L' channel from the *original* input image (not the
# resized one) and concatenate the original 'L' channel with the
# predicted 'ab' channels
L = cv2.split(lab)[0]
colorized = np.concatenate((L[:, :, np.newaxis], ab), axis=2)

# convert the output image from the Lab color space to RGB, then
# clip any values that fall outside the range [0, 1]
colorized = cv2.cvtColor(colorized, cv2.COLOR_LAB2BGR)
colorized = np.clip(colorized, 0, 1) # 剪切超出范围[0,1]的任何像素强度

# the current colorized image is represented as a floating point
# data type in the range [0, 1] -- let's convert to an unsigned
# 8-bit integer representation in the range [0, 255]
colorized = (255 * colorized).astype("uint8")

# show the original and output colorized images
cv2.imshow("Original", image)
cv2.imshow("Colorized", colorized)
cv2.waitKey(0)
最后,原始图像和彩色图像都显示在屏幕上!
图像着色结果
现在已经完成了图像着色脚本,打开终端,进入到源代码目录,执行以下命令:
$ python bw2color_image.py \
	--prototxt model/colorization_deploy_v2.prototxt \
	--model model/colorization_release_v2.caffemodel \
	--points model/pts_in_hull.npy \
	--image images/robin_williams.jpg
[INFO] loading model...
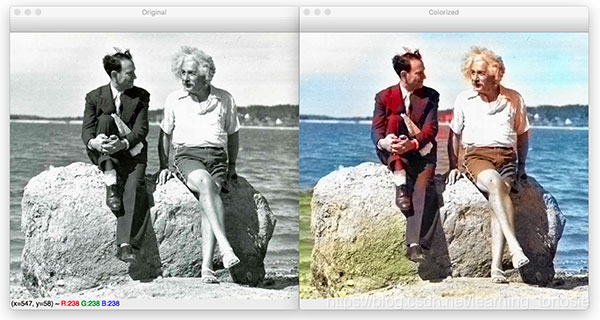
可以看出,水是蓝色的,而爱因斯坦的衬衫是白色的,他的裤子是卡其色,这些都是合理的颜色。
另一个示例图像:
$ python bw2color_image.py \
	--prototxt model/colorization_deploy_v2.prototxt \
	--model model/colorization_release_v2.caffemodel \
	--points model/pts_in_hull.npy
	--image images/mark_twain.jpg
[INFO] loading model...
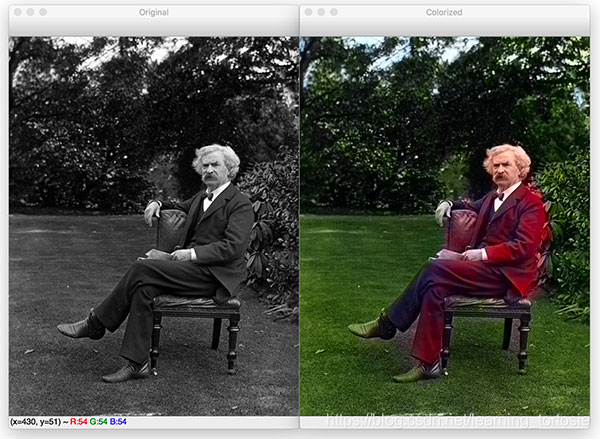
可以看到,草和树叶被正确地着色为绿色,尽管鞋子和手也是绿色的。
不太好的黑白图像着色:
$ python bw2color_image.py \
	--prototxt model/colorization_deploy_v2.prototxt \
	--model model/colorization_release_v2.caffemodel \
	--points model/pts_in_hull.npy
	--image images/adrian_and_janie.png
[INFO] loading model...
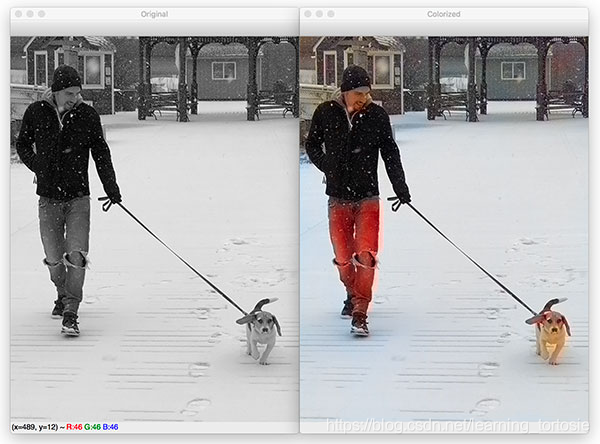
可以看到,虽然雪,狗,夹克,甚至背景中的凉亭都是正确的颜色,但是蓝色牛仔裤却是红色的。
并非所有的图像着色都是完美的,但今天的结果确实证明了Zhang等人的工作是合理的。
使用OpenCV进行实时黑白视频着色
我们已经看到了如何将黑白图像着色应用于图像,但是我们可以对视频流做同样的事情吗?
下面的脚本遵循与上个脚本相同的过程,除了处理视频流的帧。
打开bw2color_video.py并插入以下代码:
# import the necessary packages
from imutils.video import VideoStream
import numpy as np
import argparse
import imutils
import time
import cv2

# construct the argument parser and parse the arguments
ap = argparse.ArgumentParser()
ap.add_argument("-i", "--input", type=str,
	help="path to optional input video (webcam will be used otherwise)")
ap.add_argument("-p", "--prototxt", type=str, required=True,
	help="path to Caffe prototxt file")
ap.add_argument("-m", "--model", type=str, required=True,
	help="path to Caffe pre-trained model")
ap.add_argument("-c", "--points", type=str, required=True,
	help="path to cluster center points")
ap.add_argument("-w", "--width", type=int, default=500,
	help="input width dimension of frame")
args = vars(ap.parse_args())
VideoStream允许我们从网络摄像头或视频文件中抓取帧,time将用于暂停以允许网络摄像头预热。
初始化VideoStream:
# initialize a boolean used to indicate if either a webcam or input
# video is being used
webcam = not args.get("input", False)

# if a video path was not supplied, grab a reference to the webcam
if webcam:
	print("[INFO] starting video stream...")
	vs = VideoStream(src=0).start()
	time.sleep(2.0)

# otherwise, grab a reference to the video file
else:
	print("[INFO] opening video file...")
	vs = cv2.VideoCapture(args["input"])
加载着色器深度学习模型和聚类中心:
# load our serialized black and white colorizer model and cluster
# center points from disk
print("[INFO] loading model...")
net = cv2.dnn.readNetFromCaffe(args["prototxt"], args["model"])
pts = np.load(args["points"])

# add the cluster centers as 1x1 convolutions to the model
class8 = net.getLayerId("class8_ab")
conv8 = net.getLayerId("conv8_313_rh")
pts = pts.transpose().reshape(2, 313, 1, 1)
net.getLayer(class8).blobs = [pts.astype("float32")]
net.getLayer(conv8).blobs = [np.full([1, 313], 2.606, dtype="float32")]
在传入帧上启动无限循环,直接在循环中处理帧:
# loop over frames from the video stream
while True:
	# grab the next frame and handle if we are reading from either
	# VideoCapture or VideoStream
	frame = vs.read()
	frame = frame if webcam else frame[1]

	# if we are viewing a video and we did not grab a frame then we
	# have reached the end of the video
	if not webcam and frame is None:
		break

	# resize the input frame, scale the pixel intensities to the
	# range [0, 1], and then convert the frame from the BGR to Lab
	# color space
	frame = imutils.resize(frame, width=args["width"])
	scaled = frame.astype("float32") / 255.0
	lab = cv2.cvtColor(scaled, cv2.COLOR_BGR2LAB)

	# resize the Lab frame to 224x224 (the dimensions the colorization
	# network accepts), split channels, extract the 'L' channel, and
	# then perform mean centering
	resized = cv2.resize(lab, (224, 224))
	L = cv2.split(resized)[0]
	L -= 50
应用深度学习着色并对结果进行后处理:
	# pass the L channel through the network which will *predict* the
	# 'a' and 'b' channel values
	net.setInput(cv2.dnn.blobFromImage(L))
	ab = net.forward()[0, :, :, :].transpose((1, 2, 0))

	# resize the predicted 'ab' volume to the same dimensions as our
	# input frame, then grab the 'L' channel from the *original* input
	# frame (not the resized one) and concatenate the original 'L'
	# channel with the predicted 'ab' channels
	ab = cv2.resize(ab, (frame.shape[1], frame.shape[0]))
	L = cv2.split(lab)[0]
	colorized = np.concatenate((L[:, :, np.newaxis], ab), axis=2)

	# convert the output frame from the Lab color space to RGB, clip
	# any values that fall outside the range [0, 1], and then convert
	# to an 8-bit unsigned integer ([0, 255] range)
	colorized = cv2.cvtColor(colorized, cv2.COLOR_LAB2BGR)
	colorized = np.clip(colorized, 0, 1)
	colorized = (255 * colorized).astype("uint8")
显示结果:
# show the original and final colorized frames
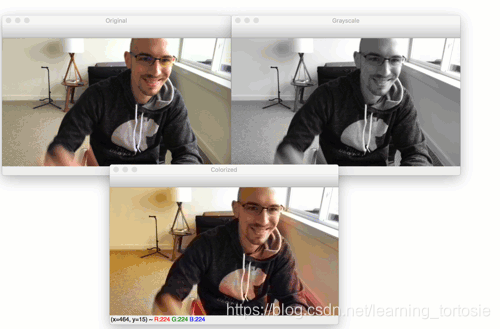
cv2.imshow("Original", frame)
cv2.imshow("Grayscale", cv2.cvtColor(frame, cv2.COLOR_BGR2GRAY))
cv2.imshow("Colorized", colorized)
key = cv2.waitKey(1) & 0xFF
# if the `q` key was pressed, break from the loop
if key == ord("q"):
break
# if we are using a webcam, stop the camera video stream
if webcam:
vs.stop()
# otherwise, release the video file pointer
else:
vs.release()
# close any open windows
cv2.destroyAllWindows()
将一起显示原始网络摄像头图像,灰度图像和着色图像。
如果按下“q”键,将退出循环并清理。
视频着色结果
打开终端,进入到源代码目录,执行以下命令:
$ python bw2color_video.py \
	--prototxt model/colorization_deploy_v2.prototxt \
	--model model/colorization_release_v2.caffemodel \
	--points model/pts_in_hull.npy
如果要在视频文件上运行着色器,可以使用以下命令:
$ python bw2color_video.py \
	--prototxt model/colorization_deploy_v2.prototxt \
	--model model/colorization_release_v2.caffemodel \
	--points model/pts_in_hull.npy
	--input video/jurassic_park_intro.mp4
这个模型在3Ghz Intel Xeon W上接近实时运行。
使用GPU,当然可以获得实时性能;但是,请记住,对OpenCV的“dnn”模块的GPU支持目前有点受限,但遗憾的是,它还不支持NVIDIA GPU。
总结
在今天的教程中,您学习了如何使用OpenCV和深度学习为黑白图像着色。
我们的结果虽然不完美,但展示了自动着色黑白图像和视频的合理性。