一、什么是请求合并
首先先理解请求,请求是客户端发送给服务端的数据要求,指明客户端想要做什么或者想要什么样的数据的一个要求(请求),得到服务端的批准之后,服务端会把相应的客户端想要的数据返回给客户端(我们称之为响应)。举个例子:就是中午吃饭,点餐告诉餐厅你想要什么(这个过程为发送请求),然后餐厅给你端来你想要的东西也有可能是与你想要的不一样的(这个过程为返回响应)。
那么请求合并表面意思就是把请求合并起来一起发送给服务端(一次性批量发送请求),服务端批量处理完成后再返回给客户端。再举个吃的例子:中午吃饭,这时我们不满足点一个菜了,想点很多,但是我们需要一个一个告诉餐厅,但是餐厅并不是你说一个他做一个,餐厅需要整合你所需要的所有菜品,然后统一去做,这个整合菜品的过程就是我想说的请求合并。
所以通过上面的例子与介绍可以分析出,请求合并的功能是客户端来控制的,由客户端整合发起,然后由服务端统一处理,但是需要服务端支持批量处理请求的能力。
二、Hystrix 请求合并例子
1.搭建服务注册中心(可以参考以往的例子,单例即可:https://blog.csdn.net/notMoonHeart/article/details/84949475)
注:这里服务注册中心不是必需的,可以搭建,也可以不搭建,毕竟请求与响应这种事情一个客户端和一个服务端就可以了
2.搭建服务端
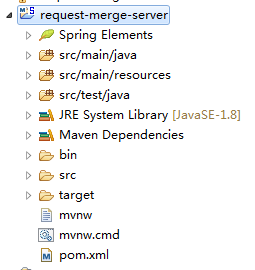
①首先创建Spring Boot工程,作者这里命名为request-merge-server,如图:

②创建controller处理类,命名为UserController.java,图如下:

UserControlller.java代码如下:
package com.example.demo.web;

import java.util.ArrayList;
import java.util.List;
import java.util.logging.Logger;

import org.springframework.web.bind.annotation.PathVariable;
import org.springframework.web.bind.annotation.RequestMapping;
import org.springframework.web.bind.annotation.RequestMethod;
import org.springframework.web.bind.annotation.RequestParam;
import org.springframework.web.bind.annotation.RestController;

@RestController
public class UserController {
	private static Logger log = Logger.getLogger(UserController.class.toString());

	//批量请求处理服务
	@RequestMapping(value="/users",method=RequestMethod.GET)
	public List<User> usersHandle(@RequestParam(value="ids") String ids) {
		List<User> list = new ArrayList<User>(ids.length());
		log.info("接受到批量信息"+ids);
		String[] id = ids.split(",");
		for(int i=0;i<id.length;i++) {
			list.add(new User(id[i],"user-"+id[i]));
		}
		return list;
	}

	//单个请求处理服务
	@RequestMapping(value="/users/{id}",method=RequestMethod.GET)
	public User userHandle(@PathVariable Long id) {//这里注意参数注解
		log.info("接受到单个处理的信息"+id);
		return new User(id,"user-"+id);
	}
}
踩过的的坑:这里处理单个请求的参数设置必须以@PathVariable的注解来标注,否则发送请求的时候,这里拿的id是null
③设置配置文件application.properties,代码如下:
server.port=8090
spring.application.name=USER-SERVICE

#如果没有服务注册中心下边代码可以不要
eureka.client.registerwitheureka=true
eureka.client.service-url.defaultZone=http://localhost:8088/eureka/eureka
这里服务端搭建完毕,可以启动项目,然后访问测试该服务是否可用
例如:
批量测试:http://localhost:8090/users?ids=1,2,3
单个测试:http://localhost:8090/users/1
3.搭建客户端:
①创建Spring Boot工程,作者命名为:request-merge-client,步骤与创建服务端一致,作者就懒得截图了。
②设置pom.xml文件,加入hystrix依赖,具体代码如下:
<dependency>
    <groupId>org.springframework.cloud</groupId>
    <artifactId>spring-cloud-starter-hystrix</artifactId>
    <version>1.3.5.RELEASE</version>
</dependency>
③创建所需要的客户端类,如图所示:

(1)User.java类,pojo类不在复述,根据服务端的pojo类自行设置
(2)UserServiceImpl.java类,代码如下:
package com.example.demo.web;

import java.util.List;

import org.apache.commons.lang.StringUtils;
import org.slf4j.Logger;
import org.slf4j.LoggerFactory;
import org.springframework.beans.factory.annotation.Autowired;
import org.springframework.stereotype.Service;
import org.springframework.web.client.RestTemplate;

import com.netflix.hystrix.contrib.javanica.annotation.HystrixCollapser;
import com.netflix.hystrix.contrib.javanica.annotation.HystrixCommand;
import com.netflix.hystrix.contrib.javanica.annotation.HystrixProperty;


@Service
public class UserServiceImpl {
	private static Logger log = LoggerFactory.getLogger(UserServiceImpl.class);

	@Autowired
	RestTemplate restTemplate;

	@HystrixCollapser(batchMethod="findAll",scope=com.netflix.hystrix.HystrixCollapser.Scope.GLOBAL,collapserProperties={
			@HystrixProperty(name="timerDelayInMilliseconds", value="1000")})
	public User find(Long id) {
		User user = restTemplate.getForObject("http://USER-SERVICE/users/users/{1}", User.class, id);
		log.info("单个数据返回信息:"+user.toString());
		return null;
	}

	@HystrixCommand
	public List<User> findAll(List<Long> ids) {
		List<User> userList = restTemplate.getForObject("http://USER-SERVICE/users?ids={1}", List.class, StringUtils.join(ids, ","));
		log.info("批量数据返回的信息:"+userList.toString());
		return null;
	}

}
(3)UserBathCommand.java类,代码如下:
package com.example.demo.web;

import java.util.List;

import com.netflix.hystrix.HystrixCommand;
import com.netflix.hystrix.HystrixCommandGroupKey;
import com.netflix.hystrix.HystrixCommandKey;


public class UserBathCommand extends HystrixCommand<List<User>>{

	private UserServiceImpl userService;
	private List<Long> ids;

	public UserBathCommand(UserServiceImpl userService,List<Long> ids) {
		super(Setter.withGroupKey(HystrixCommandGroupKey.Factory.asKey("userServiceCommand")).
				andCommandKey(HystrixCommandKey.Factory.asKey("userCollapseCommand")));
		this.userService = userService;
		this.ids = ids;
	}

	@Override
	protected List<User> run() throws Exception {
		return userService.findAll(ids);
	}
}
(4)UserCollapseCommand.java类,代码如下:
package com.example.demo.web;

import java.util.ArrayList;
import java.util.Collection;
import java.util.List;
import java.util.stream.Collectors;

import org.springframework.stereotype.Service;

import com.netflix.hystrix.HystrixCollapser;
import com.netflix.hystrix.HystrixCollapserKey;
import com.netflix.hystrix.HystrixCollapserProperties;
import com.netflix.hystrix.HystrixCommand;

/**
 * 实现请求合并器
 * @author Administrator
 *
 */
@Service
public class UserCollapseCommand extends HystrixCollapser<List<User>, User, Long>{

	private UserServiceImpl userService;
	private Long userID;

	public UserCollapseCommand(UserServiceImpl userService,Long userID) {
		//设置合并请求窗为100毫秒,默认是10毫秒
		super(Setter.withCollapserKey(HystrixCollapserKey.Factory.asKey("userCollapseCommand"))
				.andCollapserPropertiesDefaults(HystrixCollapserProperties.Setter().withTimerDelayInMilliseconds(100))
				.andScope(Scope.GLOBAL));
		this.userService = userService;
		this.userID = userID;
	}

	@Override
	public Long getRequestArgument() {
		return userID;
	}

	@Override
	protected HystrixCommand<List<User>> createCommand(Collection<CollapsedRequest<User, Long>> requests) {
		List<Long> userIds = new ArrayList<Long>(requests.size());
		userIds.addAll(requests.stream().map(CollapsedRequest::getArgument).collect(Collectors.toList()));
		return new UserBathCommand(userService, userIds);
	}

	@Override
	protected void mapResponseToRequests(List<User> batchResponse,Collection<CollapsedRequest<User, Long>> requests) {
		int count = 0;
		for(CollapsedRequest<User,Long> request:requests) {
			User user = batchResponse.get(count++);
			request.setResponse(user);
		}
	}

}
踩过的坑:首先在构造方法的时候,需要指定范围,否则死活发送不出去,即设置.andScope(Scope.GLOBAL),这里Scope的默认值是REQUEST。
通过上边的代码我们可以大致猜出合并请求器干了什么事情,通过mapResponseToRequests方法合并请求,然后通过createCommand方法指定命令发送。
(5)UserSend.java测试发送的controller类,代码如下:
package com.example.demo.web;

import java.util.concurrent.ExecutionException;

import org.springframework.beans.factory.annotation.Autowired;
import org.springframework.web.bind.annotation.RequestMapping;
import org.springframework.web.bind.annotation.RequestMethod;
import org.springframework.web.bind.annotation.RestController;

@RestController
public class UserSend {

	@Autowired
	UserServiceImpl userService;

	@RequestMapping(value="/test",method=RequestMethod.GET)
	public void userSend() throws InterruptedException, ExecutionException {

		new UserCollapseCommand(userService,10L).queue();
		new UserCollapseCommand(userService,11L).queue();
		new UserCollapseCommand(userService,12L).queue();
		Thread.sleep(2000);//暂停,测试是否分线程,即请求合并
		new UserCollapseCommand(userService,13L).queue();

	}
}
④设置配置文件,application.properties,修改端口号为8091(这步根据自己需求自行配置)
至此,客户端搭建完毕,接下来就启动项目查看结果吧!
4.测试,访问http://localhost:8091/test,打开后台查看结果,结果如下(服务端日志):![]()
四、使用注解实现请求合并:
①修改客户端中的UserServiceImpl.java,代码如下:
package com.example.demo.web;

import java.io.IOException;
import java.util.ArrayList;
import java.util.List;
import java.util.concurrent.Future;

import org.apache.commons.lang.StringUtils;
import org.slf4j.Logger;
import org.slf4j.LoggerFactory;
import org.springframework.beans.factory.annotation.Autowired;
import org.springframework.stereotype.Service;
import org.springframework.web.client.RestClientException;
import org.springframework.web.client.RestTemplate;

import com.fasterxml.jackson.core.JsonParseException;
import com.fasterxml.jackson.databind.JsonMappingException;
import com.netflix.hystrix.contrib.javanica.annotation.HystrixCollapser;
import com.netflix.hystrix.contrib.javanica.annotation.HystrixCommand;
import com.netflix.hystrix.contrib.javanica.annotation.HystrixProperty;


@Service
public class UserServiceImpl {
	private static Logger log = LoggerFactory.getLogger(UserServiceImpl.class);

	@Autowired
	RestTemplate restTemplate;

	@HystrixCollapser(batchMethod="findAll",scope=com.netflix.hystrix.HystrixCollapser.Scope.GLOBAL,collapserProperties={
			@HystrixProperty(name="timerDelayInMilliseconds", value="100")})
	public Future<User> find(Long id) {
		User user = restTemplate.getForObject("http://USER-SERVICE/users/{1}", User.class, id);
		log.info("单个批量数据:"+user.toString());
		throw new RuntimeException("This method body should not be executed");
	}

	@HystrixCommand()
	public List<User> findAll(List<Long> ids) throws JsonParseException, JsonMappingException, RestClientException, IOException {
		String join = StringUtils.join(ids, ",");
		User[] user = restTemplate.getForObject("http://USER-SERVICE/users?ids={1}", User[].class, join);

		List<User> userList = new ArrayList<User>(user.length);
		for(User tmp:user) {
			userList.add(tmp);
		}

		log.info("批量数据返回信息:"+userList.toString());

		return userList;
	}

}
踩过的坑:
(1)批量执行方法返回必须是List,如果直接返回User[]的数组会报错。(其实这样写作者感觉不知道是好还是坏,因为之前提过,返回对象类型无法把枚举类型也确定,总之提供了两种方法)
(2)单个数据处理的时候,find方法的返回类型必须是Future<User>,否则无法合并请求(不知道为什么这样写,作者测试的时候,如果不是Future类型,发送请求时,虽然走的也是批量请求,但是没有合并,只是一个一个发过去的,就算扩大了请求合并的时间并且还开了多个客户端一起发送也还是一样,)
(3)如果是注解实现合并请求时,在Application类中,必须加注解@EnableCircuitBreaker,否则注解实现的请求合并是无效的(就是不会去调用批量请求方法)
注意:这里批量请求的类型变掉了,服务端的批量处理也要进行修改,改为返回数组而不是集合的形式,这里作者就不贴代码了(懒),而且第一次启动,客户端会报错(np错误,一个什么fallback找不到的错,不要慌,正常操作,因为我们没有指定fillback)
五、合并请求的缺点:
合并请求的开启,意味着当只有1个请求时,也需要合并请求走批量来实现。如果一个请求的响应时间时5ms,那么合并时间为10ms,那么最坏的情况需要15ms才可以响应。所以,并不适合并发量小的系统。而且,合并请求目前作者认为是无法控制是否能自动开启合并请求的功能的。