利用urllib进行简单的网页抓取
from urllib import request

if __name__ == "__main__":
    response = request.urlopen("https://blog.csdn.net/yanluandai1985")
    html = response.read()
    html = html.decode("utf-8")
    print(html)
获取网页编码
from urllib import request
import chardet

if __name__ == "__main__":
    response = request.urlopen("https://blog.csdn.net/yanluandai1985")
    html = response.read()
    charset = chardet.detect(html)
    print(charset)

返回:{'encoding': 'utf-8', 'confidence': 0.99, 'language': ''}
使用第三方类库Requests
import requests
from urllib import request
import chardet


def getEncodingType(url):
    response = request.urlopen(url)
    html = response.read()
    charset = chardet.detect(html)
    return charset['encoding']


if __name__ == "__main__":
    url = 'https://blog.csdn.net/yanluandai1985'
    headers = {
        "User-Agent": "Mozilla/5.0 (Windows NT 6.1; Win64; x64) AppleWebKit/537.36 (KHTML, like Gecko) Chrome/58.0.3029.110 Safari/537.36"
    }
    req = requests.get(url=url, headers=headers)
    req.encoding = getEncodingType(url)
    html = req.text
    print(html)
封装Request对象
from urllib import request

if __name__ == "__main__":
    url = "https://blog.csdn.net/yanluandai1985";
    #封装Request对象
    req = request.Request(url)
    response = request.urlopen(req)
    html = response.read()
    html = html.decode("utf-8")
    print(html)
获取响应信息
from urllib import request

if __name__ == "__main__":
    url = "https://blog.csdn.net/yanluandai1985";
    #封装Request对象
    req = request.Request(url)
    response = request.urlopen(req)
    html = response.read()
    print("响应url:%s"%(response.geturl()))
    print("响应info:%s"%(response.info()))
    print("响应码:%s"%(response.getcode()))

响应url:https://blog.csdn.net/yanluandai1985

响应info:Server: openresty
Date: Tue, 19 Mar 2019 03:35:03 GMT
Content-Type: text/html; charset=UTF-8
Transfer-Encoding: chunked
Connection: close
Vary: Accept-Encoding
Set-Cookie: uuid_tt_dd=10_25693801750-1552966503272-598300; Expires=Thu, 01 Jan 2025 00:00:00 GMT; Path=/; Domain=.csdn.net;
Set-Cookie: dc_session_id=10_1552966503272.256890; Expires=Thu, 01 Jan 2025 00:00:00 GMT; Path=/; Domain=.csdn.net;
Vary: Accept-Encoding
Strict-Transport-Security: max-age= 31536000


响应码:200
发送携带JSON的请求
from urllib import request
from urllib import parse
import json

if __name__ == "__main__":
    # 对应上图的Request URL
    Request_URL = 'http://localhost:8984/mis/actions/authenticate'
    # 创建Form_Data字典,存储上图的Form Data
    Form_Data = {}
    Form_Data['userName'] = 107180060
    Form_Data['password'] = 248659
    Form_Data['rememberMe'] = False
    # 使用urlencode方法转换标准格式
    data = parse.urlencode(Form_Data).encode('utf-8')
    # 传递Request对象和转换完格式的数据
    response = request.urlopen(Request_URL, data)
    # 读取信息并解码
    html = response.read().decode('utf-8')
    # 使用JSON
    translate_results = json.loads(html)
    # 打印翻译信息
    print("结果是:%s" % translate_results)

结果是:{'reason': '认证成功!', 'success': True}
使用Requests发送JSON请求
import requests
from urllib import request
import chardet


def getEncodingType(url):
    response = request.urlopen(url)
    html = response.read()
    charset = chardet.detect(html)
    return charset['encoding']


if __name__ == "__main__":
    url = 'http://localhost:8984/mis/actions/authenticate'
    headers = {
        "User-Agent": "Mozilla/5.0 (Windows NT 6.1; Win64; x64) AppleWebKit/537.36 (KHTML, like Gecko) Chrome/58.0.3029.110 Safari/537.36"
    }
    # 创建Form_Data字典,存储上图的Form Data
    Form_Data = {}
    Form_Data['userName'] = 107180060
    Form_Data['password'] = 248659
    Form_Data['rememberMe'] = False
    req = requests.post(url=url,headers=headers,data=Form_Data)
    req.encoding = getEncodingType(url)
    html = req.text
    print(html)

{"reason":"认证成功!","success":true}
urllib.error异常
from urllib import request
from urllib import error

if __name__ == "__main__":
    #不存在的域名
    #url = "http://www.xiaodayu.com"
    url = "https://blog.csdn.net/yanluandai198"
    req = request.Request(url)

    try:
        response = request.urlopen(req)
        html = response.read().decode('utf-8')
        print(html)
    #HTTPError是URLError的一个子类
    #HttpError通常是404或者500出错
    except error.HTTPError as e:
        print(e.code)
        print(e.reason)
    #URLError是Ping不通,没有这个网站
    except error.URLError as e:
        print(e.reason)

结果:
404
Not Found
User Agent
User Agent的中文名为用户代理,简称UA。
常见的User Agent
1.Android
Mozilla/5.0 (Linux; Android 4.1.1; Nexus 7 Build/JRO03D) AppleWebKit/535.19 (KHTML, like Gecko) Chrome/18.0.1025.166 Safari/535.19
Mozilla/5.0 (Linux; U; Android 4.0.4; en-gb; GT-I9300 Build/IMM76D) AppleWebKit/534.30 (KHTML, like Gecko) Version/4.0 Mobile Safari/534.30
Mozilla/5.0 (Linux; U; Android 2.2; en-gb; GT-P1000 Build/FROYO) AppleWebKit/533.1 (KHTML, like Gecko) Version/4.0 Mobile Safari/533.1
2.FirefoxMozilla/5.0 (Windows NT 6.2; WOW64; rv:21.0) Gecko/20100101 Firefox/21.0
Mozilla/5.0 (Android; Mobile; rv:14.0) Gecko/14.0 Firefox/14.0
3.Google ChromeMozilla/5.0 (Windows NT 6.2; WOW64) AppleWebKit/537.36 (KHTML, like Gecko) Chrome/27.0.1453.94 Safari/537.36
Mozilla/5.0 (Linux; Android 4.0.4; Galaxy Nexus Build/IMM76B) AppleWebKit/535.19 (KHTML, like Gecko) Chrome/18.0.1025.133 Mobile Safari/535.19
4.iOSMozilla/5.0 (iPad; CPU OS 5_0 like Mac OS X) AppleWebKit/534.46 (KHTML, like Gecko) Version/5.1 Mobile/9A334 Safari/7534.48.3
Mozilla/5.0 (iPod; U; CPU like Mac OS X; en) AppleWebKit/420.1 (KHTML, like Gecko) Version/3.0 Mobile/3A101a Safari/419.3
上面列举了Andriod、Firefox、Google Chrome、iOS的一些User Agent,直接copy就能用。
from urllib import request

if __name__ == "__main__":
    # 以CSDN为例,CSDN不更改User Agent是无法访问的
    url = 'https://blog.csdn.net/yanluandai1985'
    head = {}
    # 写入User Agent信息
    head[ 'User-Agent'] = 'Mozilla/5.0 (Linux; Android 4.1.1; Nexus 7 Build/JRO03D) AppleWebKit/535.19 (KHTML, like Gecko) Chrome/18.0.1025.166  Safari/535.19'
    # 创建Request对象
    req = request.Request(url, headers=head)
    # 传入创建好的Request对象
    response = request.urlopen(req)
    # 读取响应信息并解码
    html = response.read().decode('utf-8')
    # 打印信息
    print(html)
IP代理的使用
# -*- coding: UTF-8 -*-
from urllib import request

if __name__ == "__main__":
    # 访问网址
    url = 'https://ip.cn/'
    # 这是代理IP  #https://www.xicidaili.com/
    """
    1.创建代理   :proxy_support = request.ProxyHandler(proxy)
    2.创建Opener :opener = request.build_opener(proxy_support)
    3.安装Opener :request.install_opener(opener)
    """
    proxy = {'http': '14.115.104.66:808'}
    # 创建ProxyHandler
    proxy_support = request.ProxyHandler(proxy)
    # 创建Opener
    opener = request.build_opener(proxy_support)
    # 添加User Angent
    opener.addheaders = [('User-Agent',
                          'Mozilla/5.0 (Windows NT 6.1; Win64; x64) AppleWebKit/537.36 (KHTML, like Gecko) Chrome/56.0.2924.87 Safari/537.36')]
    # 安装OPener
    request.install_opener(opener)
    # 使用自己安装好的Opener
    response = request.urlopen(url)
    # 读取相应信息并解码
    html = response.read().decode("utf-8")
    # 打印信息
    print(html)
Python3安装Scrapy
https://blog.csdn.net/c406495762/article/details/60156205
使用Cookie模拟登录并获取登录后系统数据
# -*- coding: UTF-8 -*-
from urllib import request
from urllib import error
from urllib import parse
from http import cookiejar

if __name__ == '__main__':
    # 登陆地址
    login_url = 'http://localhost:8984/mis/actions/authenticate'
    # User-Agent信息
    user_agent = r'Mozilla/5.0 (Windows NT 6.2; WOW64) AppleWebKit/537.36 (KHTML, like Gecko) Chrome/27.0.1453.94 Safari/537.36'
    # Headers信息
    head = {'User-Agnet': user_agent, 'Connection': 'keep-alive'}
    head = {'Referer': 'http://localhost:8984/mis/actions/secured/home'}
    # 登陆Form_Data信息
    Login_Data = {}
    Login_Data['userName'] = '107180060'
    Login_Data['password'] = '***'
    Login_Data['rememberMe'] = False
    # 使用urlencode方法转换标准格式
    logingpostdata = parse.urlencode(Login_Data).encode('utf-8')
    # 声明一个CookieJar对象实例来保存cookie
    cookie = cookiejar.CookieJar()
    # 利用urllib.request库的HTTPCookieProcessor对象来创建cookie处理器,也就CookieHandler
    cookie_support = request.HTTPCookieProcessor(cookie)
    # 通过CookieHandler创建opener
    opener = request.build_opener(cookie_support)
    # 创建Request对象
    req1 = request.Request(url=login_url, data=logingpostdata, headers=head)

    # 面向对象地址
    date_url = 'http://localhost:8984/mis/actions/secured/getParameter?paramType=HOUSE_CERTIFICATES_TYPE'
    # 面向对象
    Date_Data = {}
    Date_Data['paramType'] = 'HOUSE_CERTIFICATES_TYPE'
    # 使用urlencode方法转换标准格式
    datepostdata = parse.urlencode(Date_Data).encode('utf-8')
    req2 = request.Request(url=date_url, headers=head)
    try:
        # 使用自己创建的opener的open方法
        response1 = opener.open(req1)
        response2 = opener.open(req2)
        html = response2.read().decode('utf-8')

        print(html)

    except error.URLError as e:
        if hasattr(e, 'code'):
            print("HTTPError:%d" % e.code)
        elif hasattr(e, 'reason'):
            print("URLError:%s" % e.reason)
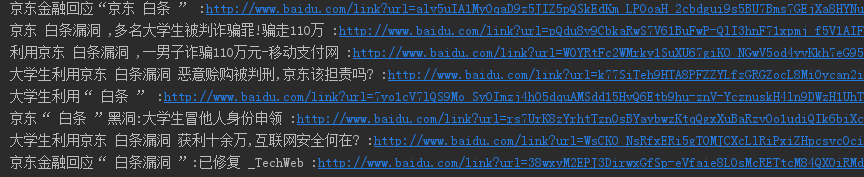
使用Beautiful Soup
from bs4 import BeautifulSoup
import requests

if __name__ == '__main__':
    url = 'https://www.baidu.com/s?wd=%E7%99%BD%E6%9D%A1%E6%BC%8F%E6%B4%9E&rsv_spt=1&rsv_iqid=0xc57c2ef6000b7b3d&issp=1&f=8&rsv_bp=0&rsv_idx=2&ie=utf-8&tn=baiduhome_pg&rsv_enter=1&rsv_sug3=16&rsv_sug1=10&rsv_sug7=100&rsv_sug2=0&inputT=1898&rsv_sug4=3234'
    headers = {
        "User-Agent": "Mozilla/5.0 (Windows NT 6.1; Win64; x64) AppleWebKit/537.36 (KHTML, like Gecko) Chrome/58.0.3029.110 Safari/537.36"
    }
    req = requests.get(url=url, headers=headers)
    req.encoding = 'utf-8'
    html = req.text
    #将html转为Soup对象处理
    bf = BeautifulSoup(html, 'html.parser')
    targets_url = bf.find_all(class_='result c-container')
    list_url = []
    for each in targets_url:
        list = each.h3.a.contents;
        print(list[0],list[1].string,list[2],end=" :")
        print(each.h3.a["href"])
爬取美女
https://blog.csdn.net/yanluandai1985/article/details/88666960