实现功能:添加一个学生,该学生信息包括个人图片,图片上传到服务器上,数据库保存图片的文件名,在查看学生列表时可以看到图片,同时在选择要上传的图片之后可以直接在前端显示。
实现效果:在选择图片之后,点击上传照片,将图片上传到服务器上,然后点击保存,将学生的所有信息保存到数据库中

实现过程(前端使用easyui框架):
1、添加学生信息同时实现图片上传功能以及选择图片文件之后及时在前端显示
<div id="addStu" class="easyui-dialog" title="添加" style="width:400px;height:460px;"
data-options="iconCls:'icon-save',resizable:true,modal:true,closed:true,closable:false,
buttons:[{
text:'保存',
handler:saveStu
},{
text:'关闭',
handler:closewin
}]
">
<form id="stuform" enctype="multipart/form-data" action="">
<input type="hidden" name="sid" value="">
<table align="center">
<tr>
<td >学号 :</td>
<td><input id="stu_id" name="stu_id" type="text" class="easyui-textbox" > </td>
</tr>
<tr>
<td>姓名:</td>
<td><input id="stu_name" type="text" name="stu_name" class="easyui-textbox" ></td>
</tr>
<tr>
<td>性别:</td>
<td><input name="sex" type="radio" value="男"/>男
<input name="sex" type="radio" value="女"/>女
</td>
</tr>
<tr>
<td width="75">出生日期:</td>
<td><input id="birthdate" name="birthdate" type= "text" class= "easyui-datebox" required ="required" /></td>
</tr>
<tr>
<td>QQ:</td>
<td><input id="qq" name="qq" type="text" class="easyui-textbox"/></td>
</tr>
<tr>
<td>手机号码:</td>
<td><input id="phone_num" name="phone_num" type="text" class="easyui-textbox"></td>
</tr>
<tr>
<td>学院信息:</td>
<td><input id="college_id" name="college_id" class="easyui-combobox"
data-options="valueField:'id',textField:'college_name',url:'/dorm_system/college/getAllCollege.action'"/></td>
</tr>
<tr>
<td>宿舍信息:</td>
<td><input id="dorm_id" name="dorm_id" class="easyui-combobox"
data-options="valueField:'id',textField:'allDormInfo',url:'/dorm_system/dorm/getAllDorm.action'"></td>
</tr>
<tr>
<td>照片:</td>
<td>
<img id="stu_pic" width="62" height="69">
</td>
</tr>
<tr>
<td></td>
<td>
<input id="pic_url" type="file" name="pic_url" />
<input type="button" onclick="uploadPic()" value="上传照片"/>
</td>
</tr>
</table>
</form>
</div>
<script>
//选择好图片之后及时显示图片
$(document).off('change','pic_url').on('change','#pic_url',function(){
$('#stu_pic').attr('src',URL.createObjectURL($(this)[0].files[0]));
});
//上传图片方法
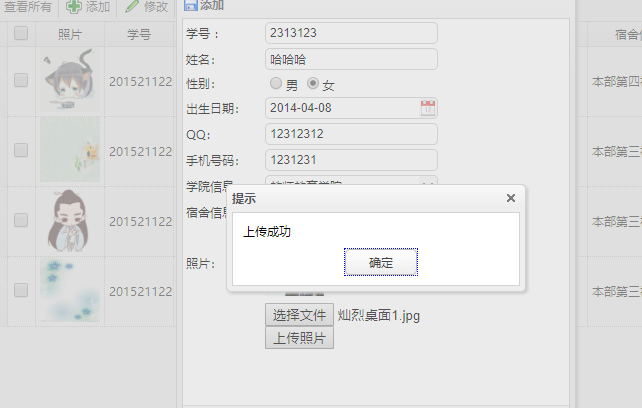
function uploadPic(){
var stuform=new FormData($('#stuform')[0]);
$.ajax({
url:'/dorm_system/stu_pic/uploadFile.action',
type:'post',
contentType:false,
processData:false,
data:stuform,
success:function(msg){
$.messager.alert(msg);
}
})
}
//保存数据到数据库的方法
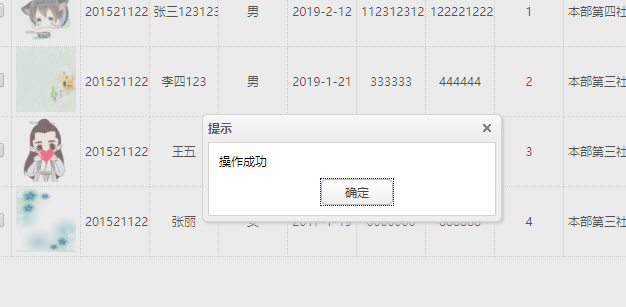
function saveStu(){
var stuform=new FormData($('#stuform')[0]);
$.ajax({
url:'/dorm_system/student/saveStudent.action',
type:'post',
contentType:false,
processData:false,
data:stuform,
success:function(msg){
$('#stuform').form('clear');
$('#stu_pic').attr('src','');
$(’#addStu‘).dialog('close');
$.messager.alert(msg);
}
})
}
</script>
uploadFile.action的后台代码:
@RequestMapping(value="/uploadFile.action",produces="text/html;charset=utf-8",method=RequestMethod.POST)
public @ResponseBody String uploadFile(HttpSession session,@RequestParam(value="pic_url",required=false) MultipartFile uploadPic)
{
//文件保存在服务器上的地址
String path="D:\\upload_file\\";
if((uploadPic!=null)&&(!uploadPic.isEmpty()))
{
//获取源文件的名称
String oldName=uploadPic.getOriginalFilename();
//获取文件的后缀名
String prefixName=FilenameUtils.getExtension(oldName);
int fileSize=500000;
//限制文件上传的大小不超过500k
if(uploadPic.getSize()>fileSize)
{
return "上传的文件不超过500k";
}else if(prefixName.equalsIgnoreCase("jpg")||prefixName.equalsIgnoreCase("png")||prefixName.equalsIgnoreCase("jpeg")||prefixName.equalsIgnoreCase("pneg"))//判断文件上传的格式
{
String filename=System.currentMillis()+RandomUtils.nextInt(1000000)+"stupic.jpg";//上传到服务器的文件名称
File file=new File(path,filename);
if(!file.exists())
{
file.mkdirs();
}
try {
uploadPic.transferTo(file);
session.setAttribute("uploadPic", fileName);
return "上传成功";
} catch (IllegalStateException e) {
e.printStackTrace();
} catch (IOException e) {
e.printStackTrace();
}
return "上传失败";
}
}
return "请选择所要上传的文件";
}
saveStudent.action的后台代码
@RequestMapping(value="/saveStudent.action",method=RequestMethod.POST,produces="text/html;charset=utf-8")
public @ResponseBody String saveStudent(HttpSession session,Student stu,String sid)
{
try {
String uploadPic=(String) session.getAttribute("uploadPic");
System.out.println("=====uploadPic: "+uploadPic);
stu.setPicture_url(uploadPic);
if(sid==null||sid.equals(""))
{
stuService.insertStudent(stu);
}
else
{
stu.setId(Integer.parseInt(sid));
stuService.updateStudent(stu);
}
return "操作成功";
} catch (Exception e) {
e.printStackTrace();
}
return "操作失败"
}
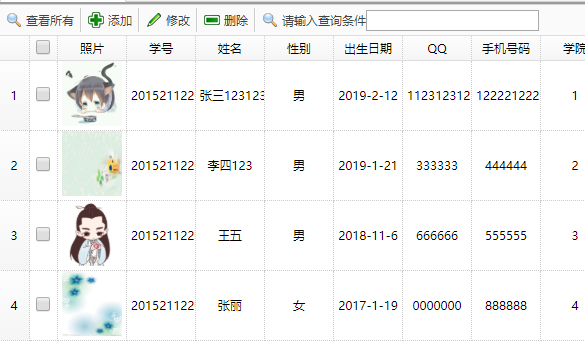
2、根据数据库保存的图片名称显示保存在服务器上的图片信息
前端代码:其中row.picture_url就是数据库中保存的图片文件数据
<img src='/dorm_system/stu_pic/IoReadImage/’+row.picture_url+‘.action' +"width='60' height='65'/>
后台代码:
@RequestMapping(value="/IoReadImage/{imgName}.action",method=RequestMethod.GET)
public void IoReadImage(@PathVariable String imgName,HttpServletRequest request,HttpServletResponse response)
{
response.setContentType("multipart\form-data");
ServletOutputStream out=null;
FileInputStream ips=null;
try{
String picPath="D:\\upload_file\\"+imgName;
File file=new File(picPath);
ips=new FileInputStream(file);//获取文件的输入流
out=response.getOutputStream();
byte[] buffer=new byte[1024*10];
int len=0;
while((len=ips.read(buffer)!=-1)
{
out.write(buffer,0,len);
}
out.flush();
}catch(Exception e)
{
e.printStackTrace();
}finally{
out.close();
ips.close();
}
}