版权声明:整理不易,转载请注明出处。 https://blog.csdn.net/linmengmeng_1314/article/details/84944056
图片上传与删除
之前写了一篇博客记录了关于修改资料中的图片上传 (传送门),这次用到了直接上传图片的功能,对上一篇博客进行了简单的优化与改进。
改进问题:
- 之前删除该数据时,仅仅删除了数据库中的数据,而项目下面的图片文件仍然存在,这就导致以后即使数据库清空之后,项目文件夹下删除的图片记录仍然存在的问题。
- 直接使用ajax上传图片。
1.上传文件
下面贴一下代码:
<button type="button" onclick="newPicture()" class="btn btn-primary tab-modify">新增</button>
由于页面使用了bootscript,CSS功底不好,显得页面比较乱,凑合先用着了
<!-- 新增图片 -->
<div id="tanchuang-tab">
<div class="tanchuang-tab">
<!-- <form id="updateForm"> -->
<form class="form-horizontal over-hd" role="form" id="updateForm"
method="post" enctype="multipart/form-data" action="picture/insertPicture.do">
<div class="kaizhi-box col-xs-12 tanchuang-content"
style="left: 0%;">
<span id="x-close3"
style="margin:0px;position:absolute;right:2%;top:3%;">x</span>
<div class="" style="width: 100%;margin:0 auto;padding-top:20px;">
<div class="form-group"
style="margin-right: 10%;margin-left: 10%;">
<label for="firstname" class="col-sm-5 control-label"
style="font-size: 16px;">所属管理员:</label>
<div class="col-sm-7">
<input id="pOwner" name="pOwner" style="display:none;"/>
<select id="selectOwner" class="form-control-select"
style="width:100%;height:34px;border: 1px solid #ccc;border-radius:4px">
</select>
</div>
</div>
<div class="form-group" style="margin-left: 24%;" >
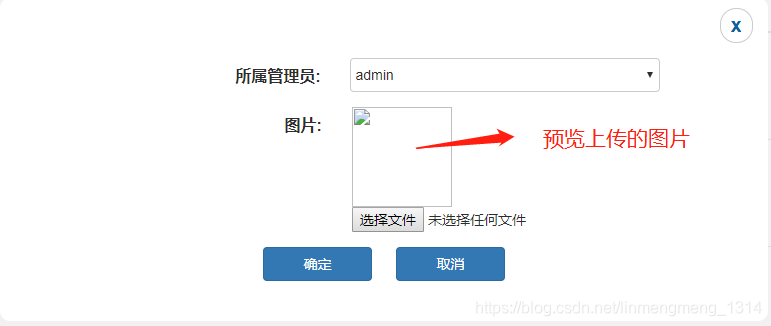
<label for="firstname" class="col-sm-3 control-label" style="font-size: 16px;">图片:</label>
<div class="col-sm-7">
<div id="localImag">
<img id="preview" src=""
width="100" height="100">
</div>
<input type="file" id="inputFile" name="file" accept="image/*"
onchange="javascript:setImagePreview();" />
</div>
</div>
<div class="text-center btn-box">
<button type="button" class="btn btn-primary btn-width"
id="btn-submit3">确定</button>
<button type="button" class="btn btn-primary btn-width"
id="btn-cancel3">取消</button>
</div>
</div>
</div>
</form>
</div>
</div>
js部分:(页面可以参考上面的传送连接里的博客,比较清晰(传送门))
		//下面用于图片上传预览功能
		function setImagePreview(avalue) {
			var docObj = document.getElementById("inputFile");
			var imgObjPreview = document.getElementById("preview");
			if (docObj.files && docObj.files[0]) {
				//火狐下,直接设img属性
				imgObjPreview.style.display = 'block';
				imgObjPreview.style.width = '100px';
				imgObjPreview.style.height = '100px';
				//imgObjPreview.src = docObj.files[0].getAsDataURL();
				//火狐7以上版本不能用上面的getAsDataURL()方式获取,需要一下方式
				imgObjPreview.src = window.URL.createObjectURL(docObj.files[0]);
			} else {
				//IE下,使用滤镜
				docObj.select();
				var imgSrc = document.selection.createRange().text;
				var localImagId = document.getElementById("localImag");
				//必须设置初始大小
				localImagId.style.width = "150px";
				localImagId.style.height = "180px";
				//图片异常的捕捉,防止用户修改后缀来伪造图片
				try {
					localImagId.style.filter = "progid:DXImageTransform.Microsoft.AlphaImageLoader(sizingMethod=scale)";
					localImagId.filters
							.item("DXImageTransform.Microsoft.AlphaImageLoader").src = imgSrc;
				} catch (e) {
					alert("您上传的图片格式不正确,请重新选择!");
					return false;
				}
				imgObjPreview.style.display = 'none';
				document.selection.empty();
			}
			return true;
		}

		// 点击确认按钮触发
		$('#btn-submit3').click(function() {
			var owner = $('#selectOwner option:selected').val();  // 获取下拉框里选中的值
			$("#pOwner").val(owner);
			var fileObj = document.getElementById("inputFile").files[0]; // js 获取文件对象
			if (typeof (fileObj) == "undefined" || fileObj.size <= 0) {
				alert("请选择上传的图片!");
				return;
			}
			var formFile = new FormData();
			formFile.append("pOwner", owner);
			formFile.append("file", fileObj);

			var data = formFile;
			$.ajax({
				url : 'picture/insertPicture.do',
				type : 'post',
				dataType : 'json',
				data : data,
				cache: false,   //上传文件无需缓存
				processData: false,   // 用于对参数进行序列化处理,这里必须设为false
				contentType:false, // 必须
				success : function(data) {
					console.log(data);
					 if (data.state == 200) {
						alert(data.message);
						var to = "${pageContext.request.contextPath}/picture/pictureList.do";
						doPost(to);
					}
					if(data.state == 300){
						alert("图片上传失败!");
						return;
					}
				}
			});
		});
		$('#btn-cancel3').click(function() {
			console.log("2222");
			$("#selectOwner").find("option").remove();
			//var name = $("#inputFile").val();
			//$("#inputFile").val(null);
			//$("#preview").src(null);
			var obj = document.getElementById('inputFile') ;
			obj.outerHTML=obj.outerHTML;
			$('#tanchuang-tab').hide();
		});
		// 使用post提交访问请求
		function doPost(to){
	    	//to为跳转链接
	    	var myForm = document.createElement("form");
	    	myForm.method = "post";
	    	myForm.action = to;
	    	document.body.appendChild(myForm); //
	    	myForm.submit();
	    	document.body.removeChild(myForm); // 提交后移除创建的form
	    }
使用ajax提交表单可能都不陌生了,但是当表单里存在文件时,ajax普通的写法就会报错了,这里的写法是参考网上的资料整理的,
这里利用FormData对象来将数据封装起来,其中pOwner是from里提交的另一个参数
var formFile = new FormData();
formFile.append("pOwner", owner);
formFile.append("file", fileObj);
在ajax中processData: false必须false才会避开jQuery对 formdata 的默认处理
java后台的东西
我这里将初始文件名也保存到数据库里了,picture_url里存的是图片的路径和名称,这是存在了项目根目录的upload文件夹下面了。

在展示的时候,展示的图片名称是上传的文件名,而图片的显示却不能用文件名来显示,因为上传的文件如果出现重名的的话,将影响图片的回显。这里我使用UUID给图片重命名,或者使用MD5对当前时间进行加密,然后取值作为图片名称,这样图片就可以避免重名的问题了。每张图片都是唯一标识的。
首先是Controller类:
	@RequestMapping("insertPicture")
	@ResponseBody
	public JsonResult<String> insertPicture(@RequestParam(value="file")MultipartFile pictureFile,HttpServletRequest request, String pOwner) throws IOException{
		System.out.println("pOwner:" + pOwner);
		// pictureURL是数据库里picture_url的值,这里用到一个封装的工具类UploadUtil
		String pictureURL= UploadUtil.imageUpload(pictureFile, request);
		System.out.println("pictureURL:" + pictureURL);
        //获取上传时的文件名
        String pictureName = FilenameUtils.getName(pictureFile.getOriginalFilename());
        System.out.println("pictureName:" + pictureName);
        // 把图片数据保存到数据库
        Picture picture = new Picture();
        picture.setPictureName(pictureName);
        picture.setPictureUrl(pictureURL);
        picture.setPictureOwner(pOwner);
        int insert = pictureService.insert(picture);
        if (insert > 0 && pictureURL != "") {
        	return new JsonResult<>(200, "上传成功!", null);
		}
        return new JsonResult<>(300, "上传失败", null);
	}
上传文件工具类:UploadUtil.java
import java.io.File;
import java.io.IOException;
import java.util.UUID;

import javax.servlet.http.HttpServletRequest;

import org.apache.commons.io.FilenameUtils;
import org.springframework.web.bind.annotation.RequestParam;
import org.springframework.web.multipart.MultipartFile;

public class UploadUtil {
	public static String imageUpload(@RequestParam(value="file") MultipartFile file,HttpServletRequest req){
		// 获取要上传的目标位置,即是项目的upload文件夹所在的绝对路径
		String path = req.getSession().getServletContext().getRealPath("upload");
		// 获取文件的扩展名
        String ext = FilenameUtils.getExtension(file.getOriginalFilename());
		String filename = UUID.randomUUID().toString().replaceAll("-", "")+"."+ ext;
		// 写入文件成功之后,返回的数据,也就是数据库里要存的文件的url
		String src="upload/"+filename;
		File targetFile= new File(path,filename);
		try {
			if(!targetFile.exists()){
				//写入文件
				file.transferTo(targetFile);
			}
			return src;
		} catch (IllegalStateException e) {
			e.printStackTrace();
		} catch (IOException e) {
			e.printStackTrace();
		}
		//写入文件失败,则返回空字符串
		return "";
	}
}
返回的JSON工具类:JsonResult.java
import java.io.Serializable;

/**
 * 用于封装服务器到客户端的Json返回值
 *
 * @author soft01
 *
 */
public class JsonResult<T> implements Serializable {
	// Serializable将对象的状态保存在存储媒体中以便可以在以后重新创建出完全相同的副本
	public static final int SUCCESS = 0;
	public static final int ERROR = 1;
	public static final int OTHER = 2;

	private int state;
	private String message = "";
	private T data;
	private String pass = "";

	public JsonResult() {
		state = SUCCESS;
	}

	// 为了方便,重载n个构造器
	public JsonResult(int state, String message, T data) {
		super();
		this.state = state;
		this.message = message;
		this.data = data;
	}

	public JsonResult(int state, String error) {
		this(state, error, null);
	}

	public JsonResult(int state, T data) {
		this(state, "", data);
	}

	public JsonResult(String error) {
		this(ERROR, error, null);
	}

	public JsonResult(T data) {
		this(SUCCESS, "", data);
	}

	public JsonResult(int state) {
		this(state, "", null);
	}

	public JsonResult(Throwable e) {
		this(ERROR, e.getMessage(), null);
	}

	public int getState() {
		return state;
	}

	public void setState(int state) {
		this.state = state;
	}

	public String getMessage() {
		return message;
	}

	public void setMessage(String message) {
		this.message = message;
	}

	public T getData() {
		return data;
	}

	public void setData(T data) {
		this.data = data;
	}

	public static int getSuccess() {
		return SUCCESS;
	}

	public static int getError() {
		return ERROR;
	}

	@Override
	public String toString() {
		return "JsonResult [state=" + state + ", message=" + message
				+ ", pass=" + pass + ", data=" + data + "]";
	}
}
到这里文件上传就算完成了,这时可以检查数据库中的值和项目文件夹下是否有上传的图片了。
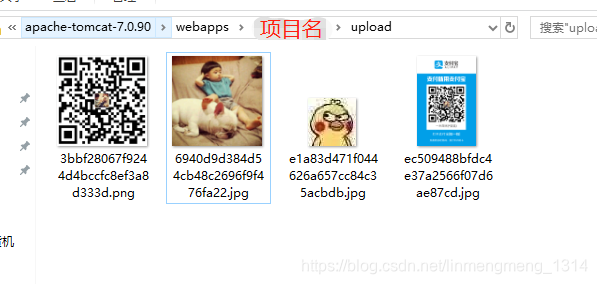
数据库里的数据:
2.删除数据,并且删除对应的文件
根据图片的id删除图片,前台传来图片的Id,后台查询获得对应图片的url,进行截取文件名,然后遍历图片文件夹,最后删除。

前台页面:
						<table class="table table-hover"
							style="border-bottom: 1px solid #ccc;text-align:center">
							<thead>
								<tr>
									<th style="display:none;">ID</th>
									<th>预览</th>
									<th>图片名</th>
									<th>所属管理员</th>
									<th>操作</th>
								</tr>
							</thead>
							<tbody>
								<c:forEach items="${pageInfo.list }" var="picture">
									<tr>
										<td style="display:none;">${picture.id}</td>
										<td><img src="<%=basePath%>${picture.pictureUrl}"  width="90px" height="90px" /></td>
										<td>${picture.pictureName }</td>
										<td>${picture.pictureOwner }</td>
										<td><button type="button"
												onclick="delPicture(${picture.id})"
												class="btn btn-primary tab-modify">删除</button></td>
									</tr>
								</c:forEach>
							</tbody>
						</table>
		function delPicture(pictureId) {
			if (!confirm("确定要删除吗?"))
				return;
			$.ajax({
				url : 'picture/delPictureById.do',
				data : {
					'pictureId' : pictureId
				},
				type : 'post',
				dataType : 'json',
				success : function(data) {
					alert(data.message);
					window.location.reload();
				}
			});
		}
java后台:
	/**
	 * 删除图片
	 * @param pictureId
	 * @param request
	 * @return
	 */
	@RequestMapping("delPictureById")
	@ResponseBody
	public JsonResult<String> delPictureById(String pictureId, HttpServletRequest request){
		Integer Id = Integer.valueOf(pictureId);
		String realPath = request.getServletContext().getRealPath("upload");
		System.out.println(realPath);
		Picture picture = pictureService.selectByPrimaryKey(Id);
		System.out.println("picture:" + picture);
		if (picture != null) {
			String picUrl = picture.getPictureUrl();
			System.out.println("picUrl:" + picUrl);
			//获取文件名,用于后面的遍历查找删除
			String name = picUrl.substring(7);
			System.out.println(name);
			//获取目标文件夹:项目中图片所在的绝对路径
			File folder = new File(realPath);
			File[] files = folder.listFiles();
			for(File file : files){
				if (file.getName().equals(name)) {
					boolean delete = file.delete();
					if (delete) {
						int i = pictureService.deleteByPrimaryKey(Id);
						if (i > 0) {
							return new JsonResult<>(200, "删除成功!", null);
						}
					}
				}
			}
		}
		return new JsonResult<>(300, "删除失败!", null);
	}
至此,删除图片就结束了,删除之后,可以检查一下,upload文件夹下是否还存在相应的文件。