从零开始搭建SSH 框架
仅作为个人学习整理使用,欢迎指导,不喜勿喷!!!:
目录
工具 :
eclipse MySQL jdk1.8 tomcat7 druid连接池
所需jar包 :
Struts2的jar包
Spring的jar包
Hibernate的jar包
Struts-Spring的连接jar包
还有连库jar包及连接池jar包。
********本例中用的是mysql数据库和druid连接池********
第一步:搭建struts2框架
(需要达成目标:可以发出请求并进行页面跳转)
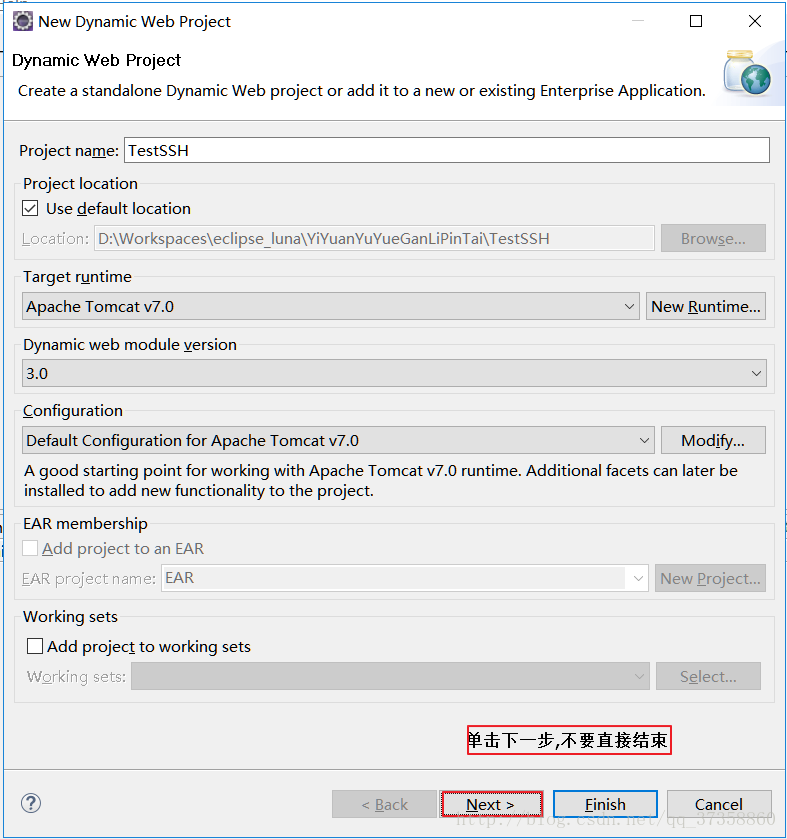
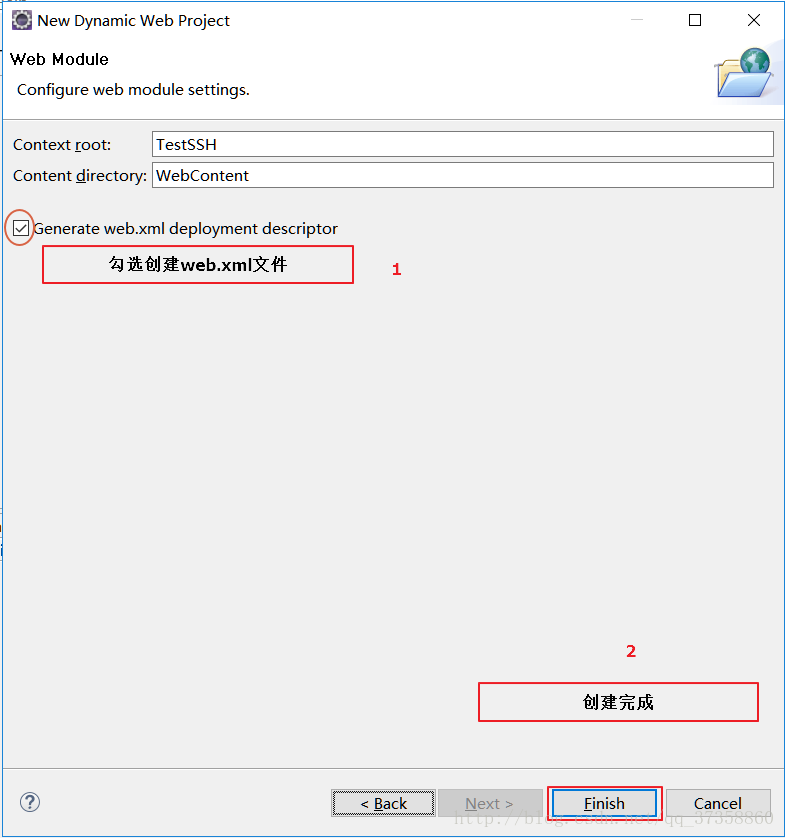
1.首先创建一个web项目,过程中注意选择创建web.xml文件,不要直接点finish
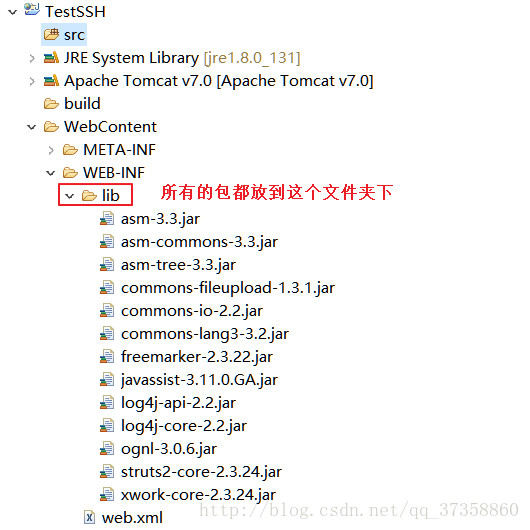
2.将struts2的jar包,复制粘贴到项目的lib文件夹下
3.在web.xml文件下,添加Struts2的核心过滤器
  <!--
    作者: 郎国峰
    时间: 2017年11月9日13:05:51
    描述: 添加Struts2核心过滤器
   -->
  <filter>
    <filter-name>struts2</filter-name>
    <filter-class>org.apache.struts2.dispatcher.ng.filter.StrutsPrepareAndExecuteFilter</filter-class>
  </filter>
  <filter-mapping>
    <filter-name>struts2</filter-name>
    <url-pattern>/*</url-pattern>
  </filter-mapping>
4.在WebContent文件夹下创建index.jsp欢迎页,并可以发送一个Struts2的请求
<%@ page language="java" contentType="text/html; charset=UTF-8" pageEncoding="UTF-8"%>
<!DOCTYPE html PUBLIC "-//W3C//DTD HTML 4.01 Transitional//EN" "http://www.w3.org/TR/html4/loose.dtd">
<html>
<head>
<meta http-equiv="Content-Type" content="text/html; charset=UTF-8">
<title>SSH测试欢迎页</title>
</head>
<body>
    <!--
        作者: 郎国峰
        时间: 2017年11月9日13:12:48
        描述: Struts2的测试请求
     -->
    <a href="<%=request.getContextPath()%>/stu_listStu.action">Struts2测试请求</a>
</body>
</html>
5.在webContent下创建jsp/student文件,并在文件夹内创建listStudent.jsp页面,用户转向的列表页.
<%@ page language="java" contentType="text/html; charset=UTF-8"
    pageEncoding="UTF-8"%>
<!DOCTYPE html PUBLIC "-//W3C//DTD HTML 4.01 Transitional//EN" "http://www.w3.org/TR/html4/loose.dtd">
<html>
<head>
<meta http-equiv="Content-Type" content="text/html; charset=UTF-8">
<title>listStudent</title>
</head>
<body>
    <h1>This is listStudent page</h1>
</body>
</html>
6.在src下创建一个包com.laolang.student.action,并在这个包下创建Struts2的控制器StudentAction
package com.laolang.student.action;
/**
 * 标题: StudentAction.java
 * 路径: com.laolang.student.action
 * 描述: Student的控制器
 * 作者: 郎国峰
 * 时间: 2017年11月9日 下午1:31:04
 * 版本: @version V1.0
 */
public class StudentAction {
    /**
     * @方法名: listStu
     * @描述: 查询学生信息,并跳转到学生列表页
     * @作者: 郎国峰
     * @时间: 2017年11月9日 下午1:32:14
     * @return
     */
    public String listStu(){
        System.out.println("===method:listStu()===");
        return "listStu";
    }
}
7.在项目中创建一个源文件夹config用来存放配置文件,并在config下创建struts2的配置文件struts.xml
<?xml version="1.0" encoding="UTF-8" ?>
<!DOCTYPE struts PUBLIC
"-//Apache Software Foundation//DTD Struts Configuration 2.1//EN"
"http://struts.apache.org/dtds/struts-2.1.dtd">
<struts>
    <package name="struts2test"  extends="struts-default"  >
        <!--
            作者: 郎国峰
            时间: 2017年11月9日13:37:31
            描述: 请求Student的控制器
         -->
        <action name="stu_*" class="com.laolang.student.action.StudentAction" method="{1}">
            <result name="listStu">/jsp/student/lsitStudent.jsp</result>
        </action>
    </package>
</struts>
其中action节点中的class为请求控制器的类路径,name为请求名称,本例中用的是action节点的method属性来请求具体方法 , *号为通配符 , 请求过来是什么就走什么方法!具体可以参照Struts2的具体用法,后边我会接着写!
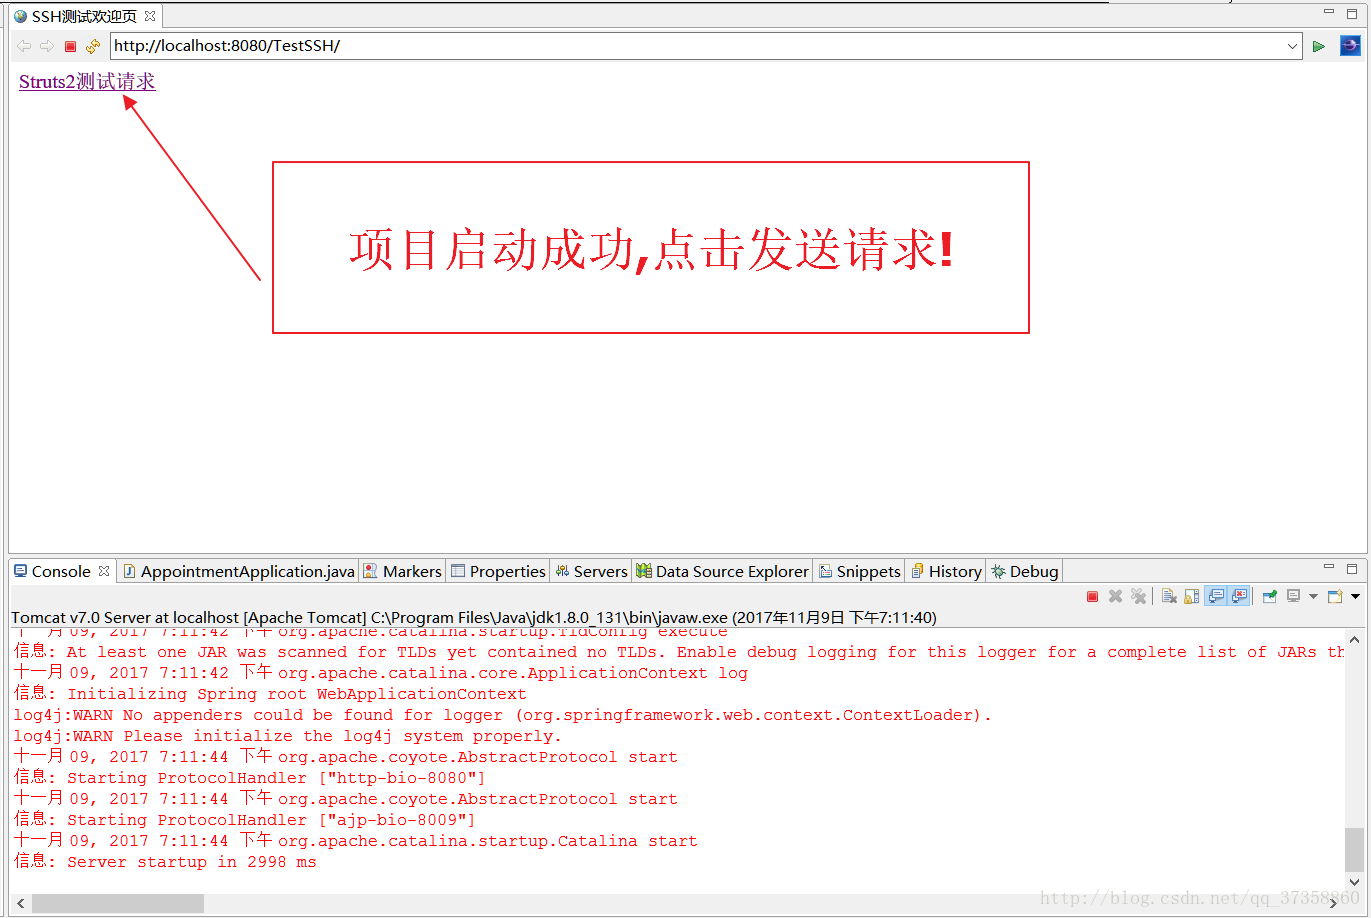
8.到目前为止,我们就已经搭建好Struts2框架了,可以启动项目发送请求测试一下
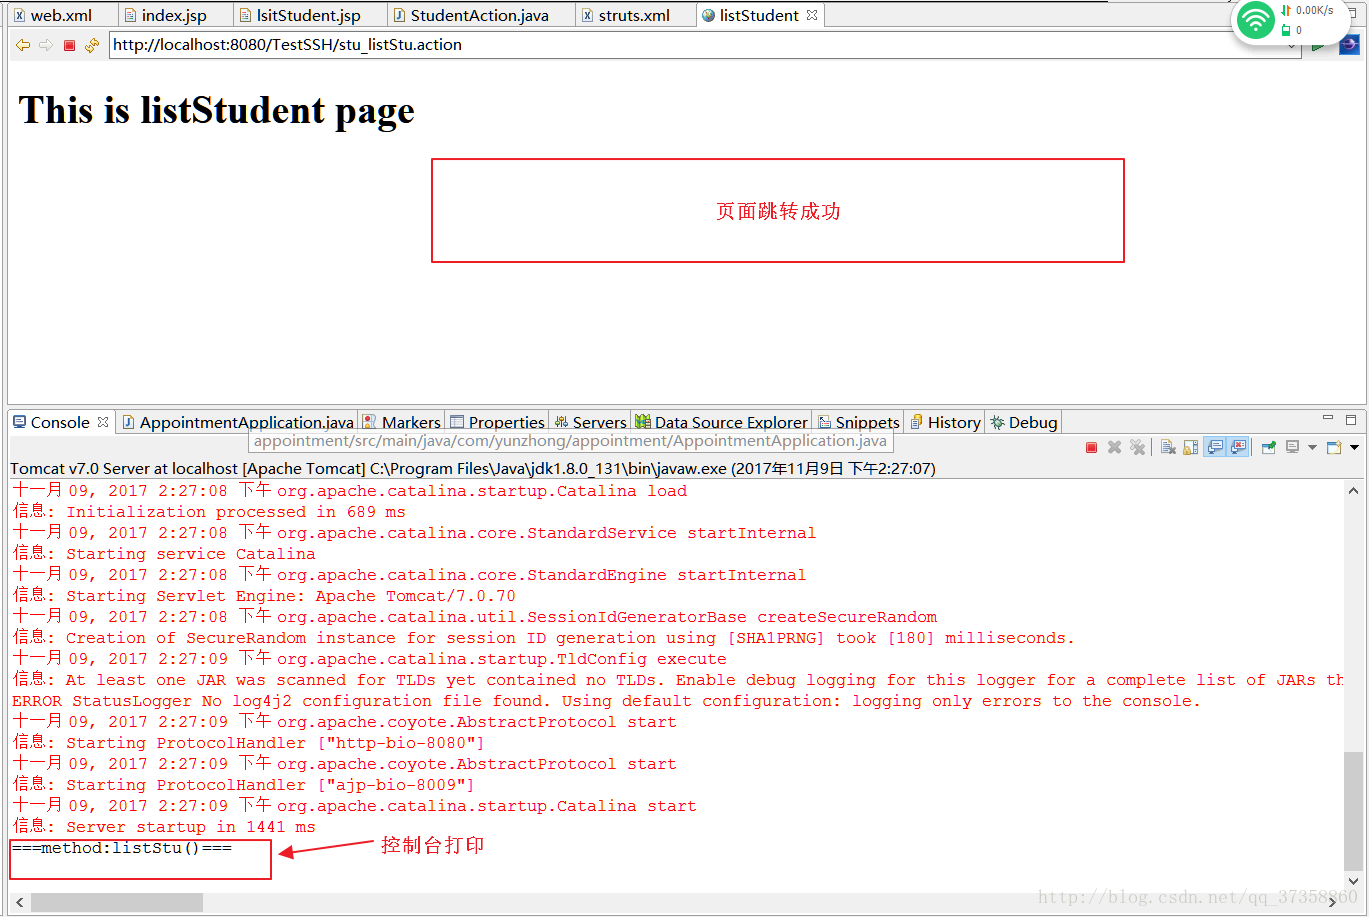
项目启动成功,进入欢迎页面,然后点击请求
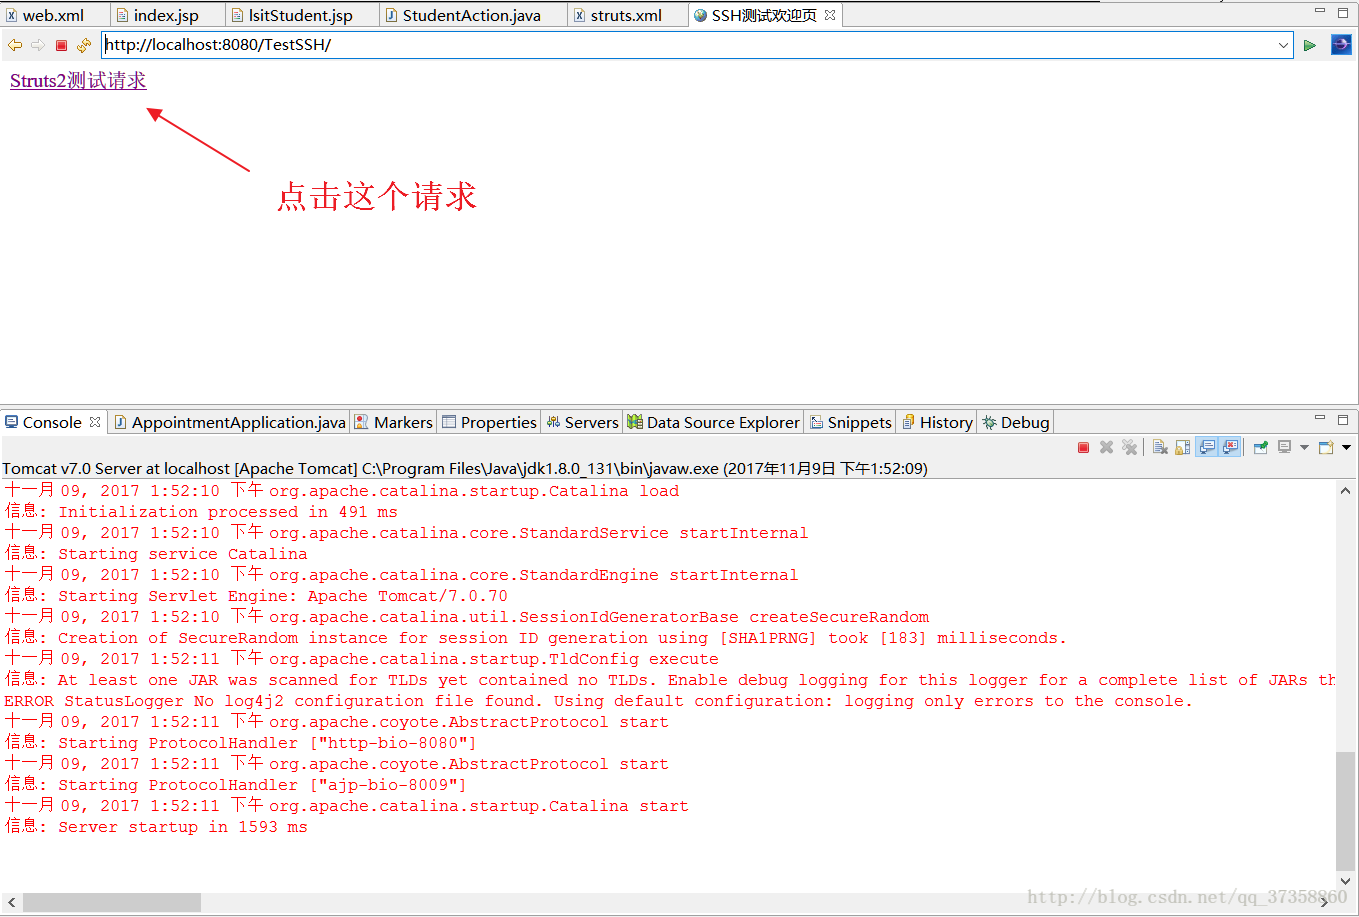
点击后跳转到学生列表页,控制台打印控制器方法,测试成功!
第二步:加入Spring框架
( 需要达成目标:改造后将控制器对象交给Spring管理仍可以实现发请求转页 )
1.将Spring的jar包和Struts-Spring的联合包,导入到项目的lib文件夹中
2.在web.xml文件中启动Spring监听器,并指定Spring的配置文件名称和位置
  <!--
    作者: 郎国峰
    时间: 2017年11月9日14:44:48
    描述: 启动Spring监听
   -->
  <listener>
    <listener-class> org.springframework.web.context.ContextLoaderListener </listener-class>
  </listener>
  <!--
    作者: 郎国峰
    时间: 2017年11月9日14:45:23
    描述: 设定Spring配置文件的名称及位置
   -->
  <context-param>
    <param-name>contextConfigLocation</param-name>
    <param-value>classpath:applicationContext.xml</param-value>
  </context-param>
3.在config源文件夹下创建spring的配置文件:applicationContext.xml,并将Struts与Spring进行整合,将控制器交个Spring来管理
Spring与struts2的整合: 在spring配置文件中加入控制器的bean节点,并将struts2配置文件中对应action节点的class属性改成此bean节点的id或name属性
applicationContext.xml:
<?xml version="1.0" encoding="UTF-8"?>
<beans xmlns="http://www.springframework.org/schema/beans"
xmlns:xsi="http://www.w3.org/2001/XMLSchema-instance"
xmlns:context="http://www.springframework.org/schema/context"
xsi:schemaLocation="http://www.springframework.org/schema/beans
 http://www.springframework.org/schema/beans/spring-beans-3.0.xsd
 http://www.springframework.org/schema/context
 http://www.springframework.org/schema/context/spring-context-2.5.xsd">
  <!--
    作者: 郎国峰
    时间: 2017年11月9日14:57:34
    描述: 将控制器交给Spring来管理
  -->
  <bean id="stuAction" class="com.laolang.student.action.StudentAction" scope="prototype"></bean>
</beans>
更改后的 struts.xml:
<?xml version="1.0" encoding="UTF-8" ?>
<!DOCTYPE struts PUBLIC
"-//Apache Software Foundation//DTD Struts Configuration 2.1//EN"
"http://struts.apache.org/dtds/struts-2.1.dtd">
<struts>
    <package name="struts2test"  extends="struts-default"  >
        <!--
            作者: 郎国峰
            时间: 2017年11月9日13:37:31
            描述: 请求Student的控制器
         -->
        <action name="stu_*" class="stuAction" method="{1}">
            <result name="listStu">/jsp/student/lsitStudent.jsp</result>
        </action>
    </package>
</struts>
4.到目前为止,Struts2与Spring就整合完了,从新启动项目,和第一次测试一样,能够发送请求跳页,控制台打印,那么就算成功了
第三步:加入hibernate框架
(需要达成目标: 可实现对数据库数据的CRUD)
1.导入hibernate的jar包,druid连接池jar包,MySQL连库jar包
2.在src下创建模型层接口和实现类,控制器中声明模型层接口的属性,并通过spring将模型层注入到控制器中
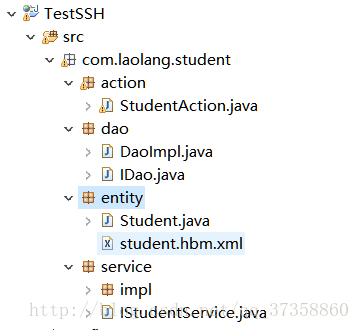
模型层接口和实现类位置 :

控制器里声明学生模型层对象 :

Spring配置文件:将控制器中声明的这个对象交个Spring来管理
<?xml version="1.0" encoding="UTF-8"?>
<beans xmlns="http://www.springframework.org/schema/beans"
xmlns:xsi="http://www.w3.org/2001/XMLSchema-instance"
xmlns:context="http://www.springframework.org/schema/context"
xsi:schemaLocation="http://www.springframework.org/schema/beans
 http://www.springframework.org/schema/beans/spring-beans-3.0.xsd
 http://www.springframework.org/schema/context
 http://www.springframework.org/schema/context/spring-context-2.5.xsd">
  <!--
    作者: 郎国峰
    时间: 2017年11月9日14:57:34
    描述: 将控制器交给Spring来管理
  -->
  <bean id="stuAction" class="com.laolang.student.action.StudentAction" scope="prototype">
    <!-- 将学生模型层对象注入到控制器中  -->
    <property name="studentService">
        <bean class="com.laolang.student.service.impl.StudentServiceImpl"></bean>
    </property>
  </bean>
</beans>
3.创建Dao接口及其实现类DaoImpl
Dao接口和实现类的位置:
Dao接口:
package com.laolang.student.dao;

import java.util.List;

/**
 * 标题: IDao.java
 * 路径: com.laolang.student.dao
 * 描述: Dao接口
 * 作者: 郎国峰
 * 时间: 2017年11月9日 下午3:56:10
 * 版本: @version V1.0
 */
public interface IDao {
    /**
     * @方法名: listEntity
     * @描述: 查询所有的数据
     * @作者: 郎国峰
     * @时间: 2017年11月9日 下午3:59:25
     * @return
     */
    public List listEntity(String hql);
}
Dao实现类:
package com.laolang.student.dao;

import java.util.List;

import org.springframework.orm.hibernate3.support.HibernateDaoSupport;

/**
 * 标题: DaoImpl.java
 * 路径: com.laolang.student.dao
 * 描述: Dao实现类
 * 作者: 郎国峰
 * 时间: 2017年11月9日 下午3:56:53
 * 版本: @version V1.0
 */
public class DaoImpl extends HibernateDaoSupport implements IDao{

    @Override
    public List listEntity(String hql) {
        // TODO Auto-generated method stub
        return super.getHibernateTemplate().find(hql);
    }

}
4.创建实体类和映射文件
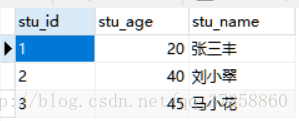
MySQL数据库Student表:
实体类和映射文件位置:
Student实体类:
package com.laolang.student.entity;
/**
 * 标题: Student.java
 * 路径: com.laolang.student.entity
 * 描述: Student实体类
 * 作者: 郎国峰
 * 时间: 2017年11月9日 下午4:09:39
 * 版本: @version V1.0
 */
public class Student {
    private String stuId;
    private String stuName;

    public String getStuId() {
        return stuId;
    }
    public void setStuId(String stuId) {
        this.stuId = stuId;
    }
    public String getStuName() {
        return stuName;
    }
    public void setStuName(String stuName) {
        this.stuName = stuName;
    }
}
Studernt实体类映射文件:
<?xml version="1.0" encoding="utf-8"?>
<!DOCTYPE hibernate-mapping PUBLIC "-//Hibernate/Hibernate Mapping DTD 3.0//EN"
"http://hibernate.sourceforge.net/hibernate-mapping-3.0.dtd">

<hibernate-mapping>
   <!--
        作者: 郎国峰
        时间: 2017年11月9日16:13:07
        描述: Student对象关系映射
    -->
    <class name="com.laolang.student.entity.Student" table="student">
        <id name="stuId" column="stu_id">
            <!-- 自己管理主键 -->
            <generator class="assigned"></generator>
        </id>
        <property name="stuName" column="stu_name"></property>
    </class>
</hibernate-mapping>
5.在Spring配置文件中添加数据源
本例中用的是mysql数据库和druid连接池 ————可以不用
 <!--
    作者: 郎国峰
    时间: 2017年11月9日16:31:32
    描述: 注入数据源------druid连接池------根据项目需求自行配置
   -->
  <bean id="dataSource" class="com.alibaba.druid.pool.DruidDataSource" init-method="init" destroy-method="close">
      <property name="driverClassName" value="com.mysql.jdbc.Driver" />
      <property name="url" value="jdbc:mysql://127.0.0.1:3306/ssh" />
      <property name="username" value="root" />
      <property name="password" value="root" />
      <!-- 配置初始化大小、最小、最大 -->
      <property name="initialSize" value="3" />
      <property name="minIdle" value="1" />
      <property name="maxActive" value="10" />
      <!-- 配置获取连接等待超时的时间 -->
      <property name="maxWait" value="60000" />
      <!-- 配置间隔多久才进行一次检测,检测需要关闭的空闲连接,单位是毫秒 -->
      <property name="timeBetweenEvictionRunsMillis" value="60000" />
      <!-- 配置一个连接在池中最小生存的时间,单位是毫秒 -->
      <property name="minEvictableIdleTimeMillis" value="300000" />
      <property name="validationQuery" value="SELECT 'x' FROM DUAL" />
      <property name="testWhileIdle" value="true" />
      <property name="testOnBorrow" value="false" />
      <property name="testOnReturn" value="false" />
      <!-- 打开PSCache,并且指定每个连接上PSCache的大小 -->
      <property name="poolPreparedStatements" value="true" />
      <property name="maxPoolPreparedStatementPerConnectionSize" value="20" />
      <!-- 配置监控统计拦截的filters -->
      <property name="filters" value="stat" />
  </bean>
6.在spring配置文件中设置Hibernate的基本属性
  <!--
    作者: 郎国峰
    时间: 2017年11月9日16:36:37
    描述: 配置Hibernate属性
  -->
  <bean id="hibernateProperties"  class="org.springframework.beans.factory.config.PropertiesFactoryBean">
      <property name="properties">
         <props>
            <!-- 设置Hibernate方言为MySQL -->
            <prop key="hibernate.dialect">org.hibernate.dialect.MySQLDialect</prop>
            <!-- 显示sql -->
            <prop key="hibernate.show_sql">true</prop>
         </props>
     </property>
  </bean>
7.在Spring配置文件中配置SessionFactory
  <!--
    作者: 郎国峰
    时间: 2017年11月9日16:43:46
    描述: 设置SessionFactory
   -->
  <bean id="sessionFactory" class="org.springframework.orm.hibernate3.LocalSessionFactoryBean">
    <!-- 注入数据源 -->
    <property name="dataSource" ref="dataSource" />
    <!-- hibernate属性设置 -->
    <property name="hibernateProperties">
         <ref bean="hibernateProperties" />
    </property>
    <!-- 映射文件声明 -->
    <property name="mappingDirectoryLocations">
       <list>
          <value>classpath:com/laolang/student/entity</value>
       </list>
    </property>
  </bean>
8.在Spring配置文件中添加dao的bean节点用于实现持久化操作,并将session工厂注入到dao中
(其父类需要sessionFactory)
  <!--
    作者: 郎国峰
    时间: 2017年11月9日16:50:54
    描述: 将Dao交给Spring来管理,并将session工厂注入到dao中,其父类需要sessionFactory
   -->
   <bean id="dao" class="com.laolang.student.dao.DaoImpl">
        <property name="sessionFactory" ref="sessionFactory"></property>
   </bean>
9.在模型层的实现类声明dao属性,并通过spring注入dao
声明dao:
package com.laolang.student.service.impl;

import com.laolang.student.dao.IDao;
import com.laolang.student.service.IStudentService;
/**
 * 标题: StudentServiceImpl.java
 * 路径: com.laolang.student.service.impl
 * 描述: Student模型层实现类
 * 作者: 郎国峰
 * 时间: 2017年11月9日 下午3:29:24
 * 版本: @version V1.0
 */
public class StudentServiceImpl implements IStudentService {
    /**
     * 模型层里的Dao对象
     */
    private IDao dao;

    public IDao getDao() {
        return dao;
    }
    public void setDao(IDao dao) {
        this.dao = dao;
    }
}
10.将Dao注入到模型层中,更改Spring配置文件中的stuAction这个bean节点
  <!--
    作者: 郎国峰
    时间: 2017年11月9日14:57:34
    描述: 将控制器交给Spring来管理
  -->
  <bean id="stuAction" class="com.laolang.student.action.StudentAction" scope="prototype">
    <!-- 将学生模型层对象注入到控制器中  -->
    <property name="studentService">
        <bean class="com.laolang.student.service.impl.StudentServiceImpl" autowire="byType"></bean>
    </property>
  </bean>
至此,我们整个SSH框架就已将搭建完成了,下面我们可以调用dao实现持久化操作,并将结果返回给页面了.我们简单的写一个查询进行测试
StudentAction控制器:
package com.laolang.student.action;

import java.util.List;

import com.laolang.student.entity.Student;
import com.laolang.student.service.IStudentService;

/**
 * 标题: StudentAction.java
 * 路径: com.laolang.student.action
 * 描述: Student的控制器
 * 作者: 郎国峰
 * 时间: 2017年11月9日 下午1:31:04
 * 版本: @version V1.0
 */
public class StudentAction {
    /**
     * 声明学生模型层对象
     */
    private IStudentService studentService;
    /**
     * 声明一个Student的list集合
     */
    private List<Student> listStu;
    /**
     * @方法名: listStu
     * @描述: 查询学生信息,并跳转到学生列表页
     * @作者: 郎国峰
     * @时间: 2017年11月9日 下午1:32:14
     * @return
     */
    public String listStu(){
        System.out.println("===method:listStu()===");
        //调用模型层查询所有学生的信息
        listStu = studentService.listStu("from Student");
        return "listStu";
    }
    public IStudentService getStudentService() {
        return studentService;
    }
    public void setStudentService(IStudentService studentService) {
        this.studentService = studentService;
    }
    public List<Student> getListStu() {
        return listStu;
    }
    public void setListStu(List<Student> listStu) {
        this.listStu = listStu;
    }
}
IStudentService模型层接口:
package com.laolang.student.service;

import java.util.List;

import com.laolang.student.entity.Student;

/**
* 标题: IStudentService.java
* 路径: com.laolang.student.service
* 描述: Student模型层接口
* 作者: 郎国峰
* 时间: 2017年11月9日 下午3:25:08
* 版本: @version V1.0
 */
public interface IStudentService {
    /**
     * @方法名: listStu
     * @描述: 查询所有学生的信息
     * @作者: 郎国峰
     * @时间: 2017年11月9日 下午6:57:45
     * @param string 传入hql语句
     * @return
     */
    List<Student> listStu(String hql);

}
StudentServiceImpl模型层实现类:
package com.laolang.student.service.impl;

import java.util.List;

import com.laolang.student.dao.IDao;
import com.laolang.student.entity.Student;
import com.laolang.student.service.IStudentService;
/**
 * 标题: StudentServiceImpl.java
 * 路径: com.laolang.student.service.impl
 * 描述: Student模型层实现类
 * 作者: 郎国峰
 * 时间: 2017年11月9日 下午3:29:24
 * 版本: @version V1.0
 */
public class StudentServiceImpl implements IStudentService {
    /**
     * 模型层里的Dao对象
     */
    private IDao dao;

    @Override
    public List<Student> listStu(String hql) {
        List<Student> listStu = dao.listEntity(hql);
        return listStu;
    }
    public IDao getDao() {
        return dao;
    }

    public void setDao(IDao dao) {
        this.dao = dao;
    }

}
listStudent.jsp页面:
<%@ page language="java" contentType="text/html; charset=UTF-8" pageEncoding="UTF-8"%>
<%@ taglib uri="/struts-tags" prefix="s" %>
<!DOCTYPE html PUBLIC "-//W3C//DTD HTML 4.01 Transitional//EN" "http://www.w3.org/TR/html4/loose.dtd">
<html>
<head>
<meta http-equiv="Content-Type" content="text/html; charset=UTF-8">
<title>listStudent</title>
</head>
<body>
    <h1>This is listStudent page</h1>
    <!-- 测试取值 -->
    <table border="1">
        <tr>
            <th>序号</th>
            <th>学生id</th>
            <th>学生姓名</th>
        </tr>
        <s:iterator value="listStu" var="t" status="i">
            <tr>
                <td><s:property value="#i.count"/></td>
                <td><s:property value="#t.stuId"/></td>
                <td><s:property value="#t.stuName"/></td>
            </tr>
        </s:iterator>
    </table>
</body>
</html>
启动项目,发送请求:
跳转到listStudent页,显示数据:

###源码下载 :
链接:http://pan.baidu.com/s/1dFfaJeT 密码:5rj9