环境搭建
1.创建maven项目(jar)
2.pom.xml添加依赖
    <parent>
        <groupId>org.springframework.boot</groupId>
        <artifactId>spring-boot-starter-parent</artifactId>
        <version>1.4.0.RELEASE</version>
    </parent>
    <dependencies>
        <dependency>
            <groupId>org.springframework.boot</groupId>
            <artifactId>spring-boot-devtools</artifactId>
        </dependency>
        <dependency>
            <groupId>org.springframework.boot</groupId>
            <artifactId>spring-boot-starter-web</artifactId>
        </dependency>
        <dependency>
            <groupId>org.springframework.boot</groupId>
            <artifactId>spring-boot-starter-activemq</artifactId>
        </dependency>
    </dependencies>
3.编写引导类
@SpringBootApplication
public class Application {

    public static void main(String[] args) {
        SpringApplication.run(Application.class,args);
    }
}
4.在resources下的application.properties配置文件中添加对应的配置
spring.activemq.broker-url=tcp://192.168.25.131:61616
#此url为activeMQ所在服务器的链接
5.在类中注入JmsMessageTemplate
@Autowired
private JmsMessagingTemplate jmsMessagingTemplate;
6.调用JmsMessageTemplate的方法发送消息
jmsMessagingTemplate.convertAndSend(“queue消息名称”,"消息内容");
在引导类中配置消息类型
Queue
@Bean(name="queue")
public Destination getQueue(){
    return new ActiveMQQueue("queue_test");
}
Topic
@Bean(name="topic")
public Destination getTopic(){
    return new ActiveMQTopic("topic_test");
}
类中注入发送消息类型
在发送消息的类中注入发送消息类型对象Destination
Queue
@Resource(name="queue")
private Destination queue;
Topic
@Autowired
@Qualifier(value="topic")
private Destination topic;
jmsMessageTemplate.convertAndSend(queue,"消息内容");
jmsMessageTemplate.convertAndSend(topic,"消息内容");
@Component
public class ActiveMQConsumer {
    //接收queue消息
    @JmsListener(destination = "queue_test")
    public void handler(String message){
        System.out.println(message);
    }
    //接收topic消息
    @JmsListener(destination = "topic_test")
    public void handlerTopic(String msessage){
        System.out.println(msessage);
    }
}
controller类的方法中添加
@RequestMapping("/send")
public void sendQueue(){
    jmsMessagingTemplate.convertAndSend(queue,"这是Queue的消息");
    jmsMessagingTemplate.convertAndSend(topic,"这是Topic的消息");
}
运行后,在控制台只输出了Queue的消息
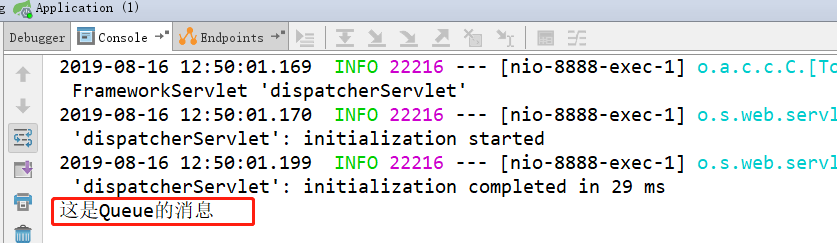
Springboot整合ActiveMQ模式只能监听Queue队列的消息进行处理,所以如何处理topic消息?
解决:
在Springboot的application.properties文件中添加如下内容
spring.jms.pub-sub-domain=true //默认是false,开启发布订阅模式
启动测试
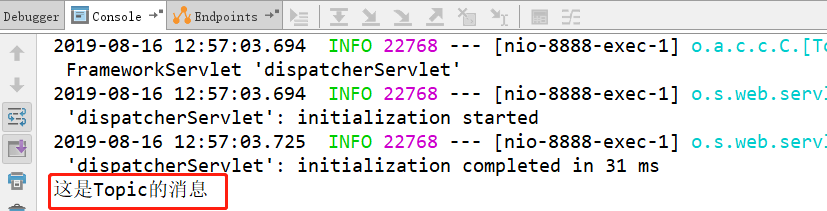
经过上述修改,又只能监听topic的消息,queue的消息又无法获取。
解决:
只有通过自定义监听器类来处理
在监听器类的@JmsListener添加connectionFactory属性
@Component
public class ActiveMQConsumer {
    //接收queue消息
   @JmsListener(destination = "queue_test",containerFactory =
                   "queueListenerContainerFactory")
    public void handler(String message){
        System.out.println(message);
    }
    //接收topic消息
    @JmsListener(destination = "topic_test",containerFactory =
                "topicListenerContainerFactory")
    public void handlerTopic(String msessage){
        System.out.println(msessage);
    }
}
创建一个配置类,在配置类中提供两个监听工厂配置
@Configuration
public class ConsumerConfiguration {

    @Value("${spring.activemq.broker-url}")
    private String host;

    @Bean
    public ConnectionFactory getActiveMqConnection(){
        return new ActiveMQConnectionFactory(host);
    }

    @Bean(name="queueListenerContainerFactory")
    public JmsListenerContainerFactory queueListenerContailerFactory(ConnectionFactory connectionFactory){
        DefaultJmsListenerContainerFactory factory = new DefaultJmsListenerContainerFactory();
        factory.setConnectionFactory(connectionFactory);
        factory.setPubSubDomain(false);
        return factory;
    }
    @Bean(name="topicListenerContainerFactory")
    public JmsListenerContainerFactory topicListenerContainerFactory(ConnectionFactory connectionFactory){
        DefaultJmsListenerContainerFactory factory = new DefaultJmsListenerContainerFactory();
        factory.setConnectionFactory(connectionFactory);
        factory.setPubSubDomain(true);
        return factory;
    }
}
运行测试
