IOS开发学习周报(二)
简介
| 课程名称 | IOS开发实训 | 任课老师 | 郑贵锋老师&字节跳动工程师 |
|---|---|---|---|
| 学号 | 16340015 | 专业(方向) | 软件工程(计应) |
| 姓名 | 陈彬彬 | [email protected] | |
| 开始日期 | 2019/03/23 | 完成日期 | 2019/03/28 |
本周概括
- 掌握Xcode下编程的各种快捷键,熟悉系统执行操作和开发步骤。
- 根据模板项目了解一个IOS项目的工程结构、命名规范等
- 完成文件浏览器项目的开发:
- 实现查看路径下的目录与文件对象信息
- 实现点击目录项继续查看修改后的路径下信息
- 实现点击文件项进入文件详情信息界面
学习记录
XCode快捷键
参考博客:
偏好设置+快捷键大全:https://www.cnblogs.com/Zy-iOS-GS/p/6085545.html
14个常用快捷键总结:http://www.cocoachina.com/ios/20151207/14586.html
内容例子:
-
显示/隐藏导航器面板:Command+0
-
显示/隐藏实用工具面板:Command+Option+0
-
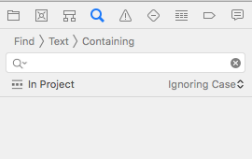
查找(替代)文本:Command+(Option)+F
-
搜索导航器(Find Navigator,也就是搜索):Command+Shift+F
-
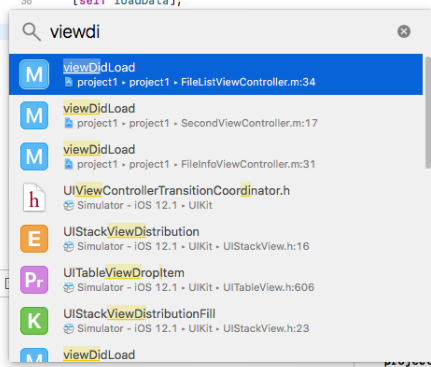
快速打开定位方法: Command + Shift + O
-
运行app: Command + R
-
清除工程: Command + Shift + K
-
构建应用程序: Command + B
-
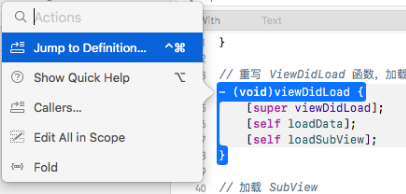
快速帮助: 在类或者方法名上执行Command+ Left-click操作
-
清空控制台:Command + K
开发规范
参考博客:
工作记录
项目要求
实现一个文件浏览器查阅目录文件:
- 实现查看路径下的目录与文件对象信息
- 实现点击目录项继续查看修改后的路径下信息
- 实现点击文件项进入文件详情信息界面
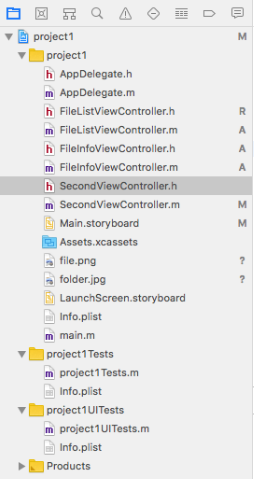
项目结构
文件服务
实现要求:
- 根据路径获取当前路径下所有目录和文件名信息
- 根据文件名获取文件详情信息
文件相关操作:
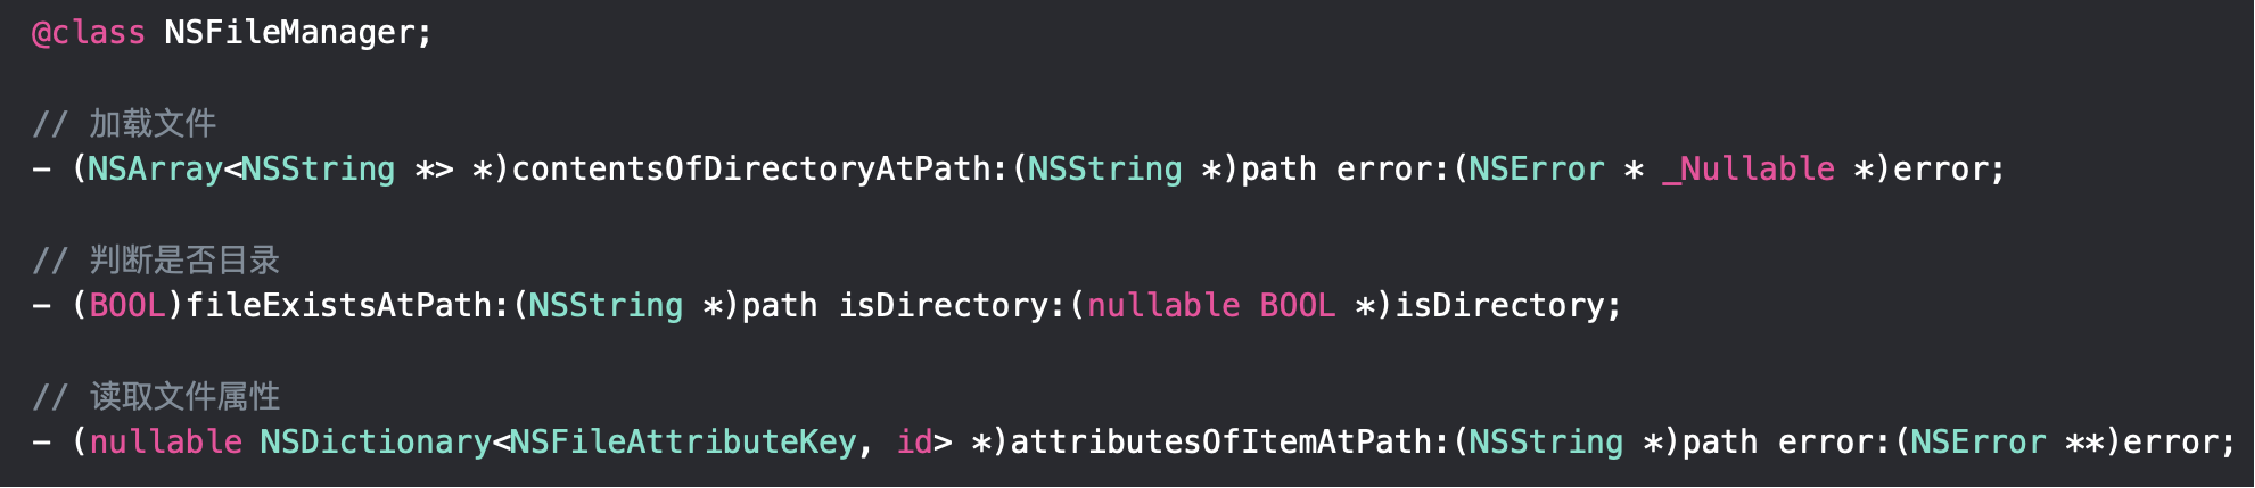
关键代码:
- 获取路径下所有目录和文件名信息,去除隐藏文件,然后按照文件夹和文件属性,分成两个
NSMutableArray
// 加载 Data, 方法使用于 ViewDidLoad()中
- (void)loadData {
    // 获取 NSFileManager
    self.fileManager = [NSFileManager defaultManager];
    // 获取文件路径 dirPath
    if(self.dirPath == nil) {
        self.dirPath = @"/Users/chenbb6";
    }
    // 获取当前路径下的所有文件与目录信息
    NSArray *contentList = [self.fileManager contentsOfDirectoryAtPath: self.dirPath error: nil];
    // 过滤隐藏文件,分层文件与文件文件夹
    self.fileList = [NSMutableArray array];
    self.folderList = [NSMutableArray array];
    for (NSString *name in contentList) {
        if ([name hasPrefix:@"."]) {
            continue;
        }
        // 根据 dirPath + name 获得文件/文件夹全目录
        NSString *path = [self.dirPath stringByAppendingPathComponent:name];
        BOOL isDirectory = NO;
        // 判断全目录是文件还是文件夹
        [self.fileManager fileExistsAtPath:path isDirectory:&isDirectory];
        if(isDirectory) {
            [self.folderList addObject:name];
        }
        else {
            [self.fileList addObject:name];
        }
    }
}
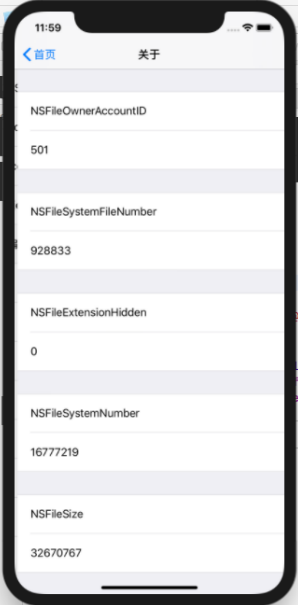
- 获取绝对路径下文件名对应的详情信息
// 加载 Data, 方法使用于 ViewDidLoad()中
// self.fileAttr.allKeys 获取详情键值队列
// self.fileAttr.allValues 获取详情信息队列
- (void)loadData {
    NSLog(@"loaddata");
    self.fileManager = [NSFileManager defaultManager];
    self.fileAttr = [self.fileManager attributesOfItemAtPath:self.fileDir error:nil];
}
UI编程
实现效果:
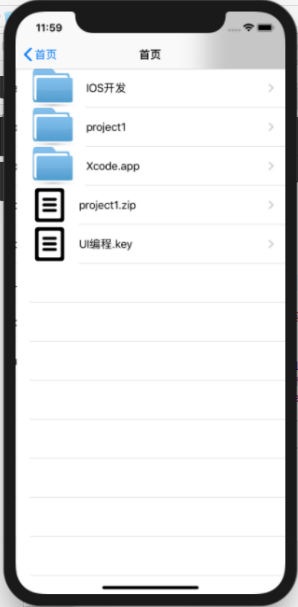
主要使用控件:
-
UITableView
UITableView有两种样式:
- UITableViewStyleGrouped
- UITableViewStylePlain
-
UILable
-
UIImageView
关键代码:
以 FileListViewController 类展示路径下信息类为例:
- 定义类,使用
UITableView,实现两个protocol协议,UITableViewDelegate,UITableViewDataSource:
@interface FileListViewController ()<UITableViewDelegate, UITableViewDataSource>

@property(nonatomic, strong) UITableView *tableView;
@property(nonatomic, strong) NSFileManager *fileManager;
@property(nonatomic, strong) NSString *dirPath;
@property(nonatomic, strong) NSMutableArray<NSString *> *fileList;
@property(nonatomic, strong) NSMutableArray<NSString *> *folderList;

@end
viewDidLoad() 中 加载 SubView
// 重写 ViewDidLoad 函数,加载 SubView 和 Data
- (void)viewDidLoad {
    [super viewDidLoad];
    [self loadData];
    [self loadSubView];
}
// 加载 SubView
- (void)loadSubView {
    self.title = @"首页";
    self.navigationItem.title = @"首页";
    self.tableView = ({
        UITableView *tableView = [[UITableView alloc] initWithFrame:self.view.bounds style:UITableViewStylePlain];
        tableView.delegate = self;
        tableView.dataSource = self;
        tableView;
    });
    [self.view addSubview:self.tableView];
}
- 实现
UITableViewDataSource协议内函数,绑定数据源
// 返回TableView中一共有几个分区
// 这里将路径下对象信息分成了文件夹队列和文件队列两个分区
- (NSInteger) numberOfSectionsInTableView:(UITableView *) tableView {
    return 2;
}
// 返回对应分区下的TableView行数
// 这里对应返回相应数据队列中的count数量
- (NSInteger)tableView:(UITableView *)tableView numberOfRowsInSection:(NSInteger)section {
    // folderList
    if(section == 0) {
        return self.folderList.count;
    }
    // fileList
    return self.fileList.count;
}
// 返回TableView下每个Cell的样式
// (相当于安卓RecyclerView内Item的样式定义)
// 同样分成两种情况,图片区分两种分区,文本显示目录或文件名
- (UITableViewCell *)tableView: (UITableView *)tableView cellForRowAtIndexPath:(NSIndexPath *)indexPath {
    NSString * cellID = [NSString stringWithFormat:@"cellID:%zd", indexPath.section];
    UITableViewCell *cell = [tableView dequeueReusableCellWithIdentifier:cellID];
    if(nil == cell) {
        cell = [[UITableViewCell alloc] initWithStyle:UITableViewCellStyleDefault reuseIdentifier: cellID];
    }
    // folderList
    if(indexPath.section == 0) {
        cell.textLabel.text = self.folderList[indexPath.row];
        cell.imageView.image = [UIImage imageNamed:@"folder.jpg"];
        cell.accessoryType = UITableViewCellAccessoryDisclosureIndicator;
    }
    // fileList
    else {
        cell.textLabel.text = self.fileList[indexPath.row];
        cell.imageView.image = [UIImage imageNamed:@"file.png"];
        cell.accessoryType = UITableViewCellAccessoryDisclosureIndicator;
    }
    return cell;
}
- 实现
UITableViewDelegate协议内函数,实现点击TableView中Cell的响应。具体看下一部分“页面跳转”
页面跳转
Main.storyboard 操作 :
- 添加
Navigation Controller - 建立新的
Tab Bar Controller -> Navigation Controller -> Root View Controller的连接关系 delete键两次删除连线关系,win键盘ctrl + left click拖动建立新的连线关系
【动图】简单展示操作流程
关键代码:
以 FileListViewController 类为例:
点击目录文件,跳转到一个新的 FileListViewController 界面
点击文件,跳转到文件信息详情 FileInfoViewController 界面
-(void)tableView:(UITableView *)tableView didSelectRowAtIndexPath:(NSIndexPath *)indexPath {
    [tableView deselectRowAtIndexPath:indexPath animated:YES];
    // folderList
    if(indexPath.section == 0) {
        NSString *path = [self.dirPath stringByAppendingPathComponent:self.folderList[indexPath.row]];
        FileListViewController *controller = [[FileListViewController alloc] initWithDirPath:path];
        controller.hidesBottomBarWhenPushed = YES;
        [self.navigationController pushViewController:controller animated:YES];
    }
    // fileList
    else {
        NSString *fileDir = [self.dirPath stringByAppendingPathComponent:self.fileList[indexPath.row]];
        SecondViewController *controller = [[FileInfoViewController alloc] initWithFileDir:fileDir];
        controller.hidesBottomBarWhenPushed = YES;
        [self.navigationController pushViewController:controller animated:YES];
    }
}
项目效果
【动图】虚拟机+模拟器运行:比较卡顿
总结
这一周IOS学得就更加充实了,比起上一周,这周的讲课节奏速度还要更加快一点,很快地就讲完了基础的UI设计,基础的网络访问和简单的文件存储,比安卓开发课程的节奏要快很多。
同样比较郁闷的还是设备问题,这周开始在自己电脑上用VMware装Mac OS的虚拟机,虽然解决了能随时使用设备的问题,但是很糟糕的一点是,虚拟机太卡了,开机5分钟,还要在虚拟机中用模拟器模拟苹果手机应用运行的情况,实在是让人有点受不了。
这周收获也很大,至少自己也开始了第一个IOS的项目,涉及到了UI编程、文件服务、页面跳转等知识点,还是有一定难度的,不过感觉可以使用纯代码的方式去完成页面跳转,而不需要去手动调整 Main.storyboard, 总觉得这不符合规范,后续还要再深入理解一下 UITabBarController,UINavigationController,UIViewController 之间的联系与作用。