前面学习了Struts2和Hibernate。
Struts2主要是用来控制业务层面逻辑和显示,告诉你什么时候走哪个action,跑去运行哪个class的什么方法,后面调到哪个jsp。
Struts2需要配置的struts.xml, 配置对应的action和jsp表单页面。
struts2包含的主要功能有哪些: 参数自动封装、参数自动转换、输入校验、拦截器、OGNL、值栈、actionContext、标签、国际化、上下文传载等。
Hibernate主要是让程序员少做Mysql操作 ,通过操作POJO这个Javabean实体来来操作数据表。---让程序员集中精力在业务上。
hibernate需要配置xxx.hbm.xml 负责映射POJO类和数据表 hibernate.cfg.xml负责连接数据库和一些数据库配置。
配置了上面两个xml就可以使用hibernate,里面也有一些特定的类:Configuration SessionFactory Session Transaction
那么Spring是用来做什么?希望 用过这个学习能明白Spring是用来干啥的,简单例子是啥?
下面文章基本是学习并参考了他们的帖子,自己按照所学实现后写的记录。想看原文请看最后附录连接!
以前也看过几次Spring,不过工作中没有用就这样忘掉了。但是其中有几个重要概念:控制反转IOC(Inverse of control),面向切面编程AOP(Aspect Oriented Programming),依赖注入DI(Dependency Injection),JavaBean等概念。现在也基本忘了。也不知道是用来干嘛的。学完后一定要能理解这个概念是用来干嘛的。
下面先来给一个例子:该添加的Jar包添加进去。
一、什么是IOC
在Spring里面也有一个配置文件:applicationContext.xml 名字不固定。就是xxx.xml用来配置bean的。
下面看我们的bean.xml, 一般直接放在src路径下:
 1 <?xml version="1.0" encoding="UTF-8"?>
 2 <beans xmlns="http://www.springframework.org/schema/beans" xmlns:xsi="http://www.w3.org/2001/XMLSchema-instance"
 3     xmlns:context="http://www.springframework.org/schema/context" xmlns:util="http://www.springframework.org/schema/util"
 4     xmlns:jee="http://www.springframework.org/schema/jee" xmlns:tx="http://www.springframework.org/schema/tx"
 5     xmlns:jpa="http://www.springframework.org/schema/data/jpa" xmlns:mvc="http://www.springframework.org/schema/mvc"
 6     xsi:schemaLocation="
 7         http://www.springframework.org/schema/beans http://www.springframework.org/schema/beans/spring-beans-3.2.xsd
 8         http://www.springframework.org/schema/context http://www.springframework.org/schema/context/spring-context-3.2.xsd
 9         http://www.springframework.org/schema/util http://www.springframework.org/schema/util/spring-util-3.2.xsd
10         http://www.springframework.org/schema/jee http://www.springframework.org/schema/jee/spring-jee-3.2.xsd
11         http://www.springframework.org/schema/tx http://www.springframework.org/schema/tx/spring-tx-3.2.xsd
12         http://www.springframework.org/schema/data/jpa http://www.springframework.org/schema/data/jpa/spring-jpa-1.3.xsd
13         http://www.springframework.org/schema/mvc http://www.springframework.org/schema/mvc/spring-mvc-3.2.xsd">
14     <!-- 上面这些是标准添加 -->
15
16     <!-- 配置bean Id 和对应的class,一个bean一个Id对应一个Class -->
17     <bean id = "computer" class="bean.Computer">
18         <!-- property 用来配置类的属性 -->
19         <property name="brand" value="HP"></property>
20         <property name="colour" value="Red"></property>
21     </bean>
22
23 </beans>
上面我们在Spring容器applicationContext.xml(暂时可以这么理解)中把这个类注册为javaBean。
注意上面说的Spring容器这个概念。
然后看我们的JavaBean类Computer.java
 1 package bean;
 2
 3 public class Computer {
 4
 5     private String brand;
 6     private String colour;
 7     /**
 8      * @return the brand
 9      */
10     public String getBrand() {
11         return brand;
12     }
13     /**
14      * @param brand the brand to set
15      */
16     public void setBrand(String brand) {
17         this.brand = brand;
18     }
19     /**
20      * @return the colour
21      */
22     public String getColour() {
23         return colour;
24     }
25     /**
26      * @param colour the colour to set
27      */
28     public void setColour(String colour) {
29         this.colour = colour;
30     }
31     /* (non-Javadoc)
32      * @see java.lang.Object#toString()
33      */
34     @Override
35     public String toString() {
36         return "Computer [brand=" + brand + ", colour=" + colour + "]";
37     }
38 }
添加我们的测试类:
 1 package test;
 2
 3 import org.springframework.context.ApplicationContext;
 4 import org.springframework.context.support.ClassPathXmlApplicationContext;
 5
 6 import bean.Computer;
 7
 8 public class TestComputer {
 9
10     public static void main(String[] args) {
11         //定义我们配置的bean.xml
12         String conf = "applicationContext.xml";
13         //加载bean.xml
14         ApplicationContext ac = new ClassPathXmlApplicationContext(conf);
15         //通过ApplicationContext来直接获取对象,不再需要new一个实例
16         Computer computer = ac.getBean("computer", Computer.class);
17         Computer computer1 = ac.getBean(Computer.class);
18
19         System.out.println(computer);
20         System.out.println(computer1);
21     }
22
23 }
运行输出:
Apr 03, 2019 4:55:19 PM org.springframework.context.support.ClassPathXmlApplicationContext prepareRefresh
INFO: Refreshing org.springframework.context.support.ClassPathXmlApplicationContext@61e717c2: startup date [Wed Apr 03 16:55:19 CST 2019]; root of context hierarchy
Apr 03, 2019 4:55:19 PM org.springframework.beans.factory.xml.XmlBeanDefinitionReader loadBeanDefinitions
INFO: Loading XML bean definitions from class path resource [applicationContext.xml]
Computer [brand=HP, colour=Red]
Computer [brand=HP, colour=Red]
至此,这个项目就完成了,大家有没有发现什么!
我们Computer类我们没有自己实例化啊,怎么可以直接用?其实整个流程是这样的,
我们刚开始写了个Computer类;
然后在applicationContext.xml文件,即,Spring容器,把这个类注册到这个容器中,这就是一个JavaBean,并且为其属性设置了值;
接下来在TestCompute类中,实例化了这个Spring容器(不理解这句话),从这个容器中拿到Computer的类对象,并且输出。
在这个过程中我们没有自己实例化Computer类,是Spring容器帮我们实例化了,这个实例化的举动由我们程序员交给了Spring容器来实现,这就是控制反转,IOC。
所以说,所谓的控制反转,就是在Spring中我们不再需要去自己new一个实例对象,在配置好的bean.xml下,我们可以直接get对象。
到此,我们可以知道Spring的第一个功能就是帮我们创建实例。
当然Spring也同样可以通过注解来进行上面的配置,不通过bean.xml来配置。
这个地方有个需要注意的,就是一个类里面的属性不是基本数据类型,而是其他类,那么通过Spring创建这个类的时候,里面的类属性也会被赋值。(但是这个属性类是怎么被创建的呢???)
二、依赖注入(DI)
依赖注入(DI):spring创建对象A时,会将对象A所依赖的对象B也创建出来,并自动注入到对象A中。
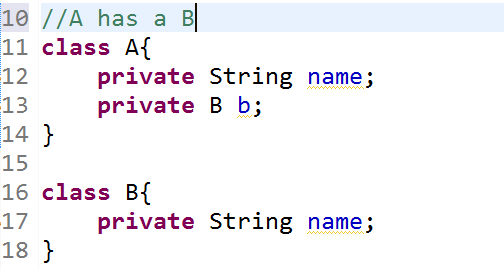
依赖:(has a) 有一个的意思,比如类A中有一个类B,那么就说A依赖B。 继承,实现(is a)
而我们说的依赖注入,就是当创建A对象时,同时会将B对象给创建,并自动注入到对象A中去,也就说,我只叫spring给我A对象,但是A中可以使用B对象了。这个有很大的用处,但如何去实现依赖注入功能呢?下面有个例子:
 1 package dao;
 2
 3 public class UserDao {
 4
 5     public void addUser(){
 6         System.out.println("UserDao。。。。。");
 7         System.out.println("依赖注入。。。。。");
 8     }
 9
10 }
11
12 package service;
13
14 import dao.UserDao;
15
16 public class UserService {
17
18     private UserDao userDao;
19
20     /**
21      * @param userDao the userDao to set
22      */
23     public void setUserDao(UserDao userDao) {
24         this.userDao = userDao;
25     }
26
27     public void addUser(){
28         System.out.println("UserService。。。。。。。");
29         userDao.addUser();
30     }
31
32 }
UserService中有使用userDao对象,这个我们都很熟悉的使用伎俩,service层调用dao层的方法。按照往常我们的写法,在service中需要自己new出UserDao对象,但是在spring中就不需要了,一切对象都让spring帮我们创建。
ApplicationContext.xml
 1 <?xml version="1.0" encoding="UTF-8"?>
 2 <beans xmlns="http://www.springframework.org/schema/beans" xmlns:xsi="http://www.w3.org/2001/XMLSchema-instance"
 3     xmlns:context="http://www.springframework.org/schema/context" xmlns:util="http://www.springframework.org/schema/util"
 4     xmlns:jee="http://www.springframework.org/schema/jee" xmlns:tx="http://www.springframework.org/schema/tx"
 5     xmlns:jpa="http://www.springframework.org/schema/data/jpa" xmlns:mvc="http://www.springframework.org/schema/mvc"
 6     xsi:schemaLocation="
 7         http://www.springframework.org/schema/beans http://www.springframework.org/schema/beans/spring-beans-3.2.xsd
 8         http://www.springframework.org/schema/context http://www.springframework.org/schema/context/spring-context-3.2.xsd
 9         http://www.springframework.org/schema/util http://www.springframework.org/schema/util/spring-util-3.2.xsd
10         http://www.springframework.org/schema/jee http://www.springframework.org/schema/jee/spring-jee-3.2.xsd
11         http://www.springframework.org/schema/tx http://www.springframework.org/schema/tx/spring-tx-3.2.xsd
12         http://www.springframework.org/schema/data/jpa http://www.springframework.org/schema/data/jpa/spring-jpa-1.3.xsd
13         http://www.springframework.org/schema/mvc http://www.springframework.org/schema/mvc/spring-mvc-3.2.xsd">
14     <!-- 上面这些是标准添加 -->
15
16     <!-- 用来创建UserDao对象-->
17     <bean id = "UserDao" class = "dao.UserDao"></bean>
18
19     <!-- 创建UserService对象
20         property对其对象中进行依赖注入过程,底层将执行setter()方法
21         name在UserService对象中UserDao对象的属性名
22         ref创建userDao对象的beanId -->
23     <bean id = "UserService" class = "service.UserService">
24         <property name="userDao" ref="UserDao"></property>
25     </bean>
26
27
28
29 </beans>
过程如下:先创建UserService对象,然后在根据property中的ref找到userDaoId并创建UserDao对象,然后根据property中的name,通过setter方法注入,这样就完成了依赖注入。测试如下:
 1 package service;
 2
 3 import org.springframework.context.ApplicationContext;
 4 import org.springframework.context.support.ClassPathXmlApplicationContext;
 5
 6 public class Test {
 7
 8     public static void main(String[] args) {
 9
10         String conf = "applicationContext.xml";
11
12         ApplicationContext ac = new ClassPathXmlApplicationContext(conf);
13
14         UserService userService = ac.getBean("UserService", UserService.class);
15
16         userService.addUser();
17     }
18
19 }
运行结果如下:
Apr 04, 2019 4:38:00 PM org.springframework.context.support.ClassPathXmlApplicationContext prepareRefresh
INFO: Refreshing org.springframework.context.support.ClassPathXmlApplicationContext@61e717c2: startup date [Thu Apr 04 16:38:00 CST 2019]; root of context hierarchy
Apr 04, 2019 4:38:00 PM org.springframework.beans.factory.xml.XmlBeanDefinitionReader loadBeanDefinitions
INFO: Loading XML bean definitions from class path resource [applicationContext.xml]
UserService。。。。。。。
UserDao。。。。。
依赖注入。。。。。
所谓的依赖注入:我们JavaBean中的参数都是通过setXXX()进去的,特别是当XXX不是一个基本类型数据,而是一个接口的时候,我们set进去就应该是它的实现子类。假如有多个实现子类,我们set进去是哪个就是哪个。这个就是依赖注入。所以从这个角度来看,依赖注入并不需要我们来做什么,就是一个常规 的赋值。
依赖注入也分两种方式:1:通过构造器注入; 2:通过setter方式注入
之前讲的那个依赖注入其实也属于属性依赖注入这一范畴中,在最开始我们演示IOC(控制反转)也就是spring帮我们创建实例时,那只是通过无参构造方法进行创建,那么在实际开发中,这样创建肯定是不行的,所以我们需要在spring的配置文件中配置一些属性信息,使spring帮我们创建时,可以直接将对象的一些属性也注入进去,有两种方法:
通过构造方法注入
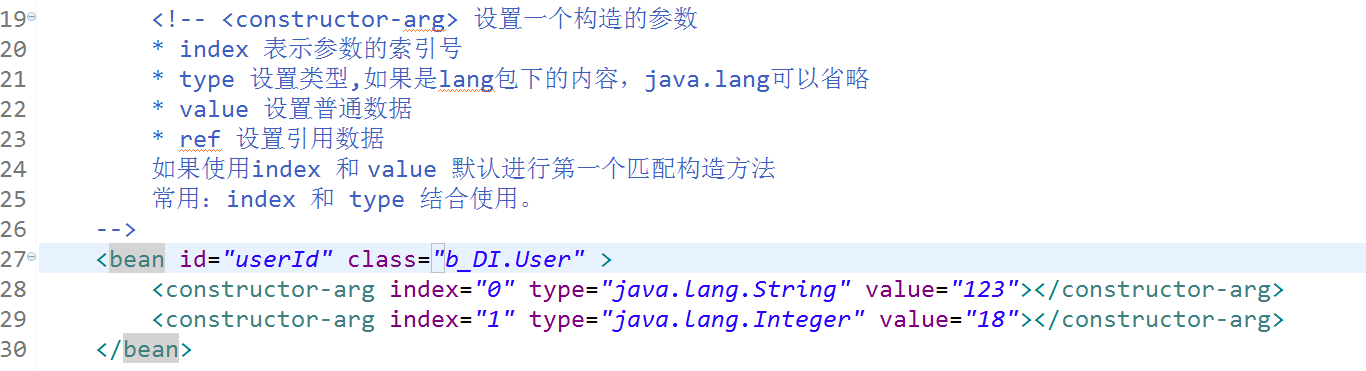
不管是普通属性还是引用数据,都可以通过构造方法进行注入。通过setter方法进行注入,
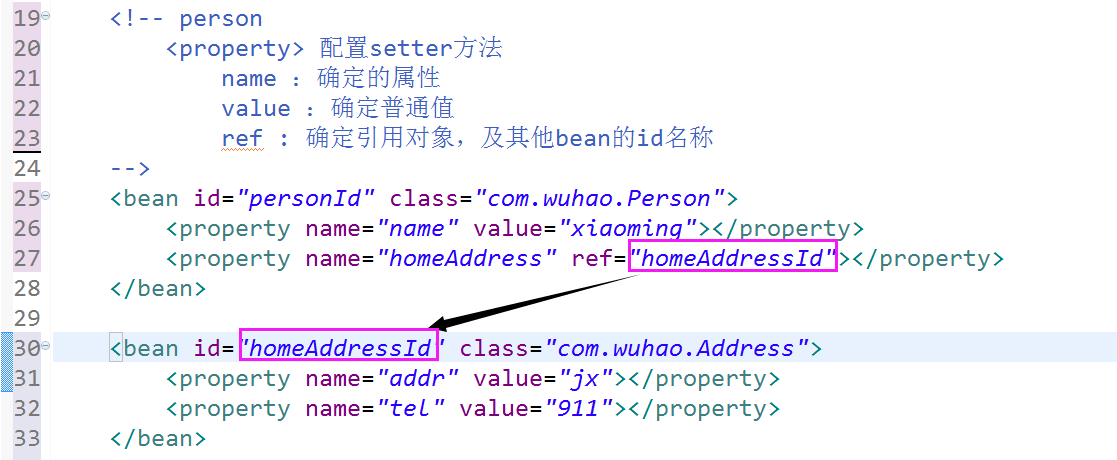
通过setter方法对普通属性和引用属性进行注入,那么要是创建的对象中有集合呢?那该如何进入注入?
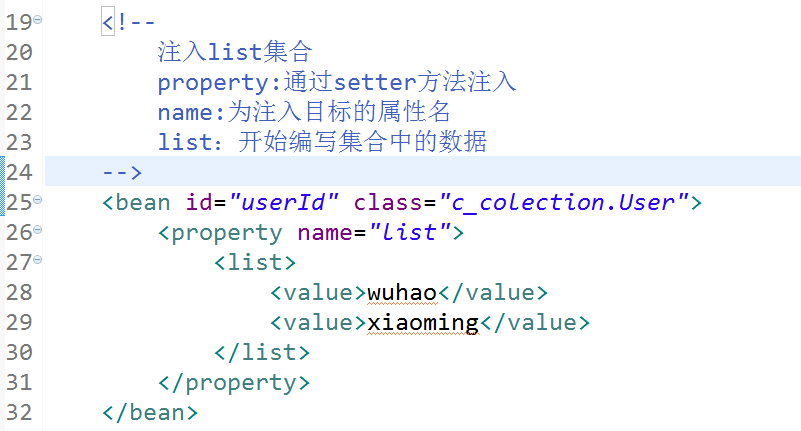
集合的注入List、Map、Set、数组、Properties等。
List
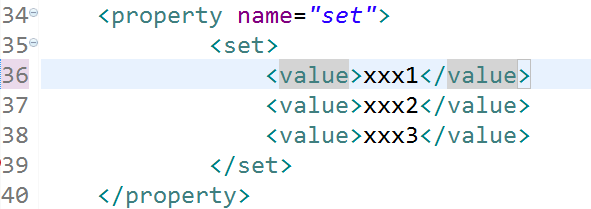
set
map

数组

propertyis
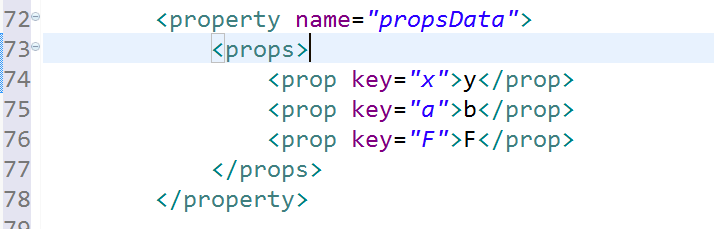
注意:properties这种类型存放形式跟map差不多,以key和value进行存放的,
![]()
到这里,基本上就把所有能够注入的属性类型都讲解完了,注入的类型基本上分为三块,普通类型,引用类型和集合。下面在讲一种基于注解来注入各种,因为基于xml感觉很麻烦。
属性依赖注入基于注解
注解格式:@xxx
使用注解:必须对使用注解的地方进行扫描,不然注解没用。而扫描需要做两件事
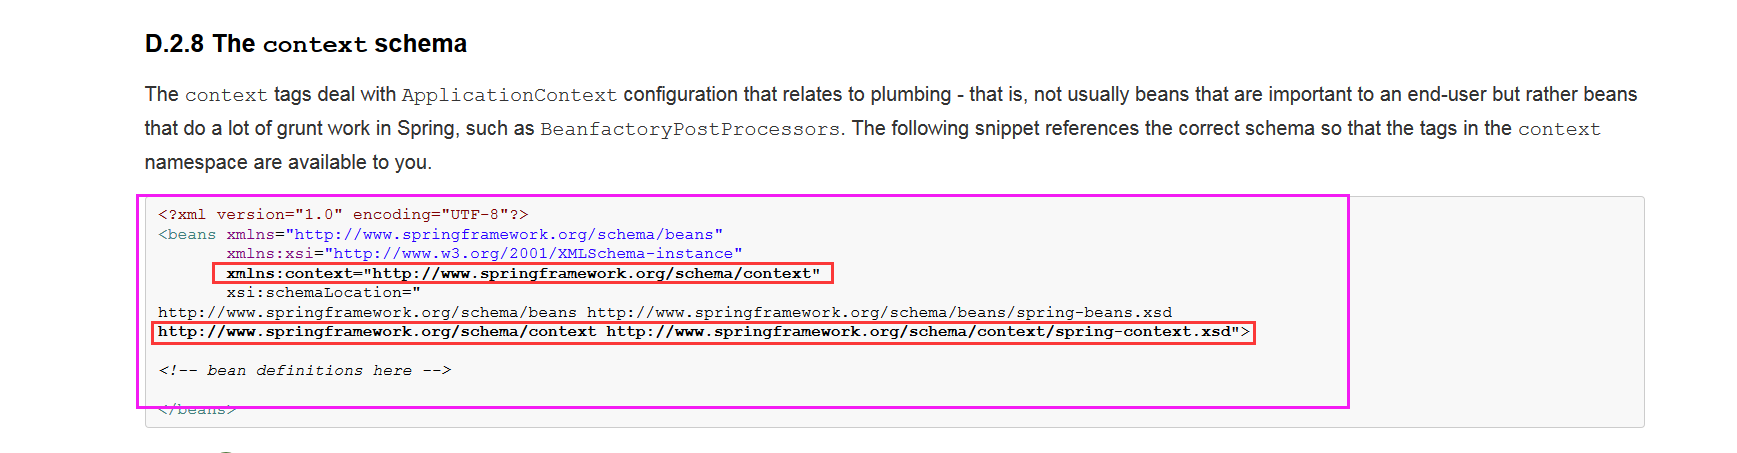
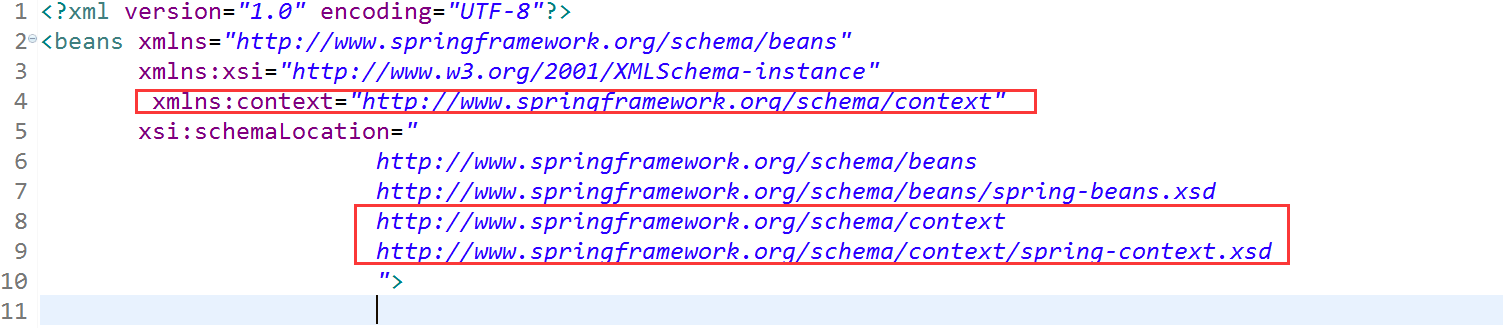
1、添加名称空间,
在我们找配置文件中约束的位置那:spring-framework-3.2.0.RELEASE\docs\spring-framework-reference\html\xsd-config.html 找到context的名称空间。
2、扫描指定的目录,

注解:
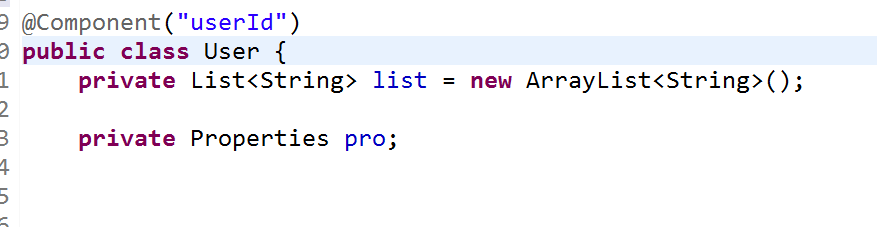
1、@Component 替代 <bean id="" class=""> 可以配置任意bean,在所在类上面添加该注解即可,
@Component("userId") userId相当于bean中的id属性值
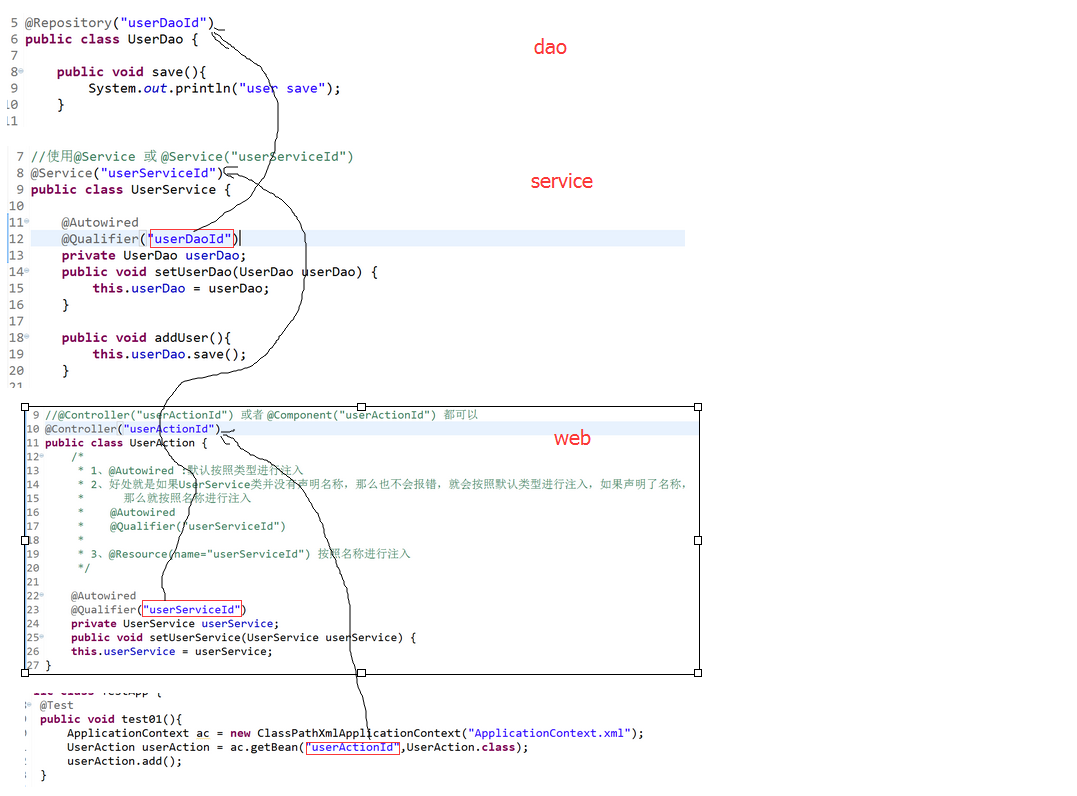
2、 这三个就跟使用@Component是一样的,但是为了更好的体现三层架构,就有了这三个注解
@Controller 修饰web层中的类。
@Service 修饰service层的类
@Repository 修饰dao层的类
两种方式,一种不声明名称,一种声明名称
@Controller("xxx") @Controller
如果声明了名称,那么在别的地方引用的话,就可以使用@Autowired或@Autowired与@Qualifier的组合 或直接使用@Resource按照名称注入
如果没有声明名称,那么在别的地方引用的话,只能使用@Autowired 来进行注入
3、属性注入
普通属性
@Value @Value("") 给普通属性注入属性值
引用属性
@Autowired 按默认类型进行注入
@Qualifier("") 按照名称注入
如果使用了@Qualifier这个注解,那么就需要两个一起使用才能生效。如果只使用@Autowired,那么写不写@Qualifier都可以
引用属性
@Resource 直接按照名称注入,与上面两个注解一起使用是等效的
@Resource(name="xxx")
4、使用
5、其他注解
@Scope("prototype") 作用域注解(spring帮我们创建的bean实例的作用域,在下面会讲解到)
@PostConstruct 修饰初始化
@PreDestory 修饰销毁
最后两个用的不多,掌握前面的即可。
细细回想上面的两个概念:控制反转(IOC)和依赖注入(DI)。
https://www.cnblogs.com/whgk/p/6616593.html---