IOC
IoC(Inversion of Control)控制反转,是一种设计思想,不同于在传统的程序中我们主动的创建依赖对象,在IoC中我们把所有对象都交给第三方(即容器)来创建和管理
- 谁控制谁,控制什么:传统Java SE程序设计,我们直接在对象内部通过new进行创建对象,是程序主动去创建依赖对象;而IoC是有专门一个容器来创建这些对象,即由IoC容器来控制对 象的创建;谁控制谁?当然是IoC 容器控制了对象;控制什么?那就是主要控制了外部资源获取(不只是对象包括比如文件等)。
- 反转:传统应用程序是由我们自己在对象中主动控制去直接获取依赖对象,反转则是由容器来帮忙创建及注入依赖对象;为何是反转?因为由容器帮我们查找及注入依赖对象,对象只是被动的接受依赖对象,所以是反转;哪些方面反转了?依赖对象的获取被反转了。
- IoC很好的体现了面向对象设计法则之一—— 好莱坞法则:“别找我们,我们找你”;即由IoC容器帮对象找相应的依赖对象并注入,而不是由对象主动去找。
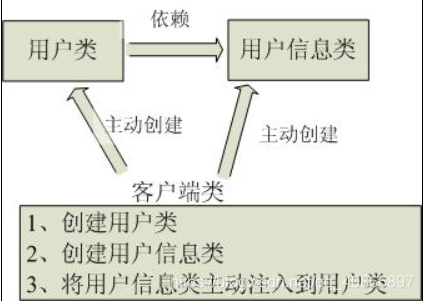
传统程序设计,都是主动去创建相关对象然后再组合起来:

当有了IoC/DI的容器后,在客户端类中不再主动去创建这些对象了

DI
DI(Dependency Injection,依赖注入) IoC的一个重点是在系统运行中,动态的向某个对象提供它所需要的其他对象。这一点是通过DI(Dependency Injection,依赖注入) 来实现的。比如对象A需要操作数据库,以前我们总是要在A中自己编写代码来获得一个Connection对象,有了 spring我们就只需要告诉spring,A中需要一个Connection,至于这个Connection怎么构造,何时构造,A不需要知道。在系统运行时,spring会在适当的时候制造一个Connection,然后像打针一样,注射到A当中,这样就完成了对各个对象之间关系的控制。A需要依赖 Connection才能正常运行,而这个Connection是由spring注入到A中的,依赖注入的名字就这么来的。那么DI是如何实现的呢? Java 1.3之后一个重要特征是反射(reflection),它允许程序在运行的时候动态的生成对象、执行对象的方法、改变对象的属性,spring就是通过反射来实现注入的。
理解DI的关键是:“谁依赖谁,为什么需要依赖,谁注入谁,注入了什么”,
- 谁依赖于谁:当然是应用程序依赖于IoC容器;
- 为什么需要依赖:应用程序需要IoC容器来提供对象需要的外部资源;
- 谁注入谁:很明显是IoC容器注入应用程序某个对象,应用程序依赖的对象;
- 注入了什么:就是注入某个对象所需要的外部资源(包括对象、资源、常量数据)。
使用spring
工具:IDEA,Maven
pom.xml
    <dependencies>
        <dependency>
            <groupId>org.springframework</groupId>
            <artifactId>spring-context</artifactId>
            <version>5.1.6.RELEASE</version>
        </dependency>
    </dependencies>
bean.xml,Bean可以理解成我们所说的对象,通过配置文件将bean注册到spring中,交由spring来管理
<?xml version="1.0" encoding="UTF-8"?>
<beans xmlns="http://www.springframework.org/schema/beans"
       xmlns:xsi="http://www.w3.org/2001/XMLSchema-instance"
       xsi:schemaLocation="http://www.springframework.org/schema/beans http://www.springframework.org/schema/beans/spring-beans.xsd">
    <!--把对象的创建交给spring来管理-->
    <bean id="accountService" class="com.lb.Service.impl.AccountServiceImpl"/>
    <bean id="accountDao" class="com.lb.dao.impl.AccountDaoImpl"/>
</beans>
获取IoC容器
spring可通过ApplicationContext和BeanFactory两个接口来获得IoC容器
ApplicationContext三个常用实现类
- ClassPathXmlApplicationContext:可以加载类路径下的配置文件,要求配置文件必须在类路径下,不在的话,加载不了。(常用)
- FileSystemXmlApplicationContext: 可以加载磁盘任意路径下的配置文件(必须有访问权限)
- AnnotationConfigApplicationContext:用于读取注解创建容器的
ApplicationContext:立即加载方式,一读取完配置文件,就创建对象 (适合单例对象)
BeanFactory: 延迟加载方式,什么时候要获取对象,什么时候才创建对象(适合多例对象)
        //------------ApplicationContext----------------
        ApplicationContext applicationContext = new ClassPathXmlApplicationContext("bean.xml");
//        ApplicationContext applicationContext = new FileSystemXmlApplicationContext("C:\\work\\bean.xml");
        //根据id获取bean对象
        IAccountService accountService = (IAccountService) applicationContext.getBean("accountService");
        IAccountDao accountDao =  applicationContext.getBean("accountDao",IAccountDao.class);
        System.out.println(accountService);
        System.out.println(accountDao);
        accountService.saveAccount();
        //------------BeanFactory----------------
        Resource resources = new ClassPathResource("bean.xml");
        BeanFactory factory = new XmlBeanFactory(resources);
        IAccountService accountService = (IAccountService) factory.getBean("accountService");
        System.out.println(accountService);
创建bean的三种方法
1.使用默认构造函数创建
在spring的配置文件中使用bean标签,配以id和class属性之后,且没有其他属性和标签时,采用的就是默认构造函数创建bean对象,如果没有默认构造函数,则对象无法创建
<bean id="accountService" class="com.lb.Service.impl.AccountServiceImpl"/>
2.使用普通工厂中的方法创建对象(使用某个类中的方法创建对象,并存入spring容器)
    <bean id="InstanceFactory" class="com.lb.factory.InstanceFactory"/>
    <bean id="accountService" factory-bean="InstanceFactory" factory-method="getAccountService"/>
3.使用静态工厂中的静态方法创建对象,并存入spring容器
<bean id="accountService" class="com.lb.factory.StaticFactory" factory-method="getAccountService"/>
bean的作用范围和生命周期
bean标签的scope属性:指定bean的作用范围
- singleton 单例(默认)
- prototype 多例
- request 作用于web应用的请求范围
- session 作用于web应用的会话范围
- global-session 作用于集群环境的会话范围(全局会话范围),不受集群环境时,就是session
<bean id="accountService" class="com.lb.Service.impl.AccountServiceImpl" scope="prototype"/>
bean的生命周期
单例
出生:当容器创建时对象出生
活着:只要容器还在,对象一直活着
死亡:容器销毁,对象消亡
单例对象的生命周期和容器相同
多例
出生:对象使用了,才出生
活着:对象只要在使用就一直活着
死亡:对象长时间不用时,且没有别的对象引用时,由Java的垃圾回收器回收
spring中的依赖注入
能注入的三种数据类型
- 基本类型和string
- 其他bean类型(在配置文件中或注解过的bean)
- 复杂类型/集合类
注入的三种方式
- 使用构造函数提供
- 使用set方法提供
- 使用注解
构造函数注入
使用的标签:constructor-arg
属性:
- type:用于指定要注入的数据的数据类型,该类型也是构造函数中某个或某些的类型
- index:用于指定要注入的数据给构造函数中指定索引位置的参数赋值,索引从0开始
- name:用于指定给构造函数中指定名称的参数赋值
- value:用于指定基本类型和string类型的数据
- ref:用于指定其他的bean类型数据
demo
注:因为Date不属于基本类型,所有需要配置一个Date的bean,由ref指向这个bean
public class AccountServiceImpl implements IAccountService {

    private String name;
    private int age;
    private Date birthday;

    public AccountServiceImpl(String name, int age, Date birthday) {
        this.name = name;
        this.age = age;
        this.birthday = birthday;
    }

    @Override
    public void saveAccount() {
        System.out.println("Service中的account方法"+name+","+age+","+birthday);
    }

}
-------------------------
<bean id="accountService" class="com.lb.Service.impl.AccountServiceImpl">
        <constructor-arg name="name" value="林北"/>
        <constructor-arg name="age" value="21"/>
        <constructor-arg name="birthday" ref="time"/>
 </bean>
 <!--配置一个日期对象-->
    <bean id="time" class="java.util.Date"/>
---------
        IAccountService accountService = (IAccountService) applicationContext.getBean("accountService");
        accountService.saveAccount();

set方法注入
使用的标签:property
属性:
- name:用于指定注入时所调用的set方法名称
- value:用于提供基本类型和string类型的数据
- ref:用于指定其他的bean类型数据
demo
public class AccountServiceImpl2 implements IAccountService {

    private String name;
    private int age;
    private Date birthday;

    public void setName(String name) {
        this.name = name;
    }

    public void setAge(int age) {
        this.age = age;
    }

    public void setBirthday(Date birthday) {
        this.birthday = birthday;
    }

    @Override
    public void saveAccount() {
        System.out.println("Service中的account方法"+name+","+age+","+birthday);
    }

}
------
    <bean id="accountService2" class="com.lb.Service.impl.AccountServiceImpl2">
        <property name="name" value="柠檬百事"/>
        <property name="age" value="20"/>
        <property name="birthday" ref="time"/>
    </bean>
    <!--配置一个日期对象-->
    <bean id="time" class="java.util.Date"/>
------
        IAccountService accountService = (IAccountService) applicationContext.getBean("accountService2");
        accountService.saveAccount();

复杂类型注入/集合类型注入
public class AccountServiceImpl3 implements IAccountService {

    private String[] myStr;
    private List<String> myList;
    private Set<String> mySet;
    private Map<String,String> myMap;
    private Properties myProps;

    public void setMyStr(String[] myStr) {
        this.myStr = myStr;
    }

    public void setMyList(List<String> myList) {
        this.myList = myList;
    }

    public void setMySet(Set<String> mySet) {
        this.mySet = mySet;
    }

    public void setMyMap(Map<String, String> myMap) {
        this.myMap = myMap;
    }

    public void setMyProps(Properties myProps) {
        this.myProps = myProps;
    }

    @Override
    public void saveAccount() {
        System.out.println(Arrays.toString(myStr));
        System.out.println(myList);
        System.out.println(mySet);
        System.out.println(myMap);
        System.out.println(myProps );
    }

}
bean.xml
<!--复杂类型注入/集合类型注入-->
    <bean id="accountService3" class="com.lb.Service.impl.AccountServiceImpl3">
        <property name="myStr">
            <array>
                <value>array</value>
                <value>array</value>
                <value>array</value>
            </array>
        </property>
        <property name="myList">
            <list>
                <value>list</value>
                <value>list</value>
                <value>list</value>
            </list>
        </property>
        <property name="mySet">
            <set>
                <value>set</value>
                <value>set</value>
                <value>set</value>
            </set>
        </property>
        <property name="myMap">
            <map>
                <entry key="AAA" value="map"></entry>
                <entry key="BBB" >
                    <value>map</value>
                </entry>
            </map>
        </property>
        <property name="myProps">
            <props>
                <prop key="AAA">pros</prop>
                <prop key="BBB">pros</prop>
            </props>
        </property>
    </bean>
此次完整测试代码在我的GitHub
