实验环境
redhat6.5
iptables和selinux关闭
准备条件:虚拟机大约需要3G的内存
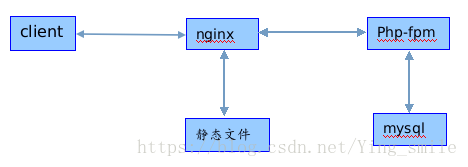
简介:
LNMP就是Linux+Nginx+MySQL+PHP
Nginx会把用户的动态请求交给php服务去处理,这个php服务就会去和数据库进行交互。用户的静态请求Nginx会直接处理。
nginx
[root@server5 ~]# tar zxf nginx-1.10.1.tar.gz
[root@server5 ~]# tar zxf nginx-sticky-module-ng.tar.gz
[root@server5 ~]# cd nginx-1.10.1
[root@server5 nginx-1.10.1]# vim src/core/nginx.h
14 #define NGINX_VER "nginx"
[root@server5 nginx-1.10.1]# vim auto/cc/gcc
178 # debug
179 # CFLAGS="$CFLAGS -g"
[root@server5 nginx-1.10.1]# yum install prce-devel -y
[root@server5 nginx-1.10.1]# ./configure --prefix=/usr/local/lnmp/nginx --with-http_ssl_module --with-http_stub_status_module --user=nginx --group=nginx --with-threads --with-file-aio //根据报错解决依赖性
[root@server5 nginx-1.10.1]# make
[root@server5 nginx-1.10.1]# make install
[root@server5 nginx-1.10.1]# cd /usr/local/lnmp/nginx/conf/
[root@server5 conf]# vim nginx.conf
43 location / {
44 root html;
45 index index.php index.html index.htm; //加入index.php会默认首先访问index.php
46 }
65 location ~ \.php$ {
66 root html;
67 fastcgi_pass 127.0.0.1:9000;
68 fastcgi_index index.php;
69 # fastcgi_param SCRIPT_FILENAME /scripts$fastcgi_script_name; //这行注释掉,因为文件fastcgi.conf里面有
70 include fastcgi.conf;
71 }
[root@server5 conf]# cd /usr/local/lnmp/nginx/sbin/
[root@server5 sbin]# pwd
/usr/local/lnmp/nginx/sbin
[root@server5 sbin]# cd
[root@server5 ~]# vim .bash_profile
10 PATH=$PATH:$HOME/bin:/usr/local/lnmp/mysql/bin:/usr/local/lnmp/nginx/sbin
[root@server5 ~]# source .bash_profile //或者ln -s /usr/local/lnmp/nginx/sbin/nginx /usr/local/sbin/ 做个软连接
[root@server5 ~]# cd /usr/local/lnmp/nginx/html/
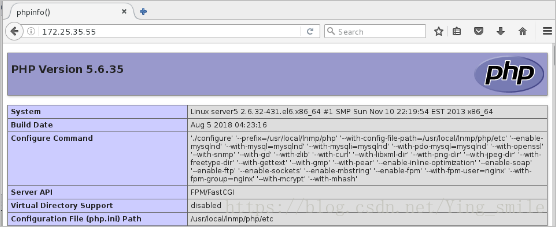
[root@server5 html]# vim index.php
<?php
phpinfo()
?>
[root@server5 html]# nginx -t
nginx: the configuration file /usr/local/lnmp/nginx/conf/nginx.conf syntax is ok
nginx: configuration file /usr/local/lnmp/nginx/conf/nginx.conf test is successful
[root@server5 html]# nginx浏览器测试:
mysql
1、编译安装
[root@server5 ~]# tar zxf mysql-boost-5.7.17.tar.gz
[root@server5 ~]# yum install -y cmake-2.8.12.2-4.el6.x86_64.rpm
[root@server5 ~]# cd mysql-5.7.17/
[root@server5 mysql-5.7.17]# cmake
-DCMAKE_INSTALL_PREFIX=/usr/local/lnmp/mysql -DMYSQL_DATADIR=/usr/local/lnmp/mysql/data -DMYSQL_UNIX_ADDR=/usr/local/lnmp/mysql/data/mysql.sock -DWITH_MYISAM_STORAGE_ENGINE=1 -DWITH_INNOBASE_STORAGE_ENGINE=1
-DDEFAULT_CHARSET=utf8
-DDEFAULT_COLLATION=utf8_general_ci
-DEXTRA_CHARSETS=all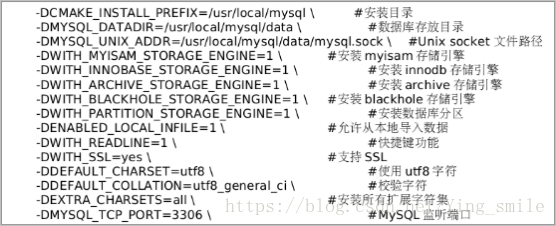
cmake 时有报错,根据报错内容解决依赖性

[root@server5 mysql-5.7.17]# yum install gcc gcc-c++ -y
[root@server5 mysql-5.7.17]# cmake
-DCMAKE_INSTALL_PREFIX=/usr/local/lnmp/mysql -DMYSQL_DATADIR=/usr/local/lnmp/mysql/data -DMYSQL_UNIX_ADDR=/usr/local/lnmp/mysql/data/mysql.sock -DWITH_MYISAM_STORAGE_ENGINE=1 -DWITH_INNOBASE_STORAGE_ENGINE=1
-DDEFAULT_CHARSET=utf8
-DDEFAULT_COLLATION=utf8_general_ci
-DEXTRA_CHARSETS=all
-DWITH_BOOST=boost/boost_1_59_0/  #添加内容Tab补齐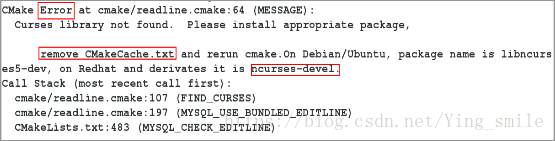
[root@server5 mysql-5.7.17]# rm -fr CMakeCache.txt
[root@server5 mysql-5.7.17]# yum install ncurses-devel -y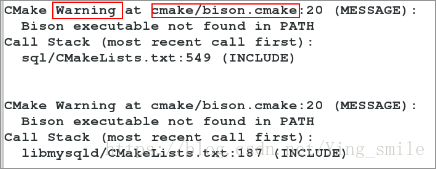
注意:每解决完一次错误,就应删除缓存 rm -fr CMakeCache.txt
[root@server5 mysql-5.7.17]# rm -fr CMakeCache.txt
 [root@server5 mysql-5.7.17]# yum install -y bison
[root@server5 mysql-5.7.17]# cmake
-DCMAKE_INSTALL_PREFIX=/usr/local/lnmp/mysql -DMYSQL_DATADIR=/usr/local/lnmp/mysql/data -DMYSQL_UNIX_ADDR=/usr/local/lnmp/mysql/data/mysql.sock -DWITH_MYISAM_STORAGE_ENGINE=1 -DWITH_INNOBASE_STORAGE_ENGINE=1
-DDEFAULT_CHARSET=utf8
-DDEFAULT_COLLATION=utf8_general_ci
-DEXTRA_CHARSETS=all
-DWITH_BOOST=boost/boost_1_59_0/
[root@server5 mysql-5.7.17]# make
[root@server5 mysql-5.7.17]# make install
2、安全初始化
[root@server5 ~]# cd /usr/local/lnmp/mysql
[root@server5 mysql]# rpm -qa | grep mysql
mysql-libs-5.1.71-1.el6.x86_64
[root@server5 mysql]# cd support-files/
[root@server5 support-files]# cp  my-default.cnf /etc/my.cnf
cp: overwrite `/etc/my.cnf'? y
[root@server5 support-files]# vim /etc/my.cnf
 18 basedir = /usr/local/lnmp/mysql
 19 datadir = /usr/local/lnmp/mysql/data
 20 port = 3306
 21 # server_id = .....
 22 socket = /usr/local/lnmp/mysql/data/mysql.sock
[root@server5 support-files]# file mysql.server
mysql.server: POSIX shell script text executable
[root@server5 support-files]# cp mysql.server /etc/init.d/mysqld
[root@server5 support-files]# cd ..
[root@server5 mysql]# groupadd -g 27 mysql
[root@server5 mysql]# useradd -u 27 -g 27 -M -d /usr/local/lnmp/mysql/data -s /sbin/nologin mysql
[root@server5 mysql]# cd
[root@server5 ~]# vim .bash_profile  //mysql添加到环境变量
 10 PATH=$PATH:$HOME/bin:/usr/local/lnmp/mysql/bin
[root@server5 ~]# source .bash_profile  //生效
[root@server5 ~]# cd /usr/local/lnmp/mysql
[root@server5 mysql]# chown mysql.mysql -R .
[root@server5 mysql]# mysqld --initialize --user=mysql  //以mysql用户身份初始化,会生成一个初始密码
[root@server5 mysql]# chown root.root -R .  //为了安全将mysql目录的所有者改为root
[root@server5 mysql]# chown mysql data/ -R
[root@server5 mysql]# /etc/init.d/mysqld start
Starting MySQL.. SUCCESS!
[root@server5 mysql]# mysql_secure_installation
Securing the MySQL server deployment.

Enter password for user root:  //输入执行mysqld --initialize --user=mysql时的密码

The existing password for the user account root has expired. Please set a new password.

New password: //添加新密码

Re-enter new password:

VALIDATE PASSWORD PLUGIN can be used to test passwords
and improve security. It checks the strength of password
and allows the users to set only those passwords which are
secure enough. Would you like to setup VALIDATE PASSWORD plugin?

Press y|Y for Yes, any other key for No: No  //选择No
Using existing password for root.
Change the password for root ? ((Press y|Y for Yes, any other key for No) :

 ... skipping.
By default, a MySQL installation has an anonymous user,
allowing anyone to log into MySQL without having to have
a user account created for them. This is intended only for
testing, and to make the installation go a bit smoother.
You should remove them before moving into a production
environment.

Remove anonymous users? (Press y|Y for Yes, any other key for No) :

 ... skipping.

Normally, root should only be allowed to connect from
'localhost'. This ensures that someone cannot guess at
the root password from the network.

Disallow root login remotely? (Press y|Y for Yes, any other key for No) :

 ... skipping.
By default, MySQL comes with a database named 'test' that
anyone can access. This is also intended only for testing,
and should be removed before moving into a production
environment.

Remove test database and access to it? (Press y|Y for Yes, any other key for No) :

 ... skipping.
Reloading the privilege tables will ensure that all changes
made so far will take effect immediately.

Reload privilege tables now? (Press y|Y for Yes, any other key for No) :

 ... skipping.
All done!
[root@server5 mysql]# mysql -p
Enter password:
Welcome to the MySQL monitor.  Commands end with ; or \g.
Your MySQL connection id is 7
Server version: 5.7.17 Source distribution

Copyright (c) 2000, 2016, Oracle and/or its affiliates. All rights reserved.

Oracle is a registered trademark of Oracle Corporation and/or its
affiliates. Other names may be trademarks of their respective
owners.

Type 'help;' or '\h' for help. Type '\c' to clear the current input statement.
mysql> show databases;
+--------------------+
| Database           |
+--------------------+
| information_schema |
| mysql              |
| performance_schema |
| sys                |
+--------------------+
4 rows in set (0.00 sec)

mysql> exit
Bye
PHP
[root@server1 ~]# tar jxf php-5.6.35.tar.bz2
[root@server1 ~]# cd php-5.6.35
[root@server1 ~]# yum install libxml2-devel openssl-devel curl-devel  gd-devel-2.0.35-26.el7.x86_64.rpm freetype-devel mvapich-common-1.2.0-0.3563.rc1.5.el6.noarch gmp-devel-4.3.1-7.el6_2.2.x86_64 net-snmp-devel-5.5-49.el6.x86_64 -y
[root@server1 ~]# rpm -ivh libmcrypt-devel-2.5.8-9.el6.x86_64.rpm  libmcrypt-2.5.8-9.el6.x86_64.rpm re2c-0.13.5-1.el6.x86_64.rpm
[root@server1 php-5.6.35]# ./configure --prefix=/usr/local/lnmp/php --with-config-file-path=/usr/local/lnmp/php/etc --enable-mysqlnd --with-mysql=mysqlnd --with-mysqli=mysqlnd --with-pdo-mysql=mysqlnd --with-openssl --with-snmp --with-gd --with-zlib --with-curl --with-libxml-dir --with-png-dir --with-jpeg-dir --with-freetype-dir --with-gettext --with-gmp --with-pear --enable-inline-optimization --enable-soap --enable-ftp --enable-sockets --enable-mbstring --enable-fpm --with-fpm-user=nginx --with-fpm-group=nginx --with-mcrypt --with-mhash  //如果还有其他报错,根据提示解决
[root@server1 php-5.6.35]# make && make install
[root@server1 php-5.6.35]# cp php.ini-production /usr/local/lnmp/php/etc/php.ini
[root@server1 php-5.6.35]# cd /usr/local/lnmp/php/etc
[root@server1 etc]# cp php-fpm.conf.default php-fpm.conf
[root@server1 etc]# vim php-fpm.conf
25 pid = run/php-fpm.pid
[root@server1 etc]# vim php.ini
936 date.timezone = Asia/Shanghai
[root@server5 etc]# useradd -M -d /usr/local/lnmp/nginx -s /sbin/nologin nginx
[root@server1 etc]# cd /root/php-5.6.35/sapi/fpm
[root@server1 fpm]# cp init.d.php-fpm /etc/init.d/php-fpm
[root@server1 fpm]# chmod +x /etc/init.d/php-fpm
[root@server1 fpm]# /etc/init.d/php-fpm start
[root@server1 fpm]# netstat -antuple
tcp        0      0 127.0.0.1:9000              0.0.0.0:*                   LISTEN      0          99446      15873/php-fpm
nginx和mysql结合安装论坛
[root@server5 ~]# unzip Discuz_X3.2_SC_UTF8.zip -d /usr/local/lnmp/nginx/html/
[root@server5 nginx]# cd html
[root@server5 html]# ls
50x.html  index.html  index.php  readme  upload  utility
[root@server5 html]# mv upload/ bbs
[root@server5 html]# cd bbs
浏览器访问172.25.35.55/bbs:
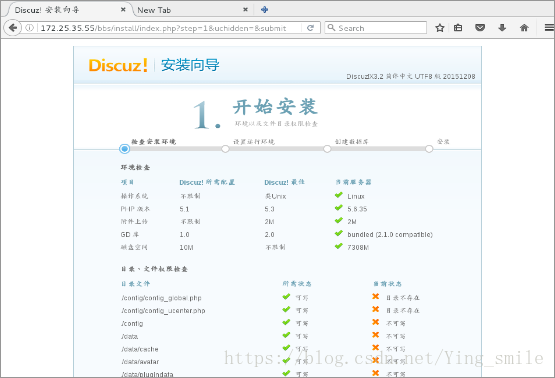
提示有错误,添加加权限
[root@server5 bbs]# chmod 777 config/ data/ uc_server/ uc_client/ -R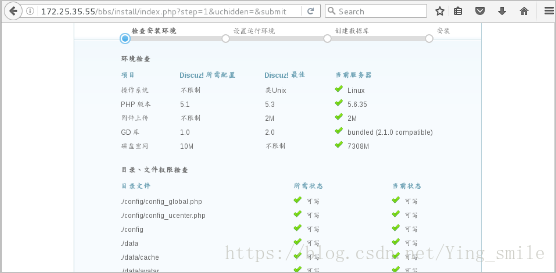
即可点击下一步:

提示数据库连接错误,有可能是脚本文件不能访问
[root@server5 bbs]# cd /usr/local/lnmp/php/etc/
[root@server5 etc]# vim php.ini
1013 pdo_mysql.default_socket=/usr/local/lnmp/mysql/data/mysql.sock
1162 mysql.default_socket =/usr/local/lnmp/mysql/data/mysql.sock
1221 mysqli.default_socket = /usr/local/lnmp/mysql/data/mysql.sock
[root@server5 etc]# /etc/init.d/php-fpm reload
[root@server5 etc]# cd /usr/local/lnmp/mysql/
[root@server5 mysql]# chmod 755 data/
[root@server5 mysql]# cd data
[root@server5 data]# ll
srwxrwxrwx 1 mysql mysql        0 Aug  5 03:20 mysql.sock
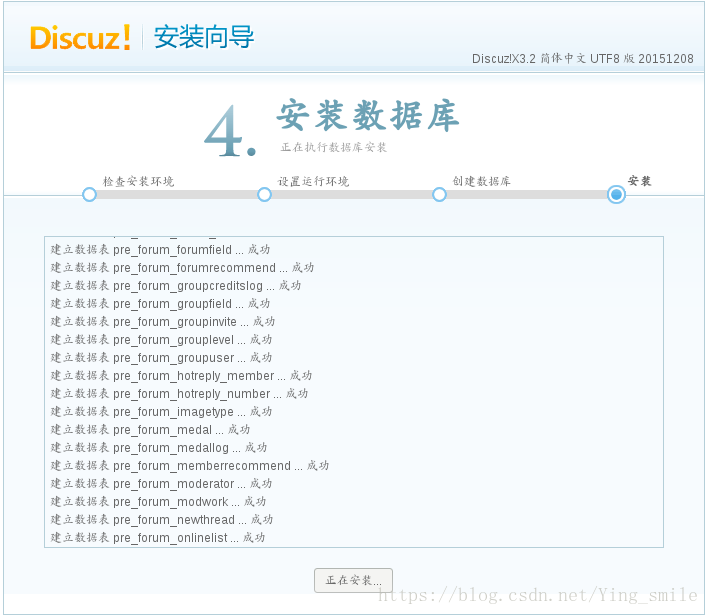
登陆之后进入管理中心

解决:
[root@server5 data]# cd /usr/local/lnmp/nginx/html/bbs/install/
[root@server5 install]# ls
data  images  include  index.php
[root@server5 install]# rm -f index.php 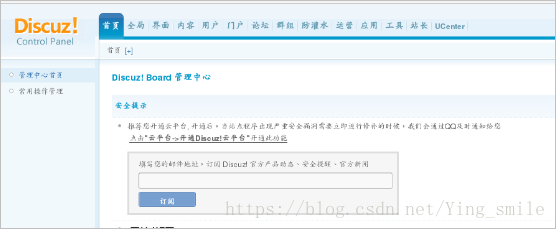
扫描二维码关注公众号,回复:
5809566 查看本文章

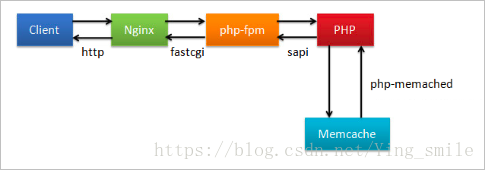
php加缓存
[root@server5 ~]# tar zxf memcache-2.2.5.tgz
[root@server5 ~]# cd /usr/local/lnmp/php/bin/
[root@server5 bin]# ls/usr/local/tomcat/bin/catalina.sh
pear peardev pecl phar phar.phar php php-cgi php-config phpize
[root@server5 bin]# cd
[root@server5 ~]# vim .bash_profile
10 PATH=$PATH:$HOME/bin:/usr/local/lnmp/mysql/bin:/usr/local/lnmp/nginx/sbin:/usr/local/lnmp/php/bin
[root@server5 ~]# source .bash_profile
[root@server5 ~]# cd memcache-2.2.5
[root@server5 memcache-2.2.5]# phpize
Configuring for:
PHP Api Version: 20131106
Zend Module Api No: 20131226
Zend Extension Api No: 220131226
[root@server5 memcache-2.2.5]# ./configure
[root@server5 memcache-2.2.5]# make && make install
[root@server5 etc]# php -m | grep memcache
[root@server5 memcache-2.2.5]# cd /usr/local/lnmp/php/etc/
[root@server5 etc]# ls
pear.conf php-fpm.conf php-fpm.conf.default php.ini
[root@server5 etc]# vim php.ini
873 extension=memcache.so
[root@server5 etc]# /etc/init.d/php-fpm reload
[root@server5 etc]# php -m | grep memcache
memcache
[root@server5 etc]# yum install -y memcached
[root@server5 etc]# /etc/init.d/memcached start
[root@server5 etc]# netstat -antlp | grep :11211
tcp 0 0 0.0.0.0:11211 0.0.0.0:* LISTEN 22358/memcached
tcp 0 0 :::11211 :::* LISTEN 22358/memcached
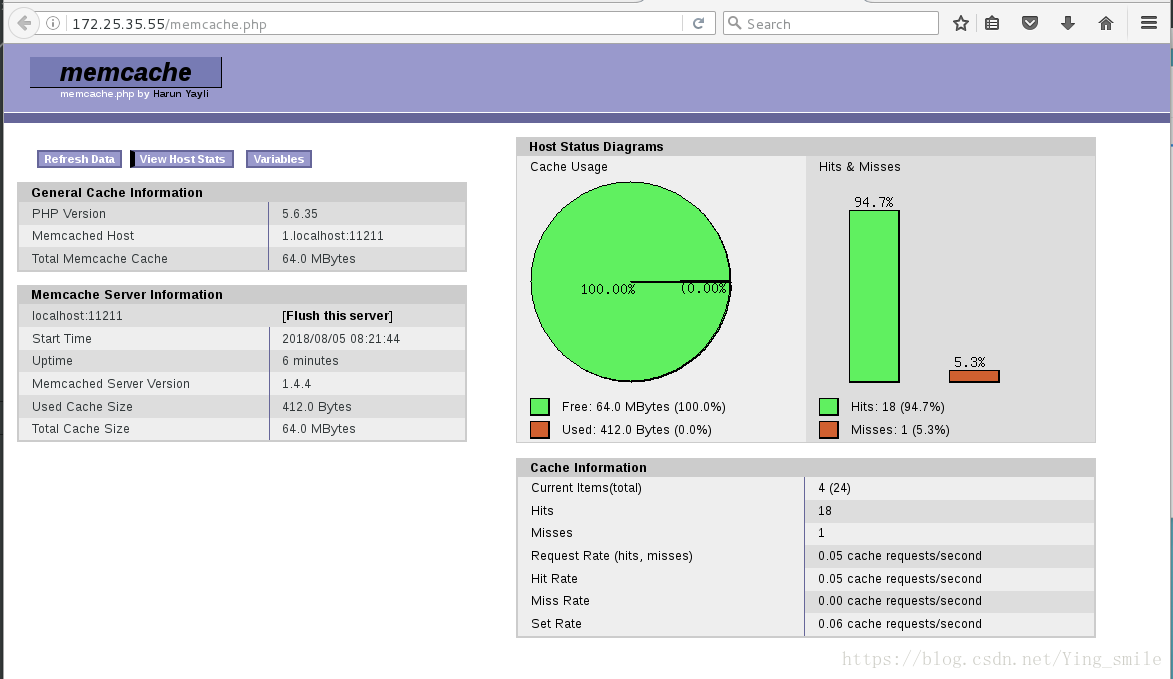
[root@server5 memcache-2.2.5]# cp memcache.php example.php /usr/local/lnmp/nginx/html/
[root@server5 memcache-2.2.5]# cd /usr/local/lnmp/nginx/html/
[root@server5 html]# ls
50x.html bbs example.php index.html index.php memcache.php readme utility
[root@server5 html]# vim memcache.php
23 define('ADMIN_PASSWORD','mysql'); // Admin Password
28 $MEMCACHE_SERVERS[] = 'localhost:11211'; // add more as an array
29 #$MEMCACHE_SERVERS[] = 'mymemcache-server2:11211'; // add more as an array
压力测试:
[root@server5 html]# yum install /usr/bin/ab -y
[root@server5 html]# ab -c 10 -n 1000 http://172.25.35.55/index.php //10个并发1000个请求
Concurrency Level: 10
Time taken for tests: 1.723 seconds
Complete requests: 1000
Failed requests: 88
Requests per second: 580.23 [#/sec] (mean)
[root@server5 html]# ab -c 10 -n 1000 http://172.25.35.55/memcache.php
Concurrency Level: 10
Time taken for tests: 1.365 seconds
Complete requests: 1000
Failed requests: 0
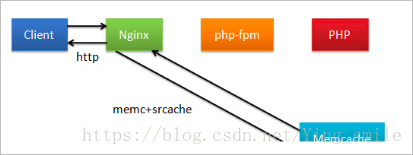
Requests per second: 732.39 [#/sec] (mean)nginx加缓存
[root@server5 ~]# tar zxf openresty-1.13.6.1.tar.gz
[root@server5 ~]# cd openresty-1.13.6.1
[root@server5 openresty-1.13.6.1]# ./configure --prefix=/usr/local/lnmp/openresty --with-http_ssl_module --with-http_stub_status_module --user=nginx --group=nginx --with-threads --with-file-aio
[root@server5 openresty-1.13.6.1]# make && make install
[root@server5 openresty-1.13.6.1]# cd /usr/local/lnmp/openresty/nginx/conf/
[root@server5 conf]# vim nginx.conf
17 http {
18 upstream memcache{
19 server localhost:11211;
20 keepalive 521;
21 }
51 location /memc{
52 internal; //只限于内部访问
53 memc_connect_timeout 100ms;
54 memc_send_timeout 100ms;
55 memc_read_timeout 100ms;
56 set $memc_key $query_string;
57 set $memc_exptime 300; //过期时间
58 memc_pass memcache;
59 }
77 location ~ \.php$ {
78 set $key $uri$args;
79 srcache_fetch GET /memc $key; //下载
80 srcache_store PUT /memc $key; //上传
81 root html;
82 fastcgi_pass 127.0.0.1:9000;
83 fastcgi_index index.php;
84 #fastcgi_param SCRIPT_FILENAME /scripts$fastcgi_script_name;
85 include fastcgi.conf;
86 }
[root@server5 conf]# /usr/local/lnmp/openresty/nginx/sbin/nginx -t
nginx: the configuration file /usr/local/lnmp/openresty/nginx/conf/nginx.conf syntax is ok
nginx: configuration file /usr/local/lnmp/openresty/nginx/conf/nginx.conf test is successful
[root@server5 conf]# /usr/local/lnmp/openresty/nginx/sbin/nginx
[root@server5 conf]# cd ..
[root@server5 nginx]# cd html
[root@server5 html]# pwd
/usr/local/lnmp/openresty/nginx/html
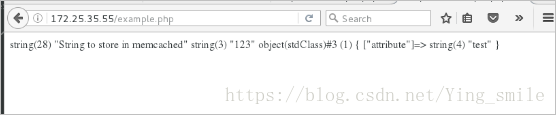
[root@server5 html]# cp /usr/local/lnmp/nginx/html/example.php .
[root@server5 html]# cp /usr/local/lnmp/nginx/html/index.php .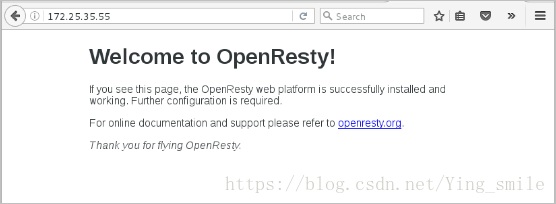
[root@server5 html]# ab -c 10 -n 1000 http://172.25.35.55/index.php
Requests per second:    4063.22 [#/sec] (mean)
[root@server5 html]# ab -c 10 -n 1000 http://172.25.35.55/example.php
Requests per second:    8771.08 [#/sec] (mean)