一.搭建LNMP基本架构
1.L(http) N(nginx) M(mysql) P(php)
2.安装顺序 Mysql-->PHP-->Nginx
3.安装包
nginx-1.4.4
httpd-2.4.27
php-5.3.22
mysql-5.6.38-linux-glibc2.12-i686
4.安装mysql数据库
(1)解压mysql压缩包
tar zxvf mysql.tar.gz
(2)将mysql目录移动/usr/下。
mv mysql目录 /usr/local/mysql

(3)在mysql目录下,创建目录,作为datadir(数据目录)
mkdir /data/mysql
(4)创建mysql用户,不允许登陆,不创建家目录。
useradd -s /sbin/nologin -M mysql
(5)将/data/mysql/目录所属组所属主给mysql用户。
chown -R mysql:mysql /data/mysql/
(6)将配置文件存放到/etc/my.conf覆盖。
cp /mysql目录/support-files/my-large.cnf /etc/my.cnf
(7)修改配置文件
vim进入/etc/my.conf
# For advice on how to change settings please see
# http://dev.mysql.com/doc/refman/5.6/en/server-configuration-defaults.html
# *** DO NOT EDIT THIS FILE. It's a template which will be copied to the
# *** default location during install, and will be replaced if you
# *** upgrade to a newer version of MySQL.

[mysqld]
port            = 3306
socket          = /usr/local/mysql/mysql.sock
datadir      = /data/mysql
pid-file = /data/mysql/mysql.pid
# Remove leading # and set to the amount of RAM for the most important data
# cache in MySQL. Start at 70% of total RAM for dedicated server, else 10%.
# innodb_buffer_pool_size = 128M
------------------------------------------
常用参数:

Port                               #监听端口

Socket                             #通信方式

Key_buffer_size                   #mysql内存使用大小

Log-bin=mysql-bin               #记录二进制日志,注释掉。

Binlog_format=mixed            #日志相关参数,注释掉。

Server_id=1                 #主从复制参数,注释掉。
(8)将服务的启动脚本放入/etc/init.d/下。
cp /mysql目录/support-files/mysql.server /etc/init.d/mysqld
(9)修改启动文件。
vi /etc/init.d/mysqld
# The following variables are only set for letting mysql.server find things.

# Set some defaults
mysqld_pid_file_path=
if test -z "$basedir"
then
  basedir=/usr/local/mysql
  bindir=/usr/local/mysql/bin
  mysqld_pid_file_path=/data/mysql/master.pid
------------------------------------------

basedir     #定义程序所在路径

bindir     #定义数据库启动路径
(10)在mysql目录下初始化mysql服务,看到两个ok就没问题。
mysql]# ./scripts/mysql_install_db --user=mysql --datadir=/data/mysql
报错1:Installing MySQL system tables..../bin/mysqld: error while loading shared libraries: libaio.so.1: cannot open shared object file: No such file or directory
    解决:yum install –y libai*

报错2:Installing MySQL system tables..../bin/mysqld: error while loading shared libraries: libnuma.so.1: cannot open shared object file: No such file or directory
    解决:yum install –y numactl-*
(11)查看是否生成mysql,test。
mysql]# ls /data/mysql
(12)启动mysql。
mysql]# /etc/init.d/mysqld start
报错1:Starting MySQL.... ERROR! The server quit without updating PID file (/data/mysql/localhost.localdomain.pid).
    解决:[root@localhost ~]# cd /usr/local/mysql
             [root@localhost mysql]# chown -R mysql.mysql .
(13)查看mysql进程。
ps aux|grep mysql
(14)开启mysql命令终端Mysql>。
/usr/local/mysql/bin/mysql
报错1:ERROR 2002 (HY000): Can't connect to local MySQL server through socket '/tmp/mysql.sock' (2)
    解决:ln -s  /usr/local/mysql/mysql.sock           /tmp/mysql.
(15)设置开机自启动
chkconfig --list | grep mysql #查看是否存在mysql服务。
chkconfig --add mysqld #添加mysqld服务
chkconfig mysqld on #打开开机自启动
/usr/local/mysql/bin/mysql
注:测试启动mysql
(16)添加环境变量赋值。可使用mysql命令直接启动。在当前终端生效。
PATH=$PATH:/usr/local/sbin:/usr/local/bin:/sbin:/bin:/usr/sbin:/usr/bin:/root/bin:/usr/local/mysql/bin[root]# mysql #测试登陆
(17)设置所有终端都可访问。
vim /etc/profile
#文件最下面输入
export PATH=$PATH:/usr/local/sbin:/usr/local/bin:/sbin:/bin:/usr/sbin:/usr/bin:/root/bin:/usr/local/mysql/bin
source /etc/profile #即时生效
(18)设置mysql管理员密码。
mysqladmin -uroot password ’123456‘
mysql -u root -p #登陆
注:再次登陆应输入管理员,与密码。
(19)mysql下添加普通用户赋予管理权限,对应主机,与密码。
mysql> grant all on *.* to 'user1'@'localhost' identified by 'discuz';
5.安装PHP
(1)解压php压缩包。
tar xvzf php-5.3.22.tar.gz
(2)创建PHP禁止登陆用户。
useradd -s /sbin/nologin php-fpm
(3)进入php目录下。
cd php-5.3.22
(4)编译安装PHP。
php-5.3.22]#./configure --prefix=/usr/local/php --with-config-file-path=/usr/local/php/etc --enable-fpm --with-mysql=/usr/local/mysql --with-mysql-sock=/tmp/mysql.sock --with-libxml-dir --with-gd with-jpeg-dir --with-png-dir --with-freetype-dir --with-iconv-dir --with-zlib-dir --with-mcrypt --enable-soap --enable-gd-native-ttf --enable-ftp --enable-mbstring --enable-exif --enable-zend-multbyte --disable-ipv6 --with-pear --with-curl
yum -y install gcc
yum -y install  libxml2-devel*
yum -y install  bzip2-devel*
yum -y install  curl curl-devel
yum -y install  libjpeg-devel
yum -y install  openssl-devel*
yum -y install  freetype-devel*
yum -y install libpng-devel
yum -y install  libmcrypt-devel*
#没有安装包需要下载源码包
#安装编译包
注:如果报错可同过 yum list | grep 报错名 :来查找需要安装的包
php-5.3.22]#make #编译
php-5.3.22]#make install #编译安装
(5)拷贝php配置文件。
php-5.3.22]#cp php.ini-production /usr/local/php/etc/php.ini
(6)修改PHP配置文件,将off改为on。
vim /usr/local/php/etc/php.ini
short_open_tag = on
(6)拷贝启动脚本。
php-5.3.22]# cp sapi/fpm/init.d.php-fpm /etc/init.d/php-fpm
(7)赋予php-fpm文件权限。
chmod 755 /etc/init.d/php-fpm
(8)启动php服务。
/etc/init.d/php-fpm start
报错1:ERROR: failed to load configuration file '/usr/local/php/etc/php-fpm.conf'
    解决:进入/usr/local/php/etc/
            cp php-fpm.conf.default php-fpm.conf
(9)查看PHP进程。
ps aux | grep php
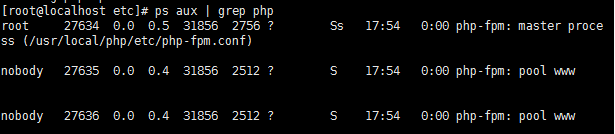
注:Ss是主进程 S是子进程
(10)查看PHP监听端口。

注:查看监听端口9000
6.安装nginx
(1)解压Nginx压缩包。
tar xvzf nginx-1.4.4.tar.gz
(2)进入Nginx目录。
cd nginx-1.4.4
(3)Nginx编译安装
nginx-1.4.4]#./configure --prefix=/usr/local/nginx --with-pcre
(3)报错
报错1:error: the HTTP rewrite module requires the PCRE library.
You can either disable the module by using --without-http_rewrite_module
option, or install the PCRE library into the system, or build the PCRE library
statically from the source with nginx by using --with-pcre=<path> option.
        解决:yum install -y pcre-devel
报错2: error: the HTTP gzip module requires the zlib library.
You can either disable the module by using –without-http_gzip_module
option, or install the zlib library into the system, or build the zlib library
statically from the source with nginx by using –with-zlib=<path> option.
        解决:yum install -y zlib-devel
make #编译
make install #编译安装
(4)启动Nginx程序
nginx-1.4.4]# /usr/local/nginx/sbin/nginx
(5)查看Nginx进程
ps aux | grep nginx

(6)关闭防火墙,SELINUX
service iptables stop
getenforce 0
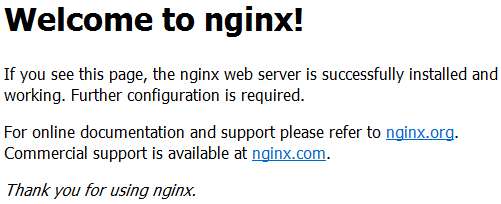
(7)测试Nginx
二.论坛安装
1.Nginx配置文件调试
(1)调试Nginx主配置文件
vim /usr/local/nginx/conf/nginx.conf
#user  nobody;
worker_processes  1;

#error_log  logs/error.log;
#error_log  logs/error.log  notice;
#error_log  logs/error.log  info;

#pid        logs/nginx.pid;


events {
    worker_connections  4096;  #处理的连接数
}


http {
    include       mime.types;
    default_type  application/octet-stream;

    #log_format  main  '$remote_addr - $remote_user [$time_local] "$request" '
    #log_format  main  '$remote_addr - $remote_user [$time_local] "$request" '
    #                  '$status $body_bytes_sent "$http_referer" '
    #                  '"$http_user_agent" "$http_x_forwarded_for"';

    #access_log  logs/access.log  main;

    sendfile        on;
    #tcp_nopush     on;

    #keepalive_timeout  0;
keepalive_timeout  65;

    #gzip  on;

    server {             #虚拟主机
        listen       80;
        server_name  localhost;

        #charset koi8-r;

        #access_log  logs/host.access.log  main;
        location / {              #配置网站所在的路径
            root   /usr/local/url;      #网站根目录
            index  index.html index.htm index.php;   #首页索引类型
        }

        #error_page  404              /404.html;

        # redirect server error pages to the static page /50x.html
        #
        error_page   500 502 503 504  /50x.html;
        location = /50x.html {
            root   html;
        }

        # proxy the PHP scripts to Apache listening on 127.0.0.1:80
        #

    keepalive_timeout  65;

    #gzip  on;

    server {
        listen       80;
        server_name  localhost;

        #charset koi8-r;

        #access_log  logs/host.access.log  main;
        location / {
            root   /usr/local/url;
            index  index.html index.htm;
        }

        #error_page  404              /404.html;

        # redirect server error pages to the static page /50x.html
        #
        error_page   500 502 503 504  /50x.html;
        location = /50x.html {
            root   html;
        }

        # proxy the PHP scripts to Apache listening on 127.0.0.1:80
        #
        #location ~ \.php$ {
        #    proxy_pass   http://127.0.0.1;
        #}

        # pass the PHP scripts to FastCGI server listening on 127.0.0.1:9000
        #
     #解开注释调用php
        location ~ \.php$ {
            root           /usr/local/url;        #网站路径(修改)
            fastcgi_pass   127.0.0.1:9000;  #指定通信代理(可改为soket)
            fastcgi_index  index.php;     #指定主页索引页
            fastcgi_param  SCRIPT_FILENAME  /usr/local/usl$fastcgi_script_name;  #脚本所在路径 (修改)
            include        fastcgi_params;
        }

        # deny access to .htaccess files, if Apache's document root
        # concurs with nginx's one
        #
(2)测试Nginx配置文件
/usr/local/nginx/sbin/nginx -t
注:yntax is ok 没问题!
(3)加载配置文件
/usr/local/nginx/sbin/nginx -s reload
