第一章:计算机网络和因特网
因特网最初就是基于“一群相互信任的用户连接到一个透明的网络上”这样的模型;身处现代计算机网络则应当有:”在相互信任的用户之间的通信是一种例外而不是规则“的觉悟。
介绍一些网络的背景知识。从网络的边缘开始,观察端系统和应用程序,以及运行在端系统上为应用程序提供的运输服务。观察了接入网中能找到的链路层技术和物理媒体。进入网络核心看到分组交换和电路交换技术是通过网络传输数据的两种基本方法。研究了全球性的因特网(网络的网络)结构。
研究了计算机网络的几个重要主题。分析分组交换网中的时延、吞吐量和丢包的原因。得到传输时延、传播时延和排队时延以及用于吞吐量的简单定量模型。
第二章:应用层
UDP socket 编程
# coding:utf-8
# UDP 客户端

from socket import socket, AF_INET, SOCK_DGRAM
serverName = 'localhost'
serverPort = 12000
clientSocket = socket(AF_INET, SOCK_DGRAM)
message = input("input: ").encode('utf-8')
clientSocket.sendto(message, (serverName, serverPort))
message, serverAddress = clientSocket.recvfrom(2048)
print(message.decode('utf-8'), "from ", serverAddress)
clientSocket.close()
# coding:utf-8
# UDP 服务器端
from socket import socket, AF_INET, SOCK_DGRAM
serverPort = 12000
serverSocket = socket(AF_INET, SOCK_DGRAM)
serverSocket.bind(('', serverPort))
print("the server is ready to receive")
while True:
print('waiting... ')
message, clientAddress = serverSocket.recvfrom(2048)
print(f"received {message}, from {clientAddress}")
if message == b'bye':
serverSocket.sendto(b'I see u.', clientAddress)
break
modifiedMessage = message.upper()
serverSocket.sendto(modifiedMessage, clientAddress)TCP socket 编程
# coding:utf-8
# TCP 客户端

from socket import socket, AF_INET, SOCK_STREAM
serverName = ''
serverPort = 12000
clientSocket = socket(AF_INET, SOCK_STREAM)
clientSocket.connect((serverName, serverPort))
# 多传回一条欢迎信息
print(clientSocket.recv(1024).decode('utf-8'))
while True:
    sentence = input('input: ').encode('utf-8')
    clientSocket.send(sentence)
    if sentence == b'bye':
        break
    message = clientSocket.recv(1024)
    print(message.decode('utf-8'))

clientSocket.close()
# coding:utf-8
# TCP 服务器端
from socket import socket, AF_INET, SOCK_STREAM
serverPort = 12000
serverSocket = socket(AF_INET, SOCK_STREAM)
serverSocket.bind(('', serverPort))
serverSocket.listen(4)
print("the server is ready to receive")
while True:
connectionSocket, addr = serverSocket.accept()
print(f'new connection from {addr}')
connectionSocket.send(b'Welcome')
while True:
sentence = connectionSocket.recv(1024)
print(f"received {sentence}., from {addr}")
if sentence == b'bye':
break
message = sentence.upper()
connectionSocket.send(message)
connectionSocket.close()作业与实验
想找配套资源的服务器代码,没找到。既然资源如此难找,何不自己做作业,当做困难模式。
Socket编程作业
1. Web Server
题目:编写一个简单的Web服务器,一次处理一个请求,如果浏览器请求一个不存在的文件,则响应404 Not Found。
Web服务器之前通过廖雪峰老师Python实战博客时有过一些了解,但是不够深入,只是看着敲,一些东西不够了解比如HTTP和TCP。这次再学习一下。
最简单的Web服务器就把上面的TCP服务器拿过来改一下就好了,响应值按照HTTP协议响应报文格式定义的来:
# coding:utf-8
# 服务器

from socket import socket, AF_INET, SOCK_STREAM
host, port = '', 8005
serverSocket = socket(AF_INET, SOCK_STREAM)
serverSocket.bind((host, port))
serverSocket.listen(1)
print(f"{host}:{port} ready to receive")
while True:
    connection, address = serverSocket.accept()
    print(f'new connection from {address}')
    request = connection.recv(1024)
    print(request)
    # 响应值按HTTP协议响应报文格式来
    response = """\
HTTP/1.1 200 OK

HEllo
"""
    connection.sendall(response.encode('utf-8'))
    connection.close()
serverSocket.close()使用WireShark抓包看看HTTP数据:(注:为了抓本地回环包,将host改为了本机IP,或者直接留空即可,注意127.0.0.1抓不到,只能是本机IP)
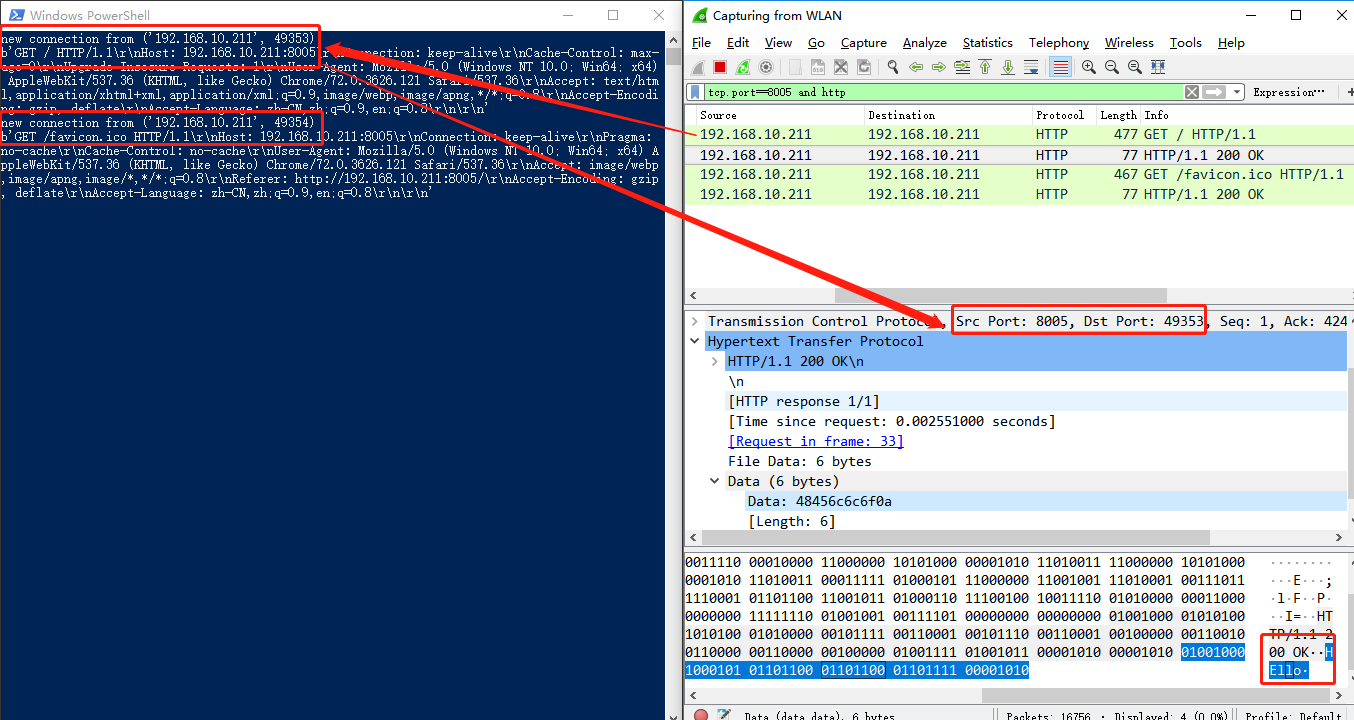
图中可以看到两次HTTP请求(有网站图标请求 GET /favicon.ico HTTP/1.1),两次请求分别建立了一次TCP连接(进程ID为:49353和49354)。服务器响应体都为HEllo。
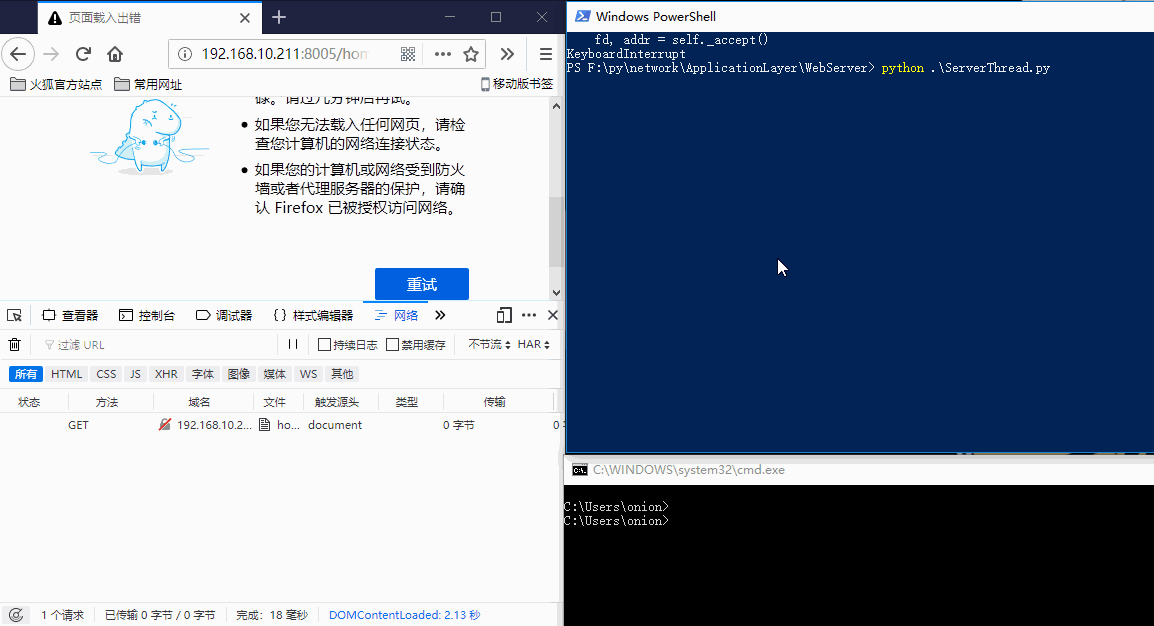
再通过telnet来建立一条TCP连接研究下:telnet 192.168.10.211回车后则建立了TCP连接,等待请求报文,查看服务器窗口得知TCP端口为:52915,使用命令netstat -ano | findstr "52915"查看该TCP:

为什么是两条呢?因为TCP连接是全双工的。telnet页面回车则得到响应,之后再查询该端口:
C:\Users\onion>netstat -ano | findstr "52915"
  TCP    192.168.10.211:8005    192.168.10.211:52915   TIME_WAIT       0
没有按预期的来,本以为两条都没了,为什么留了一条从服务器到客户端的TCP没关闭呢?此TCP的状态为TIME_WAIT,问题就出在这了。3.5.6TCP连接管理小节中有说明。这里贴一段网上的解释了解一下:
根据TCP协议定义的3次握手断开连接规定,发起socket的一方主动关闭,socket将进入TIME_WAIT状态。TIME_WAIT状态将持续2个MSL(Max Segment Lifetime),在Windows下默认为4分钟,即240秒。
说回本题,针对题目要求,只需要访问特定的接口(通过请求头中的path判断),其他接口抛404。
while True:
    connection, address = serverSocket.accept()
    print(f'new connection from {address}')
    request = connection.recv(1024)
    print(request)

    try:
        path = re.findall(r'^\w+ +/([^ ]*)', request.decode('utf-8'))[0]
    except Exception:
        path = None

    if path == 'home':
        response = """\
HTTP/1.1 200 OK

hello, network.
"""
    elif path == 'index':
        response = """\
HTTP/1.1 301 Move
Location: home

"""
    else:
        response = """\
HTTP/1.1 404 Not Found

<html>
<body><h2>404</h2></body>
</html>
"""

    connection.sendall(response.encode('utf-8'))
connection.close()获取到path之后判断,访问/home显示文字(200),访问/index跳转(301重定向)到/home,其他的路由则报错404。
复盘
P.S. 做第二题 UDP Pinger的时候,无意中找到了myk502/Top-Down-Approach, 包含有自顶向下书中配套资源,特别是WireShark Labs多个PDF很有意义。 既然找到了资源,那就拿书中的来复盘一下第一题。
翻到框架代码示例看了一下,书中(以下书中也包含配套资源)是读取相应的HTML文件,然后响应,但是发送数据有奇怪的一处不理解:为什么用循环发送?
for i in range(0, len(outputdata)):
    connectionSocket.send(outputdata[i])
是send和sendall的区别
socket.send(string[, flags]) 发送TCP数据,返回发送的字节大小。这个字节长度可能少于实际要发送的数据的长度。换句话说,这个函数执行一次,并不一定能发送完给定的数据,可能需要重复多次才能发送完成。
data = "something you want to send"
while True:
  len = s.send(data[len:])
  if not len:
      break
socket.sendall(string[, flags]) 看懂了上面那个,这个函数就容易明白了。发送完整的TCP数据,成功返回None,失败抛出异常。
python socket函数中,send 与sendall的区别与使用方法
*题外话:这篇短文写的简单且清晰,对于只想知道区别的人很受益,然而下面评论中却出现谩骂的人,举报需要登录,登录却还要验证手机便作罢,CSDN越来越没落了。讽刺的是这个jeck_cen自己挂的几篇OJ代码却全没有对齐过。
打开文件版Web服务器:
# coding:utf-8
# Web 服务器 v1.1 打开文件响应

from socket import socket, AF_INET, SOCK_STREAM

host, port = 'xxx.xxx.xxx.xxx', 8005
serverSocket = socket(AF_INET, SOCK_STREAM)
serverSocket.bind((host, port))
serverSocket.listen(2)
print(f"{host}:{port} ready to receive")
while True:
    connection, address = serverSocket.accept()
    print(f'new connection from {address}')

    try:
        request = connection.recv(1024)
        print(request)
        # 获取文件名,并读取数据
        filename = request.split()[1][1:]
        with open(filename, encoding='utf-8') as f:
            outputdata = f.read()
        # 发送HTTP响应头
        header = b"HTTP/1.1 200 OK\r\n\r\n"
        connection.send(header)
        print(outputdata)

        # 没必要用单字符发,经验证直接send/sendall都会保证数据传输
        # for i in range(0, len(outputdata)):
        #     print(f"send:{outputdata[i]}")
        #     connection.send(outputdata[i].encode())
        connection.send(outputdata.encode())

    except Exception as e:
        print(e)
        header = b"HTTP/1.1 404 Not Found\r\n\r\n"
        connection.send(header)

    connection.close()
serverSocket.close()
进阶练习
使用多线程同时处理多个请求
将上文中服务器与客户端的TCP连接封装一个函数
tcpLink(),像这样:from socket import socket, AF_INET, SOCK_STREAM def tcpLink(sock, addr): """ TCP 连接 """ print(f'new connection from {addr}') try: request = connection.recv(1024) print(request) # 获取文件名,并读取数据 filename = request.split()[1][1:] with open(filename, encoding='utf-8') as f: outputdata = f.read() # 发送HTTP响应头 header = b"HTTP/1.1 200 OK\r\n\r\n" connection.send(header) # 发送数据 connection.send(outputdata.encode()) except Exception as e: print(e) header = b"HTTP/1.1 404 Not Found\r\n\r\n" connection.send(header) print(f"{addr} close.") sock.close() host, port = '', 8005 serverSocket = socket(AF_INET, SOCK_STREAM) serverSocket.bind((host, port)) serverSocket.listen(4) print(f"{host}:{port} ready to receive") while True: connection, address = serverSocket.accept() # 新建函数处理TCP连接 tcpLink(connection, address) serverSocket.close()上面的代码只是单线程,只能同时处理一个请求。录个图:
浏览器请求可以成功,加上telnet请求连接阻塞后,浏览器再次请求就阻塞(卡)了,telnet处理完成,浏览器又能得到结果。
在试验中发现另一个问题,访问页面之后经常会自动有一条TCP连接在连接中就导致阻塞了,大概是浏览器偷偷请求或者其他原因吧。先不管了,反正要用多线程的。
多线程版
怎么加多线程呢,上面剥离出去的
tcpLink()已经做好了工作,只需要加上多线程调用就好了。tcpLink(connection, address)改为:# 使用新线程来处理TCP连接 t = threading.Thread(target=tcpLink, args=(connection, address)) t.start()之前别忘记引入, import threading
图中使用telnet发起TCP连接(前面1个,后面4个),浏览器一样可以正常请求,不会被阻塞。
http客户端
与其使用浏览器, 不如编写自己的 http 客户端来测试您的服务器。客户端将使用 tcp 连接连接到服务器, 向服务器发送 http 请求, 并将服务器响应显示为输出。您可以假定发送的 http 请求是 get 方法。
客户端应采用命令行参数, 指定服务器 ip 地址或主机名、服务器侦听的端口以及请求的对象存储在服务器上的路径。下面是用于运行客户端的输入命令格式:
client.py server_host server_port filename不深究显示页面(只输出)和资源请求(比如图片和CSS\JS等不用请求)的话,那就很简单了。只是发送一个HTTP请求即可。
# coding:utf-8
# HTTP客户端。 格式:client.py server_host server_port filename

from socket import socket, AF_INET, SOCK_STREAM
import sys

args = sys.argv[1:]
if len(args) != 3:
    print(r"(参数不足) 格式:.\client.py server_host server_port filename")
    exit()

host, port, filename = args

# 创建Socket, 建立连接
clientSocket = socket(AF_INET, SOCK_STREAM)
clientSocket.connect((host, int(port)))

# 发送请求
request = f"GET {filename} HTTP/1.1\r\n\r\n"
clientSocket.send(request.encode())

# 接收响应数据
while True:
    response = clientSocket.recv(1024)
    # 无数据则退出
    if not response:
        break
    print(response.decode(), end='')

clientSocket.close()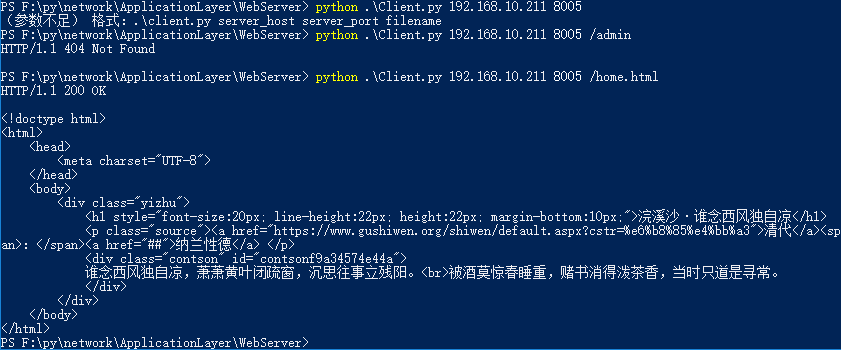
图中执行三次客户端,第一次参数不足,不请求。后面两次都为HTTP请求,一次404,一次请求正确的资源并得到响应。
在代码中使用while接收响应数据,直到接收到为空则退出(服务器已关闭,但是用
recv()可以获取到空值,如果不检测则会无限得到空数据)。正考虑有没有优雅的办法从客户端检测服务端已关闭状态,看到函数说明,就释然了。recv(buffersize[, flags]) -> data
Receive up to buffersize bytes from the socket. For the optional flags argument, see the Unix manual. When no data is available, block until at least one byte is available or until the remote end is closed. When the remote end is closed and all data is read, return the empty string.
当远程端关闭并读取所有数据时, 返回空字符串。
2. UDP Pinger
题目:创建一个非标准(但简单)的基于UDP的客户ping程序。
书中提供了服务端代码。使用rand(0,10)<4模拟丢包。Packet Loss
UDP provides applications with an unreliable transport service. Messages may get lost in the network due to router queue overflows, faulty hardware or some other reasons.丢包
udp 为应用程序提供了不可靠的传输服务。由于路由器队列溢出、硬件故障或其他一些原因, 消息可能会在网络中丢失。Specifically, your client program should
(1) send the ping message using UDP (Note: Unlike TCP, you do not need to establish a connection
first, since UDP is a connectionless protocol.)(2) print the response message from server, if any
(3) calculate and print the round trip time (RTT), in seconds, of each packet, if server responses
(4) otherwise, print “Request timed out”
Windows ping 了解
虽然不会采用ICMP协议,但是可以模仿Windows的ping显示信息。先来了解一下

Windows的ping程序通过ICMP协议发送32字节数据,内容是abcdefghijklmnopqrstuvwabcdefghi。统计信息不管超时还是正常都会有;往返行程估计时间只有在有成功的情况下才有。每一条信息分析:字节拿到了,时间可以计算到,TTL是什么呢?和Redis一样,都是生存时间。
字节代表数据包的大小,时间顾名思义就是返回时间,“TTL”的意思就是数据包的生存时间,当然你得到的这个就是剩余的生存时间。TTL用来计算数据包在路由器的消耗时间,因为现在绝大多数路由器的消耗时间都小于1s,而时间小于1s就当1s计算,所以数据包没经过一个路由器节点TTL都减一。
我的是系统默认TTL为128 (2^7),经过了一个路由器,所以为上图中我ping本机IP的TLL是127。
C:\Users\onion>tracert 192.168.10.211
通过最多 30 个跃点跟踪
到 DESKTOP-VIMN0V8 [192.168.10.211] 的路由:
  1     6 ms     3 ms     4 ms  bogon [192.168.10.1]
  2    95 ms    11 ms    20 ms  DESKTOP-VIMN0V8 [192.168.10.211] # 终点不算
跟踪完成。TTL可以先放弃,这个路由器跳数没有好的思路。往返统计时间中平均为成功的统计,比如上图(23+39)/2=31。
客户端编写
# coding:utf-8
# ping程序 客户端

from socket import socket, AF_INET, SOCK_DGRAM
import time

# 配置
host, port = '192.168.10.211', 12000
times = 10  # 次数
timeout = 1  # 超时时间

# 创建Socket
clientSocket = socket(AF_INET, SOCK_DGRAM)

# 设置超时时间为1s
clientSocket.settimeout(timeout)

print(f"\n正在Ping {host}:{port} 具有 32 字节的数据:(为什么有端口,因为俺是UDP啊)")

success_ms = []  # 成功接收用时,用于统计
for i in range(1, times+1):
    message = "abcdefghijklmnopqrstuvwabcdefghi"
    clientSocket.sendto(message.encode('utf-8'), (host, port))
    try:
        # 计算时间,由于上面设置timeout,超过会抛time out
        start_ms = int(time.time()*1000)
        rep_message, serverAddress = clientSocket.recvfrom(2048)
        end_ms = int(time.time()*1000)
        gap = end_ms-start_ms
        print(f"{i} 来自 {host} 的回复:字节=32 时间={gap}ms TTL=?")
        success_ms.append(gap)
    except Exception as e:
        print(f"{i} 请求超时。({e})")
        continue

# 输出统计信息
print(f"\n{host} 的 Ping 统计信息:")
success_times = len(success_ms)
failed_times = times-success_times
lost_scale = failed_times*100//times
print(f"\t数据包:已发送 = {times},已接收 = {success_times},丢失 = {failed_times} ({lost_scale}% 丢失)")

if success_times>0:
    # 往返行程估计时间
    print("往返行程的估计时间(以毫秒为单位):")
    print(f"\t最短 = {min(success_ms)}ms,最长 = {max(success_ms)}ms,平均 = {sum(success_ms)//success_times}ms")

# 关闭Socket
clientSocket.close()
很清晰易懂的。
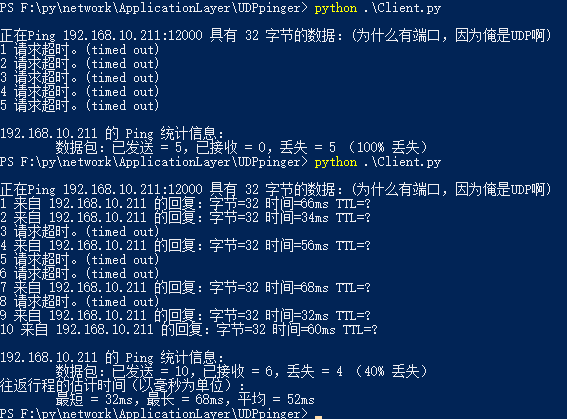
图中第一次演示5次Ping,得到了100%丢失,只显示统计信息;第二次10次Ping,统计信息和往返估计时间都有了,并且正确。
进阶练习
第一题是求往返行程以及丢包率,就是上面已经做过的往返估计时间和统计信息。下一题。
UDP 心跳 (UDP Heartbeat)
Another similar application to the UDP Ping would be the UDP Heartbeat. The Heartbeat can be used to check if an application is up and running and to report one-way packet loss. The client sends a sequence number and current timestamp in the UDP packet to the server, which is listening for the Heartbeat (i.e., the UDP packets) of the client. Upon receiving the packets, the server calculates the time difference and reports any lost packets. If the Heartbeat packets are missing for some specified period of time, we can assume that the client application has stopped. Implement the UDP Heartbeat (both client and server). You will need to modify the given UDPPingerServer.py, and your UDP ping client.
这道题按着自己的想法做,感觉和Redis的生存时间差不多。除了服务器端(HeartServer)(设置有效心跳为10秒),心跳客户端(HeartClient) 还加了一个监听客户端(HeartClientShow) 用来显示存活的客户端(显示序号和过期时间,每秒发送一次
onlineudp请求,用来监听存活序号)。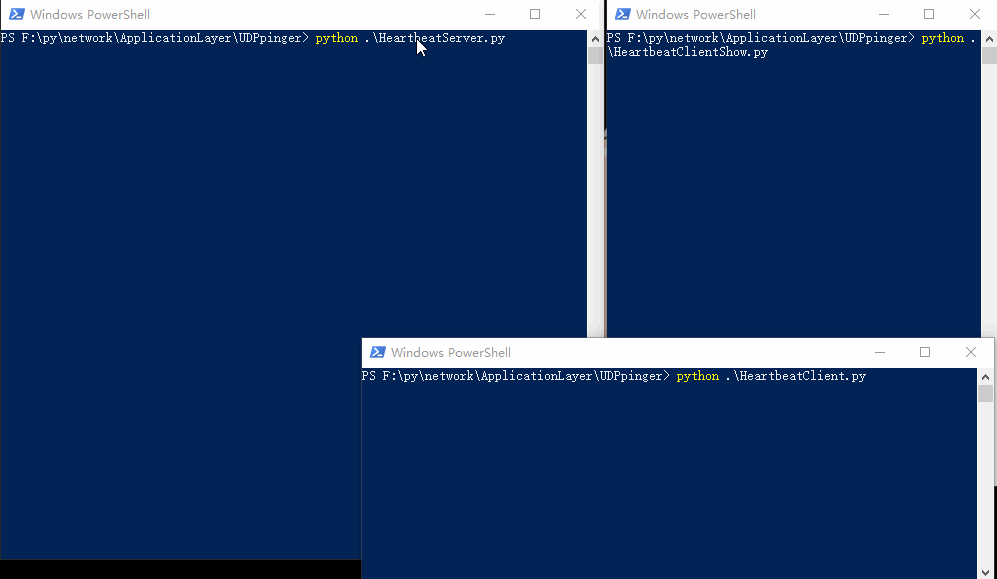
代码略,最后放到git中。
3. STMP
题目:一个简单的邮件客户端,可以向收件人发送邮件。
You will gain experience in implementing a standard protocol using Python.
Your task is to develop a simple mail client that sends email to any recipient.
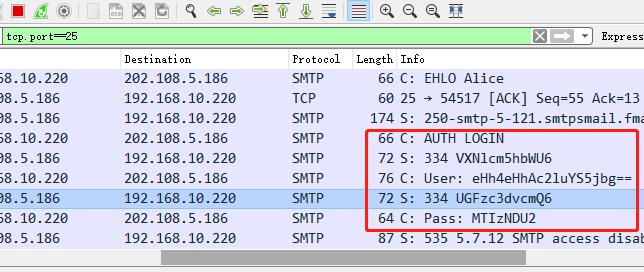
验证的时候使用AUTH LOGIN命令登录。我这里使用新浪的smtp邮件服务器,遇到一个小坑就是新浪的手机邮箱登录,验证一直提醒535 the email account of mobile is non-active换了字母邮箱就可以了。
打招呼的时候建议使用EHLO而不是旧的ECHO,当发出 EHLO 命令以启动 ESMTP 连接时,服务器的响应指出 SMTP 虚拟服务器支持的功能
When using authentication, EHLO should be used for the greeting to indicate that Extended SMTP is in use, as opposed to the deprecated HELO greeting,[10] which is still accepted when no extension is used, for backward compatibility.
# coding:utf-8
# SMTP 邮件客户端

from socket import socket, AF_INET, SOCK_STREAM
import base64

def tcp_send(cli, message, except_code):
    print("C: " + message)
    cli.send((message+'\r\n').encode())
    response = cli.recv(1024)
    response = response.decode()
    print("S: " + response)
    if response[:3] == str(except_code):
        return response
    raise Exception(response[:3])

# Choose a mail server (e.g. Google mail server) and call it mailserver
mailServer = 'smtp.sina.cn'
mailPort = 25
# Create socket called clientSocket and establish a TCP connection with mailserver
clientSocket = socket(AF_INET, SOCK_STREAM)
clientSocket.connect((mailServer, mailPort))
clientSocket.settimeout(5)
# 邮件服务器连接响应信息
response = clientSocket.recv(1024).decode()
print('S: ' + response)

if response[:3] != '220':
    print('220 reply not received from server.')

# Send HELO command and print server response. 打招呼
heloCommand = 'EHLO Alice'
tcp_send(clientSocket, heloCommand, 250)

# mail 验证
tcp_send(clientSocket, 'AUTH LOGIN', 334)

username = base64.b64encode(b'[email protected]').decode()
password = base64.b64encode(b'password').decode()
tcp_send(clientSocket, username, 334)
tcp_send(clientSocket, password, 235)

# Send MAIL FROM command and print server response.
tcp_send(clientSocket, 'MAIL FROM: <[email protected]>', 250)
# Send RCPT TO command and print server response.
tcp_send(clientSocket, 'RCPT TO: <[email protected]>', 250)
# Send DATA command and print server response.
tcp_send(clientSocket, 'DATA', 354)
# Send message data.
message = '''From: [email protected]
To: [email protected]
Subject: tcp mail client

hello
this is mail client by python tcp.
.'''
tcp_send(clientSocket, message, 250)
# Send QUIT command and get server response.
tcp_send(clientSocket, 'QUIT', 221)
发送成功:
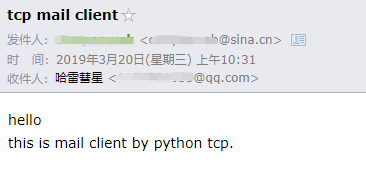
执行过程:C代表客户端,S服务器。
PS F:\py\network\ApplicationLayer\SMTP> python .\client.py
S: 220 smtp-5-121.smtpsmail.fmail.xd.sinanode.com ESMTP

C: EHLO Alice
S: 250-smtp-5-121.smtpsmail.fmail.xd.sinanode.com
250-AUTH LOGIN PLAIN
250-AUTH=LOGIN PLAIN
250-STARTTLS
250 8BITMIME

C: AUTH LOGIN
S: 334 VXNlcm5hbWU6

C: Y293cGVhd2ViQHNpbmEuY24=
S: 334 UGFzc3dvcmQ6

C: ajExMTIyMjU1NTQ0NA==
S: 235 OK Authenticated

C: MAIL FROM: <[email protected]>
S: 250 ok

C: RCPT TO: <[email protected]>
S: 250 ok

C: DATA
S: 354 End data with <CR><LF>.<CR><LF>

C: From: [email protected]
To: [email protected]
Subject: tcp mail client

hello
this is mail client by python tcp.
.
S: 250 ok queue id 290028394066

C: QUIT
S: 221 smtp-5-121.smtpsmail.fmail.xd.sinanode.com但这样传输是不安全的,邮箱名和密码都只是简单的base64编码,等于明文。图中MTIzNDU2则是123456的编码。
所以有了Transport Layer Security (TLS) or Secure Sockets Layer (SSL) 。
进阶练习
添加TLS/SSL来安全传输数据。
Mail servers like Google mail (address: smtp.gmail.com, port: 587) requires your client to add a Transport Layer Security (TLS) or Secure Sockets Layer (SSL) for authentication and security reasons, before you send MAIL FROM command. Add TLS/SSL commands to your existing ones and implement your client using Google mail server at above address and port.
之前通过EHLO打招呼之后,看到邮件服务器支持
STARTTLS( start tls 的意思),新浪smtp是587端口。请求之后,服务器响应220 ready for tls.C: STARTTLS S: 220 ready for tls然后我就是一脸懵逼的,没有使用过TLS/SSL。
How to test SMTP Authentication and StartTLS 中得知可以使用
openssl s_client -connect smtp.example.com:25 -starttls smtp连接SMTP服务器,win10下载openssl把命令替换为smtp.sina.cn:587是可以的,但是我需要通过python去访问,该怎么办呢... 怎么办呢?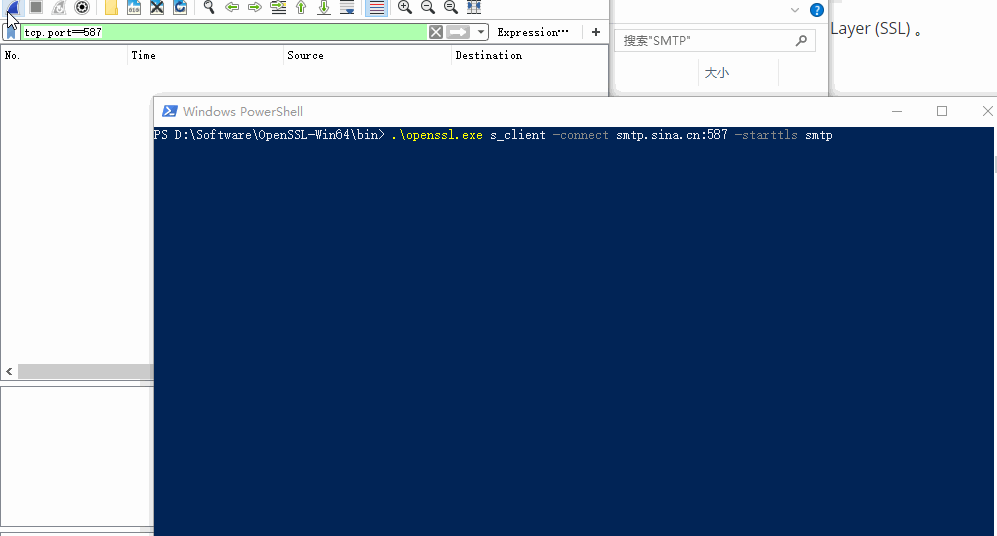
然后就找了一找, Connect to SMTP (SSL or TLS) using Python 里发现
ssl.wrap_socket函数。在
STARTTLS之后再调用ssl.wrap_socket(clientSocket),试了一下,果然可以:... # Send HELO command and print server response. 打招呼 heloCommand = 'EHLO Alice' tcp_send(clientSocket, heloCommand, 250) # TLS/SSL 加密传输 tcp_send(clientSocket, 'STARTTLS', 220) clientSocket = ssl.wrap_socket(clientSocket) # mail 验证 tcp_send(clientSocket, 'AUTH LOGIN', 334) ...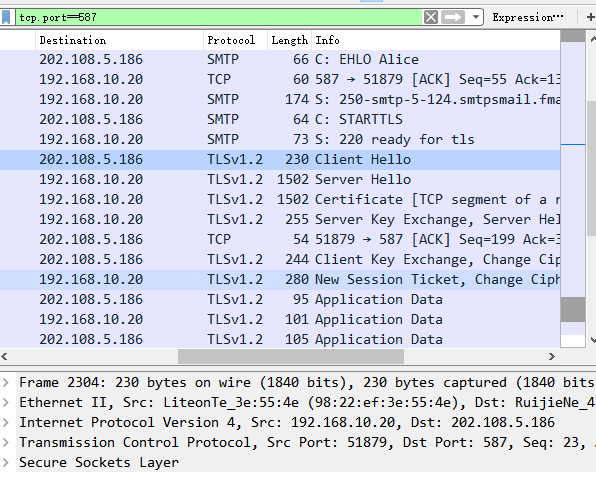
清晰的看到之后的传输加密了。协议为TLSv1.2。
现在只能发送文本,修改客户端,使其可以发送文本和图片。interesting
使用新浪发送一个带图片的邮件,收件箱查看邮件原文:
MIME-Version: 1.0 X-Priority: 3 X-MessageID: 5c9338d62381243a_201903 X-Originating-IP: [10.41.14.100] X-Mailer: Sina WebMail 4.0 Content-Type: multipart/related; type="multipart/alternative"; boundary="=-sinamail_rel_ebd2ac5ebf979d4cc71ee25713127299" Message-Id: <[email protected]> ... # 下面为base64的图片 --=-sinamail_rel_ebd2ac5ebf979d4cc71ee25713a27299 Content-ID: <part1.5c9338d62381243a_201903> Content-Type: image/gif; name="=?GBK?B?uL28/jEuZ2lm?=" Content-Disposition: attachment; filename="=?GBK?B?uL28/jEuZ2lm?=" Content-Transfer-Encoding: base64 R0lGODdh1AADAfcAAAAAABIWCgoXCA4XIwwaCg4aGw4aIxQaAw4bExIbDBIcGxIdJRsdChIeKxMe EhMgMxohExohJBshKyghGBsiGyQiKhkkPBskMygkCzMlFxsmRB4qSyMrQSMsTiguMSkuGjQuKTcu GikvIy0yPiszUj80KDY7QTg9LTE+VzI/TUFCTkZELUJFYXNGVGRHXXlIW0JKQUNPW1dQOURRUERR aXpSallYUFpZQ0tccFRdX2ReQmZec3xecmNfTldgblxgX5FhdVRigGtiRX9ifmJkXW1kTGdqXW5q T2JraHRrTnNsUnltUYNtgGtuZ2Fvd5lwgmNxhHRxWnRxh4NxjHZyUnpyT49ylGx0a310VWt1e2x1不可避免的要研究一下MIME了。
发送一个4k的图片发送完成,可是稍微大一点的文件,就会出错:
Traceback (most recent call last):
  File ".\client_send_image.py", line 93, in <module>
    tcp_send(clientSocket, message, 250)
  File ".\client_send_image.py", line 12, in tcp_send
    response = cli.recv(1024)
ConnectionResetError: [WinError 10054] 远程主机强迫关闭了一个现有的连接。
去掉SSL抓包发现,数据TCP传输未完成时,变为STMP传输,但是携带的数据还是图片中的上面TCP未传完的数据。之前状态有
FIN,ACK, 之后就RST: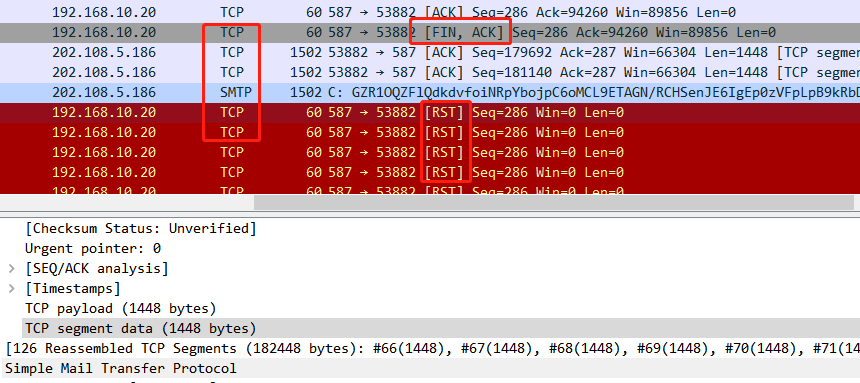
网上有帖子说,FIN,ACK 就是准备断开连接了。又发现Ack之前一直是286。再试,有时没有FIN,有时会有PSH协议,发送短一点的内容则会SMTP|IMF发送成功……耗费好久,重传?socket缓存?感觉是个小问题,只是没懂TCP的报文,去读书。
续:第二天来看,发现RST之前的SMTP携带了126条运输层报文段,共182448字节。针对上图就是53882发送到587的所有未接受数据。而且,服务器也一直未确认286号ACK,双方互相不确认。缓存区满了?
Win是缓存区大小。续2:看完第三章来看。好好分析了一波。搜索
smtp tcp data fragmentWireshark decode SMTP. The content of an email (headers + body) is sentafter the SMTP DATA command. If that content is larger than one TCPsegment, Wireshark will show every packet that belongs to the DATA"command" as "C: DATA fragment" in the Info column. So, those packets arebasically the content of the email. You can see the whole SMTPcommunication.
续3:请教群里的大佬,大佬说包看着没问题,可能是服务器设置的问题(缓存之类的)。打算换一个服务商看看。用GMAIL吧。python使用socks代理, PySocks OK。然而加了代理(127.0.0.1:1080)之后,包抓不到,放弃。这个问题耗费了太久时间,以后再来挑战。
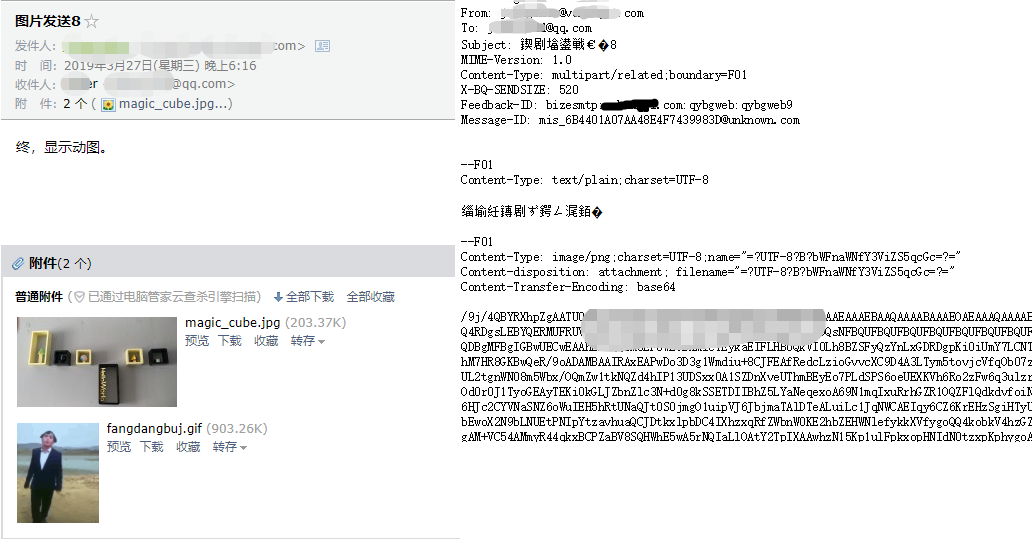
续4:用腾讯企业邮箱的时候,看到也有SMTP服务,就试了一下,可以发送成功。下图右侧为邮件原文。
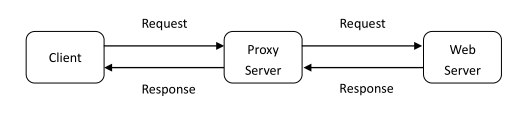
4. HTTP Web Proxy Server (多线程Web代理服务器)
开发一个小型(且简单)的 web 代理服务器, 只理解简单的 get 请求, 但能够处理各种对象:不仅是 HTML 页面, 而且包含图像。
客户端通过代理服务器请求对象,代理服务器将客户端的请求转发到 web 服务器。然后, web 服务器将生成响应消息并将其传递到代理服务器, 而代理服务器又将其发送到客户端。
进阶:
- 增加错误处理;
- 除了GET请求,增加POST请求;
- 添加缓存,并验证缓存是否有效RFC 2068.
遇到makefile问题
书中的框架代码用了
socket.makefile(),用write发送数据readlinds()获取响应,过了好久好久才能发送请求并收到响应。排查发现是因为HTTP/1.1,有可能是KEEP-ALIVE长连接原因导致的timeout。使用
socket.makefile和socket.send/recv发送请求和获取响应对比:# 发送请求 fileobj = c.makefile('wr', encoding='utf-8') request = f"GET http://{filename}/ HTTP/1.0\nHost: {hostn}\n\n" # 这里使用HTTP/1.1协议则会有长连接问题出现 fileobj.write(request) fileobj.flush() # 接收响应 response_data = '' for line in fileobj.readlines(): response_data += linerequest = f"GET http://{filename}/ HTTP/1.0\nHost: {hostn}\n\n" c.send(request.encode()) response_data = c.recv(1024)之后写文件就可以了。
代理方式
代理有两种使用方式,一种是使用IP地址+端口将请求定向到代理服务器
http://localhost:8888/www.google.com,还有一种是设置浏览器代理。这两种的请求数据是不同的,地址访问的话是这种:访问 http://192.168.10.120:1081/www.warcraft0.com 源请求 b'GET /www.warcraft0.com HTTP/1.1\r\nHost: 192.168.10.120:1081\r\nConnection: keep-alive\r\nUpgrade-In...浏览器设置代理是这种:
访问 http://www.warcraft0.com
源请求: b'GET http://www.warcraft0.com/tools HTTP/1.1\r\nHost: www.warcraft0.com\r\nProxy-Connection: keep-alive\r\nCache-Control: max-age=0\r\nUpgrade-Insecure-Requests: 1
第一种地址访问只是调试性质,为了完整的获取请求类型、http/https协议、主机和资源URL,所以针对第二种处理方式开发。而且只考虑HTTP网站(巴特,现在HTTPS很多了找HTTP还不好找,用自己的来)。
针对
GET http://www.warcraft0.com/tools HTTP/1.1\r\nHost: www.warcraft0.com\r\n请求,# 获取请求的属性 http_method = message.split()[0] req_path = message.split()[1] path_data = re.findall(r'((https?):\/\/([^/]+))?(\/.+)?', req_path) if path_data[0] and http_method in ['GET', 'POST']: _, r_protocal, r_host, r_url = path_data[0] print(http_method, r_protocal, r_host, r_url)输出
GET http www.warcraft0.com /tools分别是请求类型、协议、主机(域名)和 URL。将缓存储存到以每个请求哈希命名的文件上
hash(req_path)。这样就可以建立一个socket连接到域名的80端口,
socket.socket(r_host, 80)。之后就可以发送GET请求和接收响应了。处理POST请求
POST请求需要获取额外的请求数据,以及长度。下例的变量:message为源请求,获取部分参数组装为代理请求request
# 获取post参数
r_post_data = re.findall(r'\r\n\r\n((.|\n)*)', message)[0][0]
r_content_type = re.findall(r'Content-Type: ([^\r\n]*)', message)[0]
request = f"""\
POST http://{r_host}{r_url} HTTP/1.0
Host: {r_host}
Content-Type: {r_content_type}
Content-Length: {len(r_post_data)}

{r_post_data}"""
在登录的时候,有时会错误(比如密码无效或者邮箱无效),然后存储了缓存文件,只有请求正确的账号,也会去拿缓存(里面的错误响应)。为了只缓存有效数据,所以写缓存得条件改为:响应状态码为200且是GET请求再存储。
# 响应200 + GET请求 时,再做存储
resp_code = re.findall("^HTTP[^ ]+ +(\d+)", response)[0]
 if int(resp_code) == 200 and http_method == 'GET':
     with open(cache_file, 'w', encoding='utf-8') as f:
         f.write(response_data)
为了维护登录状态,还得设置cookie。Cookie是在登录后响应头中的Set-Cookie数据,比如这种:
Set-Cookie: cowpeas_blog=15389388760310049489E81B9CF4554983F013049CAB3FC000-1554433316-93c1f6e05dd1e16293c87f4442105eb450055470; HttpOnly; Max-Age=86400; Path=/不用存储,直接把响应返回给客户,浏览器会设置Cookie,之后每次请求需要获取Cookie头并发送。
因为可能会取到图片等二进制数据,所以缓存存储为字节类型。现在已经可以完整的处理GET访问、POST登录了。有的页面图片较多,阻塞模式处理的很慢,有一些图片请求就被丢掉了,需要加多线程。
HTTPS代理
在加多线程之前,应该先解决一下HTTPS代理的问题。现在只能代理HTTP请求,对于HTTPS就束手无策。接收到的请求形如:
'CONNECT clients1.google.com:443 HTTP/1.1\r\nHost: clients1.google.com:443\r\nProxy-Connection: keep-alive\r\nSSL该怎么加呢?隧道又是什么?p.s. HTTPS、多线程以及缓存有效期的问题,以后再补吧,这里耗费了太久。
发现有趣的请求:
在地址栏输入时,会调用 suggestion.baidu.zbb.df 获取百度提醒词。 以bas为例:
代理请求 b'GET http://suggestion.baidu.com/su?wd=bas&action=opensearch&ie=UTF-8 HTTP/1.0\nHost: suggestion.baidu.com\n\n'
响应:
HTTP/1.1 200 OK
Date: Thu, 04 Apr 2019 02:48:03 GMT
Server: suggestion.baidu.zbb.df
Content-Length: 125
Content-Type: text/javascript; charset=UTF-8
Cache-Control: private
Expires: Thu, 04 Apr 2019 03:48:03 GMT
Connection: Close

["bas",["base64 解码","base64","巴萨","base64 转图片","bastion","巴塞罗那","bash","base64 加密","basto","base"]]
其他参考
计网6 书籍配套交互式小程序 可以看动图,实验等功能需要注册