当一个主服务器不能正常工作时, Sentinel 会开始一次自动故障迁移操作, 它会将失效主服务器的其中一个从服务器升级为新的主服务器, 并让失效主服务器的其他从服务器改为复制新的主服务器; 当客户端试图连接失效的主服务器时, 集群也会向客户端返回新主服务器的地址, 使得集群可以使用新主服务器代替失效服务器。Sentinel 也使得我们的Redis 拥有了高可用。Sentinel 架构我们配置好了,下面我们结合客户端来进行结合。
回顾:Redis 客户端:Jredis 和 spring-data-redis 整合 ,我们基于原来的上面升级成为 Sentinel 哨兵模式。
修改 RedisConfig ,增加 RedisSentinelConfiguration
- JedisConnectionFactory 的构造方法有,JedisConnectionFactory(RedisSentinelConfiguration sentinelConfig, JedisPoolConfig poolConfig)
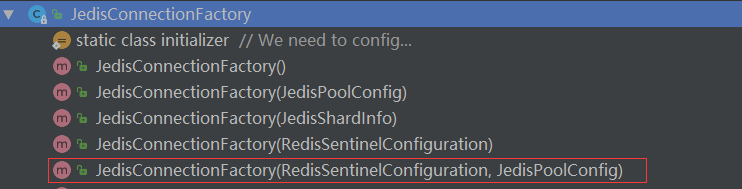
- 因此,我们增加 RedisSentinelConfiguration 的配置就好
		Set<String> setRedisNode = new HashSet<>();
        setRedisNode.add("121.42.157.181:26379");
        setRedisNode.add("121.42.157.181:26380");
        setRedisNode.add("121.42.157.181:26381");
        RedisSentinelConfiguration redisSentinelConfiguration = new RedisSentinelConfiguration("mymaster", setRedisNode);
注意事项:mymaster 为你启动sentinel 里面conf 里面的master的名称,不一致会导致链接不上。
- 修改完整后的 RedisConfig
package com.mingsoft.smoke.config;

import com.fasterxml.jackson.annotation.JsonAutoDetect;
import com.fasterxml.jackson.annotation.PropertyAccessor;
import com.fasterxml.jackson.databind.ObjectMapper;
import lombok.Data;
import org.springframework.beans.factory.annotation.Value;
import org.springframework.context.annotation.Bean;
import org.springframework.context.annotation.Configuration;
import org.springframework.context.annotation.PropertySource;
import org.springframework.core.annotation.Order;
import org.springframework.data.redis.connection.RedisNode;
import org.springframework.data.redis.connection.RedisSentinelConfiguration;
import org.springframework.data.redis.connection.jedis.JedisConnectionFactory;
import org.springframework.data.redis.connection.jedis.JedisSentinelConnection;
import org.springframework.data.redis.connection.jredis.JredisPool;
import org.springframework.data.redis.core.RedisTemplate;
import org.springframework.data.redis.serializer.Jackson2JsonRedisSerializer;
import org.springframework.data.redis.serializer.StringRedisSerializer;
import redis.clients.jedis.JedisPoolConfig;

import java.util.HashSet;
import java.util.Set;

@Data
@Configuration
@PropertySource("classpath:redis.properties")
public class RedisConfig {

    @Value("${redis.pool.maxTotal}")
    private int maxTotal;

    @Value("${redis.pool.maxIdle}")
    private int maxIdle;

    @Value("${redis.pool.numTestsPerEvictionRun}")
    private int numTestsPerEvictionRun;

    @Value("${redis.pool.timeBetweenEvictionRunsMillis}")
    private int timeBetweenEvictionRunsMillis;

    @Value("${redis.pool.minEvictableIdleTimeMillis}")
    private int minEvictableIdleTimeMillis;

    @Value("${redis.pool.softMinEvictableIdleTimeMillis}")
    private int softMinEvictableIdleTimeMillis;

    @Value("${redis.pool.maxWaitMillis}")
    private int maxWaitMillis;

    @Value("${redis.pool.testOnBorrow}")
    private boolean testOnBorrow;

    @Value("${redis.pool.testWhileIdle}")
    private boolean testWhileIdle;

    @Value("${redis.pool.blockWhenExhausted}")
    private boolean blockWhenExhausted;


    @Value("${redis.hostName}")
    private String hostName;

    @Value("${redis.port}")
    private int port;

    @Value("${redis.timeout}")
    private int timeout;

    @Value("${redis.password}")
    private String password;

    @Value("${redis.dbIndex}")
    private int dbIndex;

    @Value("${redis.usePool}")
    private boolean usePool;


    @Bean
    @Order(1)
    public JedisConnectionFactory jedisConnectionFactory() {

        Set<String> setRedisNode = new HashSet<>();
        setRedisNode.add("121.42.157.181:26379");
        setRedisNode.add("121.42.157.181:26380");
        setRedisNode.add("121.42.157.181:26381");
        RedisSentinelConfiguration redisSentinelConfiguration = new RedisSentinelConfiguration("mymaster", setRedisNode);

        JedisPoolConfig config = new JedisPoolConfig();

        //设置链接池的信息
        config.setMaxTotal(maxTotal);
        config.setMaxIdle(maxIdle);
        config.setNumTestsPerEvictionRun(numTestsPerEvictionRun);
        config.setTimeBetweenEvictionRunsMillis(timeBetweenEvictionRunsMillis);
        config.setMinEvictableIdleTimeMillis(minEvictableIdleTimeMillis);
        config.setSoftMinEvictableIdleTimeMillis(softMinEvictableIdleTimeMillis);
        config.setMaxWaitMillis(maxWaitMillis);
        config.setTestOnBorrow(testOnBorrow);
        config.setTestWhileIdle(testWhileIdle);
        config.setBlockWhenExhausted(blockWhenExhausted);

        JedisConnectionFactory connectionFactory = new JedisConnectionFactory(redisSentinelConfiguration,config);
        //设置链接的基本信息
//        connectionFactory.setHostName(hostName);
//        connectionFactory.setPort(port);
        connectionFactory.setTimeout(timeout);
        connectionFactory.setPassword(password);
        connectionFactory.setDatabase(dbIndex);
        connectionFactory.setUsePool(usePool);

        return connectionFactory;
    }


    @Bean
    @Order(2)
    public RedisTemplate<String, Object> redisTemplate(JedisConnectionFactory jedisConnectionFactory) {
        RedisTemplate<String, Object> template = new RedisTemplate<>();
        // 配置连接工厂
        template.setConnectionFactory(jedisConnectionFactory);

        //使用Jackson2JsonRedisSerializer来序列化和反序列化redis的value值(默认使用JDK的序列化方式)
        Jackson2JsonRedisSerializer jacksonSeial = new Jackson2JsonRedisSerializer(Object.class);

        ObjectMapper om = new ObjectMapper();
        // 指定要序列化的域,field,get和set,以及修饰符范围,ANY是都有包括private和public
        om.setVisibility(PropertyAccessor.ALL, JsonAutoDetect.Visibility.ANY);
        // 指定序列化输入的类型,类必须是非final修饰的,final修饰的类,比如String,Integer等会跑出异常
        om.enableDefaultTyping(ObjectMapper.DefaultTyping.NON_FINAL);
        jacksonSeial.setObjectMapper(om);

        // 值采用json序列化
        template.setValueSerializer(jacksonSeial);
        //使用StringRedisSerializer来序列化和反序列化redis的key值
        template.setKeySerializer(new StringRedisSerializer());

        // 设置hash key 和value序列化模式
        template.setHashKeySerializer(new StringRedisSerializer());
        template.setHashValueSerializer(jacksonSeial);
        template.afterPropertiesSet();

        return template;
    }

}
注意事项:这里我把 hostName 和 port 端口设置注释了,因为我们是通过sentinel来链接Redis的。
Redis 服务端的准备
- redis_7000.conf 配置文件
port 7000
daemonize yes
protected-mode no
pidfile "/var/run/redis_7000.pid"
dir "/home/redisRdbLog"
logfile "/home/redisRdbLog/7000.log"
- redis_7001.conf
port 7001
daemonize yes
protected-mode no
pidfile "/var/run/redis_7001.pid"
dir "/home/redisRdbLog"
logfile "/home/redisRdbLog/7001.log"
replicaof 121.42.157.181 7000
- redis_7002.conf
port 7002
daemonize yes
protected-mode no
pidfile "/var/run/redis_7002.pid"
dir "/home/redisRdbLog"
logfile "/home/redisRdbLog/7002.log"
replicaof 121.42.157.181 7000
注意:replicaof 121.42.157.181 7000 ,这里不要使用127.0.0.1,在实验过程中,发现如果主节点断掉,sentinle会通知客户端链接127.0.0.1,然而程序和Redis不再一个服务器,导致链接不上。
Redis sentinel 配置文件
- redis-sentinel-26379.conf
port 26379
daemonize yes
pidfile /var/run/redis-sentinel-26379.pid
dir /home/redisRdbLog/
logfile "redis-sentinel-26379.log"
sentinel monitor mymaster 121.42.157.181 7000 2
sentinel down-after-milliseconds mymaster 30000
sentinel parallel-syncs mymaster 1
sentinel failover-timeout mymaster 180000
sentinel deny-scripts-reconfig yes
- redis-sentinel-26380.conf
port 26380
daemonize yes
pidfile /var/run/redis-sentinel-26380.pid
dir /home/redisRdbLog/
logfile "redis-sentinel-26380.log"
sentinel monitor mymaster 121.42.157.181 7000 2
sentinel down-after-milliseconds mymaster 30000
sentinel parallel-syncs mymaster 1
sentinel failover-timeout mymaster 180000
sentinel deny-scripts-reconfig yes
- redis-sentinel-26381.conf
port 26381
daemonize yes
pidfile /var/run/redis-sentinel-26381.pid
dir /home/redisRdbLog/
logfile "redis-sentinel-26381.log"
sentinel monitor mymaster 121.42.157.181 7000 2
sentinel down-after-milliseconds mymaster 30000
sentinel parallel-syncs mymaster 1
sentinel failover-timeout mymaster 180000
sentinel deny-scripts-reconfig yes
注意:这里的 主节点的 Master 的IP 还是不能写成127.0.0.1。
启动Redis 服务和 sentinel 服务
root@iZ28x8osxzxZ:/opt/redis/ect# redis-server redis_7000.conf
root@iZ28x8osxzxZ:/opt/redis/ect# redis-server redis_7001.conf
root@iZ28x8osxzxZ:/opt/redis/ect# redis-server redis_7002.conf
root@iZ28x8osxzxZ:/opt/redis/ect# redis-sentinel redis-sentinel-26379.conf
root@iZ28x8osxzxZ:/opt/redis/ect# redis-sentinel redis-sentinel-26380.conf
root@iZ28x8osxzxZ:/opt/redis/ect# redis-sentinel redis-sentinel-26381.conf
root@iZ28x8osxzxZ:/opt/redis/ect# redis-cli -p 7000 info replication
# Replication
role:master
connected_slaves:2
slave0:ip=121.42.157.181,port=7001,state=online,offset=20483,lag=1
slave1:ip=121.42.157.181,port=7002,state=online,offset=20483,lag=1
master_replid:015a8e7e78486c184e04c0f040f0f56f06dedc2c
master_replid2:0000000000000000000000000000000000000000
master_repl_offset:20626
second_repl_offset:-1
repl_backlog_active:1
repl_backlog_size:1048576
repl_backlog_first_byte_offset:1
repl_backlog_histlen:20626
root@iZ28x8osxzxZ:/opt/redis/ect# redis-cli -p 26379 info sentinel
# Sentinel
sentinel_masters:1
sentinel_tilt:0
sentinel_running_scripts:0
sentinel_scripts_queue_length:0
sentinel_simulate_failure_flags:0
master0:name=mymaster,status=ok,address=121.42.157.181:7000,slaves=2,sentinels=3
启动项目测试
启动日志可以看到,链接的 JedisSentinePool 里面的 master 121.42.157.181:7000

编写测试代码
import lombok.extern.slf4j.Slf4j;
import org.springframework.beans.factory.annotation.Autowired;
import org.springframework.data.redis.core.RedisTemplate;
import org.springframework.data.redis.core.ValueOperations;
import org.springframework.web.bind.annotation.RequestMapping;
import org.springframework.web.bind.annotation.RestController;
@RequestMapping("/redis")
@RestController
@Slf4j
public class RedisTest {
@Autowired
private RedisTemplate<String,Object> redisTemplate;
@RequestMapping("/index.do")
public String redisIndex(){
while (true){
try{
ValueOperations valueOperations = redisTemplate.opsForValue();
for (int i = 0 ;i<10000;i++){
valueOperations.set("k-"+i,"v-"+i);
log.info("{} 的值是:{}","k-"+i,valueOperations.get("k-"+i));
}
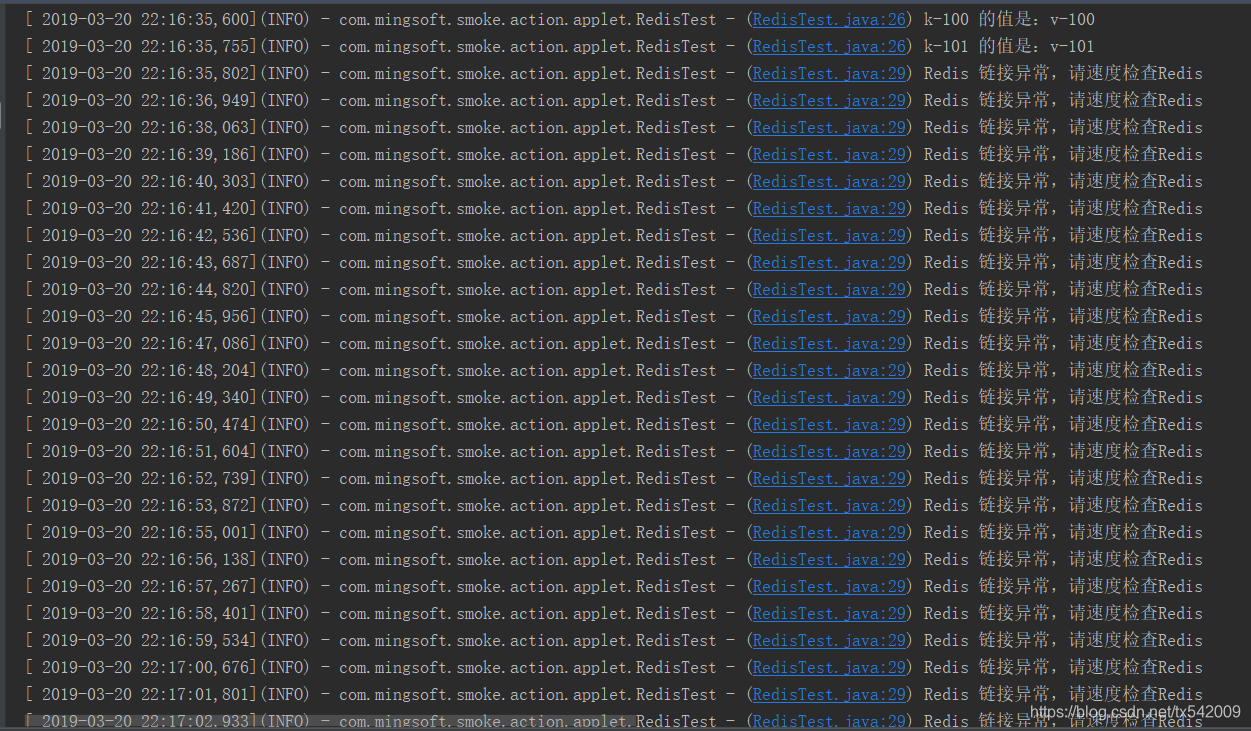
}catch (Exception e){
log.info("Redis 链接异常,请速度检查Redis");
}
}
}
}
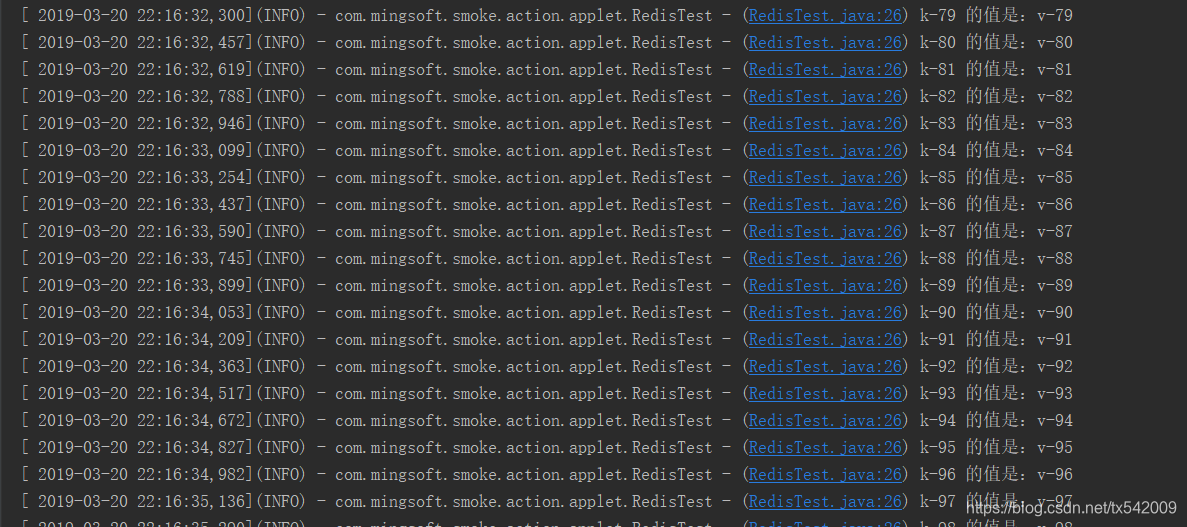
访问对应的接口,中途kill 7000端口服务,模拟故障
刚开始运行
关闭 7000 端口服务,redis 瞬间崩溃
root@iZ28x8osxzxZ:/opt/redis/ect# ps -ef | grep redis-
root     22222     1  0 22:08 ?        00:00:00 redis-server *:7000
root     22227     1  0 22:08 ?        00:00:00 redis-server *:7001
root     22233     1  0 22:08 ?        00:00:00 redis-server *:7002
root     22336     1  0 22:15 ?        00:00:00 redis-sentinel *:26379 [sentinel]
root     22341     1  0 22:15 ?        00:00:00 redis-sentinel *:26380 [sentinel]
root     22346     1  0 22:15 ?        00:00:00 redis-sentinel *:26381 [sentinel]
root     22354 22042  0 22:15 pts/0    00:00:00 grep --color=auto redis-
root@iZ28x8osxzxZ:/opt/redis/ect# kill -9 22222
sentinel 发现 master 挂掉,推荐新的slave 节点为master
从日志可以看出,sentinel 推荐了 端口为7002 为新的Master

最后,重新启动 7000 端口的服务
root@iZ28x8osxzxZ:/opt/redis/ect# redis-server redis_7000.conf
查看redis 对应的日志来深度了解sentinel机制
- redis_7000 对应的日志 7000.log
22222:M 20 Mar 2019 22:08:34.770 * Starting BGSAVE for SYNC with target: disk
22222:M 20 Mar 2019 22:08:34.771 * Background saving started by pid 22231
22231:C 20 Mar 2019 22:08:34.774 * DB saved on disk
22231:C 20 Mar 2019 22:08:34.775 * RDB: 4 MB of memory used by copy-on-write
22222:M 20 Mar 2019 22:08:34.782 * Background saving terminated with success
22222:M 20 Mar 2019 22:08:34.782 * Synchronization with replica 121.42.157.181:7001 succeeded
22222:M 20 Mar 2019 22:08:37.238 * Replica 121.42.157.181:7002 asks for synchronization
22222:M 20 Mar 2019 22:08:37.238 * Partial resynchronization request from 121.42.157.181:7002 accepted. Sending 0 bytes of backlog starting from offset 1.
22319:C 20 Mar 2019 22:14:34.313 # oO0OoO0OoO0Oo Redis is starting oO0OoO0OoO0Oo
22319:C 20 Mar 2019 22:14:34.313 # Redis version=5.0.3, bits=64, commit=00000000, modified=0, pid=22319, just started
22319:C 20 Mar 2019 22:14:34.313 # Configuration loaded
22320:M 20 Mar 2019 22:14:34.316 # Could not create server TCP listening socket *:7000: bind: Address already in use
结论:我没有执行kill 的时候 master 已经开始 主从复制了,执行 bgsave 然后异步的同步给7001,和7002,执行kill 后,已经不能链接 7000 端口了。

- redis_7001 对应的日志 7001.log
22227:S 20 Mar 2019 22:16:35.695 # Connection with master lost.
22227:S 20 Mar 2019 22:16:35.695 * Caching the disconnected master state.
22227:S 20 Mar 2019 22:16:35.822 * Connecting to MASTER 121.42.157.181:7000
22227:S 20 Mar 2019 22:16:35.822 * MASTER <-> REPLICA sync started
22227:S 20 Mar 2019 22:16:35.822 # Error condition on socket for SYNC: Connection refused
22227:S 20 Mar 2019 22:16:36.823 * Connecting to MASTER 121.42.157.181:7000
22227:S 20 Mar 2019 22:16:36.824 * MASTER <-> REPLICA sync started
22227:S 20 Mar 2019 22:16:36.824 # Error condition on socket for SYNC: Connection refused
22227:S 20 Mar 2019 22:16:37.826 * Connecting to MASTER 121.42.157.181:7000

====== 分割线 ======
22227:S 20 Mar 2019 22:17:07.048 * REPLICAOF 121.42.157.181:7002 enabled (user request from 'id=10 addr=121.42.157.181:43006 fd=13 name=sentinel-a6d57c03-cmd age=108 idle=0 flags=x db=0 sub=0 psub=0 multi=3 qbuf=297 qbuf-free=32471 obl=36 oll=0 omem=0 events=r cmd=exec')
22227:S 20 Mar 2019 22:17:07.048 # CONFIG REWRITE executed with success.
22227:S 20 Mar 2019 22:17:07.881 * Connecting to MASTER 121.42.157.181:7002
22227:S 20 Mar 2019 22:17:07.882 * MASTER <-> REPLICA sync started
结论:当从节点发现连接不上主节点Master后,后有一段时间不断地去ping,当判断Master 挂掉了,7001 端口,收到了一个请求,让他去从 7002 来 复制数据(REPLICAOF 121.42.157.181:7002),成为了 7002 的从节点slave(Connecting to MASTER 121.42.157.181:7002)。
- redis_7002 对应的日志 7002.log
22233:S 20 Mar 2019 22:16:35.695 # Connection with master lost.
22233:S 20 Mar 2019 22:16:35.695 * Caching the disconnected master state.
22233:S 20 Mar 2019 22:16:36.322 * Connecting to MASTER 121.42.157.181:7000
22233:S 20 Mar 2019 22:16:36.322 * MASTER <-> REPLICA sync started
22233:S 20 Mar 2019 22:16:36.322 # Error condition on socket for SYNC: Connection refused
22233:S 20 Mar 2019 22:16:37.324 * Connecting to MASTER 121.42.157.181:7000
22233:S 20 Mar 2019 22:16:37.324 * MASTER <-> REPLICA sync started
22233:S 20 Mar 2019 22:16:37.324 # Error condition on socket for SYNC: Connection refused
==== 分割线====
22233:M 20 Mar 2019 22:17:06.044 * MASTER MODE enabled (user request from 'id=10 addr=121.42.157.181:52667 fd=13 name=sentinel-a6d57c03-cmd age=107 idle=0 flags=x db=0 sub=0 psub=0 multi=3 qbuf=140 qbuf-free=32628 obl=36 oll=0 omem=0 events=r cmd=exec')
22233:M 20 Mar 2019 22:17:06.044 # CONFIG REWRITE executed with success.
22233:M 20 Mar 2019 22:17:07.882 * Replica 121.42.157.181:7001 asks for synchronization
22233:M 20 Mar 2019 22:17:07.882 * Partial resynchronization request from 121.42.157.181:7001 accepted. Sending 980 bytes of backlog starting from offset 20838.
22233:M 20 Mar 2019 22:17:44.688 * Replica 121.42.157.181:7000 asks for synchronization
22233:M 20 Mar 2019 22:17:44.688 * Partial resynchronization not accepted: Replication ID mismatch (Replica asked for '12250c76b43cfd7ba461d4e8718a777645140ea9', my replication IDs are '7382e3174ca88ecdcec62d124c173d1c9a63094f' and 'c073c47da0a6b936732431e460c70b61f6863d2a')
22233:M 20 Mar 2019 22:17:44.688 * Starting BGSAVE for SYNC with target: disk
22233:M 20 Mar 2019 22:17:44.689 * Background saving started by pid 22367
22367:C 20 Mar 2019 22:17:44.692 * DB saved on disk
22367:C 20 Mar 2019 22:17:44.692 * RDB: 2 MB of memory used by copy-on-write
22233:M 20 Mar 2019 22:17:44.752 * Background saving terminated with success
结论:前面和7001 一致,后面也收到成为主节点的请求,成为了主节点,收到了 7001 的请求(Replica 121.42.157.181:7001 asks for synchronization)后,执行 bgsave 备份的命令,进行主从复制。
- redis-sentinel-26379 的日志,redis-sentinel-26379.log
22139:X 20 Mar 2019 21:59:19.309 # +sdown master mymaster 121.42.157.181 7000
22139:X 20 Mar 2019 21:59:19.393 # +odown master mymaster 121.42.157.181 7000 #quorum 3/2
这里 sdown 发现了 7000 端口已经失联了,odown 触发了投票机制,3 个sentinel 有2 个认为 7000挂掉了,就决定 7000端口失联了。(之前 sentinel.conf 对应里面配置的2)
22139:X 20 Mar 2019 21:59:19.393 # +try-failover master mymaster 121.42.157.181 7000
22139:X 20 Mar 2019 21:59:19.395 # +vote-for-leader 468c594a838f9ffc1e40408982afbc3a460282ea 1
22139:X 20 Mar 2019 21:59:19.399 # 4b3f32a20c31b87bebc4e970284abba38d49d31b voted for 468c594a838f9ffc1e40408982afbc3a460282ea 1
22139:X 20 Mar 2019 21:59:19.399 # 95aa787a23d699a9dd3243a21299e99c6e3a6202 voted for 468c594a838f9ffc1e40408982afbc3a460282ea 1
22139:X 20 Mar 2019 21:59:19.462 # +elected-leader master mymaster 121.42.157.181 7000
22139:X 20 Mar 2019 21:59:19.462 # +failover-state-select-slave master mymaster 121.42.157.181 7000
sentinel-26379 发起了投票,希望成为领导者,后面sentinel-26380和sentinel26381 都投票给了26379.
22139:X 20 Mar 2019 21:59:19.528 # +selected-slave slave 121.42.157.181:7002 121.42.157.181 7002 @ mymaster 121.42.157.181 7000
22139:X 20 Mar 2019 21:59:19.528 * +failover-state-send-slaveof-noone slave 121.42.157.181:7002 121.42.157.181 7002 @ mymaster 121.42.157.181 7000
选择 slave 7002 成为 master,并且执行 slaveof no one 成为 Master(+failover-state-send-slaveof-noone slave 121.42.157.181:7002)
22139:X 20 Mar 2019 21:59:19.611 * +failover-state-wait-promotion slave 121.42.157.181:7002 121.42.157.181 7002 @ mymaster 121.42.157.181 7000
22139:X 20 Mar 2019 21:59:20.254 # +promoted-slave slave 121.42.157.181:7002 121.42.157.181 7002 @ mymaster 121.42.157.181 7000
22139:X 20 Mar 2019 21:59:20.254 # +failover-state-reconf-slaves master mymaster 121.42.157.181 7000
22139:X 20 Mar 2019 21:59:20.303 * +slave-reconf-sent slave 121.42.157.181:7001 121.42.157.181 7001 @ mymaster 121.42.157.181 7000
成为 master 后,通知 7001 成为 7002 的slave
22336:X 20 Mar 2019 22:15:12.470 # +monitor master mymaster 121.42.157.181 7000 quorum 2
22336:X 20 Mar 2019 22:15:12.470 * +slave slave 121.42.157.181:7001 121.42.157.181 7001 @ mymaster 121.42.157.181 7000
22336:X 20 Mar 2019 22:15:12.472 * +slave slave 121.42.157.181:7002 121.42.157.181 7002 @ mymaster 121.42.157.181 7000
22336:X 20 Mar 2019 22:15:18.012 * +sentinel sentinel 4571876f76677c1be4b340ea6823bb88c4c9f68d 121.42.157.181 26380 @ mymaster 121.42.157.181 7000
22336:X 20 Mar 2019 22:15:20.519 * +sentinel sentinel a6d57c039f42241fda388f37c6bfaab9c7dee1d1 121.42.157.181 26381 @ mymaster 121.42.157.181 7000
后面发现 7000 复活了,又通知 7000 成为 7002 的 slave。
- redis-sentinel-26380 的日志,redis-sentinel-26380.log
22144:X 20 Mar 2019 21:59:19.297 # +sdown master mymaster 121.42.157.181 7000
22144:X 20 Mar 2019 21:59:19.397 # +new-epoch 1
22144:X 20 Mar 2019 21:59:19.399 # +vote-for-leader 468c594a838f9ffc1e40408982afbc3a460282ea 1
22144:X 20 Mar 2019 21:59:19.399 # +odown master mymaster 121.42.157.181 7000 #quorum 2/2
也是发现 7000 挂掉了,进行投票后,推举新的 leader
22144:X 20 Mar 2019 21:59:20.304 # +switch-master mymaster 121.42.157.181 7000 121.42.157.181 7002
收到leader 的通知,7002 成为新的master
其实 sentinel 有问题会推举一个leader,然后交给一个leader去完成操作,其他的等待leader 的通知就好了。 26381 和 26380 差不多。
最后,我们查看一下redis 服务的配置文件
- redis_7000.conf
root@iZ28x8osxzxZ:/opt/redis/ect# cat redis_7000.conf
port 7000
daemonize yes
protected-mode no
pidfile "/var/run/redis_7000.pid"
dir "/home/redisRdbLog"
logfile "/home/redisRdbLog/7000.log"
# Generated by CONFIG REWRITE
replicaof 121.42.157.181 7002
一开始是 Master,后面进程被终止后,被sentinel发现,竞选了新的master,后面重新启动,成为了7002的slave。
- redis_7001.conf
root@iZ28x8osxzxZ:/opt/redis/ect# cat redis_7001.conf
port 7001
daemonize yes
protected-mode no
pidfile "/var/run/redis_7001.pid"
dir "/home/redisRdbLog"
logfile "/home/redisRdbLog/7001.log"
replicaof 121.42.157.181 7002
master 由 7000 变成了 7002
- redis_7002.conf
root@iZ28x8osxzxZ:/opt/redis/ect# cat redis_7002.conf
port 7002
daemonize yes
protected-mode no
pidfile "/var/run/redis_7002.pid"
dir "/home/redisRdbLog"
logfile "/home/redisRdbLog/7002.log"
从节点的 replicaof 的命令已经被删除了。
从 客户端的操作,再到分析对应的日志,最后查看变化后的配置,可以更加深刻的了解 Redis 的 Sentinel。
之前准备学习的时候写博客,可是都没有坚持下去,希望这次可以有始有终。
Redis 坚持第一天 :为什么要使用 redis ?
Redis 坚持第二天 :Redis 的安装与启动
Redis 坚持第三天 :Redis 使用配置文件启动,常见配置学习。
Redis 坚持第四天 :
- Redis 五种常见的数据结构:String
- Redis 五种常见的数据结构:Hash
- Redis 五种常见的数据结构:List
- Redis 五种常见的数据结构:Set
- Redis 五种常见的数据结构:zset
Redis 坚持第五天 :Redis 客户端:Jredis 和 spring-data-redis 整合。
Redis 坚持第六天 :Redis 慢查询日志。
Redis 坚持第七天 :Redis pipeline。
Redis 坚持第八天 :Redis 发布订阅。
Redis 坚持第九天 :Redis bitmp。
Redis 坚持第十天 :Redis HyperLogLogs。
Redis 坚持第十一天 :Redis GEO。
Redis 坚持第十二天 :Redis 持久化:RDB。
Redis 坚持第十三天 :Redis 持久化 :AOF。
Redis 坚持第十四天 :Redis :主从复制。
Redis 坚持第十五天 :Redis Sentinel 架构配置!!!
Redis 坚持第十六天 :Redis 客户端整合:spring + redis + sentinel(注解方式配置)