目的
制作一个虚拟摇杆,并使用虚拟摇杆控制角色行走
一、介绍虚拟摇杆
- 你可能想过如何控制你的士兵在人群中走动
- 在格斗游戏中如何控制角色战斗和移动
- 操作虚拟摇杆控制角色在场景中移动
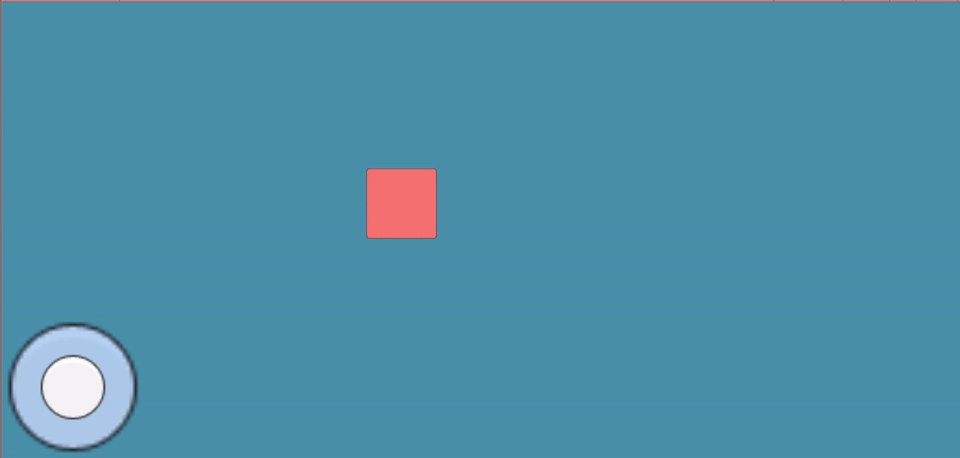
在你的脑海中想象一个简单的虚拟摇杆,我们将在接下来的内容中一步步的实现它。我们实现的效果如下图:
二、Scene 配置
配置你的场景结构,如下图所示那样。
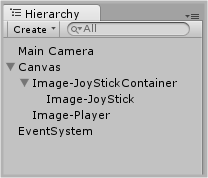

在这里,我们使用一个简单的2D图像代表我们将要控制移动的玩家。
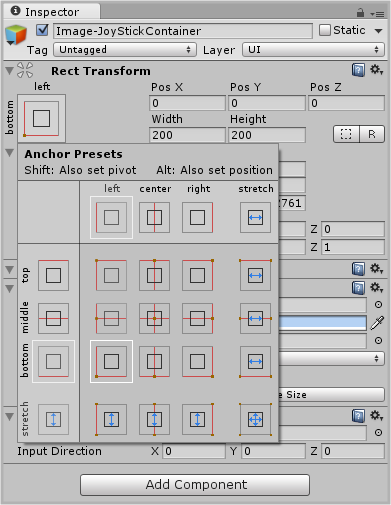
不要忘记设置Joystick Container 的Pivot (锚点)为下图所示,否则你将会发现你的Joystick 在不同的分辨率下,会处于不同的位置。
三、实现脚本
将这个脚本附加到JoystickContainer上:
using UnityEngine;
using UnityEngine.UI;
using UnityEngine.EventSystems;

public class VJHandler : MonoBehaviour,IDragHandler, IPointerUpHandler, IPointerDownHandler {
    private Image jsContainer;
    private Image joystick;

    public Vector3 InputDirection ;

    void Start(){

        jsContainer = GetComponent<Image>();
        joystick = transform.GetChild(0).GetComponent<Image>(); //this command is used because there is only one child in hierarchy
        InputDirection = Vector3.zero;
    }

    public void OnDrag(PointerEventData ped){
        Vector2 position = Vector2.zero;

        //获取输入方向
        RectTransformUtility.ScreenPointToLocalPointInRectangle
                (jsContainer.rectTransform,
                ped.position,
                ped.pressEventCamera,
                out position);

            position.x = (position.x/jsContainer.rectTransform.sizeDelta.x);
            position.y = (position.y/jsContainer.rectTransform.sizeDelta.y);

            float x = (jsContainer.rectTransform.pivot.x == 1f) ? position.x *2 + 1 : position.x *2 - 1;
            float y = (jsContainer.rectTransform.pivot.y == 1f) ? position.y *2 + 1 : position.y *2 - 1;

            InputDirection = new Vector3 (x,y,0);
            InputDirection = (InputDirection.magnitude > 1) ? InputDirection.normalized : InputDirection;

            //限定Joystick能移动的区域
            joystick.rectTransform.anchoredPosition = new Vector3 (InputDirection.x * (jsContainer.rectTransform.sizeDelta.x/3)
                                                                   ,InputDirection.y * (jsContainer.rectTransform.sizeDelta.y)/3);

    }

    public void OnPointerDown(PointerEventData ped){

        OnDrag(ped);
    }

    public void OnPointerUp(PointerEventData ped){

        InputDirection = Vector3.zero;
        joystick.rectTransform.anchoredPosition = Vector3.zero;
    }
}
在上面的脚本中,实现了三个EventSystems的接口,如下表:
| Interface | Methods | Methods Invoke |
|---|---|---|
| IDragHandler | OnDrag(PointerEventData eventData) | Drag event occurs |
| IPointerUpHandler | OnPointerDown(PointerEventData eventData) | PointerDown event occurs |
| IPointerDownHandler | OnPointerUp(PointerEventData eventData) | PointerUp event occurs |
适用于鼠标和触摸事件
现在,看下这个脚本都做了哪些工作:
-
OnDrag() 传递一个PointerEventData类型的参数, 这个类与鼠标和触摸事件相关联,我们仅需要获取几个数值,详细信息可以参考如下:
详细 -
当事件的触发在这个对象上时,RectTransformUtility.ScreenPointToLocalPointInRectangle() 这个函数返回一个bool值,并输出当前的坐标值,注意:当我们执行按下事件时,传递的是屏幕坐标,我们需要进行坐标转换,即使用这个函数将当前的屏幕坐标转换到UGUI坐标。
-
OnPointerDown() 被用来调用OnDrag()方法,这样在我们触摸或者点击遥感十,可以立刻触发这个事件。
-
OnPointerUp() 重置遥感的方向和位置为初始位置。
将以下脚本附加到需要控制的角色上:
using UnityEngine;
using System.Collections;
public class MovePlayers : MonoBehaviour {
    public float moveSpeed = 05f;
    public VJHandler jsMovement;

    private Vector3 direction;
    private float xMin,xMax,yMin,yMax;

    void Update () {

        direction = jsMovement.InputDirection; //InputDirection can be used as per the need of your project

        if(direction.magnitude != 0){

            transform.position += direction * moveSpeed;
            transform.position = new Vector3(Mathf.Clamp(transform.position.x,xMin,xMax),Mathf.Clamp(transform.position.y,yMin,yMax),0f);//to restric movement of player
        }
    }

    void Start(){

        //Initialization of boundaries
        xMax = Screen.width - 50; // I used 50 because the size of player is 100*100
        xMin = 50;
        yMax = Screen.height - 50;
        yMin = 50;
    }
}
这个脚本仅有一个Update()方法,它根据当前输入的虚拟摇杆的输入方向控制角色移动。
不要忘记,在编辑器中将 JoystickContainer 对象分配给VJHandler 上的jsMovement对象。
Demo地址:
(https://github.com/tejas123/beginners-guide-learn-to-make-simple-virtual-joystick-in-unity.git)