一、多容器复杂应用的部署
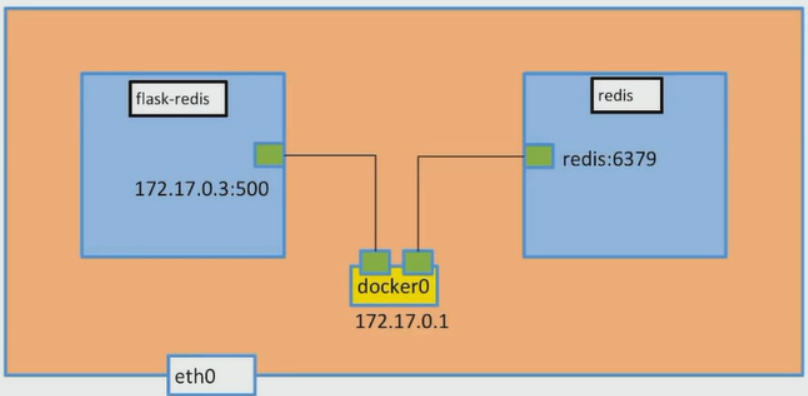
程序介绍:一个简单的python程序,但是需要去连接redis获取数据,并会进行数据的写入操作。这是在单台主机的操作,为接下来的跨主机网路通信做准备。
1.1 准备python程序
注意程序里面连接的REDIS主机的配置为REDIS_HOST的一个变量!
[root@docker01 chapter4]# cat app.py
from flask import Flask
from redis import Redis
import os
import socket

app = Flask(__name__)
redis = Redis(host=os.environ.get('REDIS_HOST', '127.0.0.1'), port=6379)


@app.route('/')
def hello():
    redis.incr('hits')
    return 'Hello Container World! I have been seen %s times and my hostname is %s.\n' % (redis.get('hits'),socket.gethostname())


if __name__ == "__main__":
    app.run(host="0.0.0.0", port=5000, debug=True)
1.2 编写Dockerfile,并制作镜像
- 第一步:编写dockerfile
FROM python:2.7
LABEL maintainer="this is test message"
COPY . /app/
WORKDIR /app
RUN pip install flask redis
EXPOSE 5000
CMD ["python","app.py"]
- 第二步:通过dockerfile生成image
docker build -t flask-redis .
1.3 运行两个容器
- 第一步:运行一个redis容器
[root@docker01 chapter4]# docker run -d --name redis redis
- 第二步:运行app容器
#通过-e参数指定环境变量
docker run -d -p 5000:5000 --link redis -e REDIS_HOST=redis --name flask-redis flask-redis
- 第三步:结果查看
#进入容器内部,并访问5000端口
root@a116f14ec6c0:/app# curl 127.0.0.1:5000
Hello Container World! I have been seen 1 times and my hostname is a116f14ec6c0.
root@a116f14ec6c0:/app# curl 127.0.0.1:5000
Hello Container World! I have been seen 2 times and my hostname is a116f14ec6c0.
root@a116f14ec6c0:/app# curl 127.0.0.1:5000
Hello Container World! I have been seen 3 times and my hostname is a116f14ec6c0.
root@a116f14ec6c0:/app# curl 127.0.0.1:5000
Hello Container World! I have been seen 4 times and my hostname is a116f14ec6c0.
root@a116f14ec6c0:/app# curl 127.0.0.1:5000
Hello Container World! I have been seen 5 times and my hostname is a116f14ec6c0.

#在外部访问宿主机5000端口
[root@docker01 chapter4]# curl 192.168.1.38:5000
Hello Container World! I have been seen 6 times and my hostname is a116f14ec6c0.
[root@docker01 chapter4]# curl 192.168.1.38:5000
Hello Container World! I have been seen 7 times and my hostname is a116f14ec6c0.
[root@docker01 chapter4]# curl 192.168.1.38:5000
Hello Container World! I have been seen 8 times and my hostname is a116f14ec6c0.
[root@docker01 chapter4]# curl 192.168.1.38:5000
Hello Container World! I have been seen 9 times and my hostname is a116f14ec6c0.
[root@docker01 chapter4]# curl 192.168.1.38:5000
Hello Container World! I have been seen 10 times and my hostname is a116f14ec6c0.
二、Docker跨主机通信
实验环境:
| 序号 | 主机名 | IP地址 |
| 1 | docker01 | 192.168.1.38 |
| 2 | docker02 | 192.168.1.39 |
2.1 overlay网络介绍
Docerk overlay 网络需要一个 key-value 数据库用于保存网络状态信息,包括 Network、Endpoint、IP 等,Consul、Etcd 和 ZooKeeper 都是 Docker 支持的 key-vlaue 软件。在这里介绍etcd以及console两种数据库的搭建方法!
2.2 搭建etcd数据库
- 第一步:在docker01上运行如下命令
cd /usr/local/src/
wget https://github.com/coreos/etcd/releases/download/v3.0.12/etcd-v3.0.12-linux-amd64.tar.gz
tar zxvf etcd-v3.0.12-linux-amd64.tar.gz
cd etcd-v3.0.12-linux-amd64
./etcd --name docker01 --initial-advertise-peer-urls http://192.168.1.38:2380 \
--listen-peer-urls http://192.168.1.38:2380 \
--listen-client-urls http://192.168.1.38:2379,http://127.0.0.1:2379 \
--advertise-client-urls http://192.168.1.38:2379 \
--initial-cluster-token etcd-cluster \
--initial-cluster docker01=http://192.168.1.38:2380,docker02=http://192.168.1.39:2380 \
--initial-cluster-state new &
- 第二步:在docker02上执行如下命令
cd /usr/local/src/
wget https://github.com/coreos/etcd/releases/download/v3.0.12/etcd-v3.0.12-linux-amd64.tar.gz
tar zxvf etcd-v3.0.12-linux-amd64.tar.gz
cd etcd-v3.0.12-linux-amd64
./etcd --name docker02 --initial-advertise-peer-urls http://192.168.1.39:2380 \
--listen-peer-urls http://192.168.1.39:2380 \
--listen-client-urls http://192.168.1.39:2379,http://127.0.0.1:2379 \
--advertise-client-urls http://192.168.1.39:2379 \
--initial-cluster-token etcd-cluster \
--initial-cluster docker01=http://192.168.1.38:2380,docker02=http://192.168.1.39:2380 \
--initial-cluster-state new &
- 第三步:分别在两个节点检查etcd cluster状态
#在docker01上检查
[root@docker01 etcd-v3.0.12-linux-amd64]# cd /usr/local/src/etcd-v3.0.12-linux-amd64
[root@docker01 etcd-v3.0.12-linux-amd64]# ./etcdctl cluster-health
member 54938145269cc13b is healthy: got healthy result from http://192.168.1.39:2379
member d243f77ba7647e92 is healthy: got healthy result from http://192.168.1.38:2379
cluster is healthy

#在docker02上检查
[root@docker02 etcd-v3.0.12-linux-amd64]# cd /usr/local/src/etcd-v3.0.12-linux-amd64
[root@docker02 etcd-v3.0.12-linux-amd64]# ./etcdctl cluster-health
member 54938145269cc13b is healthy: got healthy result from http://192.168.1.39:2379
member d243f77ba7647e92 is healthy: got healthy result from http://192.168.1.38:2379
cluster is healthy
- 第四步:修改/etc/docker/daemon.json配置文件
#docker01修改后内容如下
{
  "registry-mirrors": ["https://f0lt06pg.mirror.aliyuncs.com"],
  "dns": ["8.8.8.8","223.5.5.5"],
  "data-root": "/data/docker",
  "cluster-store": "etcd://192.168.1.38:2379",
  "cluster-advertise": "192.168.1.38:2375"
}


#docker02修改后内容如下
{
  "registry-mirrors": ["https://f0lt06pg.mirror.aliyuncs.com"],
  "dns": ["8.8.8.8","223.5.5.5"],
  "data-root": "/data/docker",
  "cluster-store": "etcd://192.168.1.39:2379",
  "cluster-advertise": "192.168.1.39:2375"
}
- 第五步:重启docker服务
systemctl daemon-reload
systemctl restart docker.service
2.3 搭建Consul数据库(etcd和consul选择其一即可)
- 第一步:修改/etc/docker/daemon.json配置文件
#docker01的配置
[root@docker01 docker]# cat /etc/docker/daemon.json
{
  "registry-mirrors": ["https://f0lt06pg.mirror.aliyuncs.com"],
  "dns": ["8.8.8.8","223.5.5.5"],
  "data-root": "/data/docker",
  "cluster-store": "consul://192.168.1.38:8500"
}

#docker02的配置
[root@docker02 docker]# cat /etc/docker/daemon.json
{
  "registry-mirrors": ["https://f0lt06pg.mirror.aliyuncs.com"],
  "dns": ["8.8.8.8","223.5.5.5"],
  "data-root": "/data/docker",
  "cluster-store": "consul://192.168.1.38:8500",
  "cluster-advertise": "192.168.1.39:2375"
- 第二步:在docker01上运行consul容器
docker run -d -p 8500:8500 --name consul progrium/consul -server -bootstrap
- 第三步:重启docker服务
sudo systemctl daemon-reload
sudo systemctl restart docker
- 第四步:浏览器验证
访问地址:http://192.168.1.38:8500
2.4 创建overlay网络
- 第一步:在docker01上创建一个damo的overlay network
[root@docker01 ~]# docker network ls
NETWORK ID          NAME                DRIVER              SCOPE
9c92b0248bc2        bridge              bridge              local
d12ebb4b73d8        host                host                local
c2fb11041077        none                null                local
[root@docker01 ~]# docker network create -d overlay demo
41149db31f6e74074b015c29a234cfda680a882717e4372e5499df175ee3b34d
[root@docker01 ~]# docker network ls
NETWORK ID          NAME                DRIVER              SCOPE
9c92b0248bc2        bridge              bridge              local
41149db31f6e        demo                overlay             global
d12ebb4b73d8        host                host                local
c2fb11041077        none                null                local
- 第二步:已经可以在node2上看到这个overlay网络了
[root@docker02 ~]# docker network ls
NETWORK ID          NAME                DRIVER              SCOPE
b26e09d0d6a9        bridge              bridge              local
41149db31f6e        demo                overlay             global
b111f83b1407        host                host                local
3ae0f95a75f8        none                null                local
- 第三步:查看demo网络的详细信息
[root@docker01 ~]# docker network inspect demo
[
    {
        "Name": "demo",
        "Id": "41149db31f6e74074b015c29a234cfda680a882717e4372e5499df175ee3b34d",
        "Created": "2019-03-31T00:32:44.9129614+08:00",
        "Scope": "global",
        "Driver": "overlay",
        "EnableIPv6": false,
        "IPAM": {
            "Driver": "default",
            "Options": {},
            "Config": [
                {
                    "Subnet": "10.0.0.0/24",
                    "Gateway": "10.0.0.1"
                }
            ]
        },
        "Internal": false,
        "Attachable": false,
        "Ingress": false,
        "ConfigFrom": {
            "Network": ""
        },
        "ConfigOnly": false,
        "Containers": {},
        "Options": {},
        "Labels": {}
    }
]
- 第三步:如果是通过etcd创建的,可以查看etcd的key-value
[root@docker01 etcd-v3.0.12-linux-amd64]# ./etcdctl ls
/docker
[root@docker01 etcd-v3.0.12-linux-amd64]# ./etcdctl ls /docker
/docker/nodes
/docker/network
[root@docker01 etcd-v3.0.12-linux-amd64]# ./etcdctl ls /docker/nodes/
/docker/nodes/192.168.1.39:2375
/docker/nodes/192.168.1.38:2375
[root@docker01 etcd-v3.0.12-linux-amd64]# ./etcdctl ls /docker/network/
/docker/network/v1.0
[root@docker01 etcd-v3.0.12-linux-amd64]# ./etcdctl ls /docker/network/v1.0/
/docker/network/v1.0/idm
/docker/network/v1.0/overlay
/docker/network/v1.0/network
/docker/network/v1.0/endpoint_count
/docker/network/v1.0/endpoint
/docker/network/v1.0/ipam
[root@docker01 etcd-v3.0.12-linux-amd64]# ./etcdctl ls /docker/network/v1.0/network/
/docker/network/v1.0/network/41149db31f6e74074b015c29a234cfda680a882717e4372e5499df175ee3b34d
2.5 overlay网络使用案例介绍
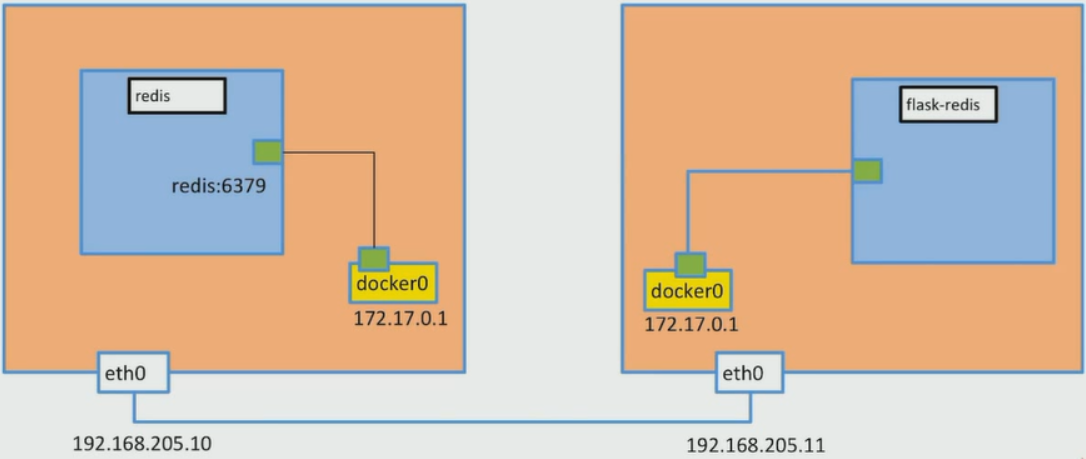
这里就使用第一章节的flask-redis来做实验,在docke01上部署redis容器,在docker02上部署app容器,并保证能正常运行!
- 第一步:在docker01上运行redis容器,并加入到demo网络
docker run -d --name redis --network demo redis
- 第二步:在docker02上运行flask-redis容器,也加入到demo网络
docker run -d -p 5000:5000 --network demo -e REDIS_HOST=redis --name flask-redis flask-redis
- 第三步:访问docker02的5000端口,查看结果。如果出现和第一章相同结果,说明跨主机网络已互通!
[root@docker01 etcd-v3.0.12-linux-amd64]# curl 192.168.1.39:5000
Hello Container World! I have been seen 1 times and my hostname is 420016e250d4.
[root@docker01 etcd-v3.0.12-linux-amd64]# curl 192.168.1.39:5000
Hello Container World! I have been seen 2 times and my hostname is 420016e250d4.
[root@docker01 etcd-v3.0.12-linux-amd64]# curl 192.168.1.39:5000
Hello Container World! I have been seen 3 times and my hostname is 420016e250d4.
[root@docker01 etcd-v3.0.12-linux-amd64]# curl 192.168.1.39:5000
Hello Container World! I have been seen 4 times and my hostname is 420016e250d4.
[root@docker01 etcd-v3.0.12-linux-amd64]# curl 192.168.1.39:5000
Hello Container World! I have been seen 5 times and my hostname is 420016e250d4.
docker跨主机通信就介绍到此~~