逻辑:client -> nginx -> php-fpm ->redis ->mysql
redis可以直接当数据库用。当线程结束后memecahe中的数据就没了,redis的话磁盘中会有数据可以恢复。
可以在redis中开发钩子函数
实验环境:
lamp:server2
redis:server3
mysql:server4
server2:
1:关闭之前的redis服务,以免对实验造成影响
[root@server2 ~]# yum install psmisc -y

[root@server2 ~]# killall redis-server
2:安装实验所需要的插件
[root@server2 ~]# ls
mha4mysql-node-0.58-0.el7.centos.noarch.rpm          redis-5.0.3
mysql-community-client-5.7.24-1.el7.x86_64.rpm       redis-5.0.3.tar.gz
mysql-community-common-5.7.24-1.el7.x86_64.rpm       rhel7
mysql-community-libs-5.7.24-1.el7.x86_64.rpm         test.php
mysql-community-libs-compat-5.7.24-1.el7.x86_64.rpm  test.sql
mysql-community-server-5.7.24-1.el7.x86_64.rpm       worker.php
redis-4.0.8.tar.gz
[root@server2 ~]# cd rhel7/

[root@server2 rhel7]# ls
gearmand-1.1.12-18.el7.x86_64.rpm          php-fpm-5.4.16-46.el7.x86_64.rpm
libevent-devel-2.0.21-4.el7.x86_64.rpm     php-mysql-5.4.16-46.el7.x86_64.rpm
libgearman-1.1.12-18.el7.x86_64.rpm        php-pdo-5.4.16-46.el7.x86_64.rpm
libgearman-devel-1.1.12-18.el7.x86_64.rpm  php-pecl-gearman-1.1.2-1.el7.x86_64.rpm
libzip-0.10.1-8.el7.x86_64.rpm             php-pecl-igbinary-1.2.1-1.el7.x86_64.rpm
openssl-1.0.2k-16.el7.x86_64.rpm           php-pecl-redis-2.2.8-1.el7.x86_64.rpm
openssl-libs-1.0.2k-16.el7.x86_64.rpm      php-process-5.4.16-46.el7.x86_64.rpm
php-cli-5.4.16-46.el7.x86_64.rpm           php-xml-5.4.16-46.el7.x86_64.rpm
php-common-5.4.16-46.el7.x86_64.rpm

[root@server2 rhel7]# yum install -y *
3:修改nginx服务配置文件
[root@server2 rhel7]# cd /usr/local/nginx/
[root@server2 nginx]# ls
client_body_temp  fastcgi_temp  logs        sbin       uwsgi_temp
conf              html          proxy_temp  scgi_temp
[root@server2 nginx]# cd conf/
[root@server2 conf]# ls
fastcgi.conf            koi-utf             nginx.conf           uwsgi_params
fastcgi.conf.default    koi-win             nginx.conf.default   uwsgi_params.default
fastcgi_params          mime.types          scgi_params          win-utf
fastcgi_params.default  mime.types.default  scgi_params.default
[root@server2 conf]# vim nginx.conf
location / {
        root   /usr/share/nginx/html;
        index  index.php index.html index.htm;
    }


    location ~ \.php$ {
        root           html;
        fastcgi_pass   127.0.0.1:9000;
        fastcgi_index  index.php;
        fastcgi_param  SCRIPT_FILENAME  /usr/share/nginx/html$fastcgi_script_name;
        include        fastcgi_params;
    }

[root@server4 html]# vim index.php


<?php

phpinfo()

?>
4:启动nginx服务:
[root@server2 conf]# nginx -t
-bash: nginx: command not found
[root@server2 conf]#
[root@server2 conf]# cd /usr/local/nginx/
[root@server2 nginx]# ls
client_body_temp  fastcgi_temp  logs        sbin       uwsgi_temp
conf              html          proxy_temp  scgi_temp
[root@server2 nginx]# cd sbin/
[root@server2 sbin]# ls
nginx  nginx.old
[root@server2 sbin]# ./nginx -t
nginx: the configuration file /usr/local/nginx//conf/nginx.conf syntax is ok
nginx: configuration file /usr/local/nginx//conf/nginx.conf test is successful
[root@server2 sbin]# ./nginx
[root@server2 sbin]# ps -ax
 2528 ?        Ss     0:00 nginx: master process ./nginx
 2529 ?        S      0:00 nginx: worker process
5:修改php-fpm服务的配置文件:
[root@server2 sbin]# vim /etc/php-fpm.
php-fpm.conf  php-fpm.d/
[root@server2 sbin]# vim /etc/php-fpm.conf 
[root@server2 sbin]# cd /etc/php-fpm.d/
[root@server2 php-fpm.d]# ls
www.conf
[root@server2 php-fpm.d]# vim www.conf

; RPM: apache Choosed to be able to access some dir as httpd
user = nginx
; RPM: Keep a group allowed to write in log dir.
group = nginx

[root@server2 php-fpm.d]# systemctl start php-fpm.
[root@server2 php-fpm.d]# systemctl status php-fpm
● php-fpm.service - The PHP FastCGI Process Manager
   Loaded: loaded (/usr/lib/systemd/system/php-fpm.service; disabled; vendor preset: disabled)
   Active: active (running) since Thu 2019-02-28 02:59:08 EST; 8s ago
 Main PID: 2540 (php-fpm)
   Status: "Ready to handle connections"
   CGroup: /system.slice/php-fpm.service
           ├─2540 php-fpm: master process (/etc/php-fpm.conf)
           ├─2541 php-fpm: pool www
           ├─2542 php-fpm: pool www
           ├─2543 php-fpm: pool www
           ├─2544 php-fpm: pool www
           └─2545 php-fpm: pool www

Feb 28 02:59:08 server2 systemd[1]: Starting The PHP FastCGI Process Manager...
Feb 28 02:59:08 server2 systemd[1]: Started The PHP FastCGI Process Manager.

[root@server2 php-fpm.d]# netstat -antlp   ##查看端口,服务是否开启
Active Internet connections (servers and established)
Proto Recv-Q Send-Q Local Address           Foreign Address         State       PID/Program name
tcp        0      0 0.0.0.0:80              0.0.0.0:*               LISTEN      2528/nginx: master
tcp        0      0 0.0.0.0:22              0.0.0.0:*               LISTEN      639/sshd
tcp        0      0 127.0.0.1:25            0.0.0.0:*               LISTEN      898/master
tcp        0      0 127.0.0.1:9000          0.0.0.0:*               LISTEN      2540/php-fpm: maste
tcp        0      0 172.25.36.2:22          172.25.36.250:57832     ESTABLISHED 2104/sshd: root@pts
tcp6       0      0 :::22                   :::*                    LISTEN      639/sshd
tcp6       0      0 ::1:25                  :::*                    LISTEN      898/master
6:查看nginx服务的默认发布目录:
[root@server2 php-fpm.d]# cd /usr/local/nginx/html/
[root@server2 html]# cat index.html
<!DOCTYPE html>
<html>
<head>
<title>Welcome to nginx!</title>
<style>
    body {
        width: 35em;
        margin: 0 auto;
        font-family: Tahoma, Verdana, Arial, sans-serif;
    }
</style>
</head>
<body>
<h1>Welcome to nginx!</h1>
<p>If you see this page, the nginx web server is successfully installed and
working. Further configuration is required.</p>

<p>For online documentation and support please refer to
<a href="http://nginx.org/">nginx.org</a>.<br/>
Commercial support is available at
<a href="http://nginx.com/">nginx.com</a>.</p>

<p><em>Thank you for using nginx.</em></p>
</body>
</html>
7:此时真机浏览器中进行检测,server2上nginx服务是否搭建完毕
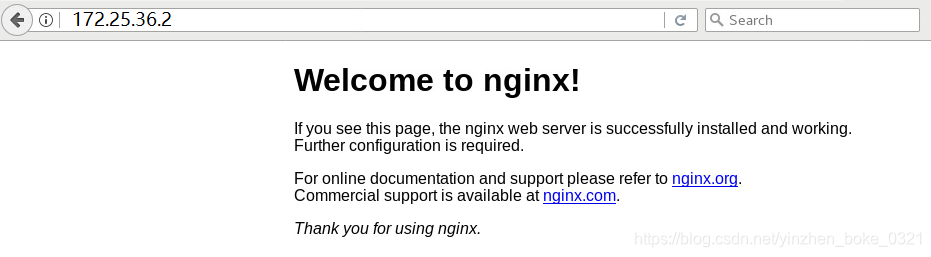
7::将测试页放到到nginx点的默认发布目录下(index.php),文件名称要和之前配置文件中写的一样
[root@server2 html]# cp ~/test.php index.php
[root@server2 html]# ls
50x.html  index.html  index.php
server3(redis):
1:登录:
[root@server3 ~]# redis-cli
127.0.0.1:6379> INFO
2:修改配置文件
[root@server3 ~]# vim /etc/redis/6379.conf 删除后来指定的master,让server3成为master
![]()
3:重新启动服务
[root@server3 ~]# systemctl restart redis_6379
# Replication
role:master               ##确保状态为master
connected_slaves:0
min_slaves_good_slaves:0
master_replid:ab5254189216dc326b224289f790a3615a20533d
master_replid2:0000000000000000000000000000000000000000
master_repl_offset:0
second_repl_offset:-1
repl_backlog_active:0
repl_backlog_size:1048576
repl_backlog_first_byte_offset:0
repl_backlog_histlen:0
注意:改错误是因为之前设置的最少的slave连接数影响,将那两行注释掉就可以了
[root@server3 ~]# redis-cli
127.0.0.1:6379> set name dd
(error) NOREPLICAS Not enough good replicas to write.
127.0.0.1:6379> get name
"888"
4:修改srever2上的index.php配置文件

server4:
1:安装mysql服务
[root@server4 ~]# rpm -e `rpm -qa |grep mysql` --nodeps
rpm: no packages given for erase
[root@server4 ~]# yum install -y mariadb-server
2:如果之前有mysql服务进行过的操作,数据、删除,以免对实验造成影响
[root@server4 ~]# cd /var/lib/mysql/
[root@server4 mysql]# ls
auto.cnf       binlog.index     ib_logfile0         relay-log.info
binlog.000001  ca-key.pem       ib_logfile1         server4-relay-bin.000011
binlog.000002  ca.pem           master.info         server4-relay-bin.000012
binlog.000003  client-cert.pem  mysql               server4-relay-bin.index
binlog.000004  client-key.pem   performance_schema  server-cert.pem
binlog.000005  ib_buffer_pool   private_key.pem     server-key.pem
binlog.000006  ibdata1          public_key.pem      sys
[root@server4 mysql]# rm -rf *
[root@server4 mysql]# ls
3:初始化登录数据库
[root@server4 mysql]# vim /etc/my.cnf
[root@server4 mysql]# systemctl start mariadb
[root@server4 mysql]# mysql_secure_installation
4:登录
[root@server4 mysql]# mysql -p

MariaDB [(none)]> show databases;
+--------------------+
| Database           |
+--------------------+
| information_schema |
| mysql              |
| performance_schema |
+--------------------+
3 rows in set (0.00 sec)

MariaDB [(none)]> create database test;
Query OK, 1 row affected (0.00 sec)
MariaDB [(none)]> grant all on test.* to redis@'%' identified by 'westos';  ##index.php文件中写的就是westos,一定要保持一致
Query OK, 0 rows affected (0.00 sec)
MariaDB [(none)]> flush privileges; ##刷新
Query OK, 0 rows affected (0.00 sec)
5:server2上修改文件,指定mysql服务主机
、
6:查看测试文件

7:将该测试文件发送给server4:
[root@server2 ~] # scp test.sql server4:8:server4上查看测试文件
[root@server4 ~]# vim test.sql

9:向数据库中导入test库
[root@server4 ~]# mysql -predhat < test.sql
[root@server4 ~]# mysql -p
Enter password:
Welcome to the MariaDB monitor. Commands end with ; or \g.
Your MariaDB connection id is 13
Server version: 5.5.52-MariaDB MariaDB Server
Copyright (c) 2000, 2016, Oracle, MariaDB Corporation Ab and others.
Type 'help;' or '\h' for help. Type '\c' to clear the current input statement.
MariaDB [(none)]> use test;
Reading table information for completion of table and column names
You can turn off this feature to get a quicker startup with -A
Database changed
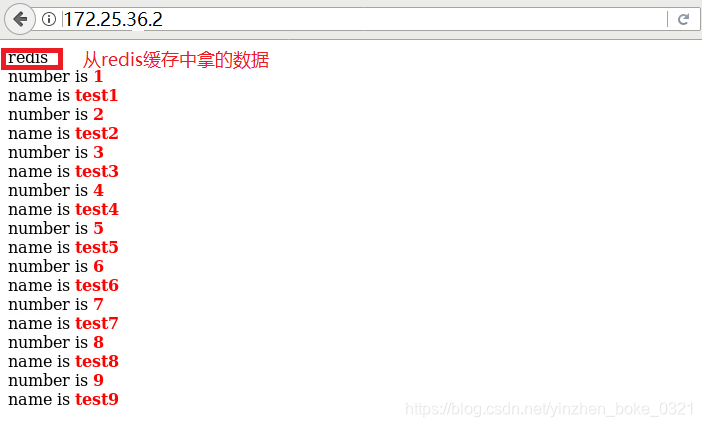
MariaDB [test]> select * from test;
+----+-------+
| id | name |
+----+-------+
| 1 | test1 |
| 2 | test2 |
| 3 | test3 |
| 4 | test4 |
| 5 | test5 |
| 6 | test6 |
| 7 | test7 |
| 8 | test8 |
| 9 | test9 |
+----+-------+
9 rows in set (0.00 sec)
10:真机进行检测:
11:修改数据库
MariaDB [test]> update test set name='westos' where id=1;
Query OK, 1 row affected (0.00 sec)
Rows matched: 1  Changed: 1  Warnings: 0

MariaDB [test]> select * from test;
+----+--------+
| id | name   |
+----+--------+
|  1 | westos |
|  2 | test2  |
|  3 | test3  |
|  4 | test4  |
|  5 | test5  |
|  6 | test6  |
|  7 | test7  |
|  8 | test8  |
|  9 | test9  |
+----+--------+
9 rows in set (0.00 sec)
12:此时在真机浏览器中进行检测,数据还是没有改变,server3,redis服务中也数据也没有改变

问题:以上我们做了redis的mysql数据缓存,客户可以在redis缓存中直接拿数据,而不是进入mysql数据库,但是,我们也发现可一个问题。当数据库里的数据发生变化时,redis缓存中不会发生变化,这在真实的生产环境中肯定是不行的,为了解决该问题就需要库函数的帮助。
gearman:分布式任务分发工具:
逻辑:mysql->update->trigger->json_object->gman_do_background->gearmnd(4730)->worker(php-gearman)->php-redis->redis
[root@server2 ~]# cd redis/
[root@server2 redis]# yum install -y gearmand-1.1.8-2.el6.x86_64.rpm libgearman-* libevent-*
[root@server2 redis]# /etc/init.d/gearmand start
[root@server2 redis]# netstat -antlp
tcp 0 0 0.0.0.0:4730 0.0.0.0:* LISTEN 5354/gearmand
[root@server2 redis]# tar zxf gearman-1.1.2.tgz
[root@server2 redis]# cd gearman-1.1.2
[root@server2 gearman-1.1.2]# phpize
Configuring for:

PHP Api Version:         20090626

Zend Module Api No:      20090626

Zend Extension Api No:   220090626
[root@server2 gearman-1.1.2]# ./configure
[root@server2 gearman-1.1.2]# make
[root@server2 gearman-1.1.2]# make install
[root@server2 gearman-1.1.2]# cd /usr/lib64/php/modules/
[root@server2 modules]# cd /etc/php.d/
[root@server2 php.d]# cp redis.ini gearman.ini
[root@server2 php.d]# vim gearman.ini
[root@server2 php.d]# systemctl restart php-fpm
[root@server2 php.d]# php -m | grep gearman
gearman[root@server2 ~]# cd redis/
[root@server2 redis]# scp gearman-mysql-udf-0.6.tar.gz lib_mysqludf_json-master.zip
Server4:
[root@server2 redis]# scp libgearman-* server4:
[root@server2 redis]# scp libevent-* server4:
[root@server4 ~]# yum install mysql-devel
[root@server4 ~]# ls
gearman-mysql-udf-0.6.tar.gz lib_mysqludf_json-master.zip test.sql[root@server4 ~]# unzip lib_mysqludf_json-master.zip
[root@server4 ~]# cd lib_mysqludf_json-master
[root@server4 lib_mysqludf_json-master]# yum install gcc -y
[root@server4 lib_mysqludf_json-master]# gcc $(mysql_config --cflags) -shared -fPIC -o lib_mysqludf_json.so lib_mysqludf_json.c
[root@server4 lib_mysqludf_json-master]# ll lib_mysqludf_json.so
-rwxr-xr-x 1 root root 22223 May 19 17:22 lib_mysqludf_json.so[root@server4 lib_mysqludf_json-master]# cd /usr/lib64/mysql/plugin/
[root@server4 plugin]# cd -
/root/lib_mysqludf_json-master[root@server4 lib_mysqludf_json-master]# cp lib_mysqludf_json.so /usr/lib64/mysql/plugin
[root@server4 lib_mysqludf_json-master]# mysql
[root@server4 lib_mysqludf_json-master]# mysql
mysql> show global variables like 'plugin_dir';

+---------------+-------------------------+

| Variable_name | Value                   |

+---------------+-------------------------+

| plugin_dir    | /usr/lib64/mysql/plugin |

+---------------+-------------------------+

mysql> create function json_object returns string soname 'lib_mysqludf_json.so';

mysql> select * from mysql.func;

+-------------+-----+----------------------+----------+

| name        | ret | dl                   | type     |

+-------------+-----+----------------------+----------+

| json_object |   0 | lib_mysqludf_json.so | function |

+-------------+-----+----------------------+----------+

1 row in set (0.00 sec)
[root@server4 ~]# tar zxf gearman-mysql-udf-0.6.tar.gz
[root@server4 ~]# yum install -y libgearman-* libevent-*
[root@server4 ~]# cd gearman-mysql-udf-0.6
[root@server4 gearman-mysql-udf-0.6]# ./configure --libdir=/usr/lib64/mysql/plugin --with-mysql
[root@server4 gearman-mysql-udf-0.6]# make
[root@server4 gearman-mysql-udf-0.6]# make install
[root@server4 gearman-mysql-udf-0.6]# cd /usr/lib64/mysql/plugin/
[root@server4 plugin]# ls
libgearman_mysql_udf.so[root@server4 plugin]# mysql
mysql> create function gman_do_background returns string soname 'libgearman_mysql_udf.so';

mysql> create function gman_servers_set returns string soname 'libgearman_mysql_udf.so';


mysql> select * from mysql.func;

+--------------------+-----+-------------------------+----------+

| name               | ret | dl                      | type     |

+--------------------+-----+-------------------------+----------+

| json_object        |   0 | lib_mysqludf_json.so    | function |

| gman_do_background |   0 | libgearman_mysql_udf.so | function |

| gman_servers_set   |   0 | libgearman_mysql_udf.so | function |

+--------------------+-----+-------------------------+----------+


mysql> select gman_servers_set('172.25.36.2:4730');

+--------------------------------------+

| gman_servers_set('172.25.36.2:4730') |

+--------------------------------------+

| 172.25.36.2:4730                     |

+--------------------------------------+
[root@server4 ~]# vim test.sql ##将上面的注释。下面的注释取消
use test;

#CREATE TABLE `test` (`id` int(7) NOT NULL AUTO_INCREMENT, `name` char(8) DEFAULT NULL, PRIMARY KEY (`id`)) ENGINE=InnoDB DEFAULT CHARSET=utf8;

#INSERT INTO `test` VALUES (1,'test1'),(2,'test2'),(3,'test3'),(4,'test4'),(5,'test5'),(6,'test6'),(7,'test7'),(8,'test8'),(9,'test9');


DELIMITER $$

CREATE TRIGGER datatoredis AFTER UPDATE ON test FOR EACH ROW BEGIN

    SET @RECV=gman_do_background('syncToRedis', json_object(NEW.id as `id`, NEW.name as `name`));

  END$$

DELIMITER ;
[root@server4 ~]# mysql < test.sql
[root@server4 ~]# mysql
mysql> show triggers from test;

+-------------+--------+-------+----------------------------------------------------------------------------------------------------------------+--------+---------+----------+----------------+----------------------+----------------------+--------------------+

| Trigger     | Event  | Table | Statement                                                                                                      | Timing | Created | sql_mode | Definer        | character_set_client | collation_connection | Database Collation |

+-------------+--------+-------+----------------------------------------------------------------------------------------------------------------+--------+---------+----------+----------------+----------------------+----------------------+--------------------+

| datatoredis | UPDATE | test  | BEGIN

    SET @RECV=gman_do_background('syncToRedis', json_object(NEW.id as `id`, NEW.name as `name`));

  END | AFTER  | NULL    |          | root@localhost | latin1               | latin1_swedish_ci    | latin1_swedish_ci  |

+-------------+--------+-------+----------------------------------------------------------------------------------------------------------------+--------+---------+----------+----------------+----------------------+----------------------+--------------------+

1 row in set (0.00 sec)
[root@server2 redis]# cp worker.php /usr/local/bin/
[root@server2 redis]# cd /usr/local/bin/
[root@server2 bin]# vim worker.php
[root@server1 bin]# nohup php /usr/local/bin/worker.php &
[root@server4 ~]# mysql
mysql> update test set name='redhat' where id=1;

Query OK, 1 row affected (0.23 sec)

Rows matched: 1  Changed: 1  Warnings: 0
[root@server3 redis]# redis-cli
127.0.0.1:6379> get 1

"redhat"
server4上Mysql和serevr3上的redis缓存实现同步了,这才符合真实的生产环境的需要