简介:
本系列博文介绍对Darknet源码的理解,这一部分为程序主体框架的理解。本博文默认读者基本熟悉Darknet的使用。
正文:
darknet的主函数在darknet.c中,其中的main()函数根据终端输入参数转向不同的功能函数。
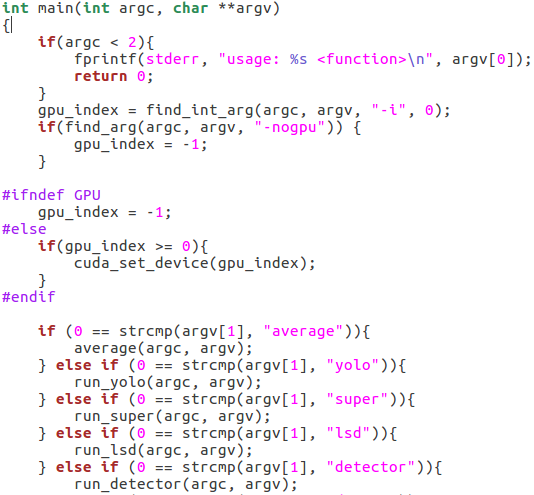
若argv[1]= “detector”,则转向run_detector()(该函数在detector.c中),并将输入参数传递给
run_detector()。
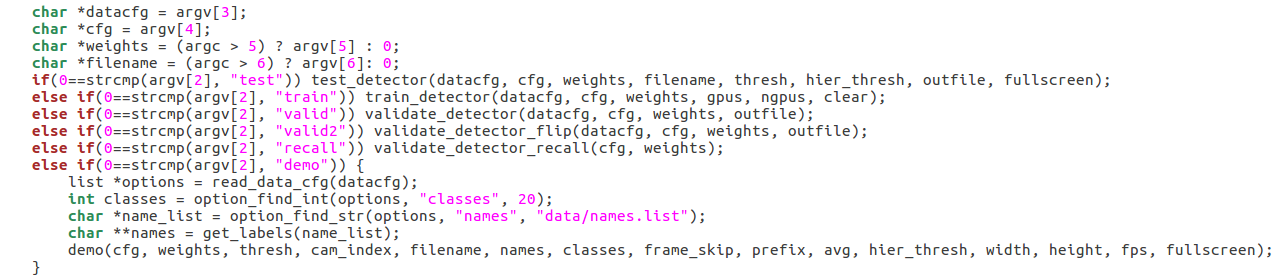
run_detector()根据参数不同,转向不同的功能函数,如下图所示,该段代码在detector.c的最下面。
熟悉darknet的使用的朋友肯定知道,一般检测一张图片时执行的命令为
./darknet detector test cfg/coco.data cfg/yolov3.cfg yolov3.weights data/dog.jpg
结合上图,当第二个参数为test时,将转向执行test_detector()(在detector.c中)。具体程序参考detector.c中。
在test_detector()中,
1. 执行network*net = load_network(cfgfile, weightfile, 0)初始化一个网络,cfgfile为模型配置文件,weightfile为
模型权重文件。
2. 执行image im= load_image_color(input,0,0),读取一张图片,input为图片地址。执行imagesized =
letterbox_image(im, net->w, net→h),对图片进行resize,resize成模型需要的大小。
3. 执行network_predict(net,X),模型进行前向传播。X为输入图片。
4. 执行detection*dets = get_network_boxes(net, im.w, im.h, thresh, hier_thresh, 0, 1,&nboxes),根据网络的输
出,提取出检测到的目标的位置以及类别。
5. 执行draw_detections(im,dets, nboxes, thresh, names, alphabet, l.classes),将目标的位置以及类别标注在图
片中。
注:
network、image、detection等为框架中定义的结构体,其在darknet.h文件中声明的。
总结:
在test_detector()函数中,包含了我们熟悉的一个端到端的过程。即,初始化模型、读取模型权重、读取图片、图片resize、
将图片喂给模型进行前向传播、根据模型输出得到目标位置及类别、将目标位置及类别标注在图片上。
下一篇博客,将介绍输入图片读取的具体过程!