在Keras框架下训练深度学习模型时,一般思路是在训练环境下训练出模型,然后拿训练好的模型(即保存模型相应信息的文件)到生产环境下去部署。在训练过程中我们可能会遇到以下情况:
- 需要运行很长时间的程序在迭代到中间某一代时出现意外;
- 人为地想停止训练过程,也许是为了用测试数据测试模型,然后从上一个检查点继续训练模型;
- 想通过损失函数和评估指标,在每次训练过程中保存模型的最佳版本。
以上这些情况都要求我们能够在训练过程中保存模型和加载模型,下面将通过这篇博客来总结一下最近学习的Keras框架下保存和加载模型的方法和技巧。
目录
这里会以MNIST手写数据集识别为例来说明如何保存和加载模型,代码如下:
MNIST数据集链接:https://pan.baidu.com/s/1LZRbpaE7eiHtoVPmByQQyQ
提取码:radl
from __future__ import print_function
import numpy as np
from keras.models import Sequential
from keras.layers.core import Dense, Activation
from keras.optimizers import SGD
from keras.utils import np_utils

# 随机数种子,重复性设置
np.random.seed(1671)

# 网络结构和训练的参数
NB_EPOCH = 20
BATCH_SIZE = 128
VERBOSE = 1
NB_CLASSES = 10
OPTIMIZER = SGD()
N_HIDDEN = 128
VALIDATION_SPLIT = 0.2
RESHAPED = 784


# 加载数据
def load_data(path="mnist.npz"):
    f = np.load(path)
    x_train, y_train = f['x_train'], f['y_train']
    x_test, y_test = f['x_test'], f['y_test']
    f.close()
    return (x_train, y_train), (x_test, y_test)

# 调用函数加载数据
(x_train, y_train), (x_test, y_test) = load_data()
# 数据预处理
(x_train, y_train), (x_test, y_test) = load_data()
# 数据变形、类型转换及归一化
x_train = x_train.reshape(60000, 784).astype('float32') / 255
x_test = x_test.reshape(10000, 784).astype('float32') / 255
# 打印消息
print('Training samples:', x_train.shape)
print('Testing samples:', x_test.shape)
# 将类别转换为one-hot编码
y_train = np_utils.to_categorical(y_train, NB_CLASSES)
y_test = np_utils.to_categorical(y_test, NB_CLASSES)

# 定义网络结构
model = Sequential()
model.add(Dense(N_HIDDEN, input_shape=(RESHAPED, )))
model.add(Activation('relu'))
model.add(Dense(N_HIDDEN))
model.add(Activation('relu'))
model.add(Dense(NB_CLASSES))
model.add(Activation('softmax'))

# 打印模型概述信息
model.summary()

# 编译模型
model.compile(loss='categorical_crossentropy', optimizer=OPTIMIZER, metrics=['accuracy'])

# 训练模型
history = model.fit(x_train, y_train, batch_size=BATCH_SIZE, epochs=NB_EPOCH, verbose=VERBOSE,
					validation_split=VALIDATION_SPLIT)

# 评估模型
score = model.evaluate(x_test, y_test, verbose=VERBOSE)
print('Test score:', score[0])
print('Test accuracy:', score[1])
1 保存模型
在模型保存方面,通常有以下两种方式:完整地保存整个模型、分别保存模型的结构和权重,以上两种方式都是将关于模型的信息保存到文件中,除此之外,我们还会通过模型图来保存模型的结构信息。
1.1 完整地保存整个模型
我们使用model.save()完整地保存整个模型,将Keras模型和权重保存在一个HDF5文件中,该文件将包含:
- 模型的结构
- 模型的参数
- 优化器参数:用于继续训练过程
代码如下:
from __future__ import print_function
import numpy as np
from keras.models import Sequential
from keras.layers.core import Dense, Activation
from keras.optimizers import SGD
from keras.utils import np_utils

# 随机数种子,重复性设置
np.random.seed(1671)

# 网络结构和训练的参数
NB_EPOCH = 20
BATCH_SIZE = 128
VERBOSE = 1
NB_CLASSES = 10
OPTIMIZER = SGD()
N_HIDDEN = 128
VALIDATION_SPLIT = 0.2
RESHAPED = 784


# 加载数据
def load_data(path="mnist.npz"):
    f = np.load(path)
    x_train, y_train = f['x_train'], f['y_train']
    x_test, y_test = f['x_test'], f['y_test']
    f.close()
    return (x_train, y_train), (x_test, y_test)

# 调用函数加载数据
(x_train, y_train), (x_test, y_test) = load_data()
# 数据预处理
(x_train, y_train), (x_test, y_test) = load_data()
# 数据变形、类型转换及归一化
x_train = x_train.reshape(60000, 784).astype('float32') / 255
x_test = x_test.reshape(10000, 784).astype('float32') / 255
# 打印消息
print('Training samples:', x_train.shape)
print('Testing samples:', x_test.shape)
# 将类别转换为one-hot编码
y_train = np_utils.to_categorical(y_train, NB_CLASSES)
y_test = np_utils.to_categorical(y_test, NB_CLASSES)

# 定义网络结构
model = Sequential()
model.add(Dense(N_HIDDEN, input_shape=(RESHAPED, )))
model.add(Activation('relu'))
model.add(Dense(N_HIDDEN))
model.add(Activation('relu'))
model.add(Dense(NB_CLASSES))
model.add(Activation('softmax'))

# 打印模型概述信息
model.summary()

# 编译模型
model.compile(loss='categorical_crossentropy', optimizer=OPTIMIZER, metrics=['accuracy'])

# 训练模型
history = model.fit(x_train, y_train, batch_size=BATCH_SIZE, epochs=NB_EPOCH, verbose=VERBOSE,
					validation_split=VALIDATION_SPLIT)

# 评估模型
score = model.evaluate(x_test, y_test, verbose=VERBOSE)
print('Test score:', score[0])
print('Test accuracy:', score[1])

# 保存模型
model.save('my_model.h5')
效果截图如下:

1.2 分别保存模型的结构和权重
分别保存模型的结构和权重,容易理解,这里我们介绍几种保存模型结构和权重的方式。
1.2.1 只保存模型的结构
我们使用to_json()方法或者to_yaml()将模型结构保存到json文件或者yaml文件。
代码如下:
from __future__ import print_function
import numpy as np
from keras.models import Sequential
from keras.layers.core import Dense, Activation
from keras.optimizers import SGD
from keras.utils import np_utils

# 随机数种子,重复性设置
np.random.seed(1671)

# 网络结构和训练的参数
NB_EPOCH = 20
BATCH_SIZE = 128
VERBOSE = 1
NB_CLASSES = 10
OPTIMIZER = SGD()
N_HIDDEN = 128
VALIDATION_SPLIT = 0.2
RESHAPED = 784


# 加载数据
def load_data(path="mnist.npz"):
    f = np.load(path)
    x_train, y_train = f['x_train'], f['y_train']
    x_test, y_test = f['x_test'], f['y_test']
    f.close()
    return (x_train, y_train), (x_test, y_test)

# 调用函数加载数据
(x_train, y_train), (x_test, y_test) = load_data()
# 数据预处理
(x_train, y_train), (x_test, y_test) = load_data()
# 数据变形、类型转换及归一化
x_train = x_train.reshape(60000, 784).astype('float32') / 255
x_test = x_test.reshape(10000, 784).astype('float32') / 255
# 打印消息
print('Training samples:', x_train.shape)
print('Testing samples:', x_test.shape)
# 将类别转换为one-hot编码
y_train = np_utils.to_categorical(y_train, NB_CLASSES)
y_test = np_utils.to_categorical(y_test, NB_CLASSES)

# 定义网络结构
model = Sequential()
model.add(Dense(N_HIDDEN, input_shape=(RESHAPED, )))
model.add(Activation('relu'))
model.add(Dense(N_HIDDEN))
model.add(Activation('relu'))
model.add(Dense(NB_CLASSES))
model.add(Activation('softmax'))

# 打印模型概述信息
model.summary()

# 编译模型
model.compile(loss='categorical_crossentropy', optimizer=OPTIMIZER, metrics=['accuracy'])

# 训练模型
history = model.fit(x_train, y_train, batch_size=BATCH_SIZE, epochs=NB_EPOCH, verbose=VERBOSE,
					validation_split=VALIDATION_SPLIT)

# 评估模型
score = model.evaluate(x_test, y_test, verbose=VERBOSE)
print('Test score:', score[0])
print('Test accuracy:', score[1])

# 保存模型的结构
json_string = model.to_json()		# 方式1
open('model_architecture_1.json', 'w').write(json_string)
yaml_string = model.to_yaml()		# 方式2
open('model_arthitecture_2.yaml', 'w').write(yaml_string)

# 打印消息
print('训练和保存模型结构完成!!!')
效果截图如下:

1.2.2 只保留模型的权重
只保留模型的权重可以通过save_weights()方法实现,也可以通过检查点checkpoint的设置实现。
通过save_weights方法实现
实现代码如下:
from __future__ import print_function
import numpy as np
from keras.models import Sequential
from keras.layers.core import Dense, Activation
from keras.optimizers import SGD
from keras.utils import np_utils

# 随机数种子,重复性设置
np.random.seed(1671)

# 网络结构和训练的参数
NB_EPOCH = 20
BATCH_SIZE = 128
VERBOSE = 1
NB_CLASSES = 10
OPTIMIZER = SGD()
N_HIDDEN = 128
VALIDATION_SPLIT = 0.2
RESHAPED = 784


# 加载数据
def load_data(path="mnist.npz"):
    f = np.load(path)
    x_train, y_train = f['x_train'], f['y_train']
    x_test, y_test = f['x_test'], f['y_test']
    f.close()
    return (x_train, y_train), (x_test, y_test)

# 调用函数加载数据
(x_train, y_train), (x_test, y_test) = load_data()
# 数据预处理
(x_train, y_train), (x_test, y_test) = load_data()
# 数据变形、类型转换及归一化
x_train = x_train.reshape(60000, 784).astype('float32') / 255
x_test = x_test.reshape(10000, 784).astype('float32') / 255
# 打印消息
print('Training samples:', x_train.shape)
print('Testing samples:', x_test.shape)
# 将类别转换为one-hot编码
y_train = np_utils.to_categorical(y_train, NB_CLASSES)
y_test = np_utils.to_categorical(y_test, NB_CLASSES)

# 定义网络结构
model = Sequential()
model.add(Dense(N_HIDDEN, input_shape=(RESHAPED, )))
model.add(Activation('relu'))
model.add(Dense(N_HIDDEN))
model.add(Activation('relu'))
model.add(Dense(NB_CLASSES))
model.add(Activation('softmax'))

# 编译模型
model.compile(loss='categorical_crossentropy', optimizer=OPTIMIZER, metrics=['accuracy'])

# 训练模型
history = model.fit(x_train, y_train, batch_size=BATCH_SIZE, epochs=NB_EPOCH, verbose=VERBOSE,
					validation_split=VALIDATION_SPLIT)

# 评估模型
score = model.evaluate(x_test, y_test, verbose=VERBOSE)
print('Test score:', score[0])
print('Test accuracy:', score[1])

# 保存模型的权重
model.save_weights('my_model_weights.h5')
效果截图如下:

通过设置检查点实现
我们通过创建ModelCheckpoint类的实例来设置检查点,代码如下:
from __future__ import print_function
import numpy as np
from keras.models import Sequential
from keras.layers.core import Dense, Activation
from keras.optimizers import SGD
from keras.utils import np_utils
from keras.callbacks import ModelCheckpoint

# 随机数种子,重复性设置
np.random.seed(1671)

# 网络结构和训练的参数
NB_EPOCH = 40
BATCH_SIZE = 128
VERBOSE = 1
NB_CLASSES = 10
OPTIMIZER = SGD()
N_HIDDEN = 128
VALIDATION_SPLIT = 0.2
RESHAPED = 784


# 加载数据
def load_data(path="mnist.npz"):
    f = np.load(path)
    x_train, y_train = f['x_train'], f['y_train']
    x_test, y_test = f['x_test'], f['y_test']
    f.close()
    return (x_train, y_train), (x_test, y_test)

# 调用函数加载数据
(x_train, y_train), (x_test, y_test) = load_data()
# 数据预处理
(x_train, y_train), (x_test, y_test) = load_data()
# 数据变形、类型转换及归一化
x_train = x_train.reshape(60000, 784).astype('float32') / 255
x_test = x_test.reshape(10000, 784).astype('float32') / 255
# 打印消息
print('Training samples:', x_train.shape)
print('Testing samples:', x_test.shape)
# 将类别转换为one-hot编码
y_train = np_utils.to_categorical(y_train, NB_CLASSES)
y_test = np_utils.to_categorical(y_test, NB_CLASSES)

# 定义网络结构
model = Sequential()
model.add(Dense(N_HIDDEN, input_shape=(RESHAPED, )))
model.add(Activation('relu'))
model.add(Dense(N_HIDDEN))
model.add(Activation('relu'))
model.add(Dense(NB_CLASSES))
model.add(Activation('softmax'))

# 编译模型
model.compile(loss='categorical_crossentropy', optimizer=OPTIMIZER, metrics=['accuracy'])

# 设置检查点
filepath = 'saved_models/weights-improvement-{epoch:02d}-{val_acc:.5f}.hdf5'
checkpoint = ModelCheckpoint(filepath=filepath, monitor='val_acc', verbose=VERBOSE,
                             save_best_only=True, mode='max')
# 训练模型
history = model.fit(x_train, y_train, batch_size=BATCH_SIZE, epochs=NB_EPOCH, verbose=VERBOSE,
					validation_split=VALIDATION_SPLIT, callbacks=[checkpoint])

# 评估模型
score = model.evaluate(x_test, y_test, verbose=VERBOSE)
print('Test score:', score[0])
print('Test accuracy:', score[1])
效果截图如下:


可以看到这种方法可以保存最优的评估结果对应的模型权重,即最后一个文件。
1.3 保存模型图
我们可以通过model.summary()打印模型的概述信息,通过模型的概述信息可以知道模型的基本结构。
代码和效果如下:
from __future__ import print_function
import numpy as np
from keras.models import Sequential
from keras.layers.core import Dense, Activation
from keras.optimizers import SGD
from keras.utils import np_utils

# 随机数种子,重复性设置
np.random.seed(1671)

# 网络结构和训练的参数
NB_EPOCH = 20
BATCH_SIZE = 128
VERBOSE = 1
NB_CLASSES = 10
OPTIMIZER = SGD()
N_HIDDEN = 128
VALIDATION_SPLIT = 0.2
RESHAPED = 784


# 加载数据
def load_data(path="mnist.npz"):
    f = np.load(path)
    x_train, y_train = f['x_train'], f['y_train']
    x_test, y_test = f['x_test'], f['y_test']
    f.close()
    return (x_train, y_train), (x_test, y_test)

# 调用函数加载数据
(x_train, y_train), (x_test, y_test) = load_data()
# 数据预处理
(x_train, y_train), (x_test, y_test) = load_data()
# 数据变形、类型转换及归一化
x_train = x_train.reshape(60000, 784).astype('float32') / 255
x_test = x_test.reshape(10000, 784).astype('float32') / 255
# 打印消息
print('Training samples:', x_train.shape)
print('Testing samples:', x_test.shape)
# 将类别转换为one-hot编码
y_train = np_utils.to_categorical(y_train, NB_CLASSES)
y_test = np_utils.to_categorical(y_test, NB_CLASSES)

# 定义网络结构
model = Sequential()
model.add(Dense(N_HIDDEN, input_shape=(RESHAPED, )))
model.add(Activation('relu'))
model.add(Dense(N_HIDDEN))
model.add(Activation('relu'))
model.add(Dense(NB_CLASSES))
model.add(Activation('softmax'))

# 编译模型
model.compile(loss='categorical_crossentropy', optimizer=OPTIMIZER, metrics=['accuracy'])

# 训练模型
history = model.fit(x_train, y_train, batch_size=BATCH_SIZE, epochs=NB_EPOCH, verbose=VERBOSE,
					validation_split=VALIDATION_SPLIT)

# 评估模型
score = model.evaluate(x_test, y_test, verbose=VERBOSE)
print('Test score:', score[0])
print('Test accuracy:', score[1])

# 打印模型的概述信息
model.summary()
效果截图如下:

这里可以看到模型的详细结构信息以及参数信息,此外,我们可以通过plot_model()方法保存模型的基本结构图。
代码如下:
from __future__ import print_function
import numpy as np
from keras.models import Sequential
from keras.layers.core import Dense, Activation
from keras.optimizers import SGD
from keras.utils import np_utils
from keras.utils import plot_model

# 随机数种子,重复性设置
np.random.seed(1671)

# 网络结构和训练的参数
NB_EPOCH = 20
BATCH_SIZE = 128
VERBOSE = 1
NB_CLASSES = 10
OPTIMIZER = SGD()
N_HIDDEN = 128
VALIDATION_SPLIT = 0.2
RESHAPED = 784


# 加载数据
def load_data(path="mnist.npz"):
    f = np.load(path)
    x_train, y_train = f['x_train'], f['y_train']
    x_test, y_test = f['x_test'], f['y_test']
    f.close()
    return (x_train, y_train), (x_test, y_test)

# 调用函数加载数据
(x_train, y_train), (x_test, y_test) = load_data()
# 数据预处理
(x_train, y_train), (x_test, y_test) = load_data()
# 数据变形、类型转换及归一化
x_train = x_train.reshape(60000, 784).astype('float32') / 255
x_test = x_test.reshape(10000, 784).astype('float32') / 255
# 打印消息
print('Training samples:', x_train.shape)
print('Testing samples:', x_test.shape)
# 将类别转换为one-hot编码
y_train = np_utils.to_categorical(y_train, NB_CLASSES)
y_test = np_utils.to_categorical(y_test, NB_CLASSES)

# 定义网络结构
model = Sequential()
model.add(Dense(N_HIDDEN, input_shape=(RESHAPED, )))
model.add(Activation('relu'))
model.add(Dense(N_HIDDEN))
model.add(Activation('relu'))
model.add(Dense(NB_CLASSES))
model.add(Activation('softmax'))

# 编译模型
model.compile(loss='categorical_crossentropy', optimizer=OPTIMIZER, metrics=['accuracy'])

# 训练模型
history = model.fit(x_train, y_train, batch_size=BATCH_SIZE, epochs=NB_EPOCH, verbose=VERBOSE,
					validation_split=VALIDATION_SPLIT)

# 评估模型
score = model.evaluate(x_test, y_test, verbose=VERBOSE)
print('Test score:', score[0])
print('Test accuracy:', score[1])

# 保存模型的基本结构图
plot_model(model, 'model_plot.png')
效果截图如下:


2 加载模型
加载模型对应着上面所说的模型部署,一般我们会通过完整地加载整个模型或者分别加载模型的结构或权重来完成模型的加载,具体情况视任务而定。
2.1 加载整个模型
加载整个模型,对应着1.1中的保存整个模型,我们从保存模型信息的文件中获取模型的结构、模型的权重和优化器的配置信息,则可以使用数据继续训练模型。这里使用load_model()来加载整个模型。
代码如下:
from __future__ import print_function
import numpy as np
from keras.utils import np_utils
from keras.models import load_model

# 随机数种子,重复性设置
np.random.seed(1671)

# 网络结构和训练的参数
NB_EPOCH = 20
BATCH_SIZE = 128
VERBOSE = 1
NB_CLASSES = 10
N_HIDDEN = 128
VALIDATION_SPLIT = 0.2
RESHAPED = 784


# 加载数据
def load_data(path="mnist.npz"):
    f = np.load(path)
    x_train, y_train = f['x_train'], f['y_train']
    x_test, y_test = f['x_test'], f['y_test']
    f.close()
    return (x_train, y_train), (x_test, y_test)

# 调用函数加载数据
(x_train, y_train), (x_test, y_test) = load_data()
# 数据预处理
(x_train, y_train), (x_test, y_test) = load_data()
# 数据变形、类型转换及归一化
x_train = x_train.reshape(60000, 784).astype('float32') / 255
x_test = x_test.reshape(10000, 784).astype('float32') / 255
# 打印消息
print('Training samples:', x_train.shape)
print('Testing samples:', x_test.shape)
# 将类别转换为one-hot编码
y_train = np_utils.to_categorical(y_train, NB_CLASSES)
y_test = np_utils.to_categorical(y_test, NB_CLASSES)

# 加载整个模型
model = load_model('my_model.h5')

# 训练模型
history = model.fit(x_train, y_train, batch_size=BATCH_SIZE, epochs=NB_EPOCH, verbose=VERBOSE,
					validation_split=VALIDATION_SPLIT)

# 评估模型
score = model.evaluate(x_test, y_test, verbose=VERBOSE)
print('Test score:', score[0])
print('Test accuracy:', score[1])
效果截图如下:

可以看到,针对同一个训练数据集,适当增加迭代次数,训练的结果变好了。
2.2 分别加载模型结构和权重
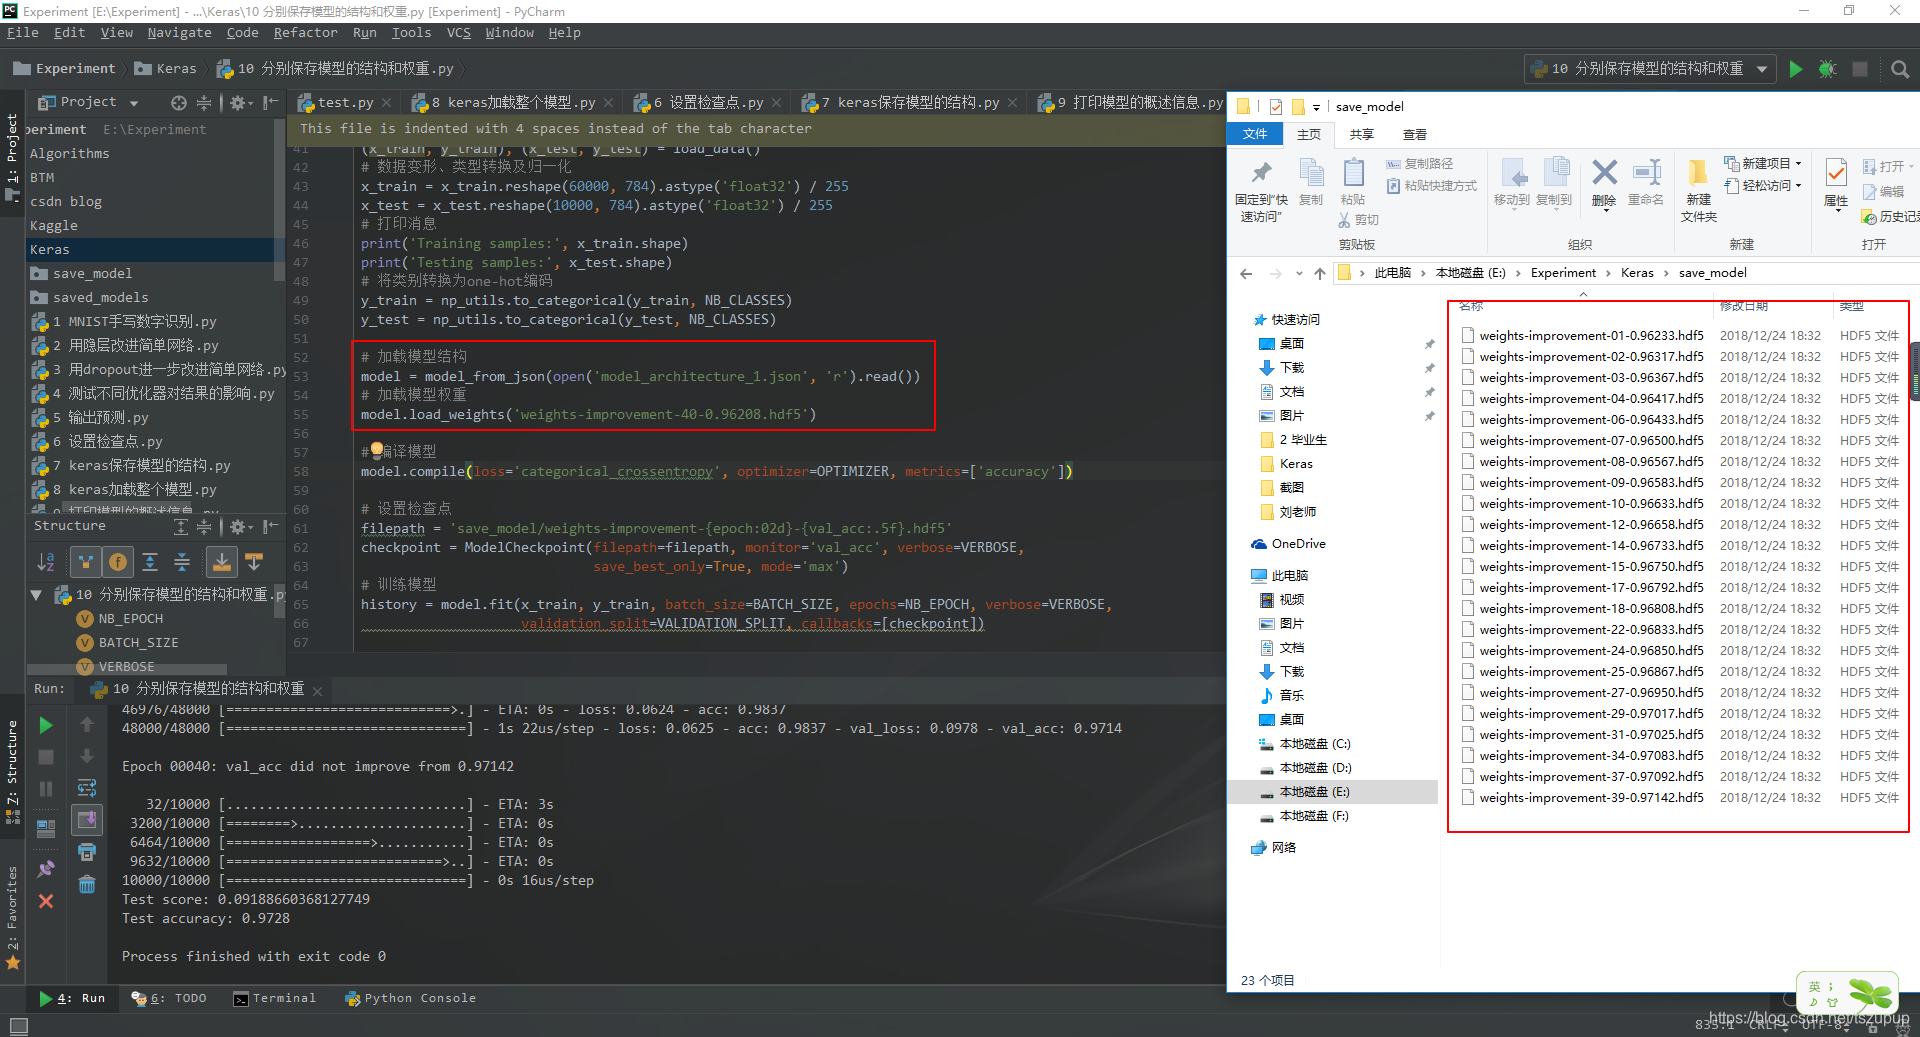
分别加载模型结构和权重,就是分别加载模型结构文件和模型权重文件,这里分别使用model_from_json或者model_from_yaml()方法和load_weights()方法,为了说明效果,请看以下的代码和截图。
代码如下:
from __future__ import print_function
import numpy as np
from keras.optimizers import SGD
from keras.utils import np_utils
from keras.callbacks import ModelCheckpoint
from keras.models import model_from_json
from keras.models import model_from_yaml

# 随机数种子,重复性设置
np.random.seed(1671)

# 网络结构和训练的参数
NB_EPOCH = 40
BATCH_SIZE = 128
VERBOSE = 1
NB_CLASSES = 10
OPTIMIZER = SGD()
N_HIDDEN = 128
VALIDATION_SPLIT = 0.2
RESHAPED = 784


# 加载数据
def load_data(path="mnist.npz"):
    f = np.load(path)
    x_train, y_train = f['x_train'], f['y_train']
    x_test, y_test = f['x_test'], f['y_test']
    f.close()
    return (x_train, y_train), (x_test, y_test)

# 调用函数加载数据
(x_train, y_train), (x_test, y_test) = load_data()
# 数据预处理
(x_train, y_train), (x_test, y_test) = load_data()
# 数据变形、类型转换及归一化
x_train = x_train.reshape(60000, 784).astype('float32') / 255
x_test = x_test.reshape(10000, 784).astype('float32') / 255
# 打印消息
print('Training samples:', x_train.shape)
print('Testing samples:', x_test.shape)
# 将类别转换为one-hot编码
y_train = np_utils.to_categorical(y_train, NB_CLASSES)
y_test = np_utils.to_categorical(y_test, NB_CLASSES)

# 加载模型结构
model = model_from_json(open('model_architecture_1.json', 'r').read())
# 加载模型权重
model.load_weights('weights-improvement-40-0.96208.hdf5')

# 编译模型
model.compile(loss='categorical_crossentropy', optimizer=OPTIMIZER, metrics=['accuracy'])

# 设置检查点
filepath = 'save_model/weights-improvement-{epoch:02d}-{val_acc:.5f}.hdf5'
checkpoint = ModelCheckpoint(filepath=filepath, monitor='val_acc', verbose=VERBOSE,
                             save_best_only=True, mode='max')
# 训练模型
history = model.fit(x_train, y_train, batch_size=BATCH_SIZE, epochs=NB_EPOCH, verbose=VERBOSE,
					validation_split=VALIDATION_SPLIT, callbacks=[checkpoint])

# 评估模型
score = model.evaluate(x_test, y_test, verbose=VERBOSE)
print('Test score:', score[0])
print('Test accuracy:', score[1])
效果截图如下:
写这篇博客参考和总结了许多其他博客,这里就不一一列举了,后面会再想想这篇博客还有哪里可以改进,谢谢大家。
欢迎交流! QQ:3408649893