版权声明:原创 https://blog.csdn.net/qq_41058594/article/details/88628576
最近在搞人脸识别,Yolo,Dlib,单纯向量法都玩了一遍,效果还可以。
昨天由老师给我发了一个百度AI的链接,我就玩开了上面的一个demo,叫做人体姿态检测出,这个名词名副其实,其背后的数学原理和论文都相当的给力,不得不佩服那些人工智能算法科学家,这也激发着我对AI的探索和学习的乐趣!
主函数,
功能:1.主要是针对百度AI接口
---------2.利用 from aip import AipBodyAnalysis #人体分析模块
# ━━━━━神兽出没━━━━━━
#    ┏┓   ┏┓
#   ┏┛┻━━━┛┻┓
#   ┃       ┃
#   ┃   ━   ┃
#   ┃ ┳┛ ┗┳ ┃
#   ┃       ┃
#   ┃   ┻   ┃
#   ┃       ┃
#   ┗━┓   ┏━┛Code is far away from bug with the animal protecting
#     ┃   ┃    神兽保佑,代码无bug
#     ┃   ┃
#     ┃   ┗━━━┓
#     ┃       ┣┓
#     ┃       ┏┛
#     ┗┓┓┏━┳┓┏┛
#      ┃┫┫ ┃┫┫
#      ┗┻┛ ┗┻┛
#
# ━━━━━━感觉萌萌哒━━━━━━
'''人体关键点识别(14个)'''
# 与human_detection 功能相同
import configparser # 配置文件模块 读写配置文件

from aip import AipBodyAnalysis #人体分析模块
import joint
import cv2
import os
然后就是一个类 class BaiDuAPI(object):
class BaiDuAPI(object):
    #特殊 构造函数 初始化函数
    def __init__(self,filePath):
        target = configparser.ConfigParser()
        target.read(filePath,encoding='utf-8-sig')
        app_id = target.get('工单密码','APP_ID')
        api_key = target.get('工单密码', 'API_KEY')
        secret_key = target.get('工单密码', 'SECRET_KEY')

        self.client = AipBodyAnalysis(app_id, api_key, secret_key)

    """ 读取图片 """
    def get_file_content(self,photoPath):
        with open(photoPath, 'rb') as fp:
            return fp.read()

    """ 主函数 """
    def file_main(self,photoPath):
        img = self.get_file_content('{}'.format(photoPath))
        """ 调用人体关键点识别 """
        #此处只能对一个人进行关键点识别
        #也就是说一个图片如果有好多人的话,只能标出一个人的关节特征
        #此处可以做修改,即进行把一张图所有人的关节特征都表达出来
        #------
#        print(self.client.bodyAnalysis(img))
        result = self.client.bodyAnalysis(img)['person_info'][0]['body_parts']
        jo = joint.Joint(result)
        jo.xunhun(photoPath)
        #print(result )
从此处运行
if __name__ == '__main__':
    print('---------正在检测-----------')
    baiduapi = BaiDuAPI('human_detection.ini')
    baiduapi.file_main('model.jpg')
    print('---------检测完成-----------')
重点来了…让我们一起看效果!
滴滴滴~~~~
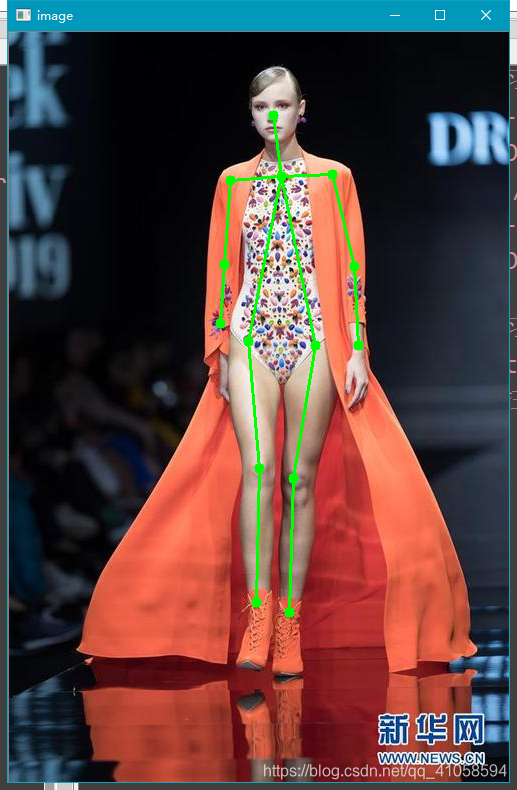
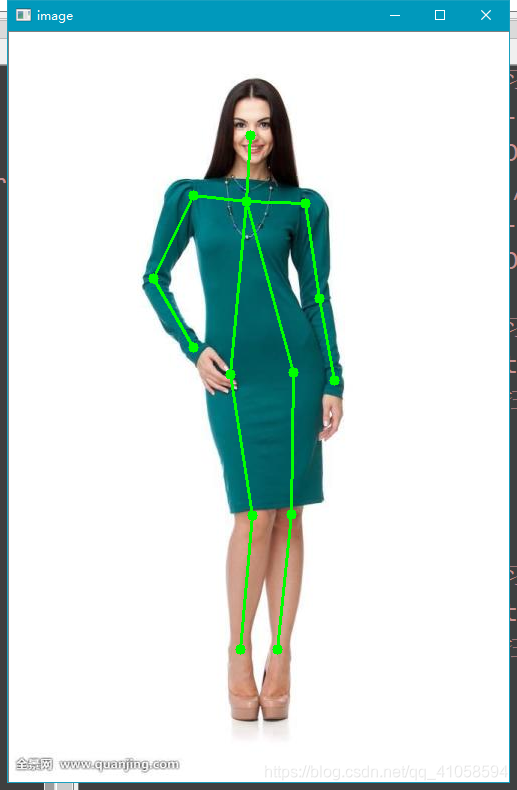
效果还行,把人体的14个主要关节都展示了出来…
由上面主代码我们可以看到一个这个模块: import joint
这个代码是我自己写的,用来连接着这14个点:
老规矩,看开头:
"""
#     @
#    010
#   0 1 0
#     1
#    0 0
#   0   0
#opencv画实心点: cv2.circle(img,(100,63),55,(255,0,0),-1)
#dic = {
#        'neck': {
#                 'y': 827.8070678710938,
#                 'x': 728.5543212890625},
#        'left_shoulder':{
#                 'y': 827.8095703125,
#                 'x': 895.0614624023438},
#        'left_knee': {
#                 'y': 1871.223754882812,
#                 'x': 901.9971313476562},
#        'left_ankle': {
#                'y': 2261.0341796875,
#                'x': 867.317138671875},
#       }
#for di in dic:
#    print(dic[di],end=',')
#In [2]: neck,left_shoulder,left_knee,left_ankle
主要部分在这里:
class Joint(object):

    __circle_list = []

    def __init__(self,dic):
        self.dic = dic

    def draw_line(self,img):
        #nose ---> neck
        cv2.line(img, (int(self.dic['nose']['x']),int(self.dic['nose']['y'])),
                 (int(self.dic['neck']['x']),int(self.dic['neck']['y'])), (0,255,0), 2)
        #neck --> left_shoulder
        cv2.line(img, (int(self.dic['neck']['x']),int(self.dic['neck']['y'])),
                 (int(self.dic['left_shoulder']['x']),int(self.dic['left_shoulder']['y'])), (0,255,0), 2)
        #neck --> right_shoulder
        cv2.line(img, (int(self.dic['neck']['x']),int(self.dic['neck']['y'])),
                 (int(self.dic['right_shoulder']['x']),int(self.dic['right_shoulder']['y'])), (0,255,0), 2)
        #left_shoulder --> left_elbow
        cv2.line(img, (int(self.dic['left_shoulder']['x']),int(self.dic['left_shoulder']['y'])),
                 (int(self.dic['left_elbow']['x']),int(self.dic['left_elbow']['y'])), (0,255,0), 2)
        #left_elbow --> left_wrist
        cv2.line(img, (int(self.dic['left_elbow']['x']),int(self.dic['left_elbow']['y'])),
                 (int(self.dic['left_wrist']['x']),int(self.dic['left_wrist']['y'])), (0,255,0), 2)
        #right_shoulder --> right_elbow
        cv2.line(img, (int(self.dic['right_shoulder']['x']),int(self.dic['right_shoulder']['y'])),
                 (int(self.dic['right_elbow']['x']),int(self.dic['right_elbow']['y'])), (0,255,0), 2)
        #right_elbow --> right_wrist
        cv2.line(img, (int(self.dic['right_elbow']['x']),int(self.dic['right_elbow']['y'])),
                 (int(self.dic['right_wrist']['x']),int(self.dic['right_wrist']['y'])), (0,255,0), 2)
        #neck --> left_hip
        cv2.line(img, (int(self.dic['neck']['x']),int(self.dic['neck']['y'])),
                 (int(self.dic['left_hip']['x']),int(self.dic['left_hip']['y'])), (0,255,0), 2)
        #neck --> right_hip
        cv2.line(img, (int(self.dic['neck']['x']),int(self.dic['neck']['y'])),
                 (int(self.dic['right_hip']['x']),int(self.dic['right_hip']['y'])), (0,255,0), 2)
        #left_hip --> left_knee
        cv2.line(img, (int(self.dic['left_hip']['x']),int(self.dic['left_hip']['y'])),
                 (int(self.dic['left_knee']['x']),int(self.dic['left_knee']['y'])), (0,255,0), 2)
        #right_hip --> right_knee
        cv2.line(img, (int(self.dic['right_hip']['x']),int(self.dic['right_hip']['y'])),
                 (int(self.dic['right_knee']['x']),int(self.dic['right_knee']['y'])), (0,255,0), 2)
        #left_knee --> left_ankle
        cv2.line(img, (int(self.dic['left_knee']['x']),int(self.dic['left_knee']['y'])),
                 (int(self.dic['left_ankle']['x']),int(self.dic['left_ankle']['y'])), (0,255,0), 2)
        #right_knee --> right_ankle
        cv2.line(img, (int(self.dic['right_knee']['x']),int(self.dic['right_knee']['y'])),
                 (int(self.dic['right_ankle']['x']),int(self.dic['right_ankle']['y'])), (0,255,0), 2)

    def xunhun(self,img):
        im1 = cv2.imread(img,cv2.IMREAD_COLOR)
        #im2 = cv2.resize(im1, (500,900), interpolation=cv2.INTER_CUBIC)

        for i in self.dic:
            cv2.circle(im1,(int(self.dic[i]['x']),int(self.dic[i]['y'])),5,(0,255,0),-1)

        self.draw_line(im1)
        cv2.imshow('image',im1)
百度AI 只是给了我们一个平台,免费的使用,以达到快速开发的目的…
分享几个链接:
【人体分析-人像分割】API示例Python
通用图像分析——通用物体和场景识别高级版
抖音上线“尬舞机”应用“人体关键点检测”技术