目录
Flink 版本为 1.7.2
Client提交任务
执行模式有:本地、远程Standalone等,下面只介绍yarn模式。
Yarn模式:
Job模式是每个flink job 单独在yarn上声明一个flink集群
Session模式会在集群中维护flink master,即一个yarn application master,运行多个job。
Job模式(重点是加上-m yarn-cluster):./flink run  -m yarn-cluster -d  -yst -yqu flinkqu -yst  -yn 4 -ys 2 -c flinkdemoclass  flinkdemo.jar  args1 args2 ...
Session模式:
先启动session:./bin/yarn-session.sh
后提交job:./bin/flink run ./path/to/job.jar
detached模式:上面job模式的-d代表detached,这种情况下flink yarn client将会只提交任务到集群然后关闭自己。这样就不能从 env.execute() 中获得 accumulator results 或 exceptions。而在session模式下使用,则无法使用flink停止yarn session,需用yarn工具来停止 yarn application -kill
根据flink的脚本可知,入口类为org.apache.flink.client.cli.CliFrontend。
main -> cliFrontend.parseParameters -> run() -> runProgram -> {
    获取yarnClusterDescriptor:customCommandLine.createClusterDescriptor()

    if (clusterId == null && runOptions.getDetachedMode()) { // job + DetachedMode模式
      从jar包中获取jobGraph
      新建一个RestClusterClient:clusterDescriptor.deploySessionCluster(); -> {
          在yarn集群中启动应用:deployInternal -> yarnClusterDescriptor.startAppMaster -> yarnClient.submitApplication() // flink便在yarn集群中启动 ClusterEntrypoint,这个类的介绍看下面。
      }
    }
    else {
        if (clusterId != null) { // session模式
          clusterDescriptor.retrieve(clusterId);
        }
        else { // job + non-DetachedMode模式
            针对非DetachedMode的job模式,job might consist of multiple parts (e.g. when using collect)。同样是新建一个RestClusterClient,只是不需要jobGraph和DetachedMode
        }
    }

    executeProgram -> 这里是父类ClusterClient的run方法 -> {
        if 非交互模式 {
            RestClusterClient的run方法,这里阻塞,直到执行完成 -> {
                getOptimizedPlan // 获取 optPlan 用于转化为JobGraph,后续图结构分析
                run // 这里接下面的restClusterClient.run()
            }
        }
        // 下面伪代码可忽略
        else 交互模式 {
            prog.invokeInteractiveModeForExecution()真正进入用户的flink代码 -> env.execute() 这里的env以及后面的指代StreamContextEnvironment -> {
                获取streamGraph:this.getStreamGraph();
                if DetachedMode模式,则setDetachedPlan(streamGraph)
                else 执行ContextEnvironment.getClient().run()
            }
            if detached mode {
                ((DetachedEnvironment) factory.getLastEnvCreated()).finalizeExecute()这里调用DetachedEnvironment的finalizeExecute,里面调用RestClusterClient的run方法
            }
            else { // blocking mode
                return this.lastJobExecutionResult;
            }
        }
    }
}
用户定义的Flink代码会根据不同的ExecutionEnvironment调用相应的execute方法。yarn模式下的job和session,对应DetachedEnvironment和ContextEnvironment。
ClusterEntrypoint
YarnJobClusterEntrypoint 和 YarnSessionClusterEntrypoint 的父类。从下面伪代码可知,ClusterEntrypoint 包含了 webMonitor、resourceManager、dispatcher 的服务。
两者的main -> ClusterEntrypoint.runClusterEntrypoint -> startCluster -> runCluster -> {
    createDispatcherResourceManagerComponentFactory // 创建相应模式的factory
    create -> {
        webMonitorEndpoint.start();
        resourceManagerRetrievalService.start();
        dispatcherLeaderRetrievalService.start();
    }
}
restClusterClient.run()
run() -> {
    getJobGraph
    restClusterClient.submitJob(jobGraph, classLoader) -> restClusterClient.submitJob(jobGraph)这里包括一些文件的上传 -> sendRetriableRequest -> restClient.sendRequest()
}
综上所述,flink on yarn模式的Client提交任务流程大致如下:
运行 flink 脚本,创建 yarnClusterDescriptor
job or session
job + Detached 模式:flink客户端根据jar包准备好启动AM的材料,包括yarnClusterDescriptor、RestClusterClient(包含jobGraph),在 Yarn 集群启动 YarnJobClusterEntrypoint
session 模式:Flink Master (AM)已经启动。clusterDescriptor.retrieve(clusterId)
调用restClusterClient.run(),创建 jobGraph,并向集群提交 job
之后 job 将被提交给 Dispatcher。后续在"flink部署与执行模型"部分。
flink的图结构
在Yarn模式下不使用StreamGraph,而是用OptimizedPlan生成JobGraph。StreamGraph适用于其他情况,比如本地执行。
flink的图结构主要有JobGraph和ExecutionGraph。
JobGraph
JobGraph表示一个被 JobManager 接收的底层的Flink dataflow program。所有上层API代码都会转化为JobGraphs。抽象来说,JobGraph是一张由 vertices 和 intermediate results 组成的DAG图。现在 iterations (feedback edges)已经不会被编译到 JobGraph 了,而是去到了一些建立了反馈管道的 vertices 中。JobGraph规定了 job 层面上的配置,而其所包含的 vertex 和 intermediate result 定义了具体算子的特征和中间结果。
ExecutionGraph
协调数据流的分布式执行的核心数据结构。它保持每个并行任务,每个中间流以及它们之间的通信的表示。它主要由以下三个部分组成:
- ExecutionJobVertex:对应 JobGraph 的 vertex,通常是一个算子,如map、join。它持有一组并行子任务的聚合状态aggregated state。由 JobVertex 确定。
- ExecutionVertex:表示一组并行任务中的其中一个子任务。数量由并行度而定。由 ExecutionJobVertex 和
- Execution:执行 ExecutionVertex ,一个 ExecutionVertex 可能有多个 Execution 来应对失败或重新计算。由 ExecutionAttemptID 确定。JM 和 TM 之间关于 task 的部署和更新都是根据 ExecutionAttemptID 来通知。

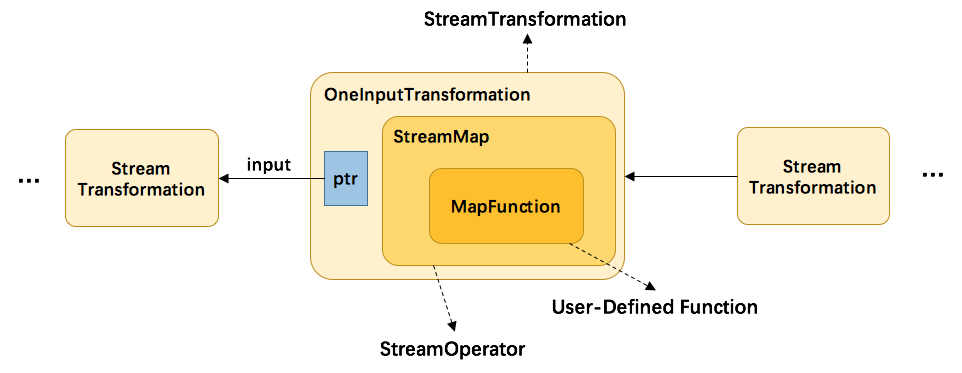
operator算子:一般operator的操作是通过反射获取所传入的function的返回对象,通过transform创建经过该function处理后得到的流实例。在返回生成的流实例之前,flink还会对转换进行登记,即.addOperator(resultTransform)。
StreamGraph
StreamGraph通过StreamExecutionEnvironment中的getStreamGraph获取。
for (StreamTransformation<?> transformation: transformations) {
    transform(transformation);
}
return streamGraph;

private Collection<Integer> transform(StreamTransformation<?> transform) {

    // 下面的各类transformXXX内部也会调用这个transform方法
    if (alreadyTransformed.containsKey(transform)) {
        return alreadyTransformed.get(transform);
    }

    // 并行度设置

    // call at least once to trigger exceptions about MissingTypeInfo
    transform.getOutputType();

    Collection<Integer> transformedIds;
    if (transform instanceof OneInputTransformation<?, ?>) {
        transformedIds = transformOneInputTransform((OneInputTransformation<?, ?>) transform);
    } else if (transform instanceof TwoInputTransformation<?, ?, ?>) {
        // ...
    }

    // need this check because the iterate transformation adds itself before
    // transforming the feedback edges
    if (!alreadyTransformed.containsKey(transform)) {
        alreadyTransformed.put(transform, transformedIds);
    }

    if (transform.getBufferTimeout() >= 0) {
        streamGraph.setBufferTimeout(transform.getId(), transform.getBufferTimeout());
    }
    if (transform.getUid() != null) {
        streamGraph.setTransformationUID(transform.getId(), transform.getUid());
    }
    if (transform.getUserProvidedNodeHash() != null) {
        streamGraph.setTransformationUserHash(transform.getId(), transform.getUserProvidedNodeHash());
    }

    if (transform.getMinResources() != null && transform.getPreferredResources() != null) {
        streamGraph.setResources(transform.getId(), transform.getMinResources(), transform.getPreferredResources());
    }

    return transformedIds;
}
transformOneInputTransform
private <IN, OUT> Collection<Integer> transformOneInputTransform(OneInputTransformation<IN, OUT> transform) {
Collection<Integer> inputIds = transform(transform.getInput());
// 在递归处理节点过程中,某个节点可能已经被其他子节点先处理过了,需要跳过
if (alreadyTransformed.containsKey(transform)) {
return alreadyTransformed.get(transform);
}
//这里是获取slotSharingGroup。这个group用来定义当前我们在处理的这个操作符可以跟什么操作符chain到一个slot里进行操作
//因为有时候我们可能不满意flink替我们做的chain聚合
//一个slot就是一个执行task的基本容器
String slotSharingGroup = determineSlotSharingGroup(transform.getSlotSharingGroup(), inputIds);
streamGraph.addOperator(transform...);
//对于keyedStream,我们还要记录它的keySelector方法
//flink并不真正为每个keyedStream保存一个key,而是每次需要用到key的时候都使用keySelector方法进行计算
//因此,我们自定义的keySelector方法需要保证幂等性
//到后面介绍keyGroup的时候我们还会再次提到这一点
if (transform.getStateKeySelector() != null) {
TypeSerializer<?> keySerializer = transform.getStateKeyType().createSerializer(env.getConfig());
streamGraph.setOneInputStateKey(transform.getId(), transform.getStateKeySelector(), keySerializer);
}
streamGraph.setParallelism(...);
streamGraph.setMaxParallelism(...);
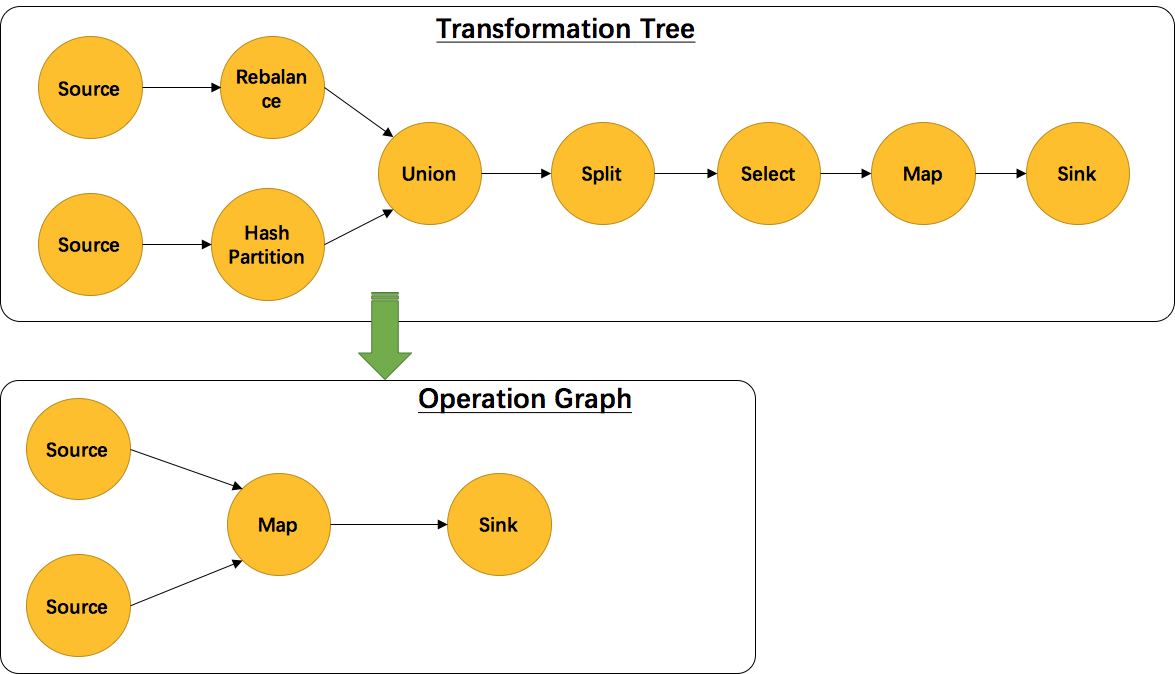
//为当前节点和它的依赖节点建立边
//这里可以看到之前提到的select, union, partition等逻辑节点被合并入edge的过程
for (Integer inputId: inputIds) {
streamGraph.addEdge(inputId, transform.getId(), 0);
}
return Collections.singleton(transform.getId());
}
//addEdge的实现,会合并一些逻辑节点
private void addEdgeInternal(...) {
//如果输入边是侧输出节点,则把side的输入边作为本节点的输入边,并递归调用
if (virtualSideOutputNodes.containsKey(upStreamVertexID)) {
int virtualId = upStreamVertexID;
upStreamVertexID = virtualSideOutputNodes.get(virtualId).f0;
if (outputTag == null) {
outputTag = virtualSideOutputNodes.get(virtualId).f1;
}
addEdgeInternal(upStreamVertexID, downStreamVertexID, typeNumber, partitioner, null, outputTag);
//如果输入边是select,则把select的输入边作为本节点的输入边
} else if (
// virtualSelectNodes和virtualPartitionNodes跟上面的virtualSideOutputNodes操作一样
} else {
//正常的edge处理逻辑
StreamNode upstreamNode = getStreamNode(upStreamVertexID);
StreamNode downstreamNode = getStreamNode(downStreamVertexID);
// If no partitioner was specified and the parallelism of upstream and downstream
// operator matches use forward partitioning, use rebalance otherwise.
if (partitioner == null && upstreamNode.getParallelism() == downstreamNode.getParallelism()) {
partitioner = new ForwardPartitioner<Object>();
} else if (partitioner == null) {
partitioner = new RebalancePartitioner<Object>();
}
// 定义了ForwardPartitioner但上下游并行度不一致时抛异常
// ...
StreamEdge edge = new StreamEdge(upstreamNode, downstreamNode, typeNumber, outputNames, partitioner, outputTag);
getStreamNode(edge.getSourceId()).addOutEdge(edge);
getStreamNode(edge.getTargetId()).addInEdge(edge);
}
}补充:
StreamTransformation的封装
StreamTransformation整合
并不是每一个 StreamTransformation 都会转换成runtime层中的物理操作。有一些只是逻辑概念,比如union、split/select、partition等在运行时会优化。
OptimizedPlan
由 PlanNode 和 Channel 组成。它们定义了算子策略,如 sorting-merge join, hash join, sorted grouping 等,定义了传递策略,如 local pipe, shuffle, broadcast, rebalance 等,还定义了数据交换模式,如 batched, pipelined。下面代码从 “Client提交任务” 的 getOptimizedPlan 开始。
 -> compiler.compile(prog.getPlan())这里prog是PackagedProgram.getPlanWithJars获得的,compiler实际为 Optimizer -> compile() -> {
     // 首先要创建 optimizer plan 的表示,这一步包括:给每个算子创建 optimizer plan node;用 channels 把它们连接起来;寻找 local strategies and channel types 的线索,并设置它们;对数据量进行估计
     new GraphCreatingVisitor,这里与 Spark 生成执行计划有点像,都是利用访问者模式。
     program.accept(graphCreator); // 这里的 visitor 先从 sink 开始遍历产生相应的 node,然后从 source 开始将 node 连接起来。
     // 后续代码关于 node 的内存等细节调整,有不少注释能帮助了解细节,这里略过。
     // 最后获取plan
     PlanFinalizer().createFinalPlan()
 }
JobGraph
获取 OptimizedPlan 后调用 ClusterClient 的另一个 run 方法。
run -> getJobGraph -> {
  // 这里根据 StreamingPlan 或者 OptimizedPlan 调用不同的方法生成 jobGraph,下面针对 OptimizedPlan
  job = gen.compileJobGraph((OptimizedPlan) optPlan) -> compileJobGraph() -> {
      program.accept(JobGraphGenerator); // 遍历,积累产生 job graph 的对象
      // 各个 task 的配置
      // 生成 job graph
      new JobGraph()
      for (JobVertex vertex : this.vertices.values()) { // vertices 是 PlanNode 和 JobVertex 的映射
            graph.addVertex(vertex);
      }

  }
  // 给 job 添加 jar url 和 classpaths
}
下面是 StreamGraph 的 getJobGraph,里面调用StreamingJobGraphGenerator.createJobGraph(this, jobID);
private JobGraph createJobGraph() {
    // make sure that all vertices start immediately,所有节点一开始就启动
    jobGraph.setScheduleMode(ScheduleMode.EAGER);
    // Generate deterministic hashes for the nodes in order to identify them across
    // submission iff they didn't change.
    Map<Integer, byte[]> hashes = defaultStreamGraphHasher.traverseStreamGraphAndGenerateHashes(streamGraph);
    // Generate legacy version hashes for backwards compatibility
    List<Map<Integer, byte[]>> legacyHashes = new ArrayList<>(legacyStreamGraphHashers.size());
    for (StreamGraphHasher hasher : legacyStreamGraphHashers) {
        legacyHashes.add(hasher.traverseStreamGraphAndGenerateHashes(streamGraph));
    }
    Map<Integer, List<Tuple2<byte[], byte[]>>> chainedOperatorHashes = new HashMap<>();
    // 遍历streamGraph,看节点之间能否chain,即多个operator合并到一个线程任务。
    setChaining(hashes, legacyHashes, chainedOperatorHashes);
    setPhysicalEdges();
    setSlotSharingAndCoLocation();
    configureCheckpointing();
    JobGraphGenerator.addUserArtifactEntries(streamGraph.getEnvironment().getCachedFiles(), jobGraph);
    // set the ExecutionConfig last when it has been finalized
    try {
        jobGraph.setExecutionConfig(streamGraph.getExecutionConfig());
    }
    catch (){}
    return jobGraph;
}

// chain作用:减少线程之间的切换,减少消息的序列化/反序列化,减少数据在缓冲区的交换,减少了延迟的同时提高整体的吞吐量。chain逻辑如下
public static boolean isChainable(StreamEdge edge, StreamGraph streamGraph) {
    // ...
    return downStreamVertex.getInEdges().size() == 1 // 下游节点没有来自其他节点的输入
            && outOperator != null
            && headOperator != null
            && upStreamVertex.isSameSlotSharingGroup(downStreamVertex)
            && outOperator.getChainingStrategy() == ChainingStrategy.ALWAYS
            && (headOperator.getChainingStrategy() == ChainingStrategy.HEAD ||
                headOperator.getChainingStrategy() == ChainingStrategy.ALWAYS)
            && (edge.getPartitioner() instanceof ForwardPartitioner)
            && upStreamVertex.getParallelism() == downStreamVertex.getParallelism()
            && streamGraph.isChainingEnabled();
}
ExecutionGraph
调用JobMaster的createAndRestoreExecutionGraph,里面时ExecutionGraphBuilder.buildGraph(…)
方法代码比较长,包括checkpoint、state backend等的设置,这些在下面代码中省略
// create a new execution graph, if none exists so far,创建过程基本都是直接赋值和创建java常用集合
// ...

// // set the basic properties
executionGraph.setScheduleMode(jobGraph.getScheduleMode());
executionGraph.setQueuedSchedulingAllowed(jobGraph.getAllowQueuedScheduling());
executionGraph.setJsonPlan(JsonPlanGenerator.generatePlan(jobGraph));

// initialize the vertices that have a master initialization hook
// file output formats create directories here, input formats create splits

log.info("Running initialization on master for job {} ({}).", jobName, jobId);

for (JobVertex vertex : jobGraph.getVertices()) {

    // 是否有executableClass,设置vertex的并行度
    // ...

    // 针对source和sink有相应的初始化
    vertex.initializeOnMaster(classLoader);
}

log.info("Successfully ran initialization on master in {} ms.",..);

// topologically sort the job vertices and attach the graph to the existing one
List<JobVertex> sortedTopology = jobGraph.getVerticesSortedTopologicallyFromSources();
// Adding {} vertices from job graph
executionGraph.attachJobGraph(sortedTopology);
// Successfully created execution graph from job graph
flink部署与执行模型
调度相关概念和大致流程可参考Flink架构及其工作原理
以下内容参考FLIP-6 - Flink Deployment and Process Model - Standalone, Yarn, Mesos, Kubernetes, etc.,有些新特征还未实现。
下面的 jobManager 和 TaskManager 都是习惯称呼,在较新版本的flink,比如1.7,底层的 JobManager 主要有 JobMaster 实现,而 TaskManager 则由 TaskExecutor 实现。
Single Job JobManager
The most important change is that the JobManager handles only a single job. The JobManager will be created with a JobGraph and will be destroyed after the job execution is finished. This model more naturally maps what happens with most jobs anyways. Cross-job functionality is handled by other components that wrap and create JobManagers. This leads to a better separation of concerns, and a more modular composability for various cluster managers. The JobManager constructor will also optionally take a Savepoint or Checkpoint to initialize the job from.
The JobManager has a SlotPool which holds the slots that were offered to it and accepted. The JobManager’s scheduler grabs slots from the SlotPool and can thus access all currently registered slots even if the ResourceManager is down. The SlotPool is a modification of what is currently the InstanceManager. The SlotPool will attempt to acquire new slots from the ResourceManager when it cannot serve a slot request. If no ResourceManager is currently available, or it gets a decline from the ResourceManager, or a request times out, it fails the slot request. The SlotPool releases slots that are unused to the ResourceManager. Slots count as unused if they are not used when the job is fully running (fully recovered).
ResourceManager
- Acquire new TaskManager (or slots) by starting containers, or allocating them to a job
- Giving failure notifications to JobManagers and TaskManagers
- Caching TaskManagers (containers) to be reused, releasing TaskManagers (containers) that are unused for a certain period.
- The ResourceManager may or may not be task slot aware (probably will be). A slot aware ResourceManager maintains a map of available TaskManager slots
For the sake of simplicity, the following talks about “slots”, but one can think simply of “TaskManager” instead, for the common case of a one-slot TaskManager.
The following are core aspects of the ResourceManager design:
ResourceManager 接受申请 slots 的请求,jobs 可以请求具有不同资源的 TaskManager。
ResourceManager 能够跨多个 jobs 和 jobManagers运行。它负责 TM 的登记,维持一个资源池,里面有available TaskManagers and their slots。
ResourceManager 的 fail 不会影响当前 jobs 的执行,只是当前 jobs 不能获得新的 slots。
ResourceManager fault tolerance should work without persistent state in general
-
- All that the ResourceManager does is negotiate between the cluster-manager, the JobManager, and the TaskManagers. Its state can hence be reconstructed from re-acquiring containers and re-registration from JobManagers and TaskManagers
- Note that certain specialization (for example for Mesos or Yarn) may still persist cluster-manager-specific state, if that is required.
JobManager 可以在 ResourceManager 处登记。登记后的 JM 可以收到 TM 及其 slots failover 的通知
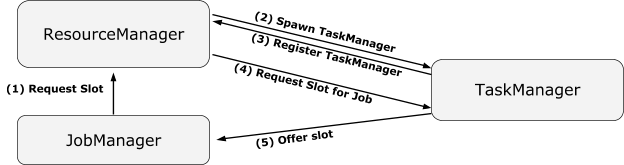
如果已登记的 TM 有可用的 slots,(2)(3)可忽略。
YarnResourceManager 是 yarn 模式下 RM 的实现类。从其 initialize() 方法可知,它会创建 resourceManagerClient 和 nodeManagerClient,这两个客户端分别包含了Yarn框架的AMRMClientAsync和NMClient,分别用来负责和Yarn的ResourceManager和NodeManager通信。
TaskManager
TaskManagers are both in contact with the ResourceManager and JobManager:
ResourceManager interaction
- The TaskManager initially registers at the ResourceManager. A disconnect from the ResourceManager simply results in re-tying to register and advertise the currently available slots.
- With each heartbeat, the TaskManager also transmits its slot availability.
- The ResourceManager may tell the TaskManager to give a slot to a specific JobManager, and the TaskManager will offer that slot to the JobManager.
- The ResouceManager may tell the TaskManager to shut down (exit the process)
JobManager interaction
- The TaskManager offers a slot to a JobManager at the ResourceManager’s behest. That slot is then tied to that JobManager until the JobManager releases the slot.
- The TaskManager watches all JobManagers to which it has offered slots. Loss of connection to the JobManager results in triggering master-failure recovery (currently: cancel all tasks form that master)
- JobManagers can deploy tasks only into slots they allocated.
- Upon loss of connection to the JobManager, the TaskManager will try to re-register the slots at the new JobManager for that job (retrieved via the HA leader lookup). After a moderate timeout period, it releases the slots and makes them available again. If a backup JobManager does not take over within that period, it will have to re-request the slots from the ResourceManager.
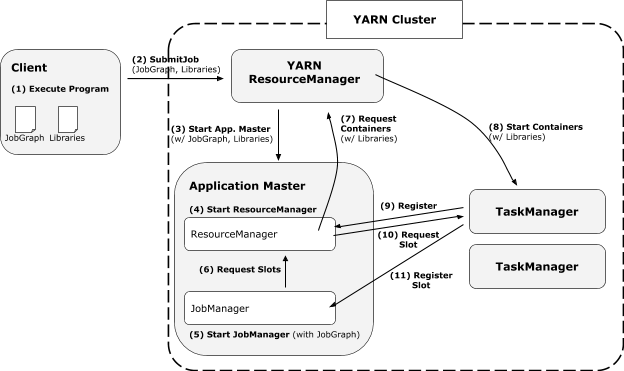
YARN
Compared to the state in Flink 1.1, the new Flink-on-YARN architecture offers the following benefits:
- The client directly starts the Job in YARN, rather than bootstrapping a cluster and after that submitting the job to that cluster. The client can hence disconnect immediately after the job was submitted
- All user code libraries and config files are directly in the Application Classpath, rather than in the dynamic user code class loader
- Containers are requested as needed and will be released when not used any more
- The “as needed” allocation of containers allows for different profiles of containers (CPU / memory) to be used for different operators
Yarn-specific Fault Tolerance Aspects
ResourceManager and JobManager run inside the ApplicationMaster process. Failure detection and restart of that process is done by YARN.
JobGraph and libraries are always part of the working directory from which the ApplicationMaster processes is spawned. Internally, YARN stores them in a private HDFS directory.
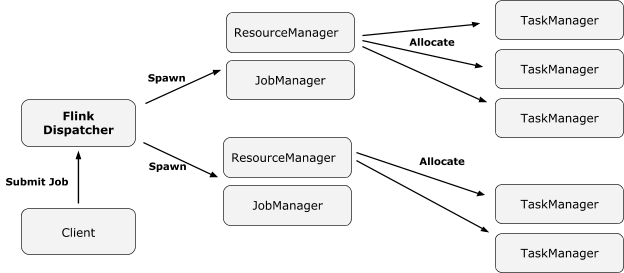
在 Yarn 模式下,dispatcher 是可选的。
Without dispatcher
With dispatcher

Dispatcher
The Dispatcher component is responsible for receiving job submissions, persisting them, spawning JobManagers to execute the jobs and to recover them in case of a master failure. Furthermore, it knows about the state of the Flink session cluster.
The dispatcher is introduced because:
- Some cluster managers need a central job spawning and monitoring instance
- It subsumes the role of the standalone JobManager, waiting for jobs to be submitted
In some setups, the dispatcher is optional (YARN) or not applicable (Kubernetes).
In the future run, the dispatcher will also help with the following aspects:
- The dispatcher is a cross-job service that can run a long-lived web dashboard
- Future versions of the dispatcher should receive only HTTP calls and thus can act as a bridge in firewalled clusters
- The dispatcher never executes code and can thus be viewed as a trusted process. It can run with higher privileges (superuser credentials) and spawn jobs on behalf of other users (acquiring their authentication tokens). Building on that, the dispatcher can manage user authentications
在源码中,MiniDispatcher 由 JobClusterEntrypoint 实例化,它只针对一个 jobGrpah。如果执行模式是 DETACHED,那么 MiniDispatcher 会在 job 完成后终止。StandaloneDispatcher 对应 session 模式。
JobMaster
JobMaster 是负责单个 JobGraph 的执行的。JobManager 是老的 runtime 框架,1.7版本依然存在,但主要起作用的应该是 JobMaster。在1.8后,JobManager 类消失了。
JM 的主要执行在本节最后的源码分析有提及。
YarnTaskExecutorRunner
TaskExecutor 在 yarn 集群中的对象,相当于 TaskManager,它可能有多个 slots,每个 slot 执行一个具体的子任务。每个 TaskExecutor 会将自己的 slots 注册到 SlotManager 上,并汇报自己的状态,是忙碌状态,还是处于一个闲置的状态。
main -> {
    SignalHandler.register(LOG);
    run(args) -> {
        TaskManagerRunner.runTaskManager -> {
            new TaskManagerRunner -> startTaskManager -> {
                创建 TaskManagerServices,实例化时创建 TaskSlot
                new TaskExecutor
            }
            taskManagerRunner.start() -> {
                连接 RM:resourceManagerLeaderRetriever.start()
                告诉 task slot 谁负责 task slot 操作:taskSlotTable.start(new SlotActionsImpl());
                jobLeaderService.start();
                startRegistrationTimeout();
            }
        }
    }
}
taskmanagerservice
源码分析
Dispatcher 的启动
Dispatcher.start() -> leaderElectionService.start() ZooKeeperLeaderElectionService的

Dispatcher 接收 client 的 submitjob
RedirectHandler.channelRead0(),一个netty对象-> AbstractHandler.respondAsLeader() -> respondToRequest -> JobSubmitHandler.handleRequest() -> gateway.submitJob(),即 Dispatcher 的方法 -> persistAndRunJob() -> runJob -> createJobManagerRunner(jobGraph){
  jobManagerRunnerFactory.createJobManagerRunner -> {
    创建DefaultJobMasterServiceFactory
    登记libraryCacheManager.registerJob
    启动(未start)haServices.getJobManagerLeaderElectionService
    启动jobMasterFactory.createJobMasterService{
        实例化JobMaster{ JobMaster.createAndRestoreExecutionGraph },JM负责一个jobGraph的执行
    }
  }
  dispatcher.startJobManagerRunner -> {
    jobManagerRunner.start() -> ZooKeeperLeaderElectionService.start -> isLeader -> JobManagerRunner.grantLeadership -> verifyJobSchedulingStatusAndStartJobManager -> startJobMaster -> JobMaster.start -> startJobExecution -> {
  startJobMasterServices:包括slotPool和scheduler的启动,告知flinkresourceManager leader的地址,当FlinkRM和JM建立好连接后,slot就可以开始requesting slots
  // 执行job
  resetAndScheduleExecutionGraph -> {
      createAndRestoreExecutionGraph -> scheduleExecutionGraph -> executionGraph.scheduleForExecution() -> scheduleEager -> {
          给 Execution 分配 slots: ExecutionJobVertex.allocateResourcesForAll -> Execution.allocateAndAssignSlotForExecution -> ProviderAndOwner.allocateSlot -> SlotPool.allocateSlot -> {
              if task.getSlotSharingGroupId() == null {
                  return allocateSingleSlot() -> return SingleLogicalSlot
              } else {
                  return allocateSharedSlot() -> {
                      if (task.getCoLocationConstraint() != null) {
                          return allocateCoLocatedMultiTaskSlot()
                      }
                      else {
                          return allocateMultiTaskSlot() -> {
                              有已经处理完的(被分配后完成job执行的) slot:multiTaskSlotLocality
                              if multiTaskSlotLocality != null && slot 是本地的 {
                                  return multiTaskSlotLocality
                              }
                              available slots: polledSlotAndLocality
                              if polledSlotAndLocality != null && (polledSlotAndLocality.getLocality() == Locality.LOCAL || multiTaskSlotLocality == null{
                                  allocatedSlot.tryAssignPayload(multiTaskSlot) // 尝试,成功就返回,失败就往下走
                              }

                              if multiTaskSlotLocality != null {
                                  return multiTaskSlotLocality
                              }

                              if (allowQueuedScheduling) { // 如果允许排队等候
                                  检查所有未处理完的 slot 是否可用
                                  如果没有,向 RM 申请: requestNewAllocatedSlot -> requestSlotFromResourceManager -> resourceManagerGateway.requestSlot -> slotManager.registerSlotRequest() -> internalRequestSlot() -> allocateResource -> resourceActions.allocateResource(),ResourceActionsImpl的 -> YarnResourceManager.startNewWorker -> requestYarnContainer(),即申请 TM
                              }
                              else {
                                  不限 locality,只要 SlotSharingManager 有 slot 就返回它
                              }
                          }
                      }
                  }
              }
          }
          遍历 execution,调用其 deploy 方法 -> {
              检查被分配的 Target slot (TaskManager) 是否还存活等一些检查
              vertex.createDeploymentDescriptor()
              slot.getTaskManagerGateway(); // 实际上是 RpcTaskManagerGateway -> taskExecutorGateway
              taskManagerGateway.submitTask(); -> taskExecutorGateway.submitTask() -> {
                检查 JM连接、JM id、slots
                通过 BlobServer 下载 用户jar文件
                new Task
                task.startTaskThread(); // 至此,任务真正执行
              }
          }
      }
    }
  }
}
flink源码阅读经验总结
- 快捷键(基于mac)
- 顺推:control + 左键
- 逆推:选中方法或类名后 shift + command + g
- 给代码分块,就像阅读文章的分段,并先看该“代码块”的注释或者条件判断,就像看文章段落开头的概括句字。exception、check等通常可略过。
- 每次转跳做好记录,如 A -> B,方便回溯。
- 注意return,尤其有一个以上时,分析好它的条件,避免之后跟错。
- 顺推:
- 一些实例化函数可能含有重要的的逻辑实现(尽管这不是好的做法),例如上面flink执行中提到的createJobManagerRunner中还包含其他对象的实例化,这些实例化中的JobMaster构造方法还有createAndRestoreExecutionGraph。
- 当跟踪到抽象时,尽量回头查看调用该方法的实例对应该抽象的哪个实现。
- 逆推:
- 只关注相关的包,有test修饰的基本可以跳过
- 先编译flink再看源码更方便
- 要关注官方的设计文档,比如flink的Flink Improvement Proposals,里面的FLIP6介绍了新的flink调度模型
参考: