介绍
1602液晶显示器(1602 Liquid Crystal Display,此后简称1602 LCD)是一种常见的字符液晶显示器,因其能显示16*2个字符而得名。
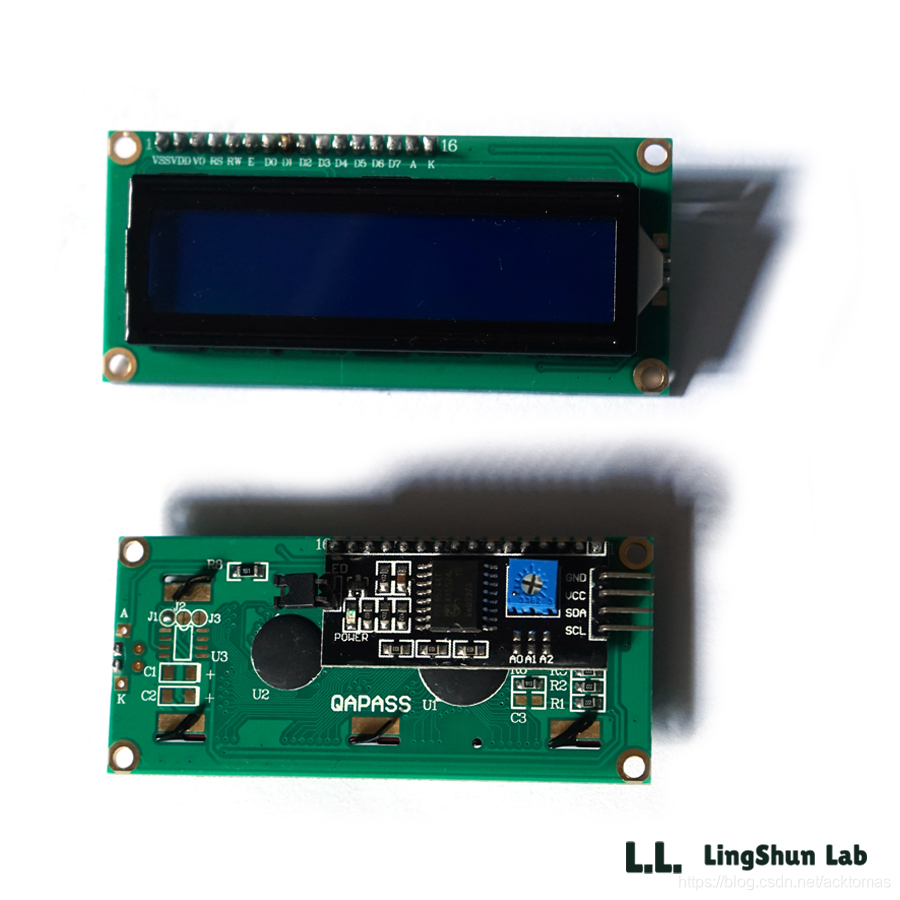
我们使用IIC LCD1602模块集成了IIC I/O扩展芯片,通过两线制的IIC总线(串行时钟线SCL,串行数据线SDA),可使Arduino实现控制LCD 1602显示的目的。
通过设置跳线还可以设置地址: 0x20-0x27。模块背面可以看到一块蓝色的电位器,旋转它可以调节1602液晶显示器的对比度。
背后的接线引脚分别为GND;VCC;SDA;SCL(SDA和SCL分别为iic通讯的数据线和时钟线)
获取此库可点击:项目-加载库-管理库,在搜索框内搜索liquidCrystal可找到若干关于驱动液晶的库文件,在下面就有LiquidCrystal_I2C相关的库文件,点击安装即可。
也可以去GitHub下载LCD1602_I2C的库,下载地址是 https://github.com/marcoschwartz/LiquidCrystal_I2C
引脚说明
GND ------ 地线
VCC ------ 电源(5V or 3.3v 电源不同显示效果有点差别)
SDA ------ I2C 数据线
SCL ------ I2C 时钟线
接线方法
LCD1602 i2c模块 Ardunio Uno
GND <------> GND接地线
VCC <------> 5V 接电源
SDA <------> A4
SCL <------> A5
代码示例1:
//LingShun lab
#include <Wire.h>
#include <LiquidCrystal_I2C.h> //引用I2C库

//设置LCD1602设备地址,这里的地址是0x3F,一般是0x20,或者0x27,具体看模块手册
LiquidCrystal_I2C lcd(0x3F,16,2);

void setup()
{
  lcd.init();                  // 初始化LCD
  lcd.backlight();             //设置LCD背景等亮
}

void loop()
{
  lcd.setCursor(0,0);                //设置显示指针
  lcd.print("LCD1602 iic Test");     //输出字符到LCD1602上
  lcd.setCursor(0,1);
  lcd.print("         by L.L.");
  delay(1000);
}
问题解疑
-
是一个模块还是两个模块?
这模块是通过LCD1602屏 和 LCD1602 I2C 模块 焊接结合的,可以直接买焊接好的,也可以分开买,不过就需要点动手能力。 -
无法正常显示?
刚上电的时候,老是显示一个个方块,如图

这情况一般是地址错误,
寻找IIC设备地址的代码
一个寻找设备地址的代码 (来源:Arduino驱动IIC/I2C LCD1602模块显示(4根线解决连接))
官方地址:i2c_scanner(http://playground.arduino.cc/Main/I2cScanner)
#include <Wire.h>

void setup() {
  Wire.begin();
  Serial.begin(9600);
  Serial.println("\nI2C Scanner");
}

void loop() {
  byte error, address;
  int nDevices;
  Serial.println("Scanning...");
  nDevices = 0;
  for (address = 1; address < 127; address++ ) {
    // The i2c_scanner uses the return value of
    // the Write.endTransmisstion to see if
    // a device did acknowledge to the address.
    Wire.beginTransmission(address);
    error = Wire.endTransmission();
    if (error == 0) {
      Serial.print("I2C device found at address 0x");
      if (address < 16)
        Serial.print("0");
      Serial.print(address, HEX);
      Serial.println(" !");
      nDevices++;
    } else if (error == 4) {
      Serial.print("Unknow error at address 0x");
      if (address < 16)
        Serial.print("0");
      Serial.println(address, HEX);
    }
  }
  if (nDevices == 0)
    Serial.println("No I2C devices found\n");
  else
    Serial.println("done\n");
  delay(5000); // wait 5 seconds for next scan
}
把模块按接线方法接好,上传这段代码后,打开端口监视器,就能找到在I2C上的设备地址.