前言
计算机视觉系列之学习笔记主要是本人进行学习人工智能(计算机视觉方向)的代码整理。本系列所有代码是用python3编写,在平台Anaconda中运行实现,在使用代码时,默认你已经安装相关的python库,这方面不做多余的说明。本系列所涉及的所有代码和资料可在我的github上下载到,gitbub地址:https://github.com/mcyJacky/DeepLearning-CV,如有问题,欢迎指出。
一、inception-v3模型下载
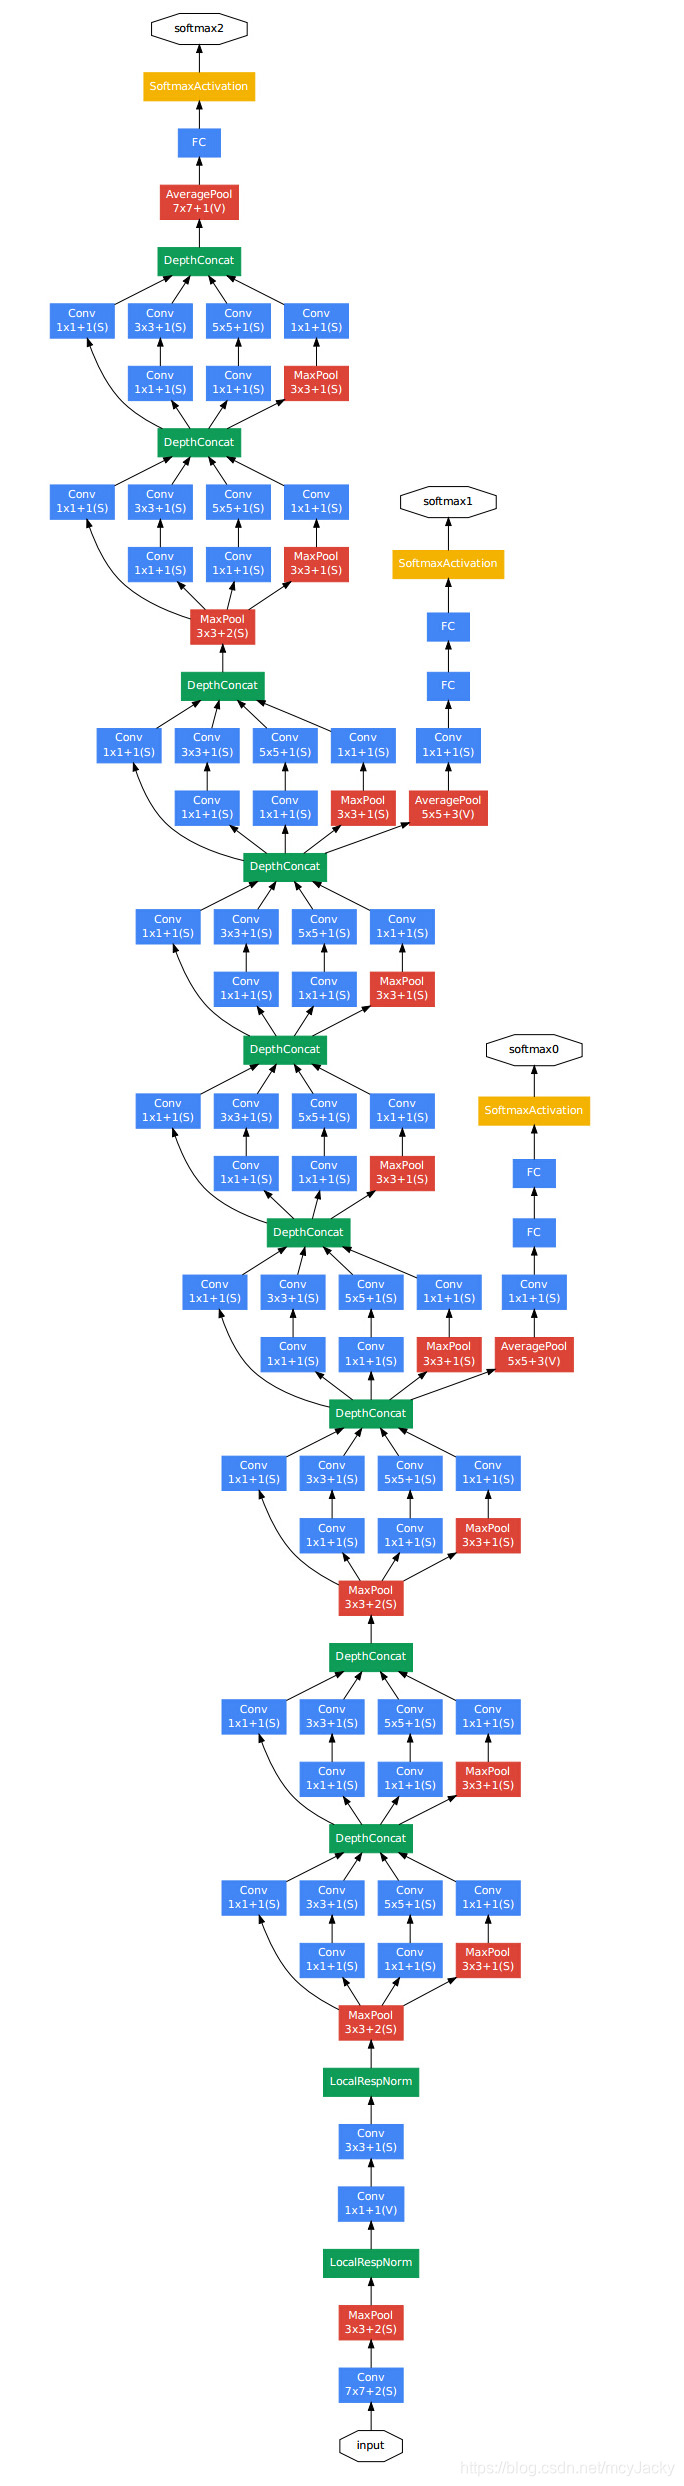
inception-v3模型是ImageNet中产生的一个经典的网络模型。inception模型包括v1/v2/v3/v4,本篇主要介绍的是v3,我们将使用现成的模型结构对图像进行识别。它的模型结构如下图1.1所示:
inception-v3模型下载地址是:http://download.tensorflow.org/models/image/imagenet/inception-2015-12-05.tgz。下载之后是一个.tgz的压缩文件,解压后它的文件类型包括如图1.2所示:
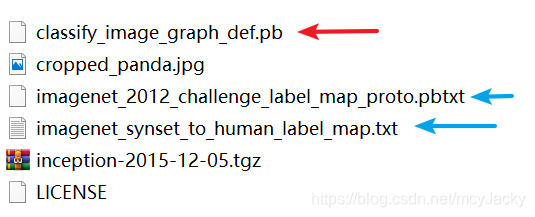
如图1.2所示,红色箭头表示的inception-v3模型训练好后保存的pb文件,蓝色箭头表示的是模型的标签文件。标签由两个文件组成(imagenet_2012_challenge_label_map_proto.pbtxt和imagenet_synset_to_human_label_map.txt),它们之间有一一映射关系,如图1.3所示,图左边的目标类型索引如449,对应着图右边的标签tench:

二、使用现有的inception-v3模型进行图像识别
下面就使用现有的模型对一些图片进行识别,具体实现如下:
import tensorflow as tf
import numpy as np
import os
from PIL import Image
import matplotlib.pyplot as plt

# 创建节点类, 进行标签文件的映射
class NodeLookup(object):

    def __init__(self):
        label_lookup_path = 'inception_model/imagenet_2012_challenge_label_map_proto.pbtxt'
        uid_lookup_path = 'inception_model/imagenet_synset_to_human_label_map.txt'
        self.node_lookup = self.load(label_lookup_path, uid_lookup_path)

    def load(self, label_lookup_path, uid_lookup_path):
        # 载入分类名称文件
        proto_as_ascii_lines = tf.gfile.GFile(uid_lookup_path, 'r').readlines()
        uid_to_human = {} # 初始化字典结构
        for line in proto_as_ascii_lines:
            # 去除换行符
            line = line.strip('\n')
            # 按'\t'进行分割
            parse_items = line.split('\t')
            # 分类编号:类似于n00004475
            uid = parse_items[0]
            # 标签
            human_string = parse_items[1]
            # 加入字典结构
            uid_to_human[uid] = human_string

        # 载入分类编号文件
        proto_as_ascii = tf.gfile.GFile(label_lookup_path, 'r').readlines()
        nodeid_to_uid = {} # 初始化字典结构
        for line in proto_as_ascii:
            # 去除换行符
            line = line.strip('\n')
            # 寻找target_class
            if line.startswith('  target_class:'):
                target_class = int(line.split(': ')[1])
            # 寻找target_class_string
            if line.startswith('  target_class_string:'):
                target_class_string = line.split(': ')[1]
                # 加入字典结构
                nodeid_to_uid[target_class] = target_class_string[1:-1]

        # 进行字典结构关联
        nodeid_to_name = {}
        for key, val in nodeid_to_uid.items():
            # 获取分类名称
            name = uid_to_human[val]
            # 建立分类编号1-1000到分类名称的映射关系
            nodeid_to_name[key] = name

        return nodeid_to_name

    # #根据传入分类编号1-1000返回分类名称
    def id_to_string(self, nodeid):
        if nodeid not in self.node_lookup:
            return ''
        return self.node_lookup[nodeid]

# 创建一个图来存放google训练好后的模型
with tf.gfile.FastGFile('inception_model/classify_image_graph_def.pb', 'rb') as f:
    graph_def = tf.GraphDef()
    graph_def.ParseFromString(f.read())
    tf.import_graph_def(graph_def, name='')

# 创建会话
with tf.Session() as sess:
    # inception-v3最后一层的tensor
    softmax_tensor = sess.graph.get_tensor_by_name('softmax:0')
    # 遍历整个待测试目录
    for root, dirs, files in os.walk("images/", topdown=False):
        # 遍历该目录下所有图片
        for file in files:
            # 载入图片
            image_data = tf.gfile.GFile(os.path.join(root, file), 'rb').read()
            predictions = sess.run(softmax_tensor, {'DecodeJpeg/contents:0':image_data})
            print('zz:', predictions.shape) # (1, 1008)
            predictions = np.squeeze(predictions) # 把结果转化为1维数据
            print('xx:', predictions.shape) # (1008,)

            # 打印图片路径及名称
            image_path = os.path.join(root, file)
            print(image_path)
            # 显示图片
            img = Image.open(image_path)
            print('img:', type(img))
            plt.imshow(img)
            plt.axis('off')
            plt.show()

            # 排序:从大到小前5个排序
            top_k = predictions.argsort()[-5:][::-1]
            print('top_k:', top_k) # top_k: [274 268 273 382 563]
            node_lookup = NodeLookup()
            for nodeid in top_k:
                # 分类名称
                human_string = node_lookup.id_to_string(nodeid)
                # 获取分类的置信度
                score = predictions[nodeid]
                print('%s (score = %.5f)' % (human_string, score))
            print('\n')
上述程序的部分输出结果如下图2.1所示:

如图2.1所示,我们直接从网上下载一张图片(本例是一辆车)进行识别,top-5的识别准确率较高,且有92.857%已经识别正确。下一篇我们就用inception-v3为基础进行迁移学习,用于我们想要的图像进行训练、识别。
【参考】:
1. 城市数据团课程《AI工程师》计算机视觉方向
2. deeplearning.ai 吴恩达《深度学习工程师》
3. 《机器学习》作者:周志华
4. 《深度学习》作者:Ian Goodfellow
转载声明:
版权声明:非商用自由转载-保持署名-注明出处
署名 :mcyJacky
文章出处:https://blog.csdn.net/mcyJacky