版权声明:本文为博主原创文章,随便转载,出处注明一哈 https://blog.csdn.net/u012551928/article/details/88286551
前端路由:
单页面富应用(SPA)的核心,前端来维护一个路由规则.
vue-router:
官方定义:是 Vue.js 官方的路由管理器。它和 Vue.js 的核心深度集成,让构建单页面应用变得易如反掌。
安装
<script src="/path/to/vue.js"></script>
<script src="/path/to/vue-router.js"></script>
npm 安装
npm install vue-router
模块化工程中使用它,必须要通过 Vue.use() 明确地安装路由功能
import Vue from 'vue'
import VueRouter from 'vue-router'
Vue.use(VueRouter)
官方实例:
<!DOCTYPE html>
<html lang="en">

<head>
  <meta charset="UTF-8">
  <meta name="viewport" content="width=device-width, initial-scale=1.0">
  <meta http-equiv="X-UA-Compatible" content="ie=edge">
  <title>vue-router</title>
  <script src="https://cdn.bootcss.com/vue/2.6.6/vue.min.js"></script>
  <script src="https://cdn.bootcss.com/vue-router/3.0.2/vue-router.min.js"></script>
</head>

<body>
  <div id="app">
    <h1>Hello App!</h1>
    <p>
      <!-- 使用 router-link 组件来导航. -->
      <!-- 通过传入 `to` 属性指定链接. -->
      <!-- <router-link> 默认会被渲染成一个 `<a>` 标签 -->
      <router-link to="/foo">Go to Foo</router-link>
      <router-link to="/bar">Go to Bar</router-link>
    </p>
    <!-- 路由出口 -->
    <!-- 路由匹配到的组件将渲染在这里 -->
    <router-view></router-view>
  </div>
  <script>
    // 0. 如果使用模块化机制编程,导入Vue和VueRouter,要调用 Vue.use(VueRouter)

    // 1. 定义 (路由) 组件。
    // 可以从其他文件 import 进来
    const Foo = {
      template: '<div>foo</div>'
    }
    const Bar = {
      template: '<div>bar</div>'
    }

    // 2. 定义路由
    // 每个路由应该映射一个组件。 其中"component" 可以是
    // 通过 Vue.extend() 创建的组件构造器,
    // 或者,只是一个组件配置对象。
    // 我们晚点再讨论嵌套路由。
    const routes = [{
        path: '/foo',
        component: Foo
      },
      {
        path: '/bar',
        component: Bar
      }
    ]

    // 3. 创建 router 实例,然后传 `routes` 配置
    // 你还可以传别的配置参数, 不过先这么简单着吧。
    const router = new VueRouter({
      routes // (缩写) 相当于 routes: routes
    })

    // 4. 创建和挂载根实例。
    // 记得要通过 router 配置参数注入路由,
    // 从而让整个应用都有路由功能
    const app = new Vue({
      router
    }).$mount('#app')

    // 现在,应用已经启动了!
  </script>
</body>

</html>
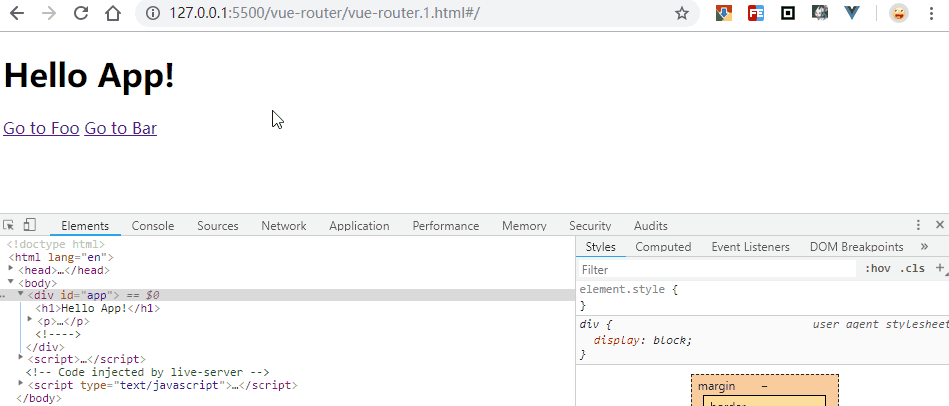
运行结果:
注:从这里开始,示例将不再提供完整代码,省略head,body等标签以及vue.js和vue-router.js的加载等,仅展示javascript和html部分
动态路由
vue-router 的路由路径中使用“动态路径参数”。例如,有个用户组件,需要根据不同ID各不相同的用户,都是用这个组件来渲染。
| 模式 | 匹配路径 | $route.params |
|---|---|---|
| /user/:username | /user/evan | {username: ‘evan’} |
| /user/:username/post/:post_id | /user/evan/post/123 | {username: ‘evan’,post_id: ‘123’} |
当使用路由参数,同一个组件切换,如/user/foo跳转/user/bar,原来组件实例被复用。生命周期钩子函数不会被调用。
const User = {
  template: '...',
  watch: {
    '$route' (to, from) {
      // 对路由变化作出响应...
    }
  }
}
使用2.2中引入的beforeRouteUpdate导航卫士。
const User = {
  template: '...',
  beforeRouteUpdate (to, from, next) {
    // react to route changes...
    // don't forget to call next()
  }
}
捕获路由或者404路由,匹配通配符*
{
  // 会匹配所有路径
  path: '*'
}
{
  // 会匹配以 `/user-` 开头的任意路径
  path: '/user-*'
}
//----------------------------------------分割线-----------------------------
// 给出一个路由 { path: '/user-*' }
this.$router.push('/user-admin')
this.$route.params.pathMatch // 'admin'
// 给出一个路由 { path: '*' }
this.$router.push('/non-existing')
this.$route.params.pathMatch // '/non-existing'
动态路由基本实例:
<div id="app">
  <h1>Hello App!</h1>
  <p>
    <router-link to="/foo">Go to Foo</router-link>
    <router-link to="/col/222">路由参数222</router-link>
    <router-link to="/col/333">路由参数333</router-link>
  </p>
  <!-- 路由匹配到的组件将渲染在这里 -->
  <router-view></router-view>
</div>
<script>
  // 1. 定义 (路由) 组件。
  const Foo = {
    template: '<div>foo</div>'
  }
  const Col = {
    template: '<div>col路由参数:{{$route.params.data}}</div>'
  }

  // 2. 定义路由
  const routes = [{
      path: '/foo',
      component: Foo
    },
    {
      path: '/col/:data',
      component: Col
    }
  ]

  // 3. 创建 router 实例,然后传 `routes` 配置
  const router = new VueRouter({
    routes // (缩写) 相当于 routes: routes
  })

  // 4. 创建和挂载根实例。
  const app = new Vue({
    router
  }).$mount('#app')
</script>
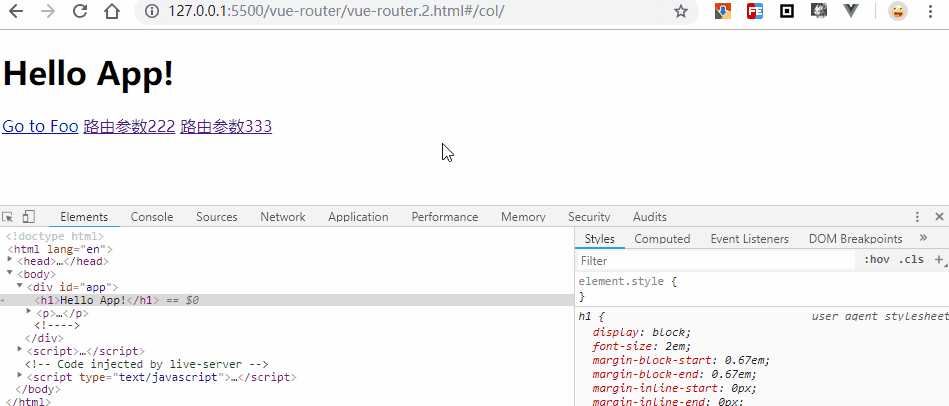
运行结果:
路由嵌套
<div id="app">
  <h1>Hello App!</h1>
  <p>
    <router-link to="/user/222/profile">路由参数222+profile</router-link>
    <router-link to="/user/333/posts">路由参数333+posts</router-link>
  </p>
  <!-- 路由匹配到的组件将渲染在这里 -->
  <router-view></router-view>
</div>
<script>
  // 1. 定义 (路由) 组件。
  const User = {
    template: `
                <div class="user">
                  <h2>User {{ $route.params.id }}</h2>
                  <router-view></router-view>
                </div>
              `
  }
  const UserProfile = {
    template: '<div>User-Profile</div>'
  }
  const UserPosts = {
    template: '<div>User-Posts</div>'
  }

  // 2. 定义路由
  const routes = [{
    path: '/user/:id',
    component: User,
    children: [{
        // 当 /user/:id/profile 匹配成功,
        // UserProfile 会被渲染在 User 的 <router-view> 中
        path: 'profile',
        component: UserProfile
      },
      {
        // 当 /user/:id/posts 匹配成功
        // UserPosts 会被渲染在 User 的 <router-view> 中
        path: 'posts',
        component: UserPosts
      }
    ]
  }]

  // 3. 创建 router 实例,然后传 `routes` 配置
  const router = new VueRouter({
    routes // (缩写) 相当于 routes: routes
  })

  // 4. 创建和挂载根实例。
  const app = new Vue({
    router
  }).$mount('#app')
</script>
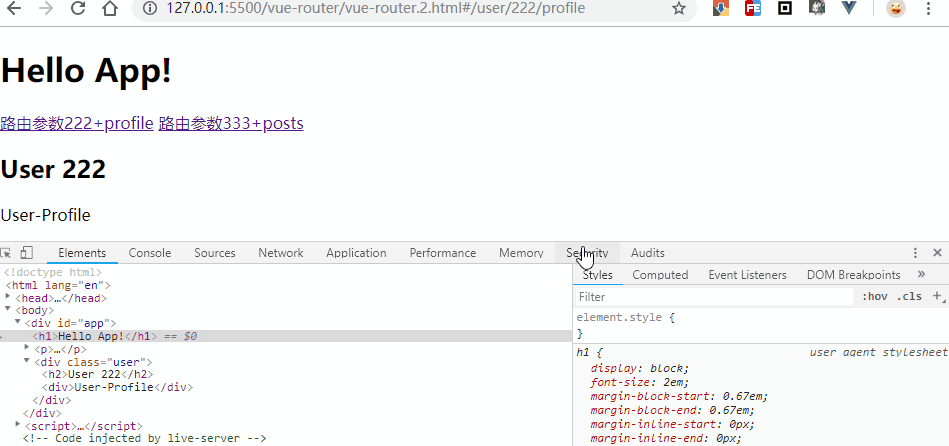
运行结果:
未完待续。。。