一、准备工作
1、在linux中部署solr,详细步骤https://blog.csdn.net/yuh_LLllccy/article/details/88399023
2、下载solr7版本的ik分词器,下载地址:http://search.maven.org/#search%7Cga%7C1%7Ccom.github.magese
二、把数据库的数据导入索引库
1.添加环境变量
将solr添加到环境变量,可以快速的启动、重启、关闭等。
vim /etc/profile配置如下
export JAVA_HOME=/usr/local/jdk/jdk1.8.0_181
export CLASSPATH=.:$JAVA_HOME/lib/dt.jar:$JAVA_HOME/lib/tools.jar
export PATH=$JAVA_HOME/bin:$PATH

# solr environment
export SOLR_INSTALL_HOME=/usr/local/solr-7.7.0
export PATH=$SOLR_INSTALL_HOME/bin:$PATH
执行
source /etc/profile使得配置文件生效
如果执行./solr start -force 命令的时候会警告你系统文件打开数的问题,可以这样解决。修改完后要重启系统。
1. 修改 /etc/sysctl.conf 文件,在最后一行添加
fs.file-max = 65535602. 修改 /etc/security/limits.conf 文件,把最下面的文件修改为如下
* soft nproc 65535

* hard nproc 65535

* soft nofile 65535

* hard nofile 65535
如果出现solr安装成功,但是外界访问不到的问题,请检查防火墙是否关闭,或者8983端口是否允许开放!
关闭防火墙的命令:
systemctl stop firewalld.service #停止firewall
systemctl disable firewalld.service #禁止firewall开机启动
有时系统因安全问题考虑,可能需要在命令后加上-force参数
solr启动后,访问 http://ip:8983/solr之后,将访问web管理界面:

2、新建Core

按照上面的步骤操作添加core后,会报一个找不到文件的错误,然后这时候,需要将标准配置文件,添加到刚才新增的Core下面,标准配置文件在 solr-7.7.0/server/solr/configsets/_default/conf下面,假设当前目录为solr根文件夹下,新的Core名字为new_core,执行下面的操作:
cp -r server/solr/configsets/_default/conf server/solr/new_core刷新一下solr主页,重新点击新建操作,新建Core完成!
3、导入数据库数据
在上一步导入的Conf目录下,修改以下配置:
在 solrconfig.xml下添加以下配置,添加位置大约在 680行,SearchHandler配置上面:
 <!-- Request Handlers
       http://wiki.apache.org/solr/SolrRequestHandler
       Incoming queries will be dispatched to a specific handler by name
       based on the path specified in the request.

       If a Request Handler is declared with startup="lazy", then it will
       not be initialized until the first request that uses it.
    -->

  <!-- add property -->
  <requestHandler name="/dataimport" class="org.apache.solr.handler.dataimport.DataImportHandler">
    <lst name="defaults">
        <str name="config">data-config.xml</str>
    </lst>
  </requestHandler>

  <!-- SearchHandler
       http://wiki.apache.org/solr/SearchHandler
       For processing Search Queries, the primary Request Handler
       provided with Solr is "SearchHandler" It delegates to a sequent
       of SearchComponents (see below) and supports distributed
       queries across multiple shards
    -->
data-config.xml是引用的配置文件,需要新建这个配置文件。在linux下,直接用vim新建即可,vim data-config.xml,然后 wq保存退出即可。
该文件的配置如下,我连接的是Mysql:
<dataConfig>
    <dataSource driver="com.mysql.jdbc.Driver" url="jdbc:mysql://12.123.12.12:122/teambattle_center" user="zkter" password="Lang123"/>
    <document>
            <entity name="t_team"  query="select id,name,join_type as joinType,password,gmt_create as gmtCreate,gmt_update as gmtUpdate from t_team">
				<field name="id" column="id" />
                <field name="name" column="name" />
				<field name="joinType" column="join_type" />
				<field name="password" column="password" />
				<field name="gmtCreate" column="gmt_create" />
				<field name="gmtUpdate" column="gmt_update" />
            </entity>
    </document>
</dataConfig>
把数据库的jar包mysql-connector-java-5.0.8-bin,可以从mvn库下载(https://mvnrepository.com/)。然后是solr的两个jar包,在solr根目录中的dist目录中可以找到solr-dataimporthandler-7.7.0和solr-dataimporthandler-extras-7.7.0。一共三个jar包拷贝到 solr\server\solr-webapp\webapp\WEB-INF\lib下。
在这之后,需要配置managed-schema文件,与数据库进行映射,在117行附近,添加与数据库的映射。如下所示。
 <!-- In this _default configset, only four fields are pre-declared:
         id, _version_, and _text_ and _root_. All other fields will be type guessed and added via the
         "add-unknown-fields-to-the-schema" update request processor chain declared in solrconfig.xml.

         Note that many dynamic fields are also defined - you can use them to specify a
         field's type via field naming conventions - see below.

         WARNING: The _text_ catch-all field will significantly increase your index size.
         If you don't need it, consider removing it and the corresponding copyField directive.
    -->

    <field name="id" type="string" indexed="true" stored="true" required="true" multiValued="false" />
    <!-- docValues are enabled by default for long type so we don't need to index the version field  -->
    <field name="_version_" type="plong" indexed="false" stored="false"/>
    <field name="_root_" type="string" indexed="true" stored="false" docValues="false" />
    <field name="_text_" type="text_general" indexed="true" stored="false" multiValued="true"/>
    <field name="name" type="string" indexed="true" stored="true"/>
    <field name="joinType" type="string" indexed="true" stored="true"/>
    <field name="password" type="string" indexed="true" stored="true" />
    <field name="gmtCreate" type="string" indexed="true" stored="true" />
    <field name="gmtUpdate" type="string" indexed="true" stored="true" />


    <!-- This can be enabled, in case the client does not know what fields may be searched. It isn't enabled by default
         because it's very expensive to index everything twice. -->
    <!-- <copyField source="*" dest="_text_"/> -->
继续添加如下代码,将下面配置放到其中,位置大约在358行
</fieldType>
    <!-- ik分词器 -->
        <fieldType name="text_ik" class="solr.TextField">
            <analyzer type="index">
            <tokenizer class="org.wltea.analyzer.lucene.IKTokenizerFactory" useSmart="false" conf="ik.conf"/>
            <filter class="solr.LowerCaseFilterFactory"/>
       </analyzer>
       <analyzer type="query">
            <tokenizer class="org.wltea.analyzer.lucene.IKTokenizerFactory" useSmart="true" conf="ik.conf"/>
            <filter class="solr.LowerCaseFilterFactory"/>
       </analyzer>
    </fieldType>
重启solr
solr restart -force然后选择之前创建好的new_core

然后选择左边的Dataimport 操作如下

出现下面的状态,就代表已经导入数据成功了
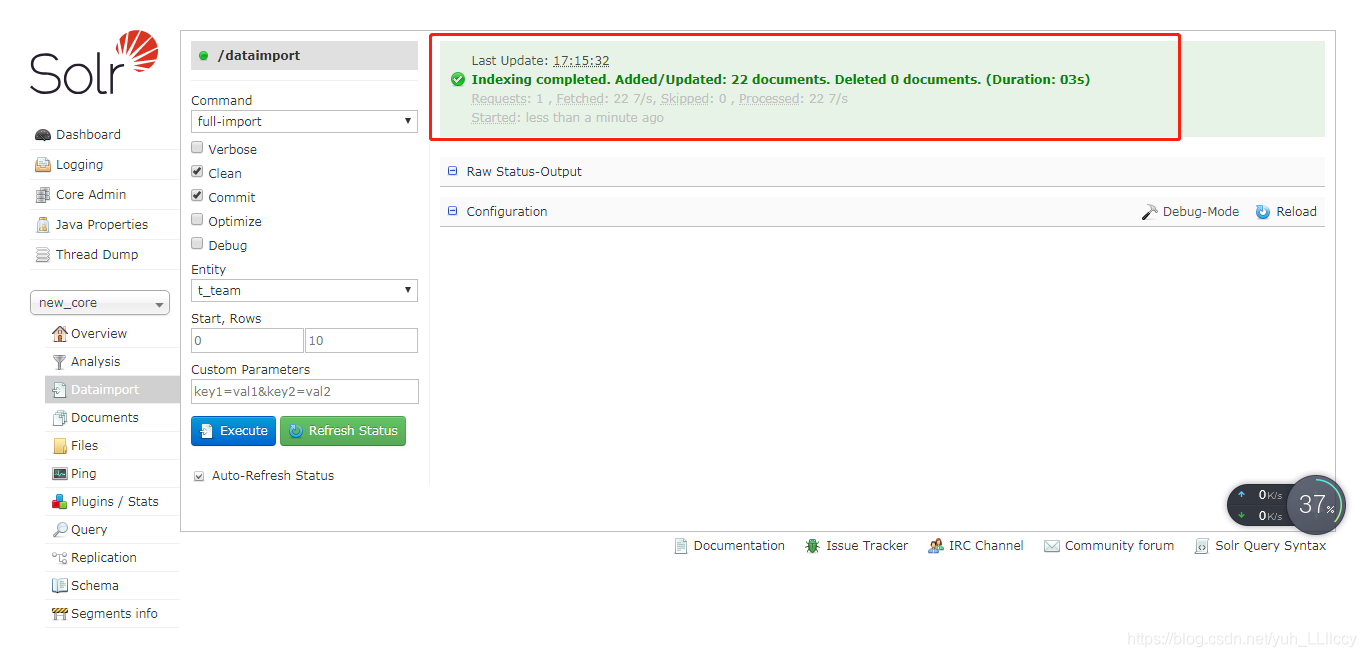
这下数据库中的数据就成功导入solr中了,可以去查询数据了

好了,以上就是全部的内容了,如果有不对的地方请大佬指正。推荐一篇有关分词器的文章,可以参考一下:https://blog.csdn.net/guyan0319/article/details/81188977